O scale 2 rail exhibition layout
Posted
#226609
(In Topic #12366)
Inactive Member
With my HO Scale Exhibition layout now mostly finished (except for about a million jobs on my to-do list, but what layout is ever finished, right?), the attention of myself and my co-conspirator Ford has turned toward our next project, and the first truly 'joint' layout - this time making use of all that O scale stuff I've been hoarding for a few years.
The working title of the layout is West Box Street (please someone help me think of something better!), as a nod toward my previous layout, as well as the trackplan, which is a modified version of Shortliner's Box Street plan.
The idea is yet again a heavily industrialised urban area somewhere in the South East of the USA. Georgia or Alabama, maybe? That's still to be decided on.
As a departure from my usual slapdash approach to layout construction, every aspect of this new layout is going to be planned from the ground up from the start. Ford insisted on it, and I don't blame him, going on my track record! :D
This will need to be bulletproof before the first piece of wood is cut.
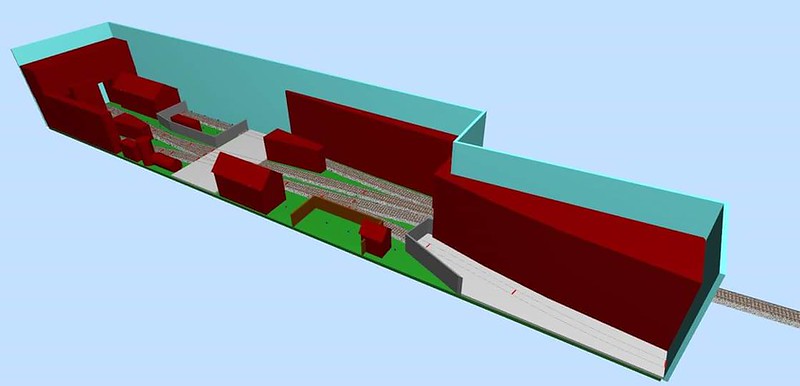
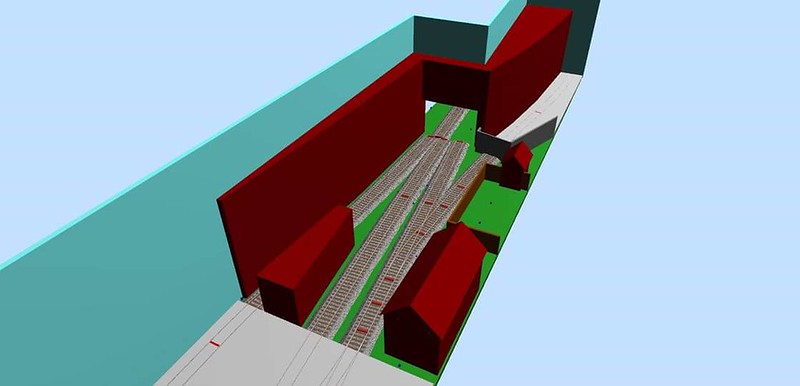
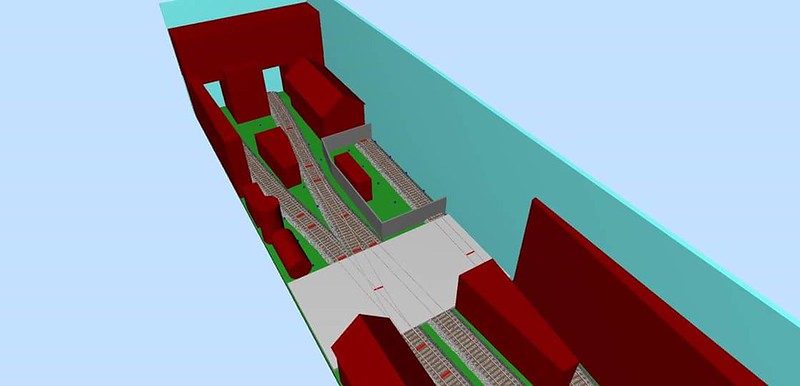
A trackplan has been settled on, and thrown together in SCARM to check clearances. All track is going to be handbuilt, and will follow the "FUnitMad" approach of tracklaying for that added realism.
Here's the trackplan:


The intention for the layout is to have full lighting, sound, and animated features, and Ford has even been kicking around the idea of an automated (or not) Day/Night cycle to make exhibitions even more interesting.
Whilst the actual construction of the layout is looking to be a while off yet, we've both started working on various other aspects of the build - I've begun work on rolling stock and structure projects, and Ford has been working on the lighting and using Arduino to animate doors, roller shutters, etc.
Photos and videos will follow of progress as and when there's something worth showing. :)

Posted

Full Member
John
John
Posted
Inactive Member
Previously I mentioned I'd been working on structures and rolling stock projects, well - here they are:
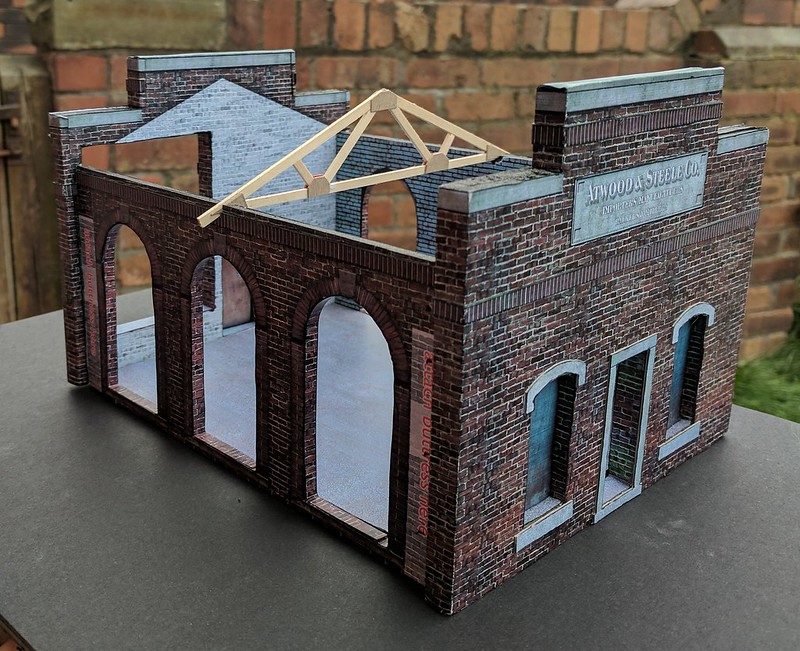
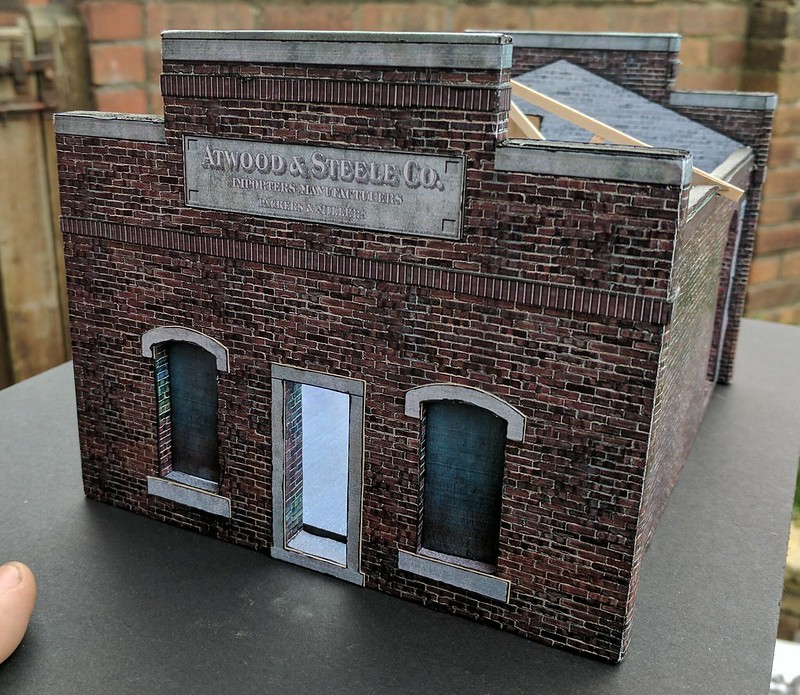
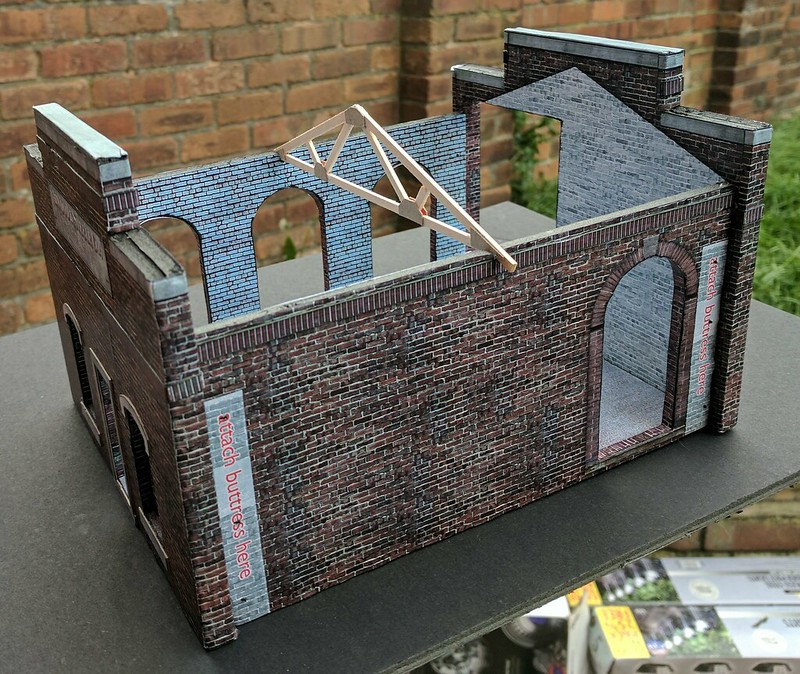
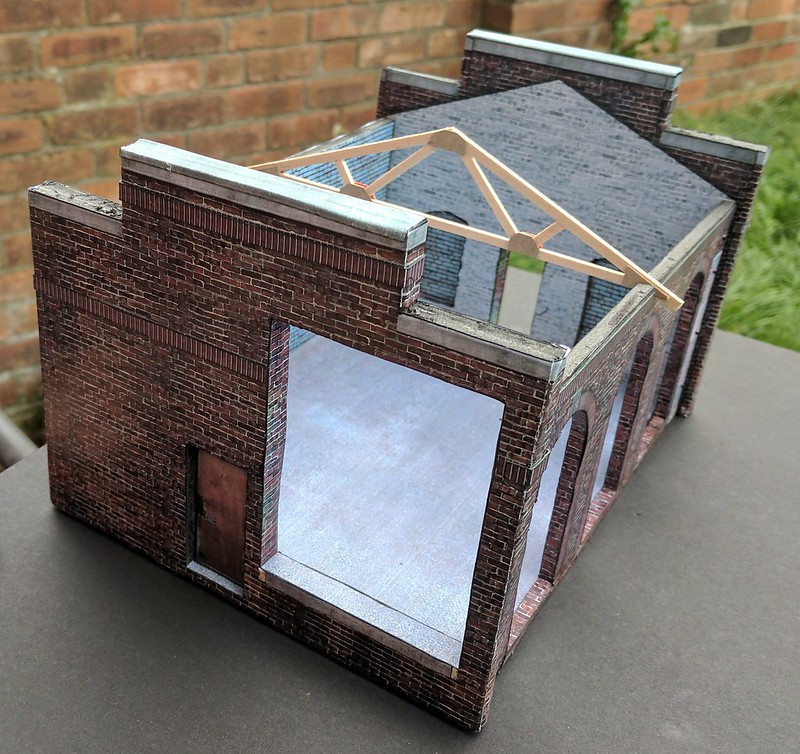
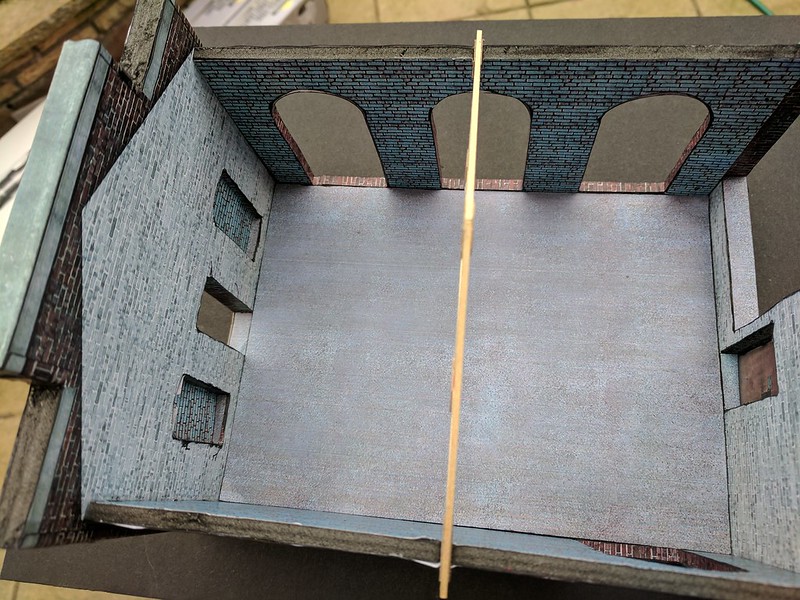
My first ever O scale structure kit build - Clevermodels Small Brick Machine Shop. Well it's certainly not small in O scale!!! :D
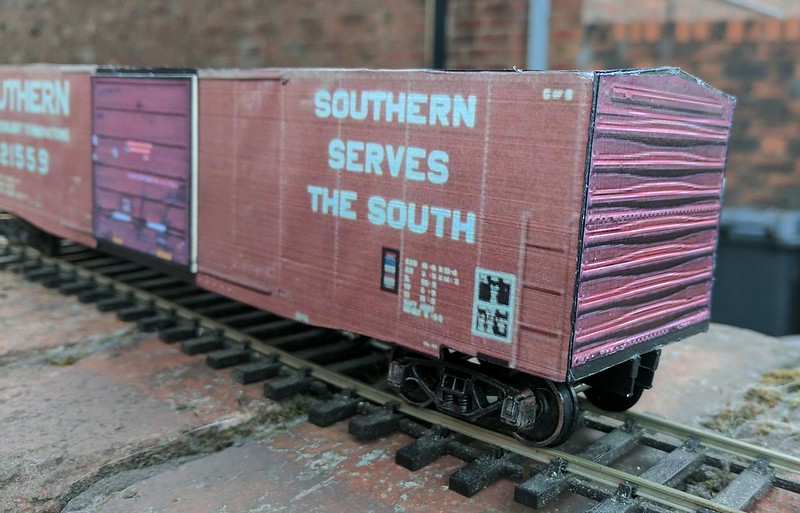
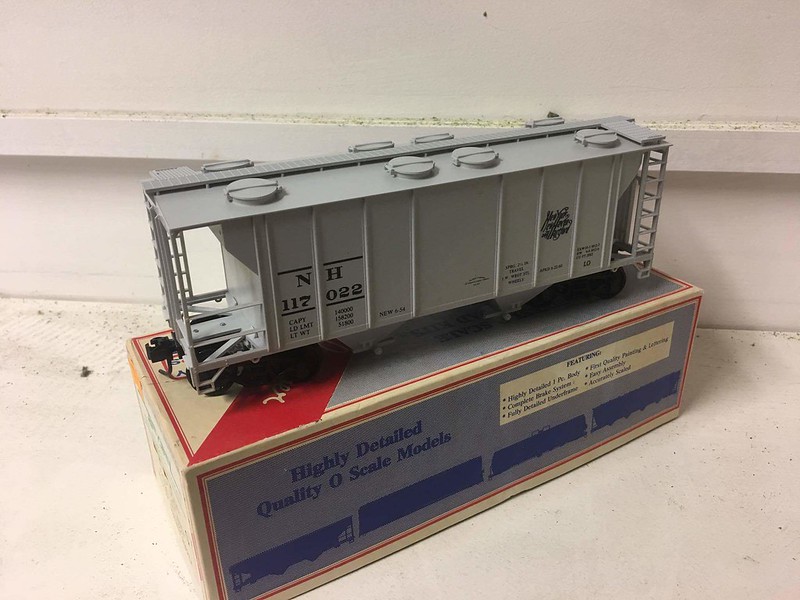
Now, seeing as it's hard to find O scale 2 rail in the UK, and considering how expensive it tends to be because of it (£90 for a 3 bay covered hopper? Jog on!), I broke out the artist mounting board and balsa wood, and - working from official Southern Railway freight car diagrams - came up with this:
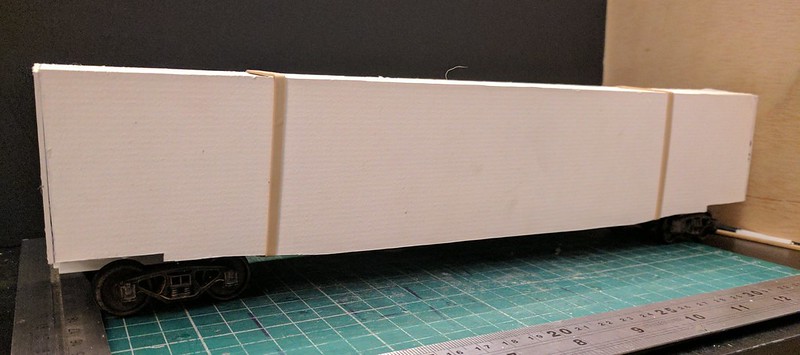
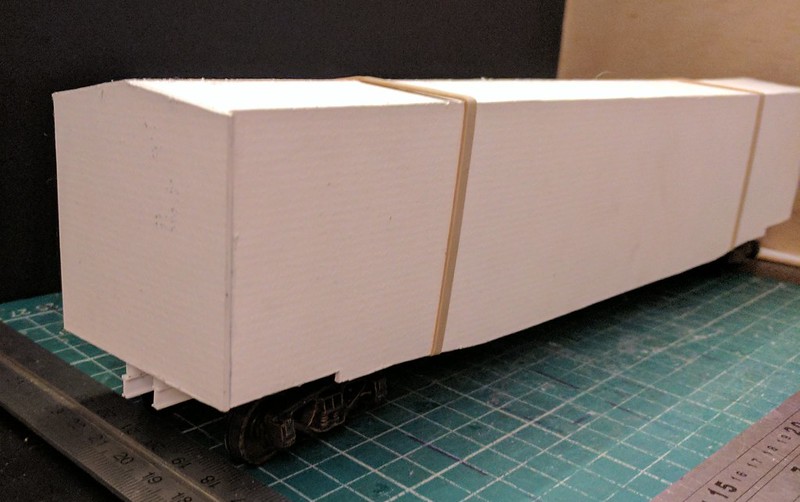
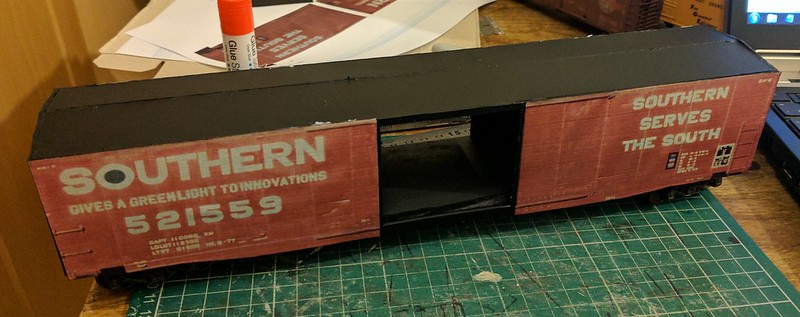
The car sides are artwork made from actual photographs of Southern boxcars, skewed in Photoshop and printed to scale. I've got the doors, roof and end walls ready to cut out and apply. :)
Posted
Full Member
Fine scale US 0 gauge doesn't seem to be prevalent here (I'm sure people must do it). I been to quite a few shows here and, other than Lionel (ugh!), I can't recall seeing any 0 gauge.
John
John
Posted

Full Member
Hi Daniel,
It's not. There is a clear distinction between High-Rail O-gauge (3 rail coarse scale) and O-Scale (2 or 3 rail fine scale). MTH's 2-3 O-Scale range has convertible trucks that operate with either 2- or 3-rails, and Atlas' O-Scale range (they took over the Weaver tooling) comes as either 2 or 3 rail operation. Nothing unrealistic about the locomotives or stock. Plenty of used fine scale O around as well - eebygum has about 125 2-rail locomotives at the moment. And it's easy enough to convert most 3 rail O-Scale locomotive to 2 rail operation. Most modern O-Gauge looks unrealistic because it sits too high - take it down with decent wheels and it looks a lot better. Get rid of the third rail operation and it actually looks very realistic.
That price you are seeing for a new boxcar is pretty good - a new Atlas Master O-Scale 2-3 boxcar is nearly $70 from my local box-shifter.
Why the perception that it's only 3-rail O-Gauge? Blame nostalgia, Christmas trees and the market (there are plenty of customers). O-scale is a different market.
Nigel
©Nigel C. Phillips
Posted
Inactive Member
Posted
Full Member
Not common in Eastern Canada, but in this area quite common. Think OO:EM/P4. Two layouts at the show I went to recently. One O-gauge (high rail), one O-scale. Biiiig. If I had the space that's what I would be doing. My daughter-in-law offered me the use of her back yard for a layout, that would suit O-scale equipment.
Nigel
©Nigel C. Phillips
Posted

Inactive Member
That's nice modelling. :thumbs
I'm modelling OW5, which you can find in the link to Port Elderly under my signature. O is anecdotally a scratch builders' scale, but I'm finding a lot of help on an O forum . . .
Home | O Gauge Railroading On Line Forum
Max
Port Elderley
Port Elderley
Posted
Inactive Member
I don't know, maybe it's because O gauge in Britain is by and large a finescale type affair - the height of realism.
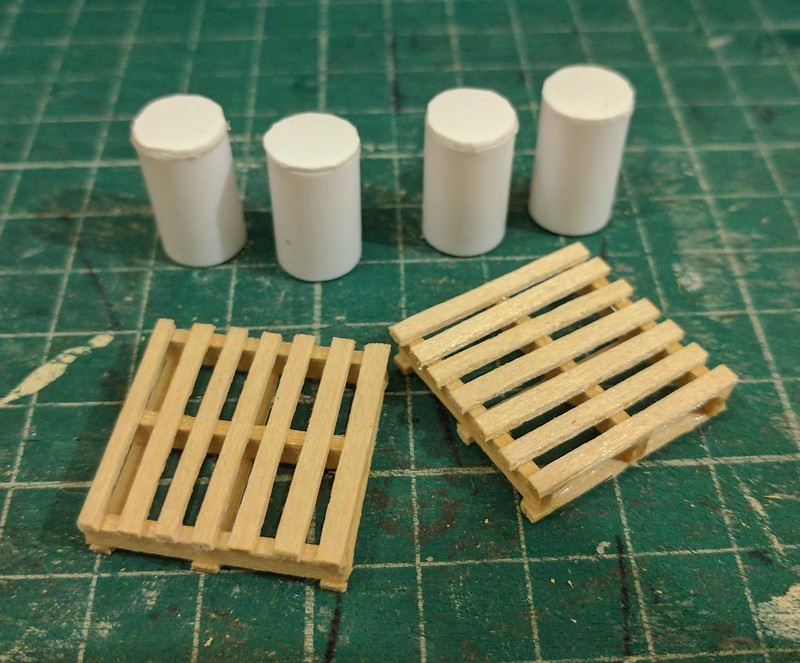
On the subject of scratchbuilding, I'm going to start working on some pallets from wood later this week I think, see how that goes.
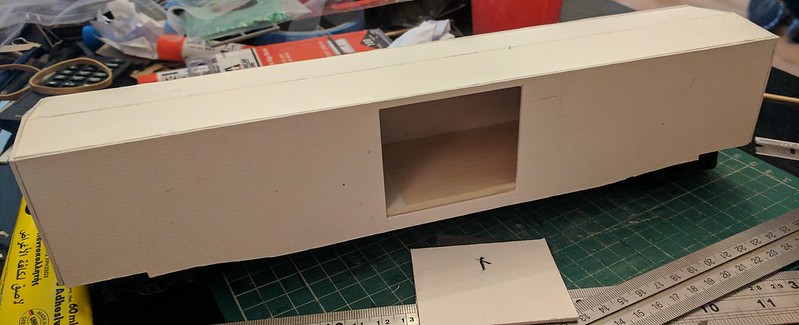
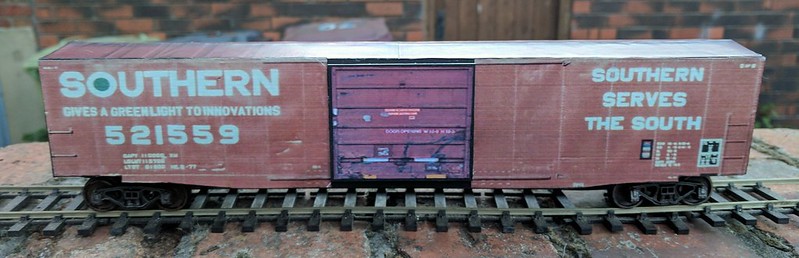
Back to the layout, Last night showed a small amount of progress on the Southern boxcar.
I'm not 100% on it at the moment, but I've just got to have faith and soldier on, once the definition is added to it, and it's weathered up, I think it'll look okay.
Let me know what you all think…
Posted
Full Member
Nice work as usual, but you've jumped up to (or into) O scale. Adding some rivets and real ladders would I think improve things enormously. In 1:48 1" is 0.54mm, very noticeable.
I don't know whether it's the printer or the camera/screen/image massaging, but it looks like the printing was done at a lowish resolution on an inkjet. At this scale it might be worth getting them done on a laser printer. That way you'll avoid the bendies from a water-based ink. I like the way the depressions in the sides were reproduced. Instant weathering as well depending on the original.
Have you consider using decals (transfers) for the lettering and rivets? Tichy Train Group does an impressive range of O-scale freight car decals (236 boxcars). $6 each. Cheaper than a boxcar on the postage.
Nigel
©Nigel C. Phillips
Posted
Inactive Member

I definitely wasn't too happy with the printout quality of the boxcar sides. As such, I was happy to see that the big laser printer at work has now been fixed and is working again, so I've re-printed the sides and will redo that. :)

I'll be adding a LOT more detail onto the model as it progresses, the last set of photos were just a progress update. I've got staples to make the grab irons, brass rod to make the ladders, etc.
It'll be getting fully detailed up. I'm going to have a go at making some brake wheels and such too - for the car ends. :)
Posted
Full Member
Brake wheels? How many are you planning on having (and which type) :lol:? Don't forget the coupler levers. At this scale detail becomes important - it's highly visible.
That cut-down ladder means it's after the roof-walks were taken off. The brake wheel would have been moved down along with the air valve and stand.
Nigel
©Nigel C. Phillips
Posted
Inactive Member
I'm bound to mess up a few of them in the process. :D
 Last edit: by Danielb
Posted
Inactive Member
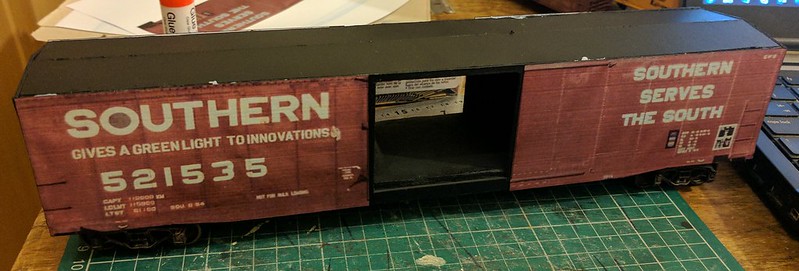
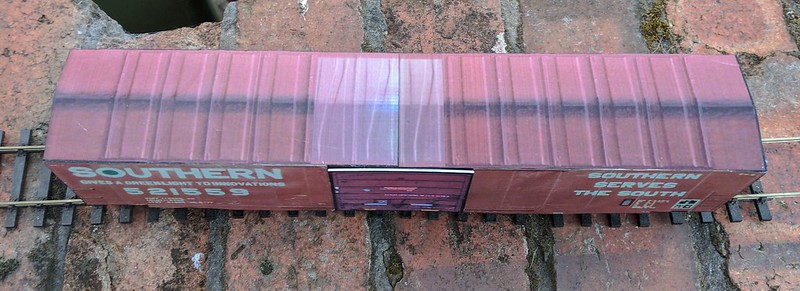
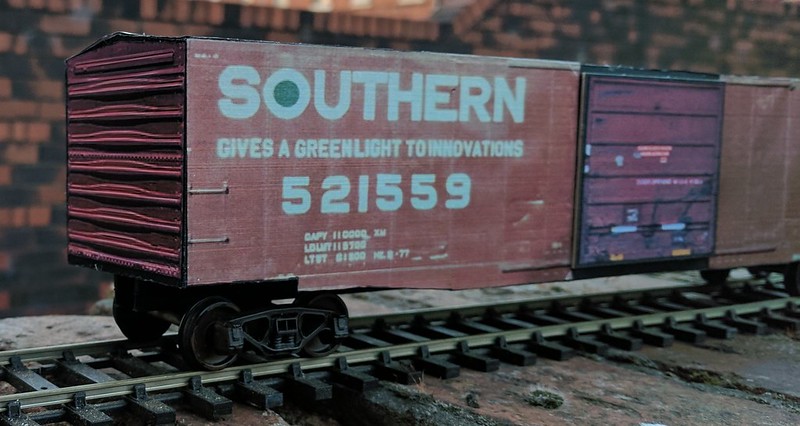
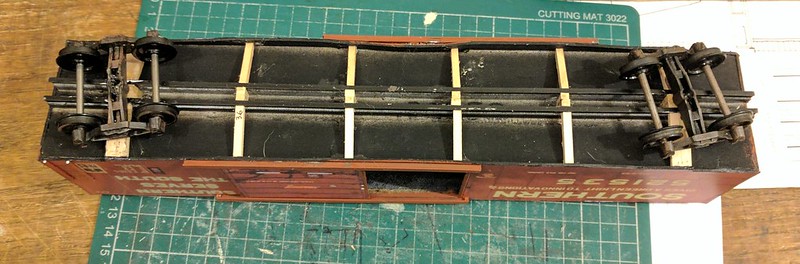
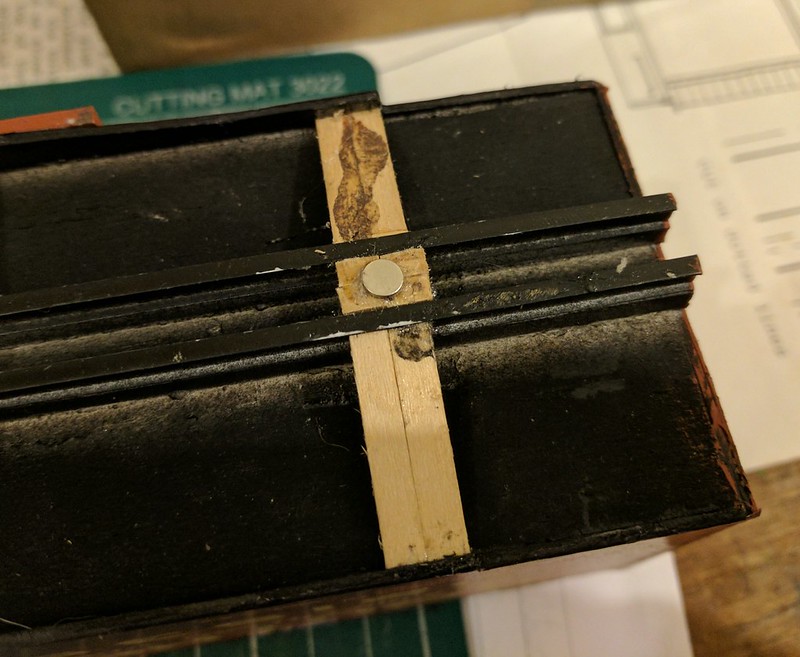
I've progressed the 50' boxcar some more; fitting the door runners, adding definition to the roof and starting work on the ladders. I've also developed the underframe, though that's not yet finished - it needs air tanks and other details.
What I have done is start working on some pallets and oil drums to add to the inside to simulate a load. A lot more work to do there too.
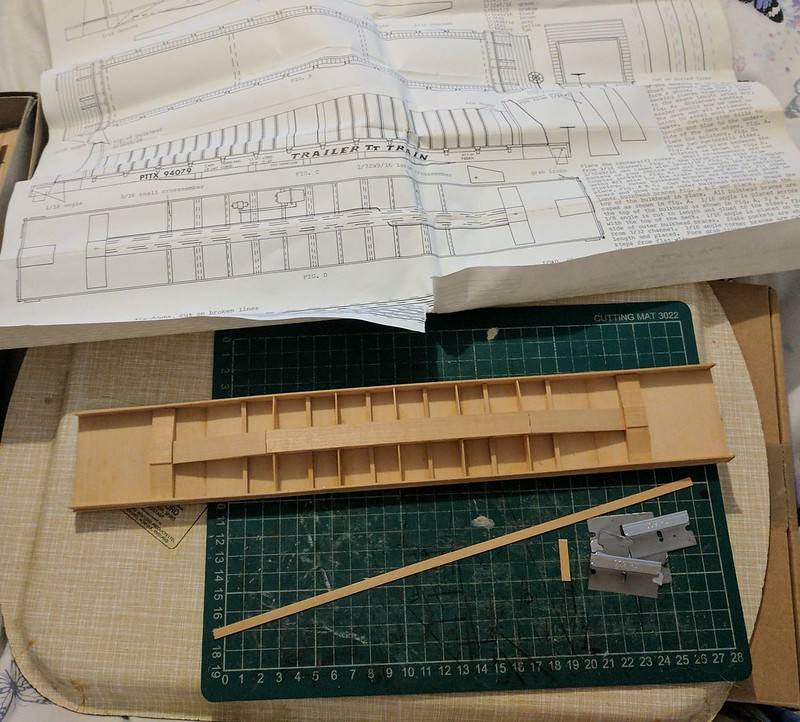
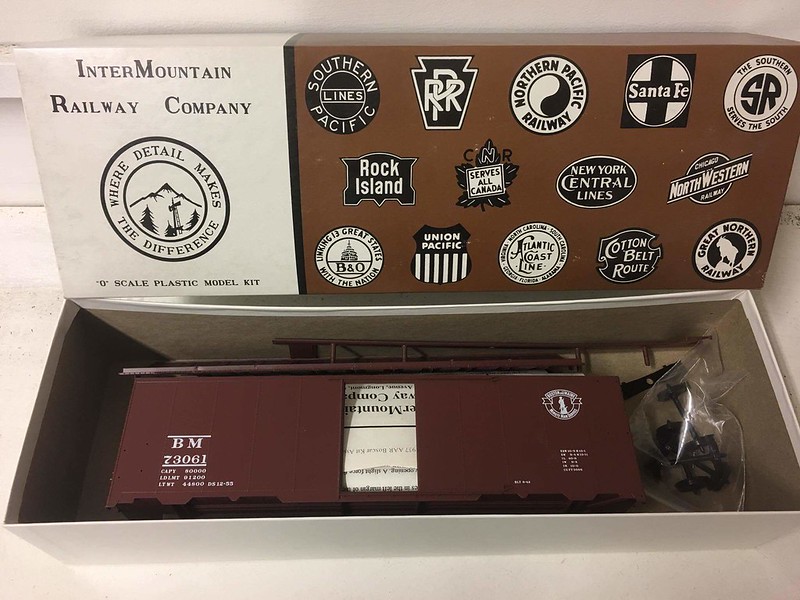
Finally, I started work on a Quality Craft Models kit of a bulkhead flat car. Having never built a freight car kit before, I'm really impressed with these wooden craftsman kits, and I'm enjoying the build so far.
More to come as work progresses. :)

Last edit: by Danielb
Posted
Inactive Member
Progress report first…
I've spent some time working on the QCM Bulkhead flat kit - now it's actually starting to look like a freight car now! :)
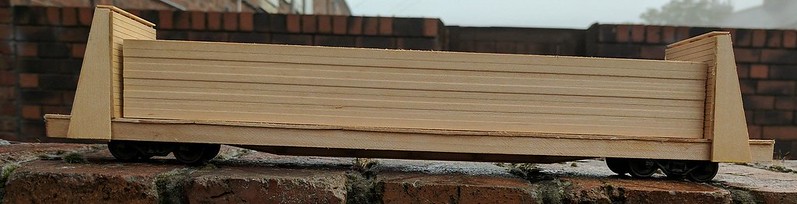
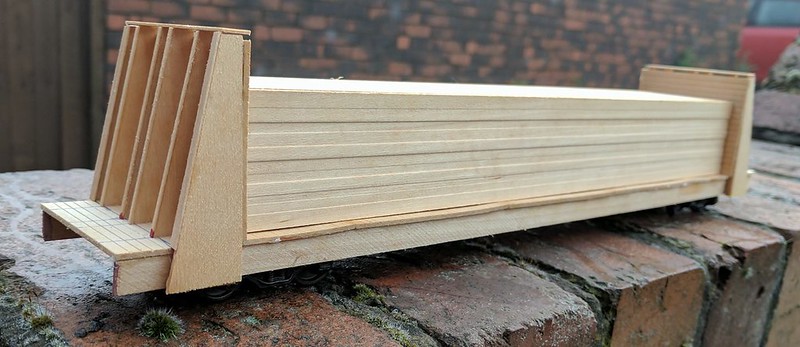
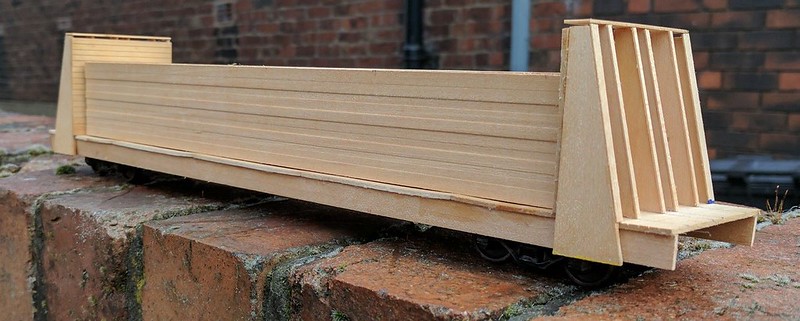
After I took these photos, I've added some Kadee couplers to the car, and permanently attached the trucks. Hopefully there'll be some updated pictures later this weekend.
Now, thanks to Neil at The Little Layout Company, I've traded a Kato, HO scale U-boat which is surplus to requirements, for 5 freight car kits of various parentage:
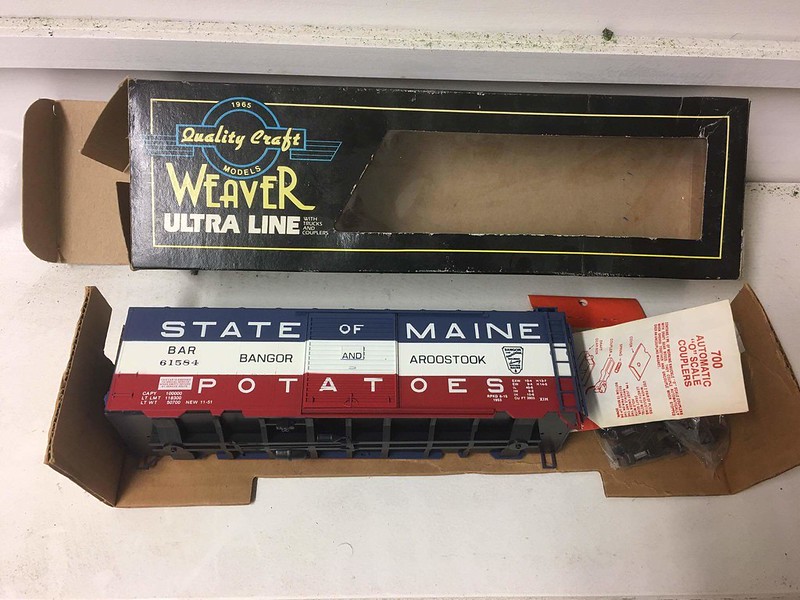
They might be bordering on the old considering the layout will be set in the 70's, but I'm thinking of Shortline patching them and seeing what happens. At least one is getting turned into a B&A style woodchip hopper. :)
Posted
Inactive Member
I'm currently awaiting arrival of a new 3D printer, so I'm going to be spending my time experimenting on printing detail parts, truck sideframes, etc. :)
I found a free download to 3D print an EMD SW1500 on GrabCad that I am going to have a go at. I've got a couple of old diesel trucks that could provide the wheels, then it'd just need motorising and away we go. :)
Lots of cool things on the horizon, for sure. If I can 3D print my own window frames, I'll be doing that too.
The possibilities this opens up for us is simply massive.
Posted
Inactive Member
Firstly, I always set my layouts in the 1970's, so thought I'd shake things up a bit.
Secondly, I want to use all the 40' cars I've collected over the last month (approx 8 boxcars and three shorty covered hoppers).
Thirdly, my road power is a Weaver RS3 in Southern tuxedo green, and a GP35 in tuxedo black. The GP35 was introduced in 1963, and the green tuxedo disappeared throughout the 60's. This will allow me to use the RS3 as is and not have to repaint it. :)
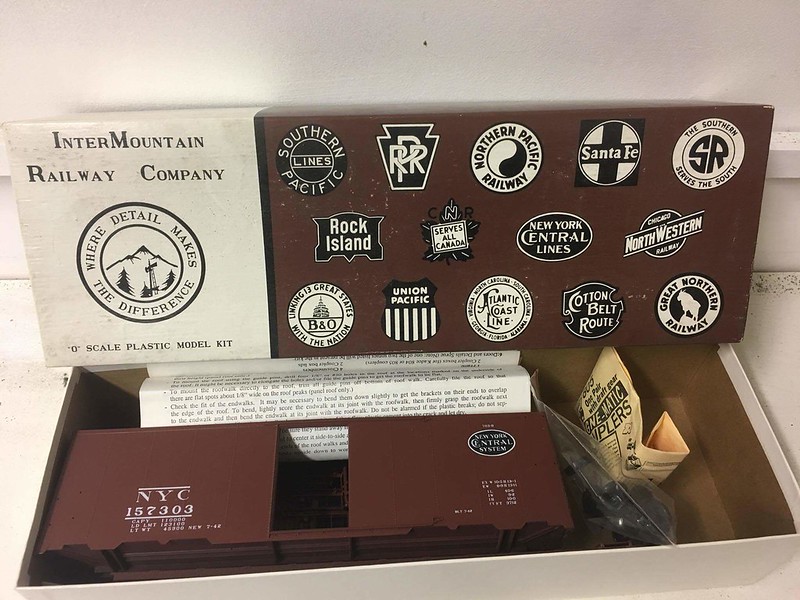
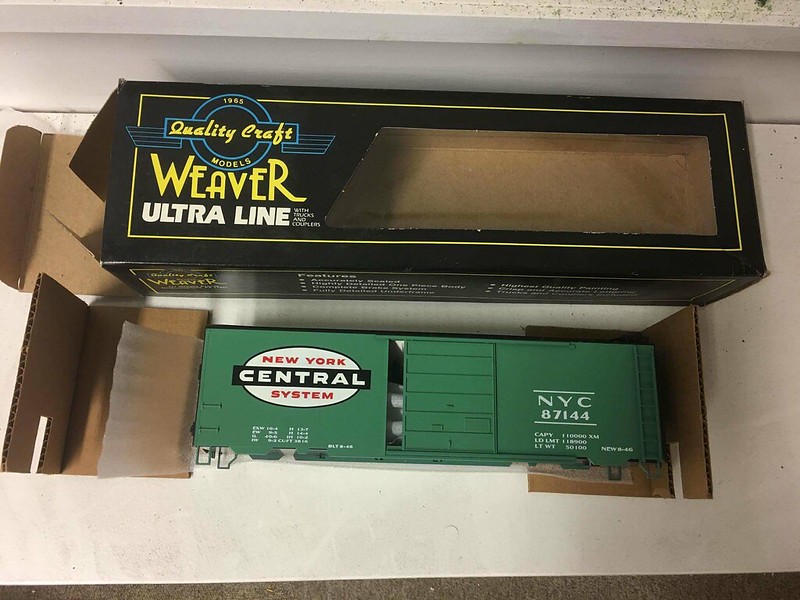
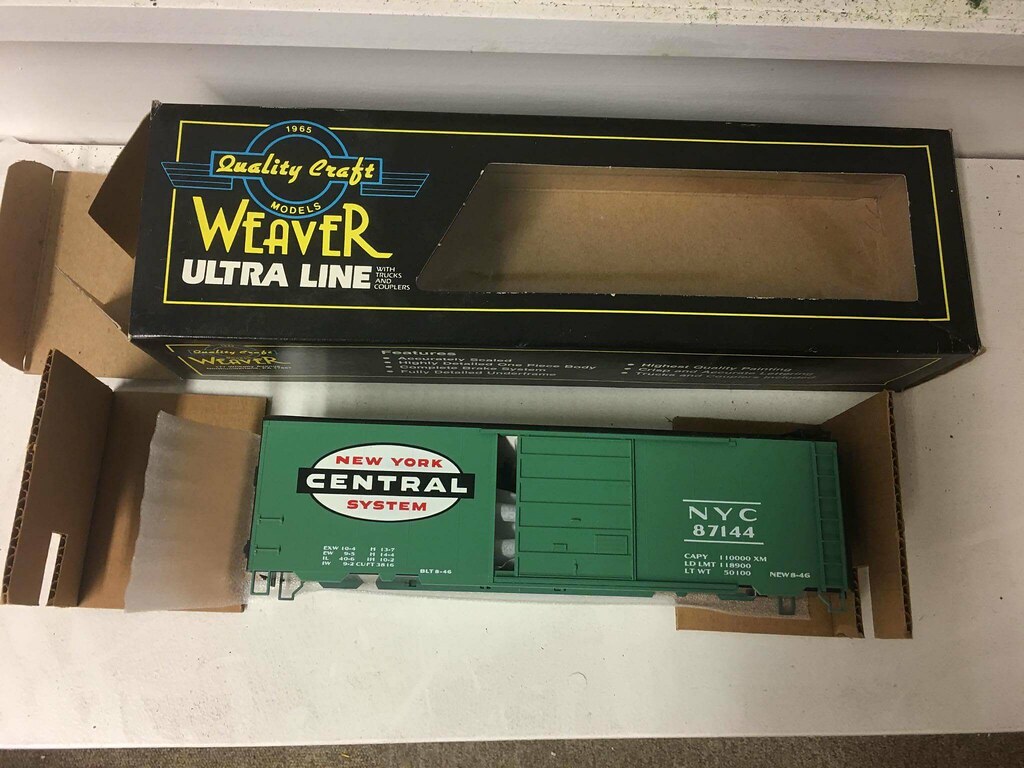
Today, I've been working on a Weaver kit of a NYC 40ft boxcar I got from Neil at The Little Layout Company.
First up, some prototype photos of similar boxcars I'm using for inspiration:
1206-10 NYC 86272 at MN&S Glenwood Jct. Yard
NYC 85850
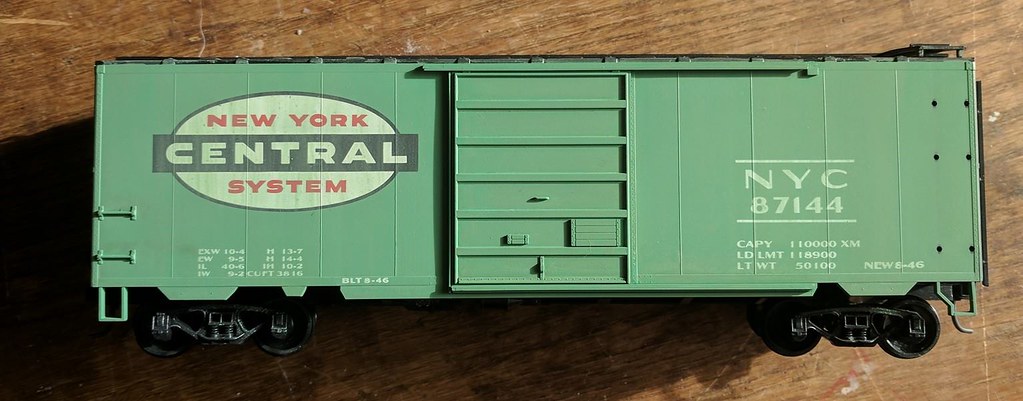
Now, here's what I started with:
After assembling the kit, I gave it a blast of dulcote equivalent, then faded the car with a wash of watered down acrylic paint - a mix that was slightly whiter than the stock NYC Century Green scheme.
Once this was dry the car got another blast of dulcote - in fact, it gets one after every layer of work is finished. I then added a wash of brown in places to give a base layer for the weathering.
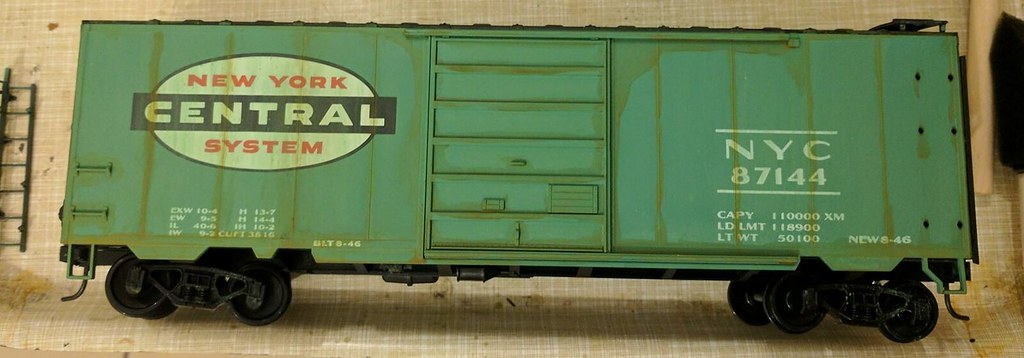
After this, the dirt was built up using various blends of black, brown, orange and red pastel powders. Once I was happy with the result, I sealed it with dulcote, then gave the whole car side a application of white pastel powder to tone the whole car down.
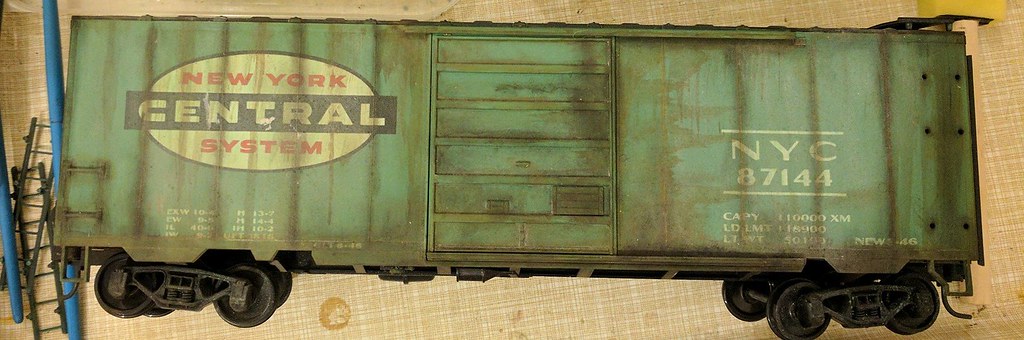
Next, scratches and dings were added using brown acrylic paint, working as always from the prototype photographs..
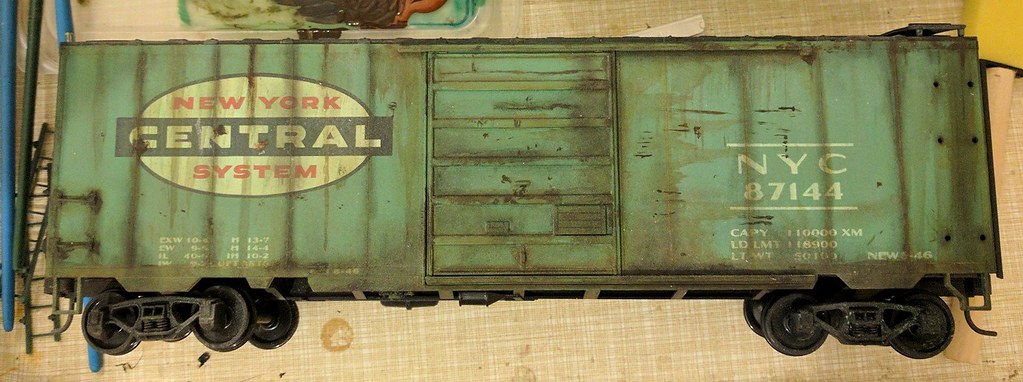
Finally, for now, the scratches were all haloed using burnt sienna oil paint in a very light application. After this, rust streaks were added in a similar manner. Dab on a little paint at the main point of concentration on the real car, then repeatedly drag the paint down the car side to create streaks.
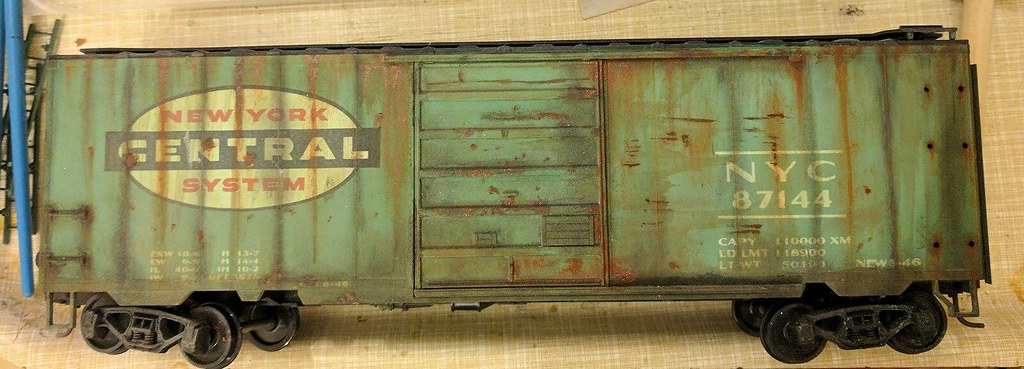
Next comes the roof and car ends, which I will document in stages as I have done here so far. :)
Posted
Full Member
Looking the business for a short line car short on life and maintenance and not used in interchange revenue. Those ladder holes on the right to the roof walk got me thinking. The ICC ruled in 1968 that roof walks were to be removed by I think 1978 and the hand brake wheels lowered, although a few boxcars still had them in place in the late 1970's (later in Canada) but with the ladders removed or a short half-ladder to assist in switching. If you're modeling in the 1970's or later it's an important detail. Which then got me thinking about another other detail oft forgotten - those brakeman hanging on for dear life during switching. Somebody has to put the brakes on when loose switching or throw the coupler trip lever. At least they didn't have to run around on the roof walk. Add a transfer caboose (used to ferry the brakemen around), often made in the shops from an old B-B diesel chassis with a deck and a boxcar body (they're still around today), makes switching a bit more of a puzzle, but another detail often forgotten.
Found this on http://www.american-rails.com/freight-cars.html#gallery[pageGallery]/4/
Photo is by Rob Kitchen, who owns the copyright. Reproduced here solely in the interests of research and education (legal stuff). The bent ladder bottom on the side at the bottom is interesting, presumably a modification to give more boot room when hanging on the side directing the engineer. Plus the different heights of the side and end ladders from when they torched them down.
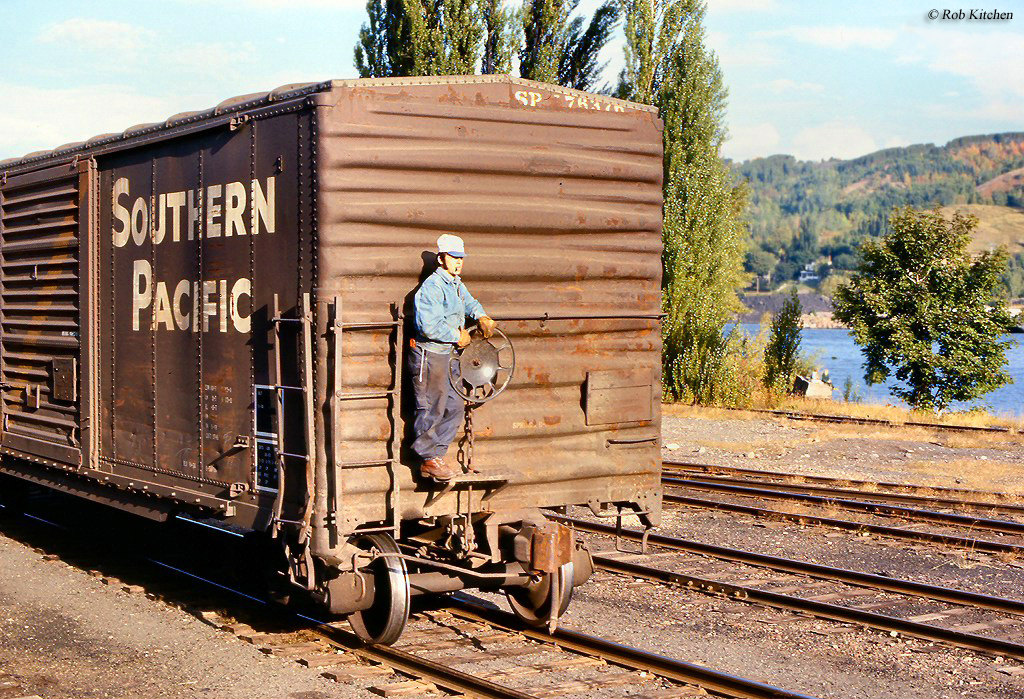
Nigel
Save
©Nigel C. Phillips
Posted
Inactive Member
The ladder isn't attached yet, I took it off to make weathering easier. I've still got a long way to go with this beast before it'll be done.
The layout I think will be set in 1965 now, as it'll allow me to use my Southern green tuxedo RS3 and my new Southern black tuxedo scheme GP35 without having to repaint the RS3.
So the ladders will be in their original state, and the roof walk will remain.
I'm tempted to add a removable brakeman figure to the cars when switching though - maybe fit magnets to the cars and attach him that way.
Interesting idea, thank you for the inspiration.
Posted

Full Member
Phil
Phil
1 guest and 0 members have just viewed this.