Photoplus X3 Tutorial.
Posted
#154067
(In Topic #8622)

Legacy Member
Photoplus X3 Techniques By Simon Parkinson
You have all seen photographs on the forum where the author says it has been photoshopped and the brilliant results that have been shown. Well we are fortunate here on the forum because Simon has volunteered to do a tutorial, the 'quick and dirty way' in his words. Now you may not have the photoshop software as I know it is expensive but I'm sure that by following Simon's tutorial closely we will all learn something that we can use in the software we do have. So pay attention on the back row.
Posted
Full Member
Firstly an apology - I am away in a minute to the Melksham show this weekend so will not be able to start until at least Tuesday night.
I aim to start with basic colour correction, cropping, getting rid of awkwardly placed telegraph poles etc and then move onto use of layers, which allow all those lovely effects shown by Phil. If anyone has any requests then let me know and I will try and do a tutorial on it.
I will be using Serif PhotoPlus Starter Edition as this is available free from here PhotoPlus Starter Edition has all the "whistles and bells" any of us will need for a while.
So you have the weekend and Monday to get your brains cranked up to medium ready for Tuesday.
N.B. LEGAL BIT
I should mention here that you should only ever use your own photographs or ones you have the express written permission from the originator or ones that are in the public domain ie on Wikipedia under the creative commons license. Do NOT EVER COPY FROM THE INTERNET WITHOUT PERMISSION, just because they are out there on the 'net doesn't mean they are public and free to be used. I will be using some of my photographs so I will therefore be releasing the copyright of those particular photographs.
Simon
 Last edit: by Simonmcp
Posted
Legacy Member
"Unless stated otherwise, all the material displayed on this web site, including all text, photographs, drawings and other images, is copyright and the property of the respective contributor. Registered members are welcome to use it for their own personal non-commercial modelmaking purposes. It must not be reproduced or re-published elsewhere in any form, or used commercially, without first obtaining the owner's express permission."
Posted
Full Member
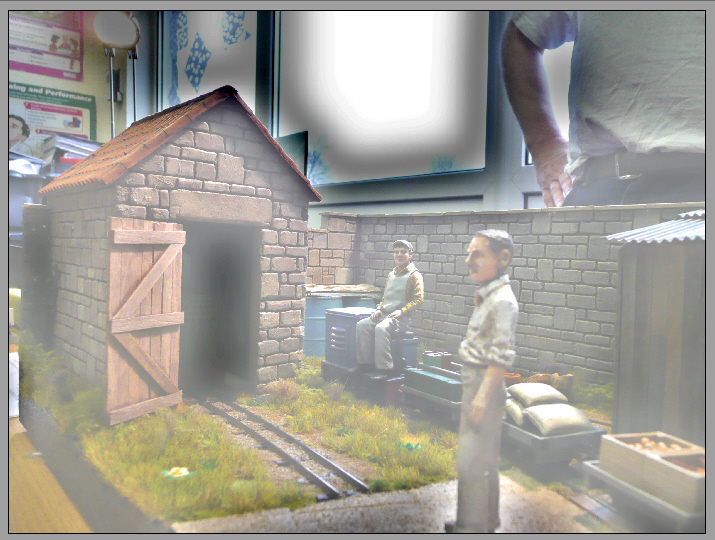
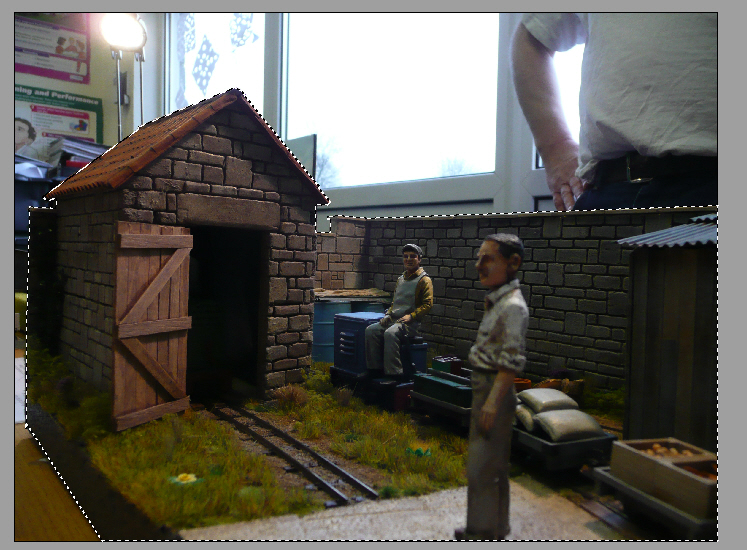
Attached is a screen shot of a typical photograph taken at an exhibition of a layout with a bright window in the background.
I will show you in the following posts how to change the colour balance and the contrast to put detail in the highlights and bring out details from the shadows.
Do not be too put off by the multitude of buttons, I have been using Photoshop for over 25 years and usually only ever used just the buttons I need. I will be explaining all the ones we will be using in words of one syllable.
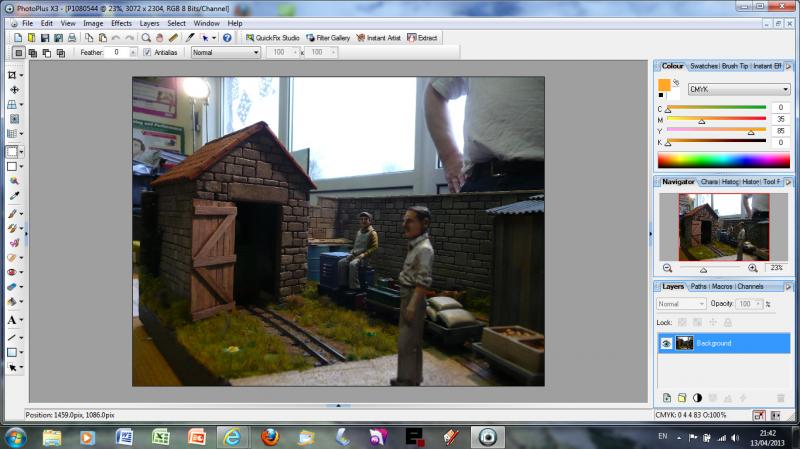
Incidentally the layout shown above is a G9 Gauge ie G scale of approx 1:24ish and using 9mm track. It is called Badger Bottom and was made by Simon Andrews. The photograph was taken at the "Small and Delightful" show at Shepton Mallet 2012.
Cheers
Simon
Posted

Inactive Member
Thank you in advance for your time and effort Simon.
Last edit: by Trev
Whenever I write a letter to someone, I add a footnote briefly explaining Ohm's law. It's my P.S. de resistance.
Posted
Full Member
Like the other Trevor, I am also grateful that you are doing this… I could really do with such a tutorial!
Regards from Australia
Thanks in Advance
Trevor
PS On a related area, has anyone done a similar thing with Google Sketch that may be readily available?
Posted
Full Member
Firstly apologies about the delay - I have only just got back from a Cornwall Railway Society Committee Meeting that I didn't know I had to attend, so will be continuing the tutorial tomorrow.
Hi xford - Re Sketch Up - there are some excellent U-Tube tutorials here http://www.youtube.com/watch?v=OPkv9tRuO-c
Posted
Full Member
Sorry it sounds a bit vague,
Regards
Trevor
Posted

Site staff
Ron
NCE DCC ; 00 scale UK outline.
NCE DCC ; 00 scale UK outline.
Posted
Full Member
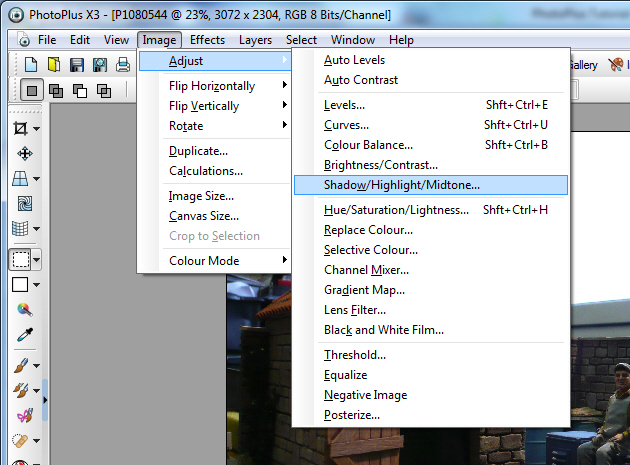
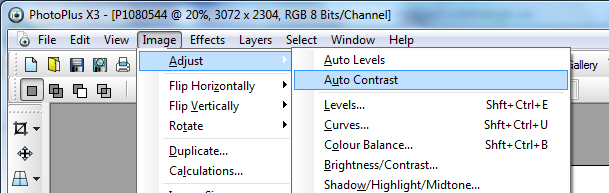
Below is a screenshot showing that I have clicked on Image – Adjust – Shadow/Highlight/Midtone…
Then the following new menu appears as shown below:
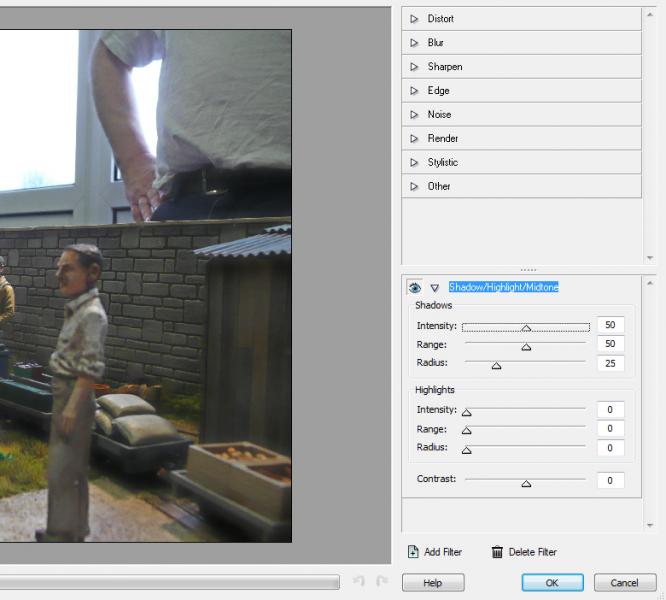
The section we are interested in is at the bottom right. The program will automatically do what it sees as the optimum changes. We can move any of the sliders to change the values.
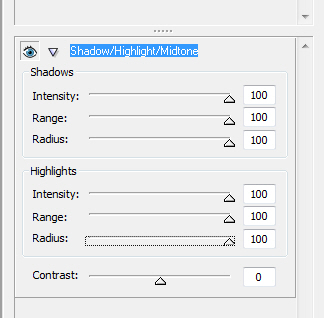
If we put in 100 on all values it will not make it the best it can be!
It will usually be best to accept the values the program gives you. If you look at the screenshot below you will see that we can just click on Auto Level or Auto Contrast and this will optimise the colours and contrast of your photograph. With Digital Photographs you may not notice much difference as the camera usually does the best it can.
The photograph I have chosen has so large a contrast that it will be impossible to make both the highlights and the shadows look good. So how can we get rid of the washed out window and the distracting background? Well one way is to effectively cut it out. We could use the Colour selection tool if the background was all one colour:
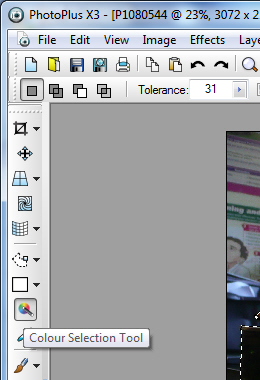
As the background in this instance is a jumble of different colours that tool will not work well.
So if we select the Rectangular Selection Tool as shown below:
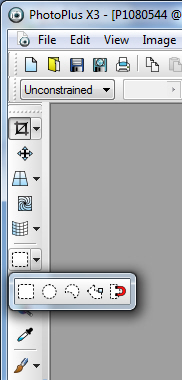
Now we need to select the fourth icon in from the left which is the Polygon Selection Tool.
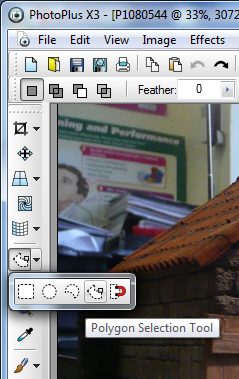
It is at this point that you might want to zoom in so that you can better see what you are cutting out, don't worry about seeing all of what you want to cut out as when you get to the edge of the window it will automatically scroll. Also I should point out that this is the way that you can produce the wonderful montage shots with steam ‘Photoshopped In’ so we are learning some ‘sexy’ things already.
When you have clicked on the Polygon Selection Tool the pointer will change to a lasso with a tail, it is the tail that shows where the line goes. First click once to start the line and then move to where you want to go, every time you wish to have another point click once again, at the end of the shape the pointer will have a little square which indicates that you have got back to the beginning and can complete the shape. It will need a lot of practice to get the shape you want. I advise starting on some very simple shapes first. The shape will now do what is known as ‘The Marching Ants’ as the dotted line will move around the shape.
Once you are happy with the result then you can Store Selection…
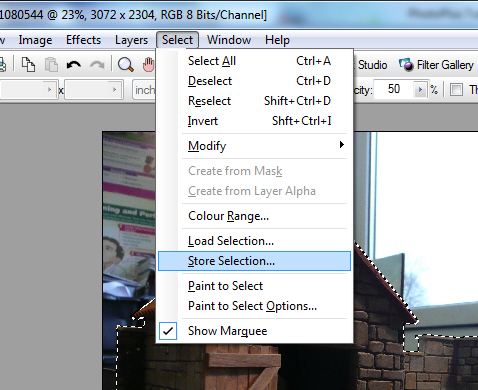
And this menu appears:
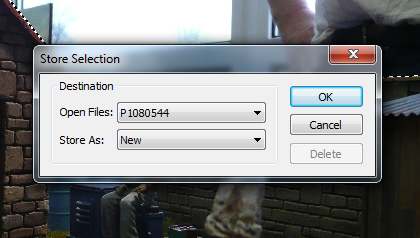
And when you click on OK the following menu overlays that one:
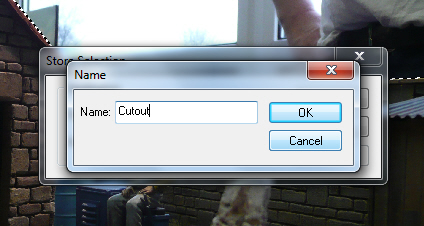
Type in something that will make sense to you (I have called it Cutout as that is what it will be doing) and click OK. This will have saved the selection so you can use it later.
So have a practice on your own on an easy to cut out shape and I will continue the Tutorial tomorrow.
If I have missed out anything or anybody needs more information please ask - no question is silly as we are all learning as we go.
Simon
Last edit: by Simonmcp
Posted
Inactive Member
I notice that according to your screen shots, you're using Photo Plus X3 instead of Photoshop.
I know both programs have similarities but I just wondered if using Photo Plus was what your tutorial was meant to be about.
Sorry if I've missed something.
Trev
Whenever I write a letter to someone, I add a footnote briefly explaining Ohm's law. It's my P.S. de resistance.
Posted
Full Member
Yes I am using Photoplus X3 as it is free to download. I have CS4 (for my work as a Tutor) but that is a bit out of the reach of most people. Although if you sign up for a Higher Education Photoshop Course and qualify as a student than you could get a substantial discount.
Or you could get Photshop Elements here: http://www.pcworld.co.uk/gbuk/software-gaming-books/software/creativity/photo-video-editing/adobe-photoshop-elements-11-19140096-pdt.html?srcid=198&cmpid=ppc%7egg%7eSoftware%2c+Gaming%2c+Books%7e19140096&istCompanyId=9a35962d-802d-4e67-9721-0a3328ca1f02&istItemId=aqppwllx&istBid=t&ef_id=oSdP3kyXxzoAAFzt3918:s
Simon
Posted
Inactive Member
I have now downloaded the starter edition.
Sorry for being a numpty, I'll go and stand in the corner at the back of the class :roll:
I have Photoshop CS2 on my computer
Last edit: by Trev
Whenever I write a letter to someone, I add a footnote briefly explaining Ohm's law. It's my P.S. de resistance.
Posted
Full Member
No one is a Numpty in my class. Only an inquisitive mind can learn.
I am seriously thinking of doing a parallel tutorial on Photoshop but it would have to be CS4 as I got rid of my CS2 when I got CS4.
It should be an interesting journey through Photoplus as I don't normally use it.
Simon
Posted
Legacy Member
PS. Can't seem to find the free download of Photoplus X3 that you mentioned.
Posted
Legacy Member
Posted

Site staff
Regards
Alan
Born beside the mighty GWR.
Alan
Born beside the mighty GWR.
Posted
Full Member
I advise you to use one of your own photos that has some nice simple shapes in it. I use this technique when I photograph an item in its box to put on eBay. So take a picture of one of your models in the box and practice cutting that out.
I would leave until a little latter things like cutting out the background from a very fluffy baby gorilla:shock: (yes I did have to do that once, and the background was a slatted wooden wall just to make it even harder)!
Then cut out the box and leave a nice soft grey or similar colour to ensure that we are not distracted by the busy background. We could also use the same saved selection to actually cut out the section of the picture we want and put it on the page as a cutout.
Hi Robert,
I forgot to put the link:oops: for Photplus here it is:-
http://www.serif.com/FreeDownloads/?mc=SERPPCFDBrand&gclid=CIHs9deQ1bYCFUXJtAodokYAqg
Scroll down and click Download on the Photoplus Starter Edition.
And an apology I haven't been able to continue the tutorial tonight. I will try and get some done tomorrow after getting the car through its MOT test which it failed yesterday
 .
.Simon
Posted
Legacy Member
Posted
Full Member
Car only cost about £150 so not too bad.
Unfortunately can't say the same for my health. I shattered my arm way back in 2007 but I damaged the nerves so badly that it is still giving me problems. I have 'lost' (due to effects of strong painkillers, they are so good I lose feeling in my extremities:shock:) several days this week when I had hoped to update the tutorial.
Luckily I have been writing the tutorial in Word in Parallel to putting it on here and I am ahead in Word so will post that section in a minute.
Simon
1 guest and 0 members have just viewed this.