Building the Scalescenes T008 Low-relief House Backs
Posted

Full Member
Another foray into butchering John's kits.
Here, here Marty thumbs
I always find it difficult to bin any of my "failed" efforts and then regret it for the rest of my life !!!
Your results Perry are, as Marty said, a triumph of willpower over impatience. :cheers
'Petermac

Posted

Full Member
Must look out for another one!
Minor problem is that I cant do white frames. and pale colour frames don't show up well either.
Cheers MIKE
I'm like my avatar - a local ruin!
I'm like my avatar - a local ruin!
Posted

Full Member
I'm still slowly making up the floor and ceiling assemblies and will post more pictures when I reach the next stage.
Perry
Due to cutbacks, the light at the end of the tunnel has been switched off.
Posted
Full Member
'Petermac
Posted
Full Member
In truth, we have one bathroom and the guy that is refitting it for us needs the space that I normally hog for modelling for a lot of his tools and materials. He will hopefully be finished soon and 'normal service will be resumed'.
I've got loads of stuff printed out and ready to go, and a certain amount of parts stuck to card ready for assembly, so as soon as I can get in there, I will.
Perry
Due to cutbacks, the light at the end of the tunnel has been switched off.
Posted

Full Member
I'm still slowly making up the floor and ceiling assemblies and will post more pictures when I reach the next stage.
Perry
Hi, Perry, I find the there is no need to make individual cuts for each window frame/glazing bar. I scan/copy one of the common windows, and then print them in rows and columns onto self adhesive A4 labels in alignment. Most photo editing/drawing systems have an alignment setting. I then stick the print-out to the acrylic medium. Most of John W's kits have most of the windows drawn in alignment anyway.
It means that one continuous cut can do all each side/edges in one pass. There is no need to stop at the internal corners of individual panes, the sticky stuff holds the tiny square piece at each junction in place. I then pick off the 'pane' area with tweezers having raised the corner with a scalpel.
[for greater relief I have stuck two sheets to the acrylic and I'm pleased to say it works very well.]
It is the method I used for the windows below, for example
 ]
]Hope this idea helps with your next job, and eases your hand strain a little,
Doug
editing of size words, etc by sol
'You may share the labours of the great, but you will not share the spoil…' Aesop's Fables
"Beer is proof that God loves us and wants us to be happy" - Benjamin Franklin
In the land of the slap-dash and implausible, mediocrity is king
"Beer is proof that God loves us and wants us to be happy" - Benjamin Franklin
In the land of the slap-dash and implausible, mediocrity is king
Posted
Full Member
I'll certainly bear it in mind for the next batch. Thanks.
Perry
Due to cutbacks, the light at the end of the tunnel has been switched off.
Posted
Full Member
Following the instruction sheets was straightforward. The only error I have noticed so far is a slight discrepancy in Step 6 which mentions Back Walls B and Centre Walls A. On page 16 of the printed parts, they are actually labelled Back Walls B and Centre Walls B. However, if someone like me could sort it out, I'm sure that no-one will experience any problems. :???:
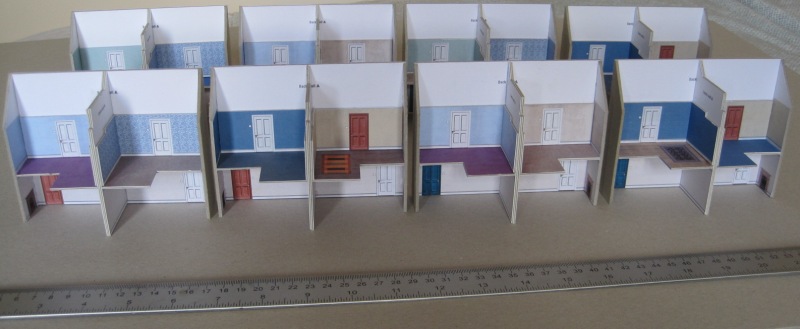
The plan for the models on the layout is to have two rows of eight dwellings end to end, separated by a narrow alley or access road (known as a 'loke' in these here parts). The photo shows one row behind the other, not as I intend to have them on the layout. I simply didn't have a wide-angle lens that could cope with them end to end!
I have completed Step 7 and am moving on the the heady heights of installing bookshelves and paintings. John is nothing if not thorough when it comes to including details! :shock:
Here is the current state of construction:
I use 'Office' glue sticks from Poundland for sticking the printed sheets to the pieces of card and 'Anita's Tacky PVA Glue' for the assembly of the parts.
Once printed sheet as been stuck to the card, I temporarily cover it with a piece of thin clear plastic (from a filing pocket) and then use a rubber roller over the top to get rid of any air bubbles and to ensure good contact and adhesion. The clear plastic keeps the printed material clean and free of stray glue. I interleave several sheets of the clear plastic between stacks of parts if I put them in my clamp to dry. The clamp helps them dry flat and keeps pressure constant. If the plastic sheets get a bit mucky, I simply wipe them over with a damp cloth, ensuring they are dry before re-using them.
Perry
Due to cutbacks, the light at the end of the tunnel has been switched off.
Posted

Full Member
Regards,
Trevor
Trevor
Posted

Full Member
 , ok im out of here :pedal
Phill
Posted
Full Member
Strangely that's exactly what I was thinking as I plan to have a row of them at Market Havering.Look nice on the old GWR line
Phill
Regards,
Trevor
Trevor
Posted
Full Member
Your spelling is atrocious, Phill. It's GER, not GWR - still, only one letter wrong! :It's a no noLovely work as per normal Perry. Look nice on the old GWR line
Phill
As was mentioned above, there is some leeway with card thickness in these models, but it's worth test-fitting a few parts before cutting a large batch. I had to do a little bit of careful trimming in places until I figured that out. :oops:
Perry
Due to cutbacks, the light at the end of the tunnel has been switched off.
Posted
Full Member
Oh, no! Please, don't encourage him, Trevor. :shock::thud[user=9]phill[/user] wrote:Strangely that's exactly what I was thinking as I plan to have a row of them at Market Havering.Look nice on the old GWR line
Phill
Perry
Due to cutbacks, the light at the end of the tunnel has been switched off.
Posted

Site staff
Seriously though i'm building the canal and locks kit atm and i'm having no problems with the card at all plus the dog is showing me undying affection.
Regards
Alan
Born beside the mighty GWR.
Alan
Born beside the mighty GWR.
Posted
Full Member
I've been studying the laminations but can't make it out ………….:roll::roll:
Is there a slot for the floors to sit in ? I ask because, whilst the centre wall on the upstairs bit seems to have 4 card thicknesses, the ground floor bit only seems to have the 2 formed by the party walls.
'Petermac
Posted
Full Member
The rubber roller I use is about 3" wide and 1" in diameter, but the dimensions are not critical. I just find this size covenient. It is exactly the same type of roller used for inking lino cuts.
The upper centre walls are indeed made up from four thickness of card. The double laminate forming the upper and lower walls have an 'inner' wall added on each side of the upper floor, hence the four thicknesses. The difference in thickness between the upper and lower parts of the central wall won't be visible once assembly progresses a little further. The floors and

Perry
Due to cutbacks, the light at the end of the tunnel has been switched off.
Posted
Full Member
Regarding the laminations and halving joints, I wonder if John has changed his method (or you have …..:roll:)
When I built the complete terraces, there were "inner walls" on both ground and first floors leaving a slot for the floors to slide into …………at least that was the idea !! The lip created by the slightly smaller inner wall, also created a ledge for the house fronts to sit up against.
It will be interesting to see the progress.
thumbs
'Petermac
Posted
Full Member
…………Regarding the laminations and halving joints, I wonder if John has changed his method (or you have …..:roll:)…….
I am building the model following the printed instructions, so I'm guessing it's something John has changed.
Perry
Due to cutbacks, the light at the end of the tunnel has been switched off.
Posted
Full Member
Great idea! I wonder if SWMBO will let me have a dog…………?I use old bonio boxes for my scalescenes models.I can hear all the gasps as i type.
I'm all in favour of throwing nothing away. It's amazing how often the stuff one would normally throw out comes in handy. :thumbs
Perry
Due to cutbacks, the light at the end of the tunnel has been switched off.
1 guest and 0 members have just viewed this.