Making trams from card or paper
Posted
Full Member
I'll file that one away for later use on a billboard. If you have a look at the tram side banners you'll see that we have both got the same problem. The artwork is really too small to see properly but if I keep your poster I can stick it in a frame on a wall.

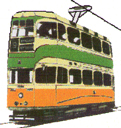
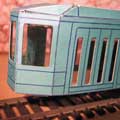
These are only 8mm high and 70mm long
Once again
Many Thanks
Jim
Because, except in some unfortunate circumstances, trains did not run on town centre streets

Posted
Full Member
What if you photograph an actuall packet of the product and then, save sample and re-size to suit, message etc etc as you want????????; the picture would at least be of a good size to start off with!!!!!!!!!!.
Regards, Tom..
PS…..Runner up will get some HORSE riding lessons…..tasty :twisted:

 Last edit: by mckinnell
Posted
Full Member
Tried the picture of box routine. Sainsburys get REALLY sniffy if you whip out a camera and start taking pictures.:shock::shock:
ASDA found "BUTE" in their corned beef. This is worrying since they did not find horse DNA and the only other user of BUTE is a junkie:shock::shock::shock::shock::shock:PS…..Runner up will get some HORSE riding lessons…..tasty :twisted:
Brings a whole new meaning to the word can a balls:mrgreen:
Regards
Jim
Because, except in some unfortunate circumstances, trains did not run on town centre streets
Posted
Full Member
I'm not a "post junkie" so I don't try to post several times a day (you know who you are) but this thread has been dormant for a while so I'll drop an update on "Provenmill" on here. It's my test track which is all I have running at present and only one live tram. I still need to do the overhead for the antique ABS Beck Coronation to double my fleet.
This shows where I am heading. From left to right we have an original DunRon Hex dash Standard, my first attempt attempt at modifying it and then my first kit from scratch.
Same suspects from the other angle. For the aeronatically minded it's a DH 108.
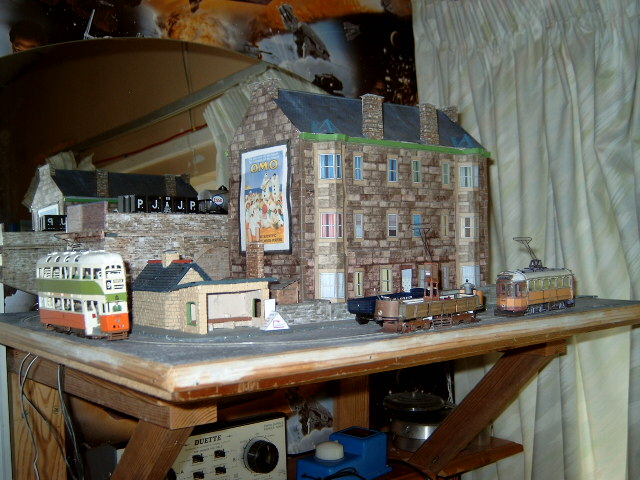
Three "real" kits. From left ABS Beck "Coronation" from 1968, Sett and permanent way car and one off Glasgow 1089 . The last two from Elro. When I get better at building them I'll do a decent version of these.

The Elro stuff is really good and you can get museum quality IF your good enough.
I need practice.
The only running tram. The Bachman Hong Kong tram with the Coronation following under the bridge on the rear of the layout.
As it's supposed to be a test track I can run two rail or (when I get one) overhead and twin rail return and I will be able to run the Coronation.
For the purist the Hong Kong tram is here on a promotion for Vesta Chou Mein and will remain when I get the overhead installed and working. and rewire the tram.
Right now I'm correcting the errors that building the Standard has highlighted, I think the one on the desktop is about mark VII which is substantially more then the originals reached.
Regards
Jim
Because, except in some unfortunate circumstances, trains did not run on town centre streets
Posted
Full Member
Just how big will the system be when when you get it completed mate??, my railway projects are now halted due to not having any money to continue so, thats it for now, realy upset as now only able to look after our bills, but, they have to be delt with first, keep us up to date, looking very nice, mind you, can still design and build or send models of anything that any one needed i guess, still, all the best my friend…………….
Regards to you and your family,
Tom………………………………………..:cool wink
Posted

Full Member
From what I've heard/read, it works reasonably well with "O" Gauge but is a real PITA on anything smaller.
Leeds used bow collectors so you have a fair amount of leeway for contact but with poles, keeping that skid/wheel in contact with the wire is 10 times as difficult as it was on the prototype and de-wiring was common, even on those.
The big advantage with rail and overhead operation is of course, that you can pick up through all 4 wheels and return via the overhead. Auto stops are a doddle as are "shunt starts" where an arriving tram activates a waiting tram in a given sector thus moving it off the stop automatically.
It was because of the bow collector vs. pole collection, as well as the fact that I lived there when they had trams, that I opted to go for Leeds models.
I have yet to decide what track system to use and whether to go for prototypical operation - although reversed so that pick up is from the rails.
I'm watching with interest……………………..
 hmm
hmm
'Petermac
Posted
Full Member
In order of asking,
Provenmill is, and always will be only a single loop of 18 X 18 inches to the inside rail of 6 inch radius curves and was originally laid down as a test track in 1974 when it consisted of Graham Farrish rail separated by insulated fishplates on both rails. Wiring was soldered direct to the tracks and was for 2 rail pick up so 4 wires from the rails to allow for the choice of 2 rail or 2 rail and overhead current. There was no scenery and overhead was supplied from custom built poles and soldered wires. The track was bare with no street surface.
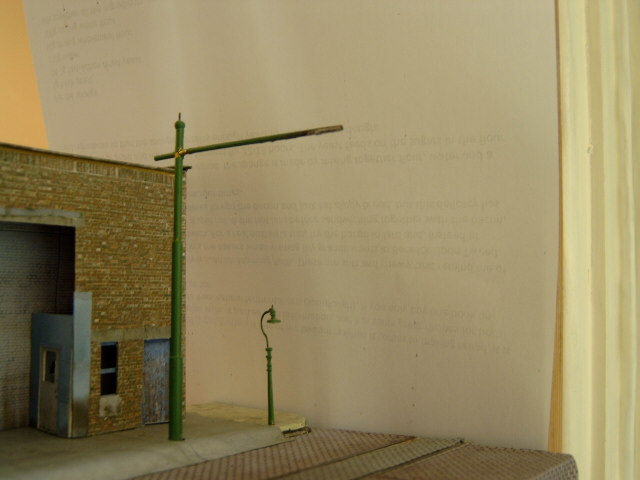
The photo shows a recycled original span pole which is made from 3 diameters of Brass tube for the upright and a fourth for the horizontal. The finial is a cut down dressmakers pin. They were simply push fit into the board and soon worked loose. If I can find a way to secure them they will be re-recycled. The span arms need to have some supports fixed to them.
The overhead pickup will be bow collector as this was standard in later years in Glasgow. I hope to be able to fix the wire to run at a slight angle from fixing point to fixing point as in real life so as to even out the wear on the collector. With the fixed bow on the tram you need extra care on the curves to keep the wire in range of the bow.
I don't know about Leeds but Glasgow made extensive use of wall rosettes for span wires and span poles were fairly uncommon, if not totally absent from the town centre. In my home town of Clydebank they were only used where tenements had been destroyed during the blitz.
The actual layout is still in the planning stages but is intended to be a U with truncated arms and a lengthened centre. The two arms being a depot at one end and a similar arrangement to Provenmill as a terminus at the other end. The arms being 3' X 1'6" each, the house is built in Imperial, with a 6' run between them probably 9" deep to allow for streetscene and pavement both sides to let me put span poles on the open side.
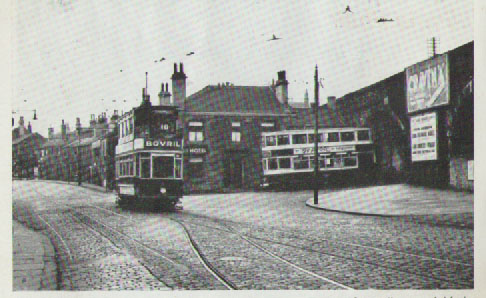
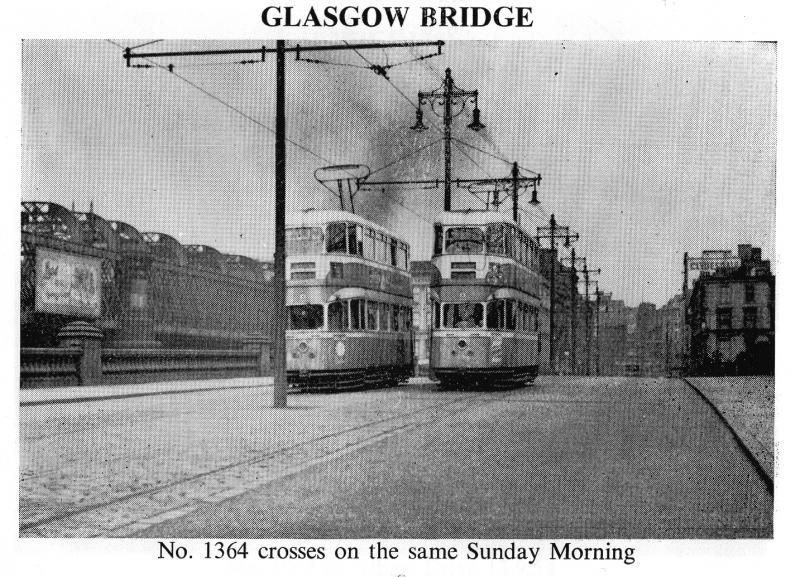
This is for you. The tram on the right is a Leeds car heading up to Pudsey (no, it's not just a fund raising bear) and the other car is a Bradford car at the Stanningley Bottom terminus. If you can make out the rails on the left side they are not bent they are tapered. This is where the trams changed from 4' Bradford gauge to the 4'81/2" Leeds standard gauge.
Hope this has been of interest
Jim
Last edit: by The Bankie
Because, except in some unfortunate circumstances, trains did not run on town centre streets
Posted
Full Member
That's an interesting picture Jim and I know exactly where it was taken although the area has changed a little since then ……….!!!…………………………………………………………..
Peter
This is for you. The tram on the right is a Leeds car heading up to Pudsey (no, it's not just a fund raising bear) and the other car is a Bradford car at the Stanningley Bottom terminus. If you can make out the rails on the left side they are not bent they are tapered. This is where the trams changed from 4' Bradford gauge to the 4'81/2" Leeds standard gauge.
Hope this has been of interest
Jim
I'm not sure what you mean about the rails being tapered …..:roll::roll: Are you saying Bradford trams operated to Leeds and that this is a sort of "exchange siding" where passengers decamped the Bradford cars to alight the Leeds cars or are you saying they somehow changed their back to back on tapered rails ? :shock::shock::shock:
On Edit - Just Googled it and you live and learn !! Something I didn't know.

http://www.mylearning.org/inventions-in-transport-from-bradford/p-2113/
'Petermac
Posted
Full Member
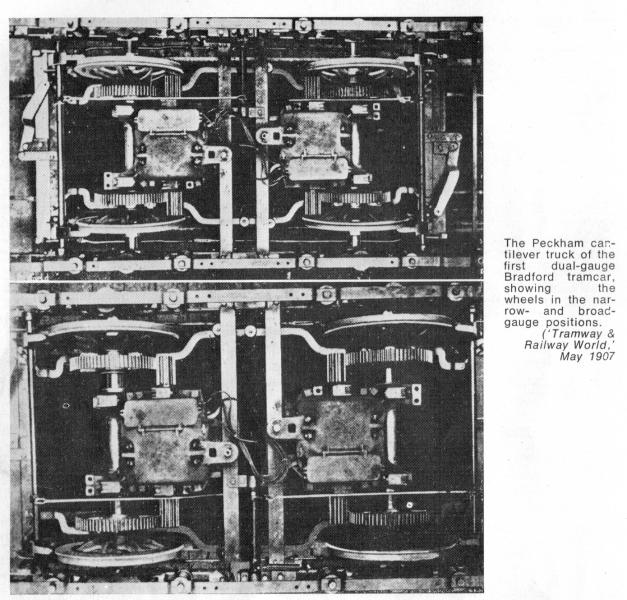
One of my earlier posts shows the trucks used to change from one gauge to the other. The service ran from June 1909 till March 1918. Seemingly the Leeds cars suffered in riding quality in Bradford due to the narrowing of the gauge whilst the reverse was true for the Bradford cars. As far as I am aware this was the only incidence of this type of dual gauge running EVER.
I'll send you the full tale as a .PDF via email later this evening.
Regards
Jim
PS The Pub behind the tram is still the Rising Sun.
Because, except in some unfortunate circumstances, trains did not run on town centre streets
Posted
Full Member
I’m not certain where this is supposed to go, Members layouts or here in the Paper and card Trams thread so if Petermac in his role of moderator will inform me of the correct location I will either expand on this or move it.
I have been asked about a full size layout. What size, track plan, construction, name etc? So this is intended to start answering some of those questions and as an aid to firming up ideas that I have. My resources are limited and having just worked my way through the “Bears End†and got deeply into the “Newcastle Emlyn†threads I am gratified that some kind people think that my efforts are worth recording. However as I said with the limited resources available this could be a long haul.
First up is a description of the differences between tramway and railway layouts and the differing problems tramway modellers face. I don’t need to go into those faced by railway modellers as the words “grandma, eggs and suck†spring to mind so I’ll outline only those specific to tramway.
Let’s start with the track
It looks like tramway modellers get a better deal. Really tight curves so you can squeeze more into a given size of baseboard and you can use any old track and plaster over it to hide the defects and ballasting is eliminated.
Only……. if you are not doing current tramway you will need to either cover your road surface with cobbles by gluing printouts on to the street or by scribing each cobble. Cobbles are 4mm X 2mm at 00 scale and a double track width of road is roughly 110 mm between pavements. That is a LOT of cobbles if your layout has 5 linear meters of double track. I suppose that you’ll want to be able to have junctions or sidings so points are a necessity but they are going to be somewhere in the range of 150mm radius, be custom built and, if you are following actual practice, have only one moving rail as a guide. Normal turnouts and slips are not too bad despite the sharp angle that the rails cross but at a T junction or Grand Junction things get interesting. Have a look at the drawing below. It’s a grand junction and gives you an idea of the size and scale of trackwork since it measures 40 X 40 centimeters and to build it I have to print it out on 4 sheets of A4. There are 16 points and if I think about wiring it in two rail (as opposed to overhead and twin rail return), my head hurts.

So on to the overhead.
Now some people will be modelling contemporary railways and you can get working overhead at a price. However tramway overhead is a single catenary wire with a very gentle curve and no supporting wire above it. It is also hung from a bewildering selection of supporting poles. My own poles are built from 4 diameters of brass tube which are a sliding fit inside each other with 3 tubes for the standard and the fourth for the span arm the overhead is attached to. Finding pictures of the span poles is very difficult as they were rarely the subject of a picture as the tram was and where they are shown they tend to blend in with the background.
See what I mean and I was attempting to show the pole.
And for those who have read some of my previous posts and are wondering this is a 2 foot section of track I had in my father in laws bookcase with a Blackpool standard as a working diorama. It originally had a high street scene but it had got badly damaged and when I found Scalescenes site there was a free set of low relief industrial units which I used as my introduction to card building building.
These days I tend to think of it as Provenmill industrial estate. You can see the three sections of tube and the span pole.
Glasgow tended to make use of wall rosettes to fix span wires to but as the nature of tramway modelling tends to have only one side of the street, [well you WANT to see the trams don’t you?] I will need to work out how to fix span wires to cardboard buildings on one side with the span poles on the other. I think that this will involve tenements with plywood or real tree backings.
I’ll leave it there for now except to say that the eventual layout will be “Glebe Street†and the Sunday Post can accept it as a tribute.
Regards
Jim
Last edit: by The Bankie
Because, except in some unfortunate circumstances, trains did not run on town centre streets
Posted
Full Member
To expand on the previous posts I have cobbled together some more information on Proven Mill.
This must not be confused with Provanmill on the other side of the city and apart from a confusing similarity of name it has no relationship with the larger community of Provanmill.
Proven Mill is in fact my test track and started out as a simple square [with 6 inch radius to the inside rail of the track at the corners] of two lengths of Grahame Farrish track with two separate feeds to each section and a single shared feed to some home built overhead. There was no scenery of any kind or roadway just the track and overhead and it was intended to test run any model trams I managed to acquire.
There were two reasons for opting for live overhead. The first is the simplicity as with what amounts to a normal two rail system turned on its side it means that there are never any polarity issues with points. As all my pointwork will be buried in a road this is a big reliability factor in favour of the system. Also you must realise that I was doing this in 1970 and guidelines were not a major factor in model mags or easily obtained literature. The other main point is prototype and if it worked for the real thing I should be OK.
Then real life got in the way until last year (2012) when I spotted some card kits available on line. I sent off for a couple with no great expectations and I was not overwhelmed by the kits I received. I got some very simple kits which provided outline and visual representation of a Glasgow Standard and a Coronation. Perfectly good for background or kids or even simple diorama but I wanted something I could motorise as I have ONE, count it one, Coronation white metal BEC kit and wanted to build up a fleet.
Searching the net indicated that not a lot had changed since 1970 and I would need to think laterally and probably build my own. At this point I discovered Ellen and Robert Hardy trading as Elro. In common with many others they produce specialist models and I want a representative fleet. However some specialist cars are always necessary so I sent off for a couple. WOW what a pleasant surprise! Well researched, beautifully drawn & coloured and to scale kits with good instructions. IF you’re good enough you can get museum quality models from these kits. I’m not, but I now have the incentive to learn to be.
An added bonus was finding Scalescenes as a source of bits to provide the scenery for my trams. If you think that finding tram models is hard, try and find a Glasgow tenement. I was going to have to make my own tenements if i didn’t just want to model the newer suburbs. So with the experience and knowledge I had gained from Elro and Scalescenes construction methods I decided to build my own streets and trams.
All I needed was a test bed. Into the loft and resuscitate the old test track. It had undergone a few alterations since it had been conceived and now had a plaster road surface and the remains of an overhead power system. The overhead was a write off but the rest was sound, all I needed was some scenery and some trams.
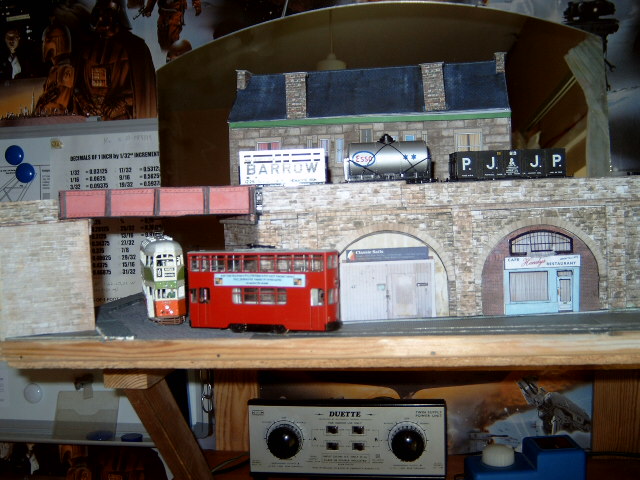
This is the current state of play:-
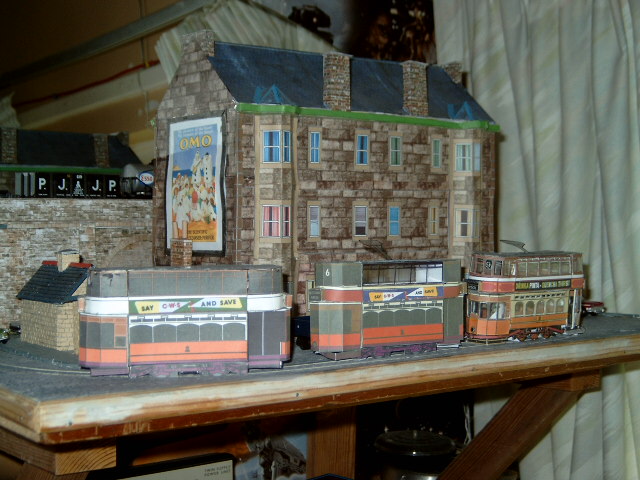
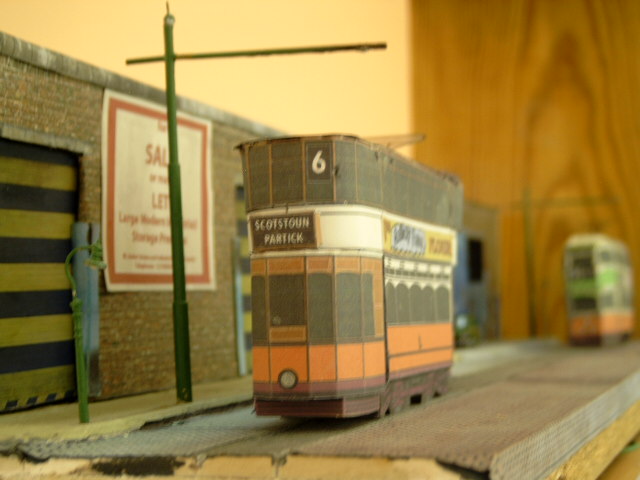
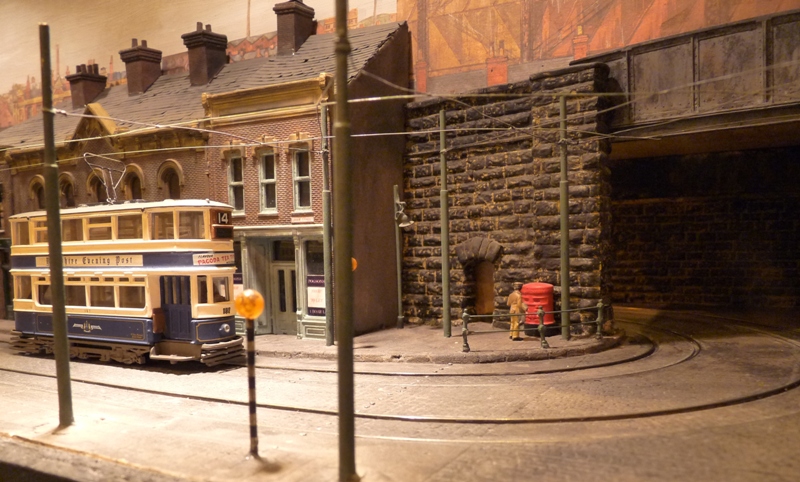
This is the current view looking East from Shirt St into the North end of High St. The Hong Kong tram just appearing is on loan while advertising a “Vesta†packet meals competition to win a trip to Hong Kong.
OK it never happened, but I’m not buying a tram then not running it. In fact the experiment is such a success it might get a partner fairly soon.
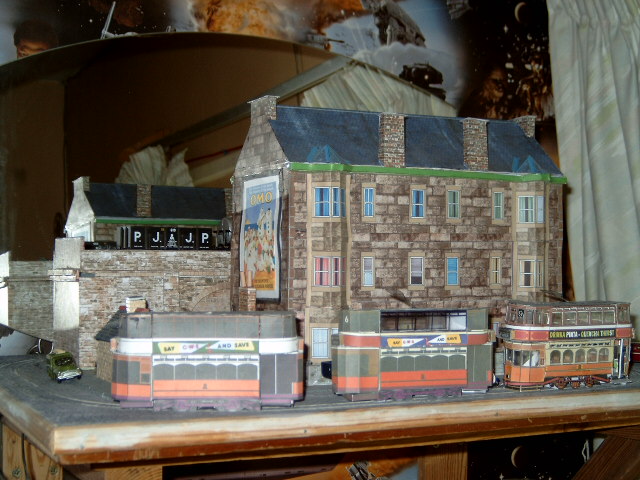
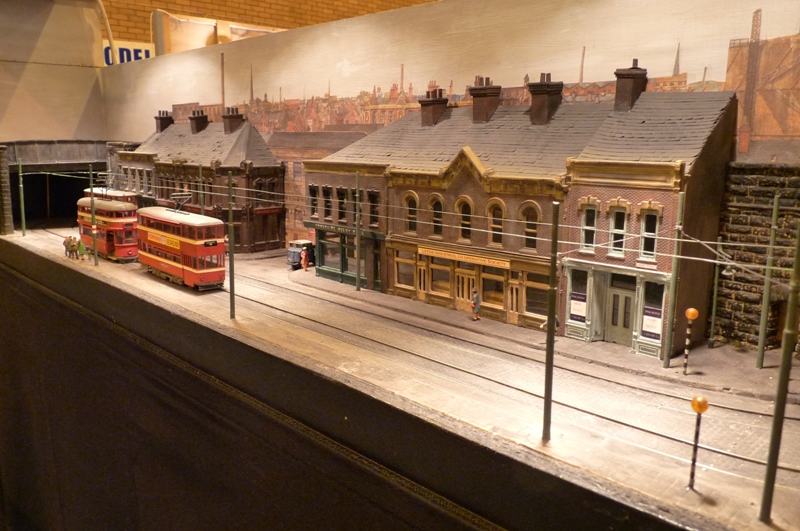
This is an earlier picture and from left to right shows an unmodified DunRon Standard, a Dunron Standard with a modified upper deck and one of my own prototype Standard kits.
I say prototype as I’m now on the Mk 6 version which is more than the originals managed.
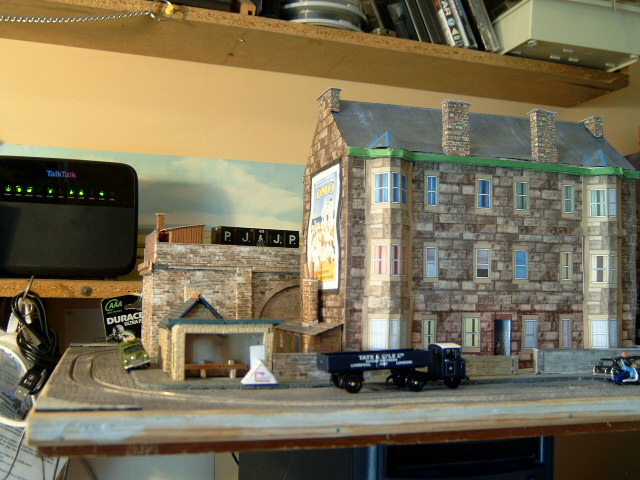
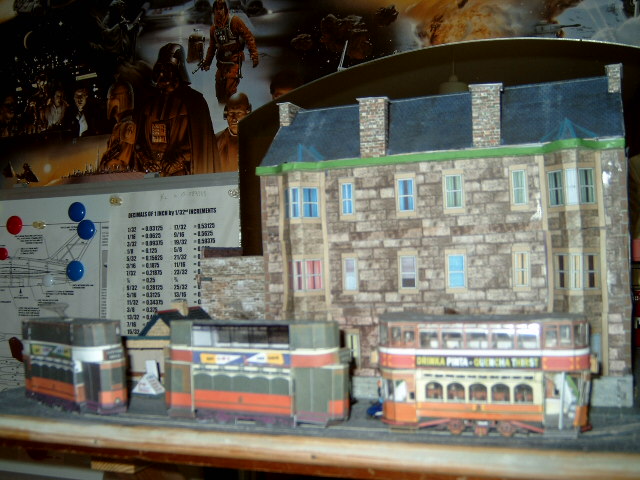
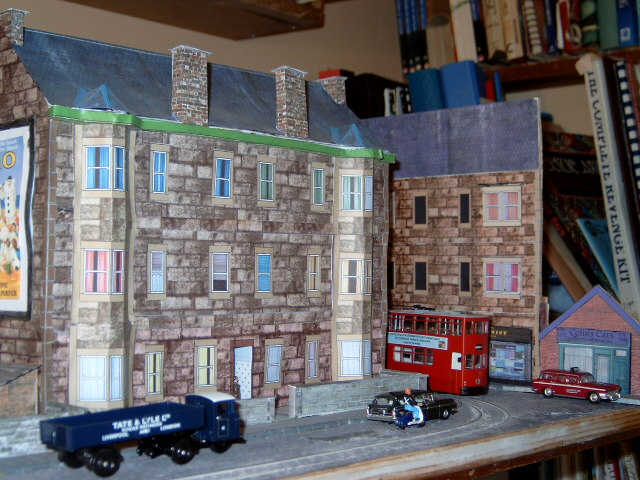
This is the Above picture in its current form and with the trams removed. It shows the view up Auchtermuchty Lane, the Linka System tram shelter and public toilets behind. The suddenly terminated viaduct is courtesy of a German bomb during the war which removed the bridge and relegated the line to a siding. The little white pyramid is an advertising board for the cafe round the back in Dock Street.

Tram 1089, officially the “Bailie Burt Experimental High Speed Tramcar†but known throughout the city as “Wee Baldie†is just about to return to its Partick depot having delivered a load of shipyard workers and is being followed by a permanent way car while the BEC Coronation is just appearing to wait at the terminus.
Since this has the ability to turn into a mammoth post I’ll stop it here to see if there is any interest in continuing the story since this is really the experiment. This is also why it’s not in the members personal layouts thread.
Let me know your thoughts as I’m certain you will have views.
Regards
Jim
Because, except in some unfortunate circumstances, trains did not run on town centre streets
Posted
Full Member
I was particularly interested in your comments about the prototype overhead pick-up. Are you going to persevere or revert to conventional two rail ?
When I eventually get back to mine, I want to try the overhead but we'll have to see …………….:roll::roll:
Another thought regarding the span wires - some, probably many, installations just used the span poles either side of the street with a wire stretched between the two to carry the overhead - i.e. no supporting arm out over the track and no wall mounted fixings.
My, now fading, memory would suggest that the supporting arms were used on single track situations with the poles just on one side of the track. :roll::roll:
Is your "Wee Baldie" a metal kit ?
'Petermac
Posted

Full Member
Last edit: by new04db
Posted
Full Member
Thanks for the compliments. I'm not too sure about the feed/blog and I intend to build a proper layout. Because it's my experiment and test area Proven Mill is simply a pun on a district in Glasgow which fitted in with it being a proving ground for rolling stock and scenery.
The next generation of Standard is on the drawing board since I have now got the main sections sorted but I need to change the build order and sections involved to ensure a better fit. The hard part is the instructions. I'll send you one when I get it sorted as a test piece. N gauge might be a bit fiddly.:shock:
Regards
Jim
Because, except in some unfortunate circumstances, trains did not run on town centre streets
Posted
Full Member
I did a fantastic and outstandingly informative reply to your query,BUT, lost it when trying to post it:shock::shock::shock::shock: Will redo it and post it shortly.
The "Wee Baldie" and the works sett car are Elro card kits.
Code
elrokits@btinternet.comRegards
Jim
Because, except in some unfortunate circumstances, trains did not run on town centre streets
Posted
Full Member
Due to the good weather card models have moved back a bit. However I managed a bit more on my 00 tram layout, concentric ovals representing a test track. 48" x 24" represents about 100 yards by 50 yards.
On the topic of two rail or three rail. If the two rail track has mostly track where each running rail is insulated from the other then it can be used for a form of automation. I first saw a simple figure of 8 with three trams running one after the other. Basically dead sections of track are created, but with the break points staggered. A tram runs into the section and after the second break stops. A following tram enters the section over the first break. As it is still connected to the other rail the dead tram now receives power and moves off, usually over a double break while the following tram continues until it hits the second break, and so on. On a linear dog bone layout a number of trams then seam to be continually running with realistic stops and starts.
For a quick trial using a third rail rather than overhead wire. Hornby Dublo track is no good, but Trix Twin should work as the running tracks are insulated from each other.
With the re-appearance of modern systems partly wireless using a centre third rail rather than overhead with modern trams is not as remotely un-prototypical as it once might have been.
Consequently my 'test track' layout will initially be 'wireless'. Not sure if putting in a centre rail will be easier than installing an overhead, but it will be different.
Also recently discovered the secret of 2 rail to three rail conversions - those brass two legged paper clips, the ones pushed through a single hole. Clip one leg off and they make great centre rail collectors.
have fun
David
freelance model railways and tramways
index02
index02
Posted
Full Member
freelance model railways and tramways
index02
index02
Posted
Full Member
OK I’m doing this in word so that I don’t lose it again.
Your comments regarding full span pole standards, those with span arms to hold the overhead out over the track, are perfectly valid. There is even a double span arm standard normally used on wide roads or reserved track and where standards or traction poles were used they were almost invariably used as lamp posts.
When using live overhead in 00 there are several things to remember.
The overhead must be taught and at the correct height as the collector, in our cases bow collectors, is spring loaded to enable it to maintain contact and it will force the overhead up if the wire is slack. If the height is wrong you get the same result for too high and too low leads to pressure lifting (usually) the front wheels up and out of contact with the track.
Span poles must be very firmly anchored. This is what destroyed the overhead on my first version of Proven Mill. They will be under a great deal of stress from the collectors and the span wires with both applying force in different directions.
Note the damage at the junction of the span pole and span arm.
In my case Glasgow tried to use as many wall “rosettes†as possible. When you consider the track mileage which needed over 1200 trams to service it this was a tremendous saving. However this leads on to the fact that in order to provide the rigidity needed for span wires the traction poles will most likely bend so it is better to use 1/32inch welding rod and in the case of wall rosettes hide the supports inside the building with the “wire†poking out and supported by a span pole, remember I will mainly only be modelling one side of the street as I want to see the trams go by.

There is one span pole in the picture. It's trebling up as a lamp post and tram stop. On the left by the "lifebuoy" add.
You will need a damn sight more of them than you think! One span wire or pole roughly every 100feet in real life which cones out as every 400mm. At every corner or bend additional “pull off†wires are needed so a minimum for a corner or bend is three. Proven Mill with four corners and four straights needs sixteen.
Unlike steam railway modelling where you go to great pains to hide the power feed the tramway has it highly visible. Regulations require that there is a break in the supply every half mile so a small section feeder box is needed every so often to stick with prototype practice. Proven Mill will get two and the feeder cable will go up the traction pole, along the span arm or wire and connect to the overhead.
It’s simpler to create the section break by using insulated frogs on the rails and it does not affect anything.
Hope I haven’t put you off.
Regards
Jim
Because, except in some unfortunate circumstances, trains did not run on town centre streets
Posted
Full Member
Here's a couple of shots of that very well known tram layout "Grime Street". It shows how he fixed his overheads although it is only cosmetic. My plan is to make it functional because it effectively doubles the wheel contact for the pick-up or return - depending on how it's wired. All 4 tram wheels are in contact with either the feed or the return and you have a rubbing contact for the other side of the circuit via the overhead and bow which seems to me to be better than a "static" wheel contact.
I discarded wheel collectors because it's nigh on impossible to keep them in contact with the overhead in "00" scale although they do apparently, work well in "0" gauge.
I know I'll need plenty of poles but "Grime Street" has used just two tubes where you've used 3. His "outer" is longer than yours so gives more support. Hopefully, they'll be strong enough to retain the required tension ……………….
David, I think your "rail break" system is used by Gordon Bulmer on his "Sunderland" tramway models ……….:roll: He's modelling in "O" Gauge but it does work very well. "Grime Street" uses a similar "section" system to avoid collisions. One tram stops just short of the one ahead and can't be moved until the leader has cleared the section. All done with simple section switches rather than automatically. :thumbs
'Petermac
Posted
Full Member
I agree with the number of tubes but the two thinner ones on mine are full length so not a lot of worry about strength. Cost is a different matter:shock::shock:!
Also the overhead in the picture is curved round the corner whereas I try to get mine in a series of short straights as that's how wire acts with "pull off" tensioning. It also spreads the wear point on the bow.
That said it's a far superior effort to mine. I'll just have to up my game.
Regards
Jim
Because, except in some unfortunate circumstances, trains did not run on town centre streets
1 guest and 0 members have just viewed this.