Making A Styrofoam Mountain
Posted

Full Member
It will still take several pours to get it all covered though. I may still have problems even with the ability to tilt the mountain.
Wayne

Posted

Full Member
It is nice to see someone getting some height into there layout, great work you must also have a good minds eye.
Regards
Acording to a recent visit to a supermarket at check out time, I an not loosing my memory it has been downgraded which means i am not stupid afterall - Sorted! - What a relief
Posted
Full Member
you must also have a good minds eye.
My folks tell me that all the time. It really is what I spent my life's work at. I was a product engineer and did a lot of development work. I had to be able to see what the customer wanted then get it built. Sure helps in the layout room too.
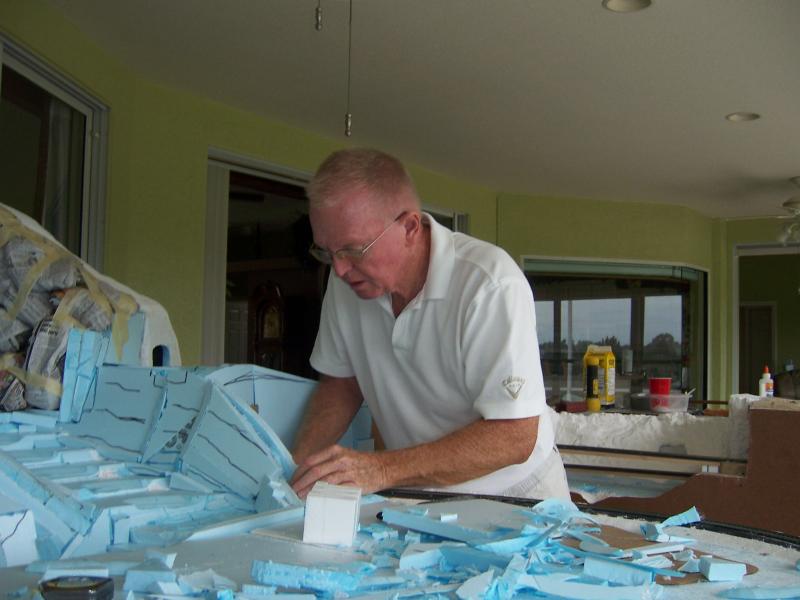
Update:
Well, I finally got around to putting on the plaster cloth on the center section of the mountain. Betty decided I needed my picture taken and snuck the camera in to the layout room. So here I am trying to figure out where the parting line is between two modules so I wouldn't glue them together without realizing it.
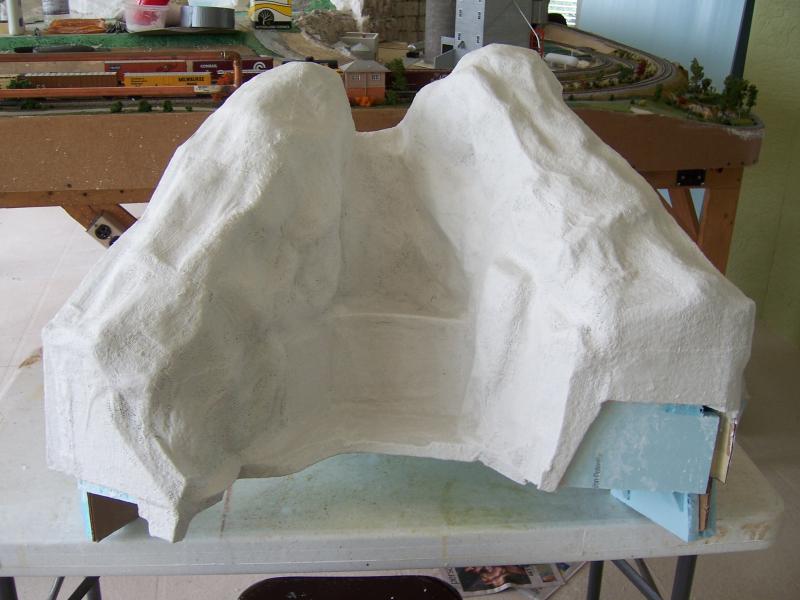
The second photo has two layers of the plaster cloth on the center section of the mountain. The waterfall is in the middle and will go down to the bottom shelf you see there.
You probably can't see what I did on the river in that last picture, but I worked about 2 hours on it this morning. Mostly small pieces that will help direct the flow of the river. I filled in a lot of holes also. The black lines on the back wall of that module will eventually become small shelves that I can plant trees on.
Wayne
Posted

Full Member
You never fail to impress.
Posted
Full Member
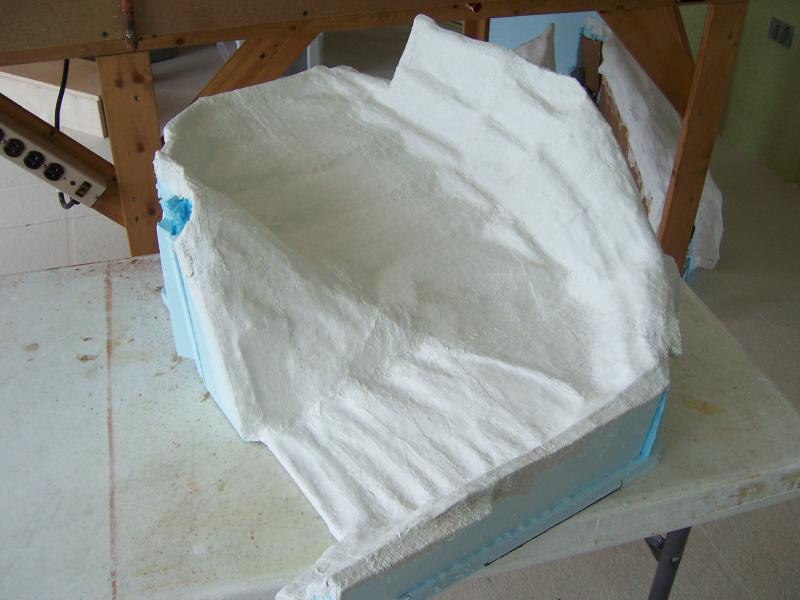
Here is the river rapids with 2 layers of poster cloth. Twas a busy afternoon. I will be inspecting the river area more tomorrow, after it dries. All the tiny holes must be sealed to hold in the liquid, until it sets up.
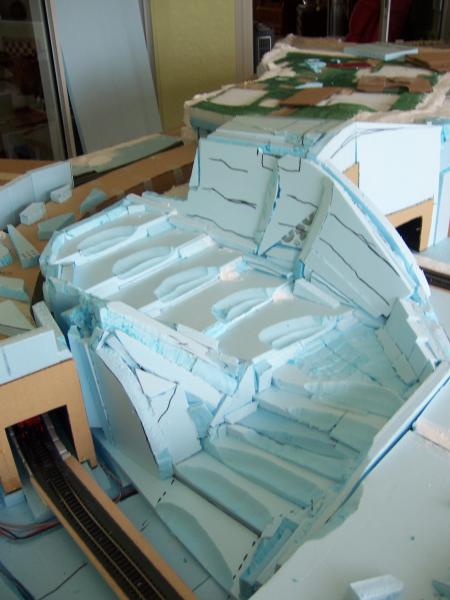
The next three photos are with all the modules for the mountain in place. Look at that hole in the center, not sure how I missed that, but it's no problem to fix. I should have that done tomorrow easily.
The last photo show you a good overall view of the layout and just how the mountain fits in. Please excuse the mess, seems like the layout makes a perfect table top for storing things. You may notice I have removed many of the scratch build models for safety sake. They are sitting next to the clock on the wall, to the left. Out of the way of carrying the modules back and forth to the work table.
All the joints you see in the 3rd & 4th pictures, with any luck, could get fixed tomorrow. I'm not sure about fixing the joints around the river as it may not be dry enough by tomorrow. Will have to wait and see.
I was real happy with the way all the modules fit back together. There was three small spots where I had to cut away some of the plaster cloth and even some foam due to premature contact. Once that was done they all fell right back in place beautifully.
Wayne


Posted
Full Member
The first photo shows the two bumps I didn't like, it's obvious where they are when you look at the second photo. I also took the time to fill in the hole in the first photo. The third photo is with 2 layers of cloth over the exposed paper.
In the last three pictures I have begun filling in the joints between the modules. The only spots where I couldn't do that today was where the wet plaster cloth was. The shipping tape I use to prevent the bonding would not stick to the wet cloth. No surprise there.
The only areas left to fill the joints are the top and bottom of the center section. The cloth should be dry enough by Monday, so hopefully I can find the time to finish all the joints on the mountain.
Wayne


Posted

Full Member
I wondered how you were going to hide the horizontal join in the falls - now I see !!! Very clever stuff and lots of "lateral thinking" - as we've come to expect from you. :pathead
'Petermac
Posted
Full Member
The joins are looking acceptable for now. Once everything dries completely I will remove the shipping tape and re-assemble the mountain. If there are any glaring gaps I can tape it again and repair it.
Keep in mind if the slope is from horizontal up to 45 degrees, I will be installing trees on it. They will go a long way in hiding small imperfections in the joints.
My goal is to get this ready for paint in time for cooler weather here. That should arrive some time in mid to late October. That way I can take everything outside for painting. It should help keep peace in the household that way.
Wayne
Posted

Inactive Member
I've used Magic Water. It's very good. Dave Williams (any relation?), is very helpful - even if you're on the other side of the planet. Also there is a booklet in the pack which describes, inter alia, how to make a waterfall.
My mistake was using real sand up to the edge and into the pond. The Magic Water wicked up into it a ways.
Easy fixed with matt spray, but a bit worrying as I wasn't sure how far it would go up the bank until it had set up.
Can't wait for more photos. :cool:
Max
Port Elderley
Port Elderley
Posted
Full Member
No Dave Williams is not related. I have had discussions with him, seems like a very nice fellow.
You must have me confused with someone else on the cable car, though it's not a bad idea.:hmm
Do you remember how long it took for the magic water to set up enough so that it would not run around? I know it says you can do multiple pours and that is what I am counting on. I am thinking on pouring small sections and leveling them as I go along. Pour just enough so it doesn't run everywhere, let it set up and re-level for the next pour. Am I way out in left field on this or with your experience is it possible?
Wayne
Posted
Inactive Member
I think it took a while to set up so it wouldn't run - an hour? I'm sorry I'm not being much help. :oops:
It'd be safer to call Dave, I think.
Max
Port Elderley
Port Elderley
Posted
Legacy Member
reg
Posted
Full Member
Wayne.

Posted

Full Member
I look forward to see how you develop this though.
Bob
Posted
Full Member
Maybe even a short stretch of cutting Here?
Bob
The area over by the clock is going to be my "Big" city, but I could still put some mountains in the back scene behind the city. I have about three feet between the mountain and the wall that holds the clock. That will definitely have a mountain in the back scene.
I see what you are saying about the mountain ending abruptly at the tunnel mouth. I have have that thought also,not sure what I can do there, but will take another look. In the valley below the tunnel mouth is the river, I was planning on putting in a rock wall along the river. sort of like a miniature Grand Canyon.
I didn't follow your last comment (quoted above), so could you explain it?
Wayne
 Last edit: by Wayne Williams
Posted
Full Member
The flat surface in front of the new slope is a road that will enter a bridge that goes across the river, I am looking forward to building the bridge, as it will have lots of arches.
In the second photo, it's hard to see here, I built up the road surface that enters the road tunnel. Tomorrow may be a bit too early to try and fill in the gaps of the joints I just created today, but I would like to get that done.
Wayne


Posted
Full Member
'Petermac
Posted
Full Member
Is it still growing Wayne …….??? :shock::shock::shock::shock:
I think there must be some kind of sub-terrain lava flow, I will have to get up early in the morning and see if it's still HOT!
Wayne
PS: I have come up with the name of the mountain. More to come!
Posted
Full Member
Posted
Full Member
 hmm:hmm
'Petermac
1 guest and 0 members have just viewed this.