Scalescene Warehouse.....somewhat modified for Granby
Posted

Full Member
:doublethumb:doublethumb:doublethumb:doublethumb:doublethumb:doublethumb:doublethumb:doublethumb:doublethumb

Posted

Full Member
Posted

Full Member
I have been quiet for a couple of weeks while I built the components of the second warehouse which will run at right angles to the first.
The principles are the same, even though this one is three dimensional, so I saw little point in boring you with the details.
In truth this build, because it was repetition, was a tad tedious……and in consequence I got a little careless and some of the corners are less crisp than on the first edition. I was also guilty of what I now call the Woody Syndrome……….glass of red wine (or two) and I will just finish cutting out those columns……..I am lucky I still have all my fingers intact !
Anyway here are the components of phase 2

This does serve to illustrate the flexibilty of the kit
The larger, left hand module is designed for 4 rail sidings……..to fit in with the track plan I have had to do some cutting and shutting, inserting a couple of slightly wider columns.
The second wider module has three loading bays for lorries…..the kit has some neat add ons for this
And then there are two side columns
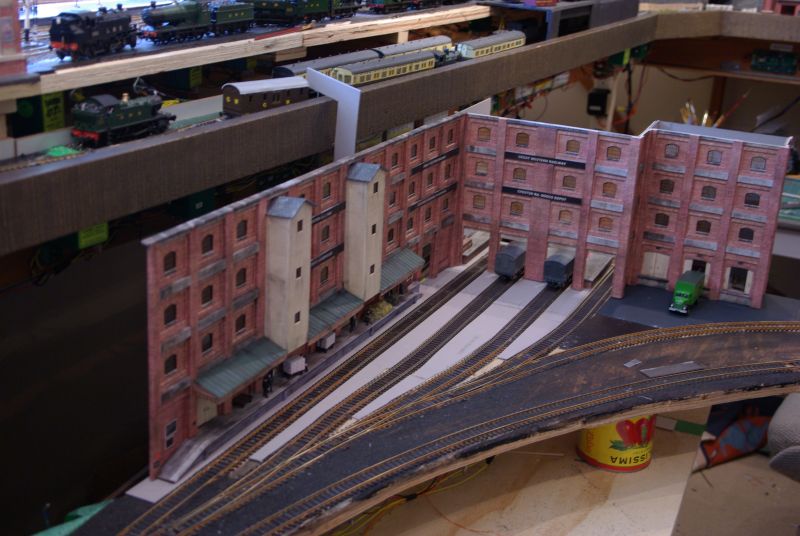
Here it is roughly put together:

And finally……weathered and detailed:

Thanks to Nick's autotrain thread I even got the door handles lined up this time.
The ultra observant will note that the Warehouse was originally the property of the Granby & Chester Railway Company (taken over by the GWR in 1871…….a detail rarely (if ever) recorded in the history of the GWR)
The warehouse has now moved from the kitchen to the Railway Room and put in its designated position on the module (which will eventually be inserted into the actual layout above)

This shot gives a better indication of the rail road connection.
I still have to insert a strengthening floor and a roof but I cant do that till I have finished the internal detailing…..you can see I have loading platforms for each of the roads……but before I do that I have to finish the track inlays.
The sub layer for the yard is already laid……..but I am kind of paranoid about where I am going with this but I think my uncertainties are best left to my Granby thread…..after all this post is about a somewhat modified Scalescene Warehouse.
Finally, and I am afraid this isn't a great shot, here are the two modules roughly in place.

Lots to do but hopefully, it already creates, to some degree, that crowded, almost overbearing, Victorian look that I am searching for.
 Last edit: by John Dew
Posted

Inactive Member
Max
Port Elderley
Port Elderley
Posted
Full Member
How does the traffic get to the external loading bays?
Posted
Full Member
Posted

Full Member
I do have one question though, what are you going to do for the background in the loading bays? At least in your pictures it is very easy to see through the openings.
Wayne
Posted

Full Member
A superb and imposing structure John well worthy of Granby :thumbs
It certainly looks impressive in that corner. So often, corners become areas for "afterthought" infills but here, it has become a masterpiece in itself with real purpose. I wish I'd thought of doing something like that (but then I'm not totally against plagiarism when my layout gets to that stage …………….. ;-);-):oops:)
These huge warehouses were a common feature of the railway world. They were magnificent buildings, as were many of the canal-side warehouses and mills, and it's such a pity so many of them have disappeared. Victorian development at it's very best. :pathead
'Petermac
Posted

Full Member
Last edit: by Bob K
Posted

Full Member
I'd not looked at this kit with any real interest before, but it's a great idea, with lots of potential.
I really like the old company sign as well, those sorts of details really lift the model up another level.
Stu
Stubby47's Bespoke Model Buildings
All photos I post are ©Stu Hilton, but are free for use by anyone.
Posted
Full Member
[user=22]Wayne Williams[/user] wrote:
I do have one question though, what are you going to do for the background in the loading bays? At least in your pictures it is very easy to see through the openings.
Wayne
Good question Wayne…….there is only a strengthening floor and backing on the road bays……nothing on the rail section until I sort out the paving and no roof on either…….once they are installed and the module is in place on the layout (right now it is on a bench in the middle of the room) there will be no reflection……..in fact I suppose I should actually think about lighting:shock:
ddolfelin wrote:
How does the traffic get to the external loading bays?
Geoff R wrote:
Another good question……………….which I have not yet completely resolved. There is indeed space to the right…… I just have to work out the most effective way of doing itI am glad DD asked the road traffic question because I didn't want to! I am eager to hear your answer though as I have often created a similar situation for myself. All my attention goes into the railway, and I all too often find myself squeezing in the necessary road access. I am sure there is room for you to do the same at the right hand end - maybe a wall between said roadway and the adjacent track?
I will go into more detail when I post on Granby but for now……..I originally planned quite a formal entrance leading the eye through to the backscene with a weigh bridge and office building but I didnt want to compromise on the track plan and I thought the 3 bay extension would look better (and be easier to accomplish!.
The yard is going to be paved with setts (scalescene…….) to my mind an absolute essential for this scene……..I have not been too satisfied with my previous efforts but I have done some experimenting using Code 75 as a check rail and I think I can pull it off on the straight sections……I will stop short at the points. Less certain about check rails in the curved section……
……originally I was going to take the setts only to the left hand edge of the curved siding and in fact the underlay is already in place (I used black rather than grey card here) which would be ballasted with a sleeper crossing giving road access to the area between the siding and the head shunt but I now think the siding is too close to the loading bays to be realistically left ballasted……..it needs to be inlaid to widen the road access :twisted:
My current thinking is to learn my trade on the straight sections and then if successful attempt to inlay the curved section…….I do need to link into the very flat backscene……..so I am thinking of leading the siding behind a large factory chimney etc in order to suggest some depth and to conceal the yard street entrance. If the worst comes to the worst I will shorten the siding
Long rambling answer I am afraid but as you can see I have been asking myself the same question all too often:roll:
Edited because post crossed with Bob and Stu
Novice wrote:
Thanks Bob……glad you like it…..I have had this kit for a while but I didnt have a very good printer (my new laser printer is brilliant)and I was uncertain about my skill level……they are surprisingly easy and relaxing to build and I have to say far more satisfying and adaptable than the Metcalfe KitsI have just read this project from start to finish and very impressive it is too. It is amazing how these card kits have come on in recent years and your take on it John, as a low relief corner backscene is superb.
Stubby47 wrote:
Thank Stu……..I am glad you like the the sign…..just a bit of whimsy on my part but I may carry it through to the station building.That last photo really does give the impression of a large, imposing warehouse towering over the insignifcant railways trucks - superb !
I'd not looked at this kit with any real interest before, but it's a great idea, with lots of potential.
I really like the old company sign as well, those sorts of details really lift the model up another level.
Stu
As I have said before the kits are very very flexible…….I am planning to use just one layer using different brick as a flat backscene elsewhere on the layout
Last edit: by John Dew
Posted
Full Member
This is perfect inspiration to build the warehouse I found near derby station.
StackPath
A question for you. How did you do the white sticky out bits like in my image was that scratch built or did you cut it from another kit?
Thanks Colin
Posted
Full Member
I had forgotten I had a separate thread for the Warehouse!
The "sticky out" bits are sack or grain hoists……………I made them from card and Scalescene paper………..Post#24 this thread.
I got the idea from a photo in Bob Essery's Freight Operations of the Midland Grain Warehouse in Leicester and you are right it is very similar to the Derby Warehouse photo you published
Kind Regards
Last edit: by John Dew
Posted
Full Member
Terry
Posted

Full Member
Just read through this for the first time. The warehouse is really great hope your hands have recovered from all that cutting.
regards
stephen
Acording to a recent visit to a supermarket at check out time, I an not loosing my memory it has been downgraded which means i am not stupid afterall - Sorted! - What a relief
Posted
Full Member
Thank you both for your kind remarks……it all seems a while ago now but it was fun to build. In fact I hope to build another one later this year.
Regards from a damp Vancouver
Posted
Guest user
Fantastic work. Excellent building, very imposing. As you say with the repetitive nature of the build it would have been easy to get a bit reckless but this does not show through in any way at all. It looks very crisp and straight throughout. I like the weathering and the signage, it just finishes it off.
Cheers
Toto
Posted

Site staff
Regards
Alan
Born beside the mighty GWR.
Alan
Born beside the mighty GWR.
Posted
Full Member
[user=1033]Spurno[/user] wrote:
Excellent modelling John.Very inspirational.I particularly like the tin of tomatoes holding up the track.:thumbs
Thanks Alan………Canned Italian Tomatoes one of the modellers most useful aids

Posted
Guest user
I've just read through your thread from the start again as Iintend to give this one a go myself. I bought the kit today and although I can't open it to look at in on my IPad, I will have a look at it when I get home this weekend.
I've a sneaking suspicion that I need ink cartridges as well so I'll need to phone SWMBO to get the printer type and get some ordered up.
I have lots of wall space which needs to be filled on the R & GLR and this kit would certainly look at home on part of it. I'll be following your hints and tips.
Cheers
toto
1 guest and 0 members have just viewed this.