Members Monthly Project - March
Posted
#116170
(In Topic #6047)

Legacy Member
March project questions and comments here please.
This is the place for your comments and questions for Perry's scratchbuilding project.
Posted

Full Member
Re the first lesson on scratchbuilding - basics they maybe, but they are the right basics ! Am now off to purchase a small try square !
Stu
Stubby47's Bespoke Model Buildings
All photos I post are ©Stu Hilton, but are free for use by anyone.
Posted
Legacy Member
Posted
Legacy Member
Posted

Full Member
:doublethumb:cheers
Perry
Due to cutbacks, the light at the end of the tunnel has been switched off.
Posted
Full Member
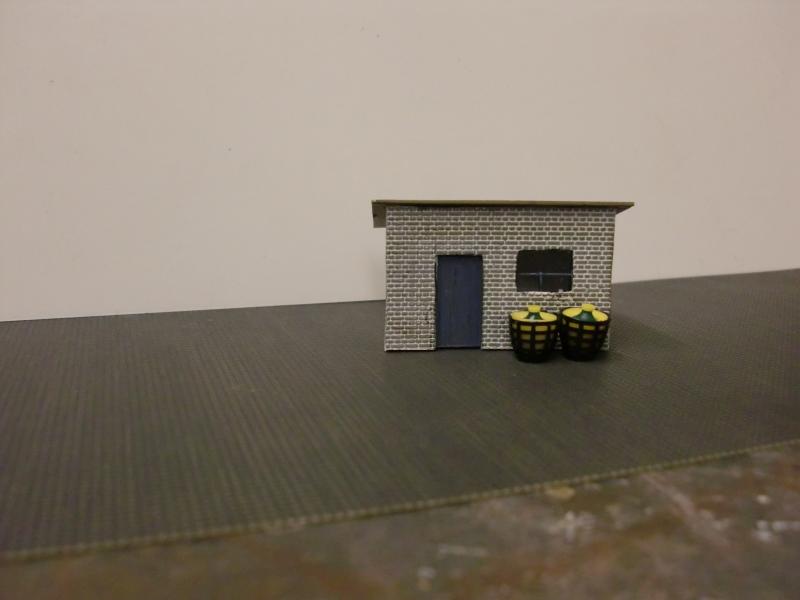
I accept that the plasticard is not very thick, but this discrepancy will be apparent.
Stu
Stubby47's Bespoke Model Buildings
All photos I post are ©Stu Hilton, but are free for use by anyone.
Posted
Full Member
I made an error in the write-up. :oops:
The end walls fit OUTSIDE the front and rear walls. The photo of the dry-assembly is correct, but my description was in error. Sorry.
Thanks for picking it up. I was just testing to see if you were paying attention really. :roll:

I have amended the original thread.
Perry
 Last edit: by Perry
Due to cutbacks, the light at the end of the tunnel has been switched off.
Posted
Full Member
Stubby47's Bespoke Model Buildings
All photos I post are ©Stu Hilton, but are free for use by anyone.
Posted
Full Member
"Depending on the sort of plastikard you are using, one face might be much shinier than the other. If that is the case, the shiny side goes inwards. In other words, the less shiny side of the material is what you’ll be painting on later so that needs to be to the outside. "
Oops ! One of the two side walls will have to be 'inside-out' as they have been cut as a matched pair and need to be an opposing pair.
(The smart-a**e at the back).
Stubby47's Bespoke Model Buildings
All photos I post are ©Stu Hilton, but are free for use by anyone.
Posted
Full Member
It's not really a problem though, Stu. You can always lightly sand the shiny face with very fine grade sandpaper just to take the gloss off. You can paint it as it is, but the paint doesn't always stick to it very well. Sanding it will give the paint a 'key'.
Perry
Due to cutbacks, the light at the end of the tunnel has been switched off.
Posted
Full Member
However, my point has raised yet another reason why you definitely know what you're talking about !
Stubby47's Bespoke Model Buildings
All photos I post are ©Stu Hilton, but are free for use by anyone.
Posted
Full Member
By the way, this isn't going to be a painting tutorial…. You can slap what you like on it when we're done.
:pedalPerry
Last edit: by Perry
Due to cutbacks, the light at the end of the tunnel has been switched off.
Posted
Legacy Member
Posted
Full Member
An old master?!!!! :shock:They don't call him a master for nothing Stu.
Oh, I see……I thought they were calling me a miserable old bars****! In which case they're probably right.
 mutley
From a lot of the stuff on here these days, e.g Wayne's fabulous scratchbuild, I feel I'm in danger of falling behind. :shock: :thud
I do feel that writing this Monthly Project has brought it home to me how much many of the people on here really know about modelling, and how little of that knowledge we actually impart to others on a day-to-day basis. It's unintentional, of course, but it's very easy to say, "I just did so-and-so the usual way", assuming that everyone else knows what 'the usual way' is. I have surprised myself at the number of little things I do as a matter of course, without even thinking about them, taking it for granted that, for example, everyone knows how to measure and mark out properly.
For that reason alone, I think that detailed Monthly Projects are going to become a very valuable resource for everyone.
Perry
Due to cutbacks, the light at the end of the tunnel has been switched off.
Posted

Full Member
Now one question i have is how do you work out what the best materils to scratchbuild with, bit like when we decide the cork tiles we need
, sorry could not resist. Ok i am off :pedalPhill
Posted
Full Member
IF that's a serious question, Phill, (and I have my doubts,Perry just caught this thread and very helpfull it is as well, i mean even the tip on putting the ruler in front of you and then you can se the point, i never really thought of that :thud. I shall follow this when i build one for my module in the next week.
Now one question i have is how do you work out what the best materils to scratchbuild with, bit like when we decide the cork tiles we need
Phill
), I tend to make 0.040" (1mm) plain plastikard by 'base-line' material. When you think about it, that means it's a scale 3" thick. By the time a layer of, perhaps 0.020" brick embossed plastikard is added, or perhaps a few bits and pieces of microstrip, you're getting up to something like the scale thickness of an 'average' wall - if there is such thing as an average wall!The reason I start with 0.040" material is that it is rigid enough to form base layers or main structures, but thin enough to be easy to work with.
I think you would find 0.020" (0.5mm) too thin to be able to support itself without a lot of bracing., whereas 0.080" (2mm) would be very hard to work with if it came to cutting out windows, etc.
One other thing I like about 1mm plastikard is that when it is cut by scoring with a knife and then snapping off, you actually don't lose any material. If you were to cut 2mm thick stuff, you would probably need a saw and would then have to allow for the thickness of the kerf (saw cut) in your marking out. Not easy in small scales.
Perry
Due to cutbacks, the light at the end of the tunnel has been switched off.
Posted
Full Member
I have never really looked for plaster card, where is the best place to get it, will the model shop have it. Only asking as i have never seen at the one i go too, The Engine Shed its called.
Phill
Posted
Full Member
James
Posted
Full Member
The material I prefer (and it is only my personal preference) is marketed by Evergreen Scale Models as 'Sheet Styrene'. Your local model shop should have that or something very similar.
It comes in packets of various thicknesses. Microstrip - sheet pre-cut into thin strips, is also available in many sizes, as is rod, tube and various embossed finishes.
You will also need a bottle of solvent to glue it together with. This is usually applied with a small brush. It's also handy to have a tube of polystyrene cement (kit glue) to hand. I find that very useful, depending on the job in hand.
Perry
Due to cutbacks, the light at the end of the tunnel has been switched off.
Posted
Full Member
James
1 guest and 0 members have just viewed this.