December Monthly Project with Jim
Posted
Full Member
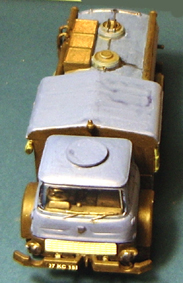
more progress to show you. the back and headlights have been painted. The roof lights are from Herpa and you will see that the right sized wheels have turned up!

Need to sort out the windows, weather it and add door mirrors and we can start to think about calling this one done.
Cheers
Jim
Jim Smith-Wright
Rule 1 - Model what you really see and not what you think you know!
www.p4newstreet.com
Rule 1 - Model what you really see and not what you think you know!
www.p4newstreet.com

Posted

Full Member
Jim,
As usual,some superb modelling with some lovely observed detailing.When you've finished,it would be great to end with a "before and after"photo.
:hmm
Cheers,John.B.:thumbs
As usual,some superb modelling with some lovely observed detailing.When you've finished,it would be great to end with a "before and after"photo.
:hmm
Cheers,John.B.:thumbs
Posted

Full Member
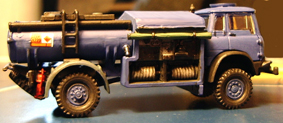
I've tried to convert a military bowser into a civilian oil tanker and this would be valid from 1950 to late 1980s on a OO layout of that period as such things were bought as surplus after WWII.
Some painting and finishing still to do but the pics. give an idea.

Posted

Full Member
Is the number plate so lettered to reflect the season ?
Also, did trucks in 1986/7 have side mounted reflectors ?
Stu
Stubby47's Bespoke Model Buildings
All photos I post are ©Stu Hilton, but are free for use by anyone.
Posted
Full Member
Stu, some seem to have them and some not. Same with the guard rails. I think my layout seems to be in the cross-over period. No sign of Tri-axle trailers yet either.
HTH
Jim
PS - not twigged the licence plate TBH!
 Last edit: by jim s-w
Jim Smith-Wright
Rule 1 - Model what you really see and not what you think you know!
www.p4newstreet.com
Rule 1 - Model what you really see and not what you think you know!
www.p4newstreet.com
Posted
Full Member
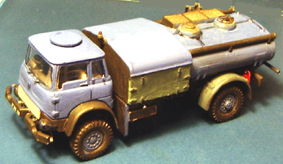
first stage of the weathering. All of it is done using washes and neat humbrol colours worked in while the washes are wet.
Starting with the wheels - the tyres are dark grey (humbrol 67) and the hubs leather. The cab has just had a wash of darkish grey while the bed has a wash of dark grey, leather worked loosely onto the surface and the humbrol 67 blended in where the wheels of the vehicles that are loaded onto it will tend to be.

More to follow
Jim
Jim Smith-Wright
Rule 1 - Model what you really see and not what you think you know!
www.p4newstreet.com
Rule 1 - Model what you really see and not what you think you know!
www.p4newstreet.com
Posted

Full Member
That looks suspiciously like a Bedford TK DD - they didn't come into production until 1959 so ex WW2 is a no-no.Not precisely what Jim is kindly showing us but I thought members might be interested in this little adapted JB kit.
I've tried to convert a military bowser into a civilian oil tanker and this would be valid from 1950 to late 1980s on a OO layout of that period as such things were bought as surplus after WWII.
Some painting and finishing still to do but the pics. give an idea.
Still, lovely conversion. :thumbs
'Petermac
Posted
Full Member
'Petermac
Posted
Full Member
Quite right, thanks.
I meant to say that there was the possibility of them being surplus items in that period - i.e. after WWII - and I'm totally wrong.
It's a Bedford MK four tonner and was introduced in the 1970s to replace the RL series.
Serve me right for trying to be clever.
Posted
Full Member
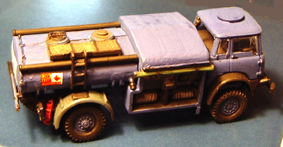
on the final approach with this one now. Should be done by the end of the week!
Right then - after the last picture everything was sprayed with matt varnish (shiny road vehicles just dont look right IMHO)

this picture shows the awkward shaped window glazed using Mircoscale Kristal Klear. A white PVA like glue that dries clear. Its not fully dry in the piccie.
Also in this picture a subtle trick that makes a big difference to how road vehicles sit. First the wheels are glued up solid. When set the lorry is rubbed on a sheet of sandpaper to flatten the bottom of the tyres. This gives the vehicle an impression that its heavy.

final touches on the back. Again sprayed with a matt varnish then Humbrol Metalcote Gunmetal is dry brushed where car wheels will go to give a bit of polish to the surface, Its reasonable to assume that the vehicles loaded on the back of the truck might be leaking various fluids (hence the reason they are on a truck!) so some Klear (the floor polish this time was dabbed on with a cocktail stick to represent shiny things like oil.
Cheers
Jim
Last edit: by jim s-w
Jim Smith-Wright
Rule 1 - Model what you really see and not what you think you know!
www.p4newstreet.com
Rule 1 - Model what you really see and not what you think you know!
www.p4newstreet.com
Posted
Guest user
As I've said in the past, your work gives me a whole new interest in road vehicles.
Mike
Posted
Guest user
Posted
Full Member
No Spray before doing the windows. If you want to respray something already with the windows in then Maskol is probably best.
HTH
Jim
Jim Smith-Wright
Rule 1 - Model what you really see and not what you think you know!
www.p4newstreet.com
Rule 1 - Model what you really see and not what you think you know!
www.p4newstreet.com
Posted
Full Member
Well, we can finally call this one done - Heres a couple of piccies


From the last post I have added a driver and the new windows (cut from the acetate the base toys lorry came) in and secured in place with Klear floor polish. A couple of dots from a cut of cocktail stick give the tax disk and operators disk. Finally the mirrors are my own etches.

Theres a huge scope for variation. The backs are obvious but Cargos come with different wheel sizes, the treatment of the area under the windscreen can vary as can the painting of the bumbers. Finally note the different locations of the registration plates. All based on photos of real vehicles.

Finally before and after. I hope you all have enjoyed the thread, perhaps picked up an idea or two and even have been tempted to have a go. The cost of a project like this is very small but you can end up with something as individual to yourself as your most expensive loco! Thanks to all who have read or commented on the thread.
If you have been tempted to have a go, please post pics of your efforts here for everyone to share.
Cheers
Jim
Last edit: by jim s-w
Jim Smith-Wright
Rule 1 - Model what you really see and not what you think you know!
www.p4newstreet.com
Rule 1 - Model what you really see and not what you think you know!
www.p4newstreet.com
Posted
Guest user
Mike
Posted

Full Member
Posted
Full Member
In a thread like this, it's easy to lose track of what's actually taken place - you tend to study the detail on each post. The "before and after" shot is a timely reminder of just how much has altered and what a huge improvement it is.
Thanks Jim - it's been something we can all learn from and as you say, it's not going to need any mortgages to have a go.
'Petermac
Posted
Guest user
Its an area of the hobby that gets neglected at exhibitions you see some lovely layouts but things like cars lorrys etc are just straight out the box and plonked on the layout and they do look to toy like
Brian
1 guest and 0 members have just viewed this.