Magic Water is indeed magic
Posted

Full Member
You could cut the wheel at water level, Doug.
Good thought, dd, I'm concerned about cutting through several different thicknesses etc without wrecking it…..I would definitely not be euphoric then!
HHm….more thinking needed.
Doug
 Last edit: by Chubber
'You may share the labours of the great, but you will not share the spoil…' Aesop's Fables
"Beer is proof that God loves us and wants us to be happy" - Benjamin Franklin
In the land of the slap-dash and implausible, mediocrity is king
"Beer is proof that God loves us and wants us to be happy" - Benjamin Franklin
In the land of the slap-dash and implausible, mediocrity is king

Posted

Full Member
Pour the Magic Brew first and then hack away to the correct level.
Posted
Guest user
It does exactly what it says on the packet as long as you do exactly what it says on the packet as well. Mix in the exact proportions and stir slowly while someone makes you a cuppa. At least 5 minutes and 10 for larger quantities.
I have made mine up a bit at a time using 6 cups (2+4) of product mixed with 6 drops of Woodland Scenics Earth Undercoat to avoid creating a clear ribbon of water.
Note this water-based paint will not mix perfectly - it breaks down into tiny particles suspended in the product. The benefit of that is the effect I am beginning to see in the river of clear water with tiny mud particles and a few larger brown "bits". I reckon it looks like a muddy river flowing slowly to the sea which is exactly what I was after.
BUT having to work outside places limitations on the quality of the finished work. It has been very hard to get the module exactly level despite careful use of spirit level and "risers" (scraps of offcut wood) to level it up. The tiniest fraction off dead level will cause the product to flow towards the low point slowly but surely.
Despite using plastic drop-sheets as a cover to protect the work from dust and insects while curing the first couple of pours have ended up with annoying imperfections. I have poured what should be the final layer this morning and tied the drop-sheet around the base of the trolley upon which the whole thing has sat during construction. I am hoping this might keep out all but the most determined little critters as well as airborne dust. A few stray fibres of field grass have also been found "floating".
Curing time is not the 24 hours suggested; more like 48 - 72 and that's in a fairly warm 29C today. But again it could have been slowed by cooler overnight temperatures.
But on the whole I like the product and find it is easy to use and effective in the end result.
Just remember to read the directions carefully and do as they say. Including wearing gloves and washing your hands very thoroughly afterwards.
Posted
Guest user
Posted
Guest user
Posted

Full Member
It does exactly what it says on the packet as long as you do exactly what it says on the packet as well. Mix in the exact proportions and stir slowly while someone makes you a cuppa. At least 5 minutes and 10 for larger quantities.
I prefer my Magic Water "shaken not stirred" 006 ;-)
I actually shook the 2:1 mix quite vigorously for the recommended 5 minutes. This created a load of little air bubbles which initially concerned me but they virtually all disappear after pouring……the very few that remain are eliminated by breathing softly
When I did my test pour I was somewhat tentative in regard to mixing and it took forever……certainly over 72 hours to cure.
Curing time is not the 24 hours suggested; more like 48 - 72 and that's in a fairly warm 29C today. But again it could have been slowed by cooler overnight temperatures.
The vigourous route brings the cure time down to about 48……….but I am still very cautious having left a crystal clear finger print……fortunately on the test strip.
BUT having to work outside places limitations on the quality of the finished work. It has been very hard to get the module exactly level despite careful use of spirit level and "risers" (scraps of offcut wood) to level it up. The tiniest fraction off dead level will cause the product to flow towards the low point slowly but surely.
I had the same problem Rick……in my case exacerbated by leaks (which you dont appear to have had….well done that man!)
There is no doubt Magic Water will find its own level……..as a result you tend to use more…….and you run the risk of Magic Water demonstrating your courses are not absolutely horizontal
Having said all that I agree with you Rick it is a very good product
Regards
Posted
Guest user
The mud flats have too many little imperfections for my liking. That is a mix of tiny particles of plaster sitting proud above the surface (and which the shine of the Magic Water exacerbates) and the occasional inclusion of fine pieces of flock during the pouring.
My thoughts here are to remove all the little bumps and re-coat the mud with something like Dullcote to give a flatter look which is still "wet".
The front of the scene was taped with parcel tape and caulked with tiny pieces of papier maché where necessary but I didn't totally escape the dreaded leaks as can be seen. Though for a scene of that width I reckon I didn't do so badly!
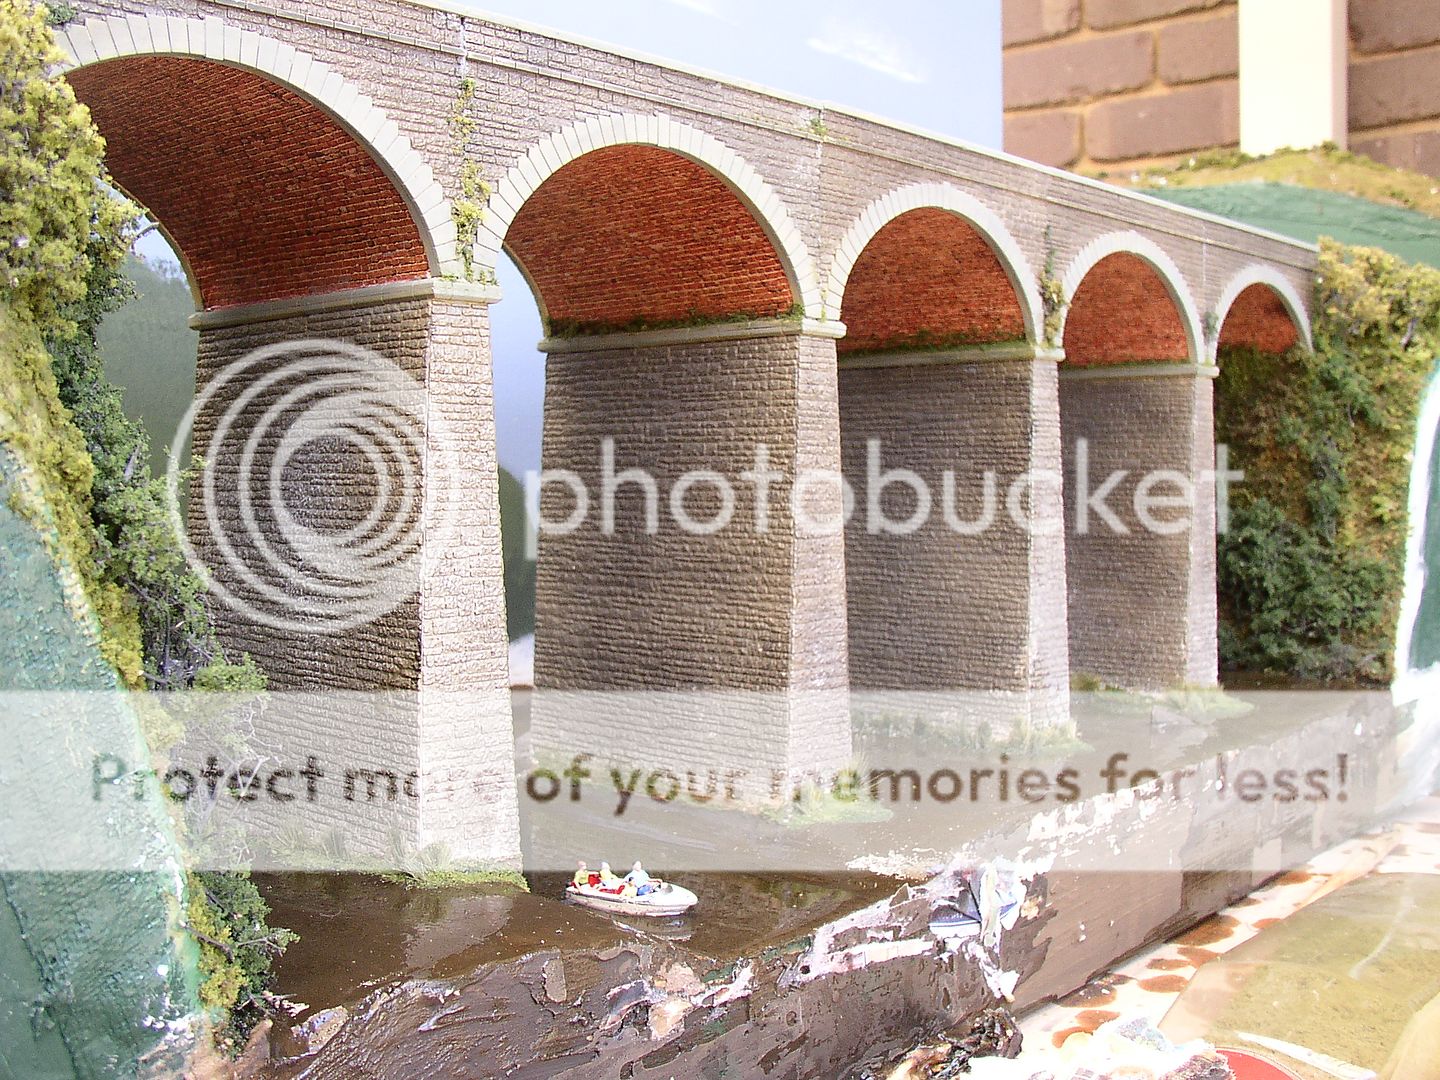
and in evil close-up which manages to capture the "tide line" between wet and dry slime on the viaduct pier as well.

Posted
Full Member
Posted
Legacy Member
reg
Posted
Guest user
It looks good (and thanks for the feedback as well) but I reckon I can get it to look superb.
Posted
Full Member
Like you I spent forever trying to get it dust free etc……now three weeks later the shiny surface is a perfect landing spot for every bit of dust in the railway room…..and unlike you at least I am in doors!
Regards
Posted
Full Member
Does the dust 'stick' ?
Is the surface hard enough to take proper cleaning?
Posted
Guest user
I also admire the stoicism of the little people. Their view must be quite alarming. The boat helps give a great sense of scale too.
Mike
Posted
Full Member
I think its like painting any other high gloss finish…….when you are actually pouring and while it is setting you want as near as is possible a dust free atmosphere………..I poured…..turned the heating on and shut the door and didnt go near the railway room for two days…………you can see from my photos at the start that there is no evidence of dust or surface particles that have stuck to the surface during the pouring/curing.Dust is something that I'm concerned about with this stuff.
Does the dust 'stick' ?
My sympathies are with Rick doing it out doors exposed to all the no doubt large antipodean insects………having said that I could see little evidence of dust on his photos.
When the surface is cured dust doesnt stick at all but, like any other highly polished surface, it does attract/show dust (and ballast and woodland scenics:twisted:) ………..I just blow it away or dust it lightly with a large artists brush
I think the answer must be yes……its rock hard and can allegedly be carved……the inventor does recommend a cleaning method, which momentarily escapes me:oops:) but it was nothing exoticIs the surface hard enough to take proper cleaning?
Kind Regards
Posted
Guest user
Did I mention I have a 3 metre long beach scene which also requires "watering" and that this was only the practice run?

That area will be caulked with Plasticine as it is a very long edge and is not dead level.
Posted
Full Member
No you did not :shock::shock::shock::shock:Did I mention I have a 3 metre long beach scene which also requires "watering" and that this was only the practice run?
I have a really good deal on mosquito netting before you pour
Posted
Guest user
Posted
Guest user
And then I will need you, Rick, over here
One day Sol, one day.
Posted
Full Member
I suppose at the back of my mind was those acrylic clear blocks we used to play with years ago - entombing various creatures. They never set completely hard (and generated quite a lot of heat while curing).
1 guest and 0 members have just viewed this.