Magic Water is indeed magic
Posted
#102912
(In Topic #5466)

Full Member
After much procrastination I have finally poured Magic Water and it is indeed Magic
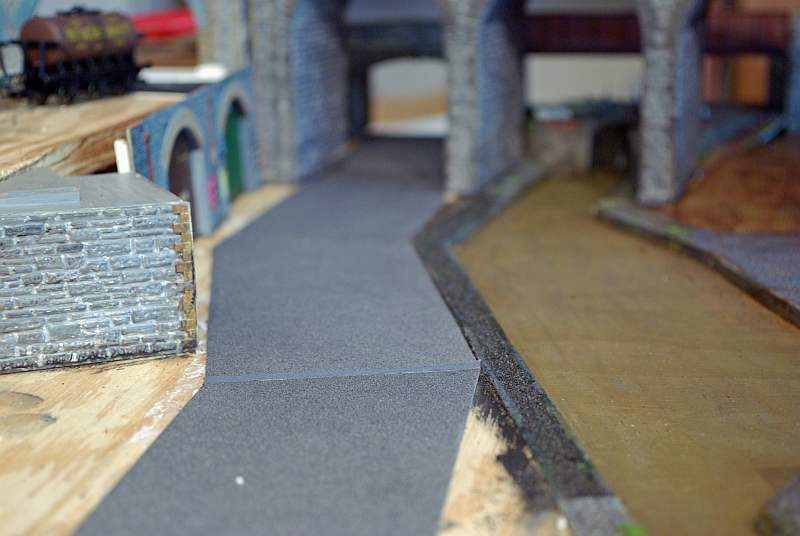
Before…………..just the canal base painted
After
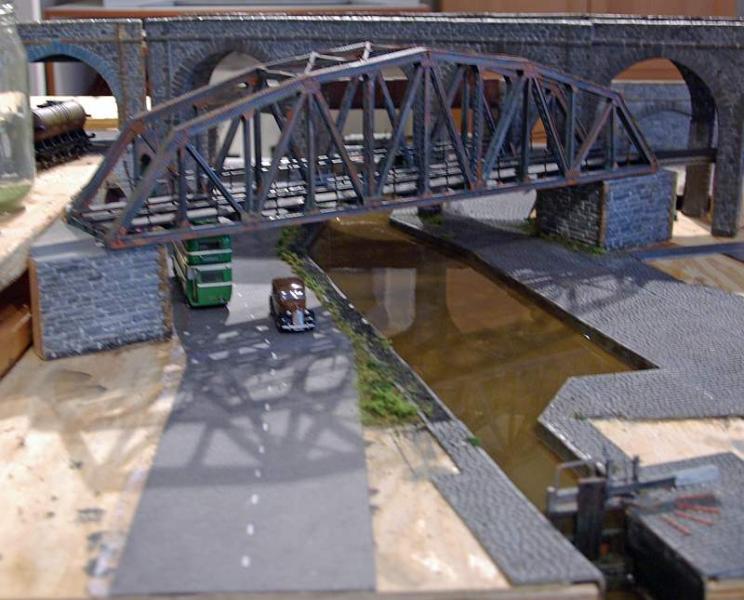
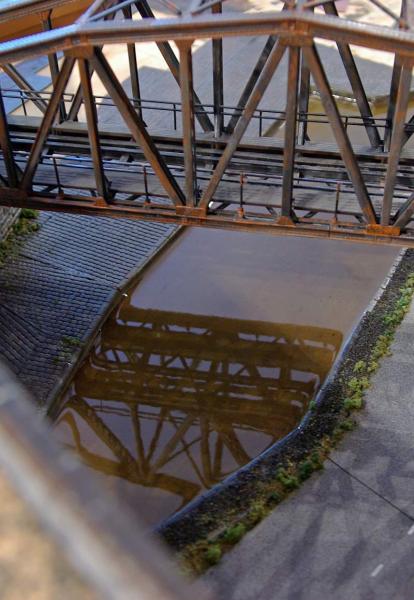
Now admittedly the bridge is in place, the road has markings/traffic and the tow path has vegetation…….but look at the water…….look at the reflection. (Dont look at the road join:twisted:)
I apologise if I appear to be verging on the euphoric but I will confess to being somewhat chuffed.
I got the idea of Magic Water from Waynes layout thread. A number of forum members recommended it including my RR&Co buddy (cobber?) Max.
The website is at http://www.unrealdetails.com/
For $25 I got two bottles and some very detailed instructions
You mix the the two bottles together in a 2:1 ratio and shake the container for 5 minutes and then pour……..up to 1/2" at a single pour although the normal amount is about 1/8" which I think is what I did.
Fortunately I had read the instructions and listened to Max
The key instruction……Magic Water will go anywhere water will go :shock:
Water finds its own level and so does Magic Water
Water will find any pin holes and so does Magic Water
I thought I had sealed all the joints but even so I took the inventors advice and painted a thin layer of the mix right over the canal base and let it dry 24 hours before pouring
Fortunately I covered the carpet (thank you Max:thumbs)
………..despite all the above there was a steady drip drip for the first 2-3 hours after pouring.:twisted:…….and yes the canal base has a 1/8" incline:oops:. I had kind of anticipated this and mixed enough to cover 1/4" so in the end all was well .
It pours very easily and requires no encouragement. Initially there are lots of tiny air bubbles but they just extinguish themselves……if any persist you just blow on them and the CO2 in your breath does the job.
Smooth cover…..no shrinkage…….it does climb up a bit at the edges…..there is a scientific term which escapes me…….but it is not that noticeable
They say allow 24 hours to dry but I allowed 48 to be on the safe side
The usual disclaimer but I have to say…….it really is Magic

Posted
Guest user
I love having water on the layout - couldn't have a layout without it, in fact.
:thumbs :thumbs
Mike
Posted

Inactive Member
Max
Port Elderley
Port Elderley
Posted
Guest user
Now then - there's a bottle of that stuff on the workbench somewhere and I have a beach scene …..
 hmm:hmm
Posted
Full Member
[user=316]Gwiwer[/user] wrote:
Looks superb, John, well done. Magic if you like! I do like the reflections as well. Can this product be used with a hint of colour added as well or will it only work if the paint is down first?
Now then - there's a bottle of that stuff on the workbench somewhere and I have a beach scene …..
Hopefully 2 bottles……..otherwise it will be very solid……I did my trials in a spice jar and hoped I could use the residue……I couldnt and SWMBO was not impressed
According to the instructions: "you can tint/colour with any solvent based product….Testors, Modelmaster, Floquil or other oil based enamels. Indelible ink will work. Water based colouring doesnt work as well. Do a small test. It doesnt take much to colour Magic Water"
Hope this helps
Regards
Posted
Legacy Member
Magic Water on a Magical section of the layout - it looks great and really brings the whole thing to life. :thumbs
Very well done - no wonder you are pleased. However in another way my pleasure is tinged with a little sadness as the water pouring is the start of the completion process for this project section and I am going to miss it when its done :roll:

Richard. A sorely missed member who lost a brave battle in 2012.
Posted

Full Member
You sound sufficiently "fired up" with the product for me to think about using it on my dirty old river. Is it really as easy as you say ?
The only thing that does worry me a little is the desire it has to get out of the cut - the "climbing up" effect. I seem to remember both Mike and Marty poking around endlessly with cocktail sticks on their waters (:roll:) - I have other uses for cocktail sticks !!!!
It certainly seems like a product to take a serious look at.
'Petermac
Posted
Full Member
Posted

Full Member
You must be thrilled with that.
Posted

Full Member

Phill
Posted
Guest user
That is really good-looking water. The reflective nature of the product is excellent. In respect of "the road-joins" why not instal cobble-stones at the joins that could represent water run-off points. Just a thought that might work. Love the Lay-out,
Kind Regards,
Michael Thornberry.
Posted
Guest user
Cheers
Dave
Posted
Full Member
[user=6]Petermac[/user] wrote:
The only thing that does worry me a little is the desire it has to get out of the cut - the "climbing up" effect. I seem to remember both Mike and Marty poking around endlessly with cocktail sticks on their waters (:roll:) - I have other uses for cocktail sticks !!!!
It certainly seems like a product to take a serious look at.
I didnt have to do any poking at all.
The instruction says Magic Water has a very insignificant miniscus effect (the word I couldnt remember) but it will "wick" or capillary into porous materials like ballast etc so you are advised to do the water first and the scenic effects after……….I couldnt do that with the canal
I sealed the base and the revetment joint with a light coat brushed on to prevent this……If I were to do it again I would maybe take the coat a little higher but we are only talking about 1/16" or so…………..I cant really show it on the photos……I just know its there:sad:
Its certainly worth a look at
[user=373]Wheeltapper[/user] wrote:
Thanks Richard…….still lots to do I am going to be bugging you for a while yet………..but now I can bed the bridges in…..lay track and even run a train!!!Very well done - no wonder you are pleased. However in another way my pleasure is tinged with a little sadness as the water pouring is the start of the completion process for this project section and I am going to miss it when its done :roll:
[user=422]Geoff R[/user] wrote:
By the way, I did look at the join in the roadway, and it looks just like the joins we have in several of the roads around here. They have a black tar seam right across the road every 100yds or so to help with expansion apparently.
Thank you Geoff:thumbs Now I can stop worrying about it…..maybe emphasise it a bit…………there are 3 or 4 of them on that street.
I am using Metcalfe Sheets and I did cover one of the joins with a scalescen tarmac "patch". I feel better now…..the problem has gone away
Posted
Legacy Member
I mean look ar Ernie Wise. :pedal
reg
Posted
Full Member
I would think John when there is a bit more added Vehicles people a few weeds or something ,the join will hardly notice .
I mean look ar Ernie Wise. :pedal
Posted

Full Member
Regards
Pete.
ECOS2 with RR&Co Traincontroller and a load of other electronics so i can sit back and watch the trains go by.
Pete.
ECOS2 with RR&Co Traincontroller and a load of other electronics so i can sit back and watch the trains go by.
Posted

Full Member
Or as Marty would say 'Bewdy'!
Doug
'You may share the labours of the great, but you will not share the spoil…' Aesop's Fables
"Beer is proof that God loves us and wants us to be happy" - Benjamin Franklin
In the land of the slap-dash and implausible, mediocrity is king
"Beer is proof that God loves us and wants us to be happy" - Benjamin Franklin
In the land of the slap-dash and implausible, mediocrity is king
Posted
Full Member
Good gloss John wish i had that for me boots when i did my drill instructors course at the Guards depot, top stuff, how does it take to go off?
I dont think you could wait that long…..48 hours! You will have to stick to the teaspoon and candle.
What unit were you in? I was in the Kings Regt for 3 years just before they amalgamated with the Manchesters which must have been many many years before your service
Posted
Full Member
Shouldn't you of added the bike and the pram before you added the water in the canal? Its definately not the Ship Canal i can't see the rainbow
Regards
Pete.
ECOS2 with RR&Co Traincontroller and a load of other electronics so i can sit back and watch the trains go by.
Pete.
ECOS2 with RR&Co Traincontroller and a load of other electronics so i can sit back and watch the trains go by.
Posted
Full Member
John a Kingo eh? they have now gone (again) i think they were amalgamated with someone the Lancs or the Cheshires?? i was in the Signals for far too many years (still miss it).
Shouldn't you of added the bike and the pram before you added the water in the canal? Its definately not the Ship Canal i can't see the rainbow
I think they are the 1st Bn Duke of Lancasters Regt now…………………drill in the Signals……….amazing.
Its supposed to be a sort of working canal……..but the bike, and I have one, would have been a good idea….darn…..maybe I can retro install something when I detail it
1 guest and 0 members have just viewed this.