DIY old factory/warehouse flatscene
Posted
Inactive Member
[Separated from DIY office thread]
Good thinking Stu - nice work.:thumbsLes
Devon Junction
Kernow Junction
Kernow Junction

Posted

Full Member

I can confirm that, even for a dumbo like me, these Scalescenes kits a super fun to make and result in a very presentable and enormously strong model irrespective of your skill level. Have a go, they're cheap as chips !!!!
If you expect to churn out the standard that both Doug and Perry are doing, well that will take a little more time………………:roll::roll:
'Petermac
Posted

Full Member
P.S. There is a cunning plan behind these…
 Last edit: by Stubby47
Stubby47's Bespoke Model Buildings
All photos I post are ©Stu Hilton, but are free for use by anyone.
Posted

Full Member
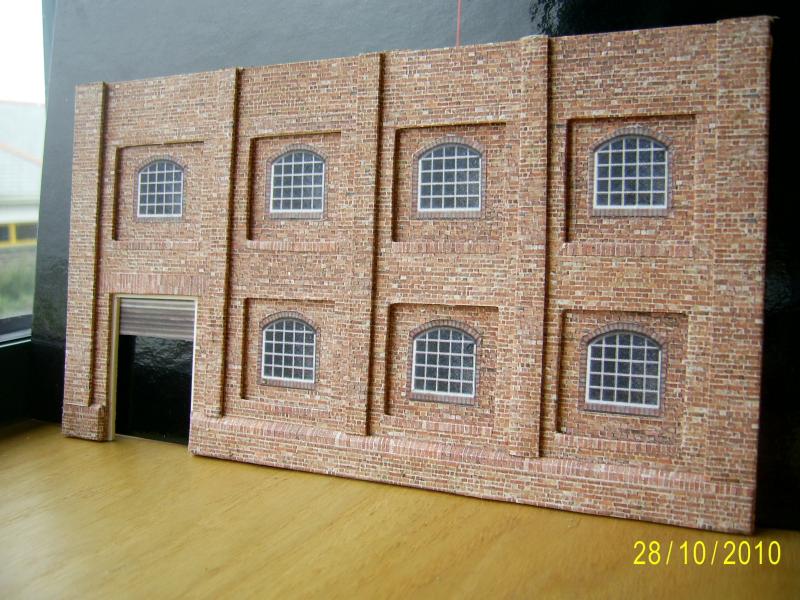
Maybe pass the back of a knife across where the pillars meet the brick base (although I know nothing about paper modelling!).
Perhaps the uprights on the recesses should be above the windows?
Just nit picking - it looks great.
Posted
Full Member
The pillars were added after the base - the gaps between the two will be hidden/disguised by drain pipes, signs or other such paraphernalia.
The uprights were added to hide the edge of the card main wall. As this doesn't show as much (if at all) under the recess top edge, I left it off there, but I see what you mean.
I also need to add some capping stones as this building is intended to have a flat roof.
Stubby47's Bespoke Model Buildings
All photos I post are ©Stu Hilton, but are free for use by anyone.
Posted
Full Member
I particularly like the frame detail around the roller door - is it wood ?
'Petermac
Posted
Full Member
If I did this style of building again I'd create a single piece frame for the base & buttresses, then add the uprights afterwards on the recesses only.
The door surround is simply a piece of 1.5mm card (my staple card thickness), left uncoloured, and cut to fit. The card used for the door is actually the cut out from the doorway.
Stu
Stubby47's Bespoke Model Buildings
All photos I post are ©Stu Hilton, but are free for use by anyone.
Posted
Full Member
Stubby47's Bespoke Model Buildings
All photos I post are ©Stu Hilton, but are free for use by anyone.
Posted

Full Member
Bring on the next card modeller, will YMR be the first plastic-free forum?
Tee-hee!
Doug
'You may share the labours of the great, but you will not share the spoil…' Aesop's Fables
"Beer is proof that God loves us and wants us to be happy" - Benjamin Franklin
In the land of the slap-dash and implausible, mediocrity is king
"Beer is proof that God loves us and wants us to be happy" - Benjamin Franklin
In the land of the slap-dash and implausible, mediocrity is king
Posted
Full Member
V3 will be better. (or V4, or V5…)
Stubby47's Bespoke Model Buildings
All photos I post are ©Stu Hilton, but are free for use by anyone.
Posted
Full Member
Only until the first burst pipe.
Posted
Guest user
P.S. There is a cunning plan behind these…
 hmm
hmmIt's to cover the floor on your box-file
Agree with the guys, but by adding a new butress to the bottom of each one will work :thumbs
Posted

Full Member
Phill
Posted

Full Member
Posted
Full Member
Phill, definitely have another go, it's only pence and some time.
John, don't look too close at mine, there are glaring errors all over it ( and no, I'n not going to ask if you can see them and point them out to me! ( but there are 6 excluding the ones previously discussed)).
Alan - no, they are not destined for a boxfile, although they are currently in a shoebox - they're very handy to keep part or fully built models in until installation on a layout.
Stubby47's Bespoke Model Buildings
All photos I post are ©Stu Hilton, but are free for use by anyone.
Posted
Guest user
( but there are 6 excluding the ones previously discussed)).
1 Butress
2 Should have been built to HO Scale :pedal:pedal
Posted
Full Member
Stubby47's Bespoke Model Buildings
All photos I post are ©Stu Hilton, but are free for use by anyone.
Posted
Guest user
Posted
Full Member
Oi, young Alan !!
Buttress is spelt with two 'T's !!
So it's only 6 !
And it's definitely NOT HO !
Stubby47's Bespoke Model Buildings
All photos I post are ©Stu Hilton, but are free for use by anyone.
Posted

Full Member
NEVER!!!! :It's a no no…………Bring on the next card modeller, will YMR be the first plastic-free forum?
Tee-hee!
Doug
Perry
Due to cutbacks, the light at the end of the tunnel has been switched off.
1 guest and 0 members have just viewed this.