Marty's N gauge trees
Posted

Full Member
'cause I need hundreds of them...
So… October rolls on to November and then, almost December.Maybe I've embarked on a quarterly project :roll:

A progress report is overdue, so here we go.
The forest of wire frame trees has grown slowly over the last 4 or 5 weeks, there are now 35 of them

and a close up

The ingredients for the bark goop were gathered together and I banished myself to the back patio near the tap on a warm gusty friday night after work. Had to rig up a 150W spot light to improve on the normal patio lighting.
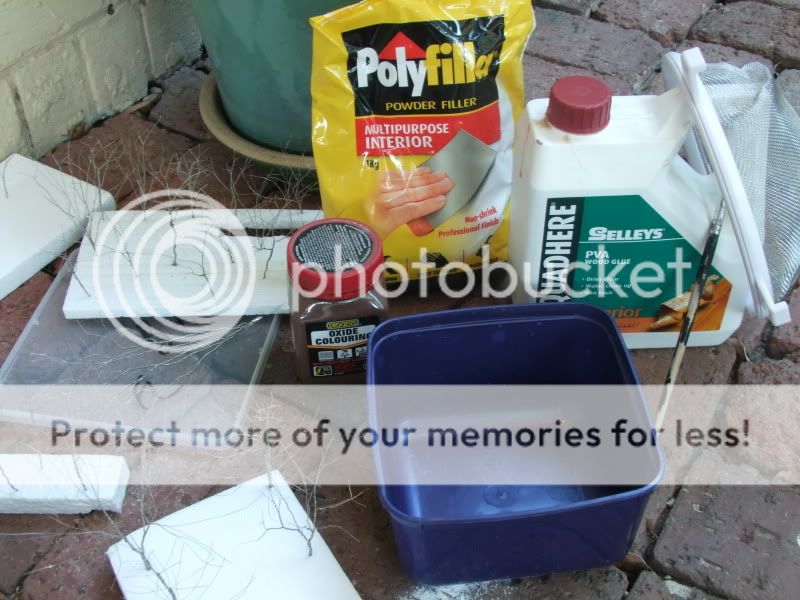
Let the fun begin…
A decent clug of pva glue…

Add some water…. aaargghh… too much I think… oh well, I'm not going to waste the pva, carry on and mix in well…

Sift in the dark brown Oxide colouring. The seive had been liberated from Tracy's kitchen utensils AFTER the handle had broken and it was deemed surplus to requirements.

Mix in well…

Sift in the polyfiller, mixing as you go and testing the consistancy. In this case the aim was to go for something that would flow well but was not too runny. Hmmm, the excess water used up my polyfiller at an alarming rate and in the end close enough was good enough although you will see the consequences later on.

Et viola… nearly 2 litres of tree bark goop. Now to dip the wire frames into the mix one at a time…

There is no way you can do this and get a good coating without involving mud pie fingers… OK, there probably is but where is the fun in that…

The first coat…

and now a dozen or so with two or three coats and left to dry while the next batch are done. You can see the droplets forming on the branches from the overly runny mixture, drat! But, as they are going to be covered in foliage anyway this shouldn't be a problem and might even provide more purchase for the glue.

Two and a half hours later there were 35 trees drying in the hot easterly wind, each with 5 dipped coats of bark goop.
Painting and foliage next…

Posted

Full Member
Phill
Posted
Full Member
Posted
Guest user
Thats certainly the way to do a volume of trees at once mixing up the goop in a tub and dipping i assume that a tub of dye or something that Oxide colouring?
Brian
Posted
Full Member
Posted
Guest user
Im a dope Marty i can see that now i actually use a similar product myself occasionally the one i use is called Febtone here.
Ive used Buff, Black and Red. Ive actually got some in the shed never dawned on me to use it for the sort of thing you have actually you have just light a spark for an idea
 hmm
hmmBrian
Posted
Full Member

Until tomorrow anyway… night all, I'm off to SES training.
Posted

Full Member
How do you manage to keep the mix fluid for two and a half hours ? Does the PVA counteract the Polyfilla's natural setting time ? I'm sure here, certainly at the temperatures you're talking of, it would set up within 20 minutes or so.
'Petermac
Posted
Guest user
In one word - YEP, & so does vinegar in lieu of water.That's an excellent idea for bulk trees Marty - or maybe even worth it for the odd one or two.
How do you manage to keep the mix fluid for two and a half hours ? Does the PVA counteract the Polyfilla's natural setting time ? I'm sure here, certainly at the temperatures you're talking of, it would set up within 20 minutes or so.
Posted
Full Member
Don't know if this is going to be useful but here is a blow by blow of twisting up a wire frame the way I done it.
First, as shown above in this topic, select your wire and cut to length.

Have a guess at how many strands you might like for this particular tree and seperate them out of the bundle.

Have in mind what sort of structure you want the branches of the tree to be.
The plan with this one is to try and get something that might pass as a Common Beech without spending a lot of time making a feature tree. One that is prominently at the front of the layout.
This particular tree will end up in the forest on the hillside and the wood… eerrrmm, might be hard to see because of the trees :roll:
This bit of the description from wikipediais is quite useful in this case - "The appearance varies according to its habitat; in forest conditions, it tends to have a long, slender light-gray trunk with a narrow crown and erect branches, in isolation with good side light the trunk is short with a large and widely spreading crown with very long branches." Just my kind of tree.
So, lets twist up the base of the trunk to hold our wires together, plant them into a polystyrene block and add a couple of bits and pieces for scale.
Just like a blank canvas, if you are like MikeC it will be another masterclass, if you are like me… well, they do say practice makes perfect. :shock:

OK, long slender trunk in a forest! Twist up the trunk to bring the branch height up a bit and spread out the remaining wire to give you a better feel of what you have to work with.

First branch about here maybe, it's up to you but in this case 4 wires are selected to make a smallish branch.

Twisting all 4 wires together for the start of the branch, stop where you think the next branching should be and pair up the wires.

Twist up the first pair for the lower branch, leaving the single strands as the fine branch tips. This wire is quite strong and once coated with bark goop represents a reasonable branch tip.

Twist up the second pair for the upper branch leaving the single strands for branch tips again and there's the first branching done.

The next set of branches might be a bit higher so twist up the remaining wires to extend the trunk upward and splay out the wires again to see what to work with.

And, proceeding as described above work your way through the remaining branches until the crown of the tree is complete.

Now we are ready for the bark goop. In this case, because of the water mixture, the oxide brown colouring was too diluted and the bark took on a more grey colour than anything else.
You can see the texture which is quite nice when the colour is right but this one is going to have to be painted.
You're right, it's not the same tree, there were 35 of them and this one will do for the demo.
As discussed above, the blobs of bark goop on the branches aren't exactly pretty and with the right consistancy of goop they don't form but once the foliage is on they won't be visible.

Tree trunks generally aren't brown, light to dark grey more often, sometimes black. In this case not quite as black as the photograph which has suffered from the lighting. The colour will be seen better later on.

Then add the foliage. Blobs of PVA glue on the branch tips is sufficient to hold the torn and teased out foliage mats in place. It dries clear too. Poke the foliage over the gluey branch to get the glue on the mat and then draw back out towards the tips of the branch to suit the effect you are looking for. There is nothing wrong with having a dead branch sticking out beyond the foliage.
Start with the lower branches using smallish tufts of mat and work upwards, less is more in this example to my mind.

The other tree gets the same treatment.

Once dry, a blast of hairspray or spray glue over the foliage and a scattering of a different colour of fine turf provides new leaf growth. Take care not to overdo it with the scatter or the fine loose look of the foilage mat is overloaded by the scatter and effect is lost.
The spray glue is still wet in this picture and they are a bit messy but once dry they tidy up easily with a pair of fine scissors.

Find a suitable spot on the layout, drill a small hole in the hardshell scenery and plant. Not glued here yet as the forest might need a bit of juggling to get the effect needed on this hillside. Yeah, that might be a Beech?

3 planted, 32 to go, playing around with hedges too.

IF that little lot is of any interest to anyone there are Larches, Spruces, Weeping Willows and a species of upright Willow that is common to the area of Newcastle Emlyn in the making and the story can continue?
cheers
Posted
Guest user
Posted

Full Member
Seriously, these trees are superb. I went to a model railway exhibition a while ago and trees very similar to these were selling for £30 EACH!
A great 'How-to'. Many thanks.
Perry
Due to cutbacks, the light at the end of the tunnel has been switched off.
Posted
Guest user
Excellent tree modelling, mate, and they look really good when "planted" on your Lay-out. They fit right-in,
Kind Regards,
Michael Thornberry.
Posted
Full Member
In this case an attempt at a Spruce
Another blow by blow of how my trees are made… just in case it’s of any use to anyone.
Once again with a bunch of wire cut to length, twist all of them together to form the main trunk and plant into a bit of polystyrene or some other suitable holder.
Spread out the wire to get an idea of what you have to work with.

Decide on how many branches per tier and pull out one strand per branch for the first tier of branches. Here there are seven.

Once selected wind them around the trunk to reduce their length, park them out together so they won’t get in the way and then select the next set of branches for the next tier.

Wind the second tier branches up around the trunk to reduce their length….hmmm, not enough here, there isn’t the typical taper in the shape of the tree…

So… wind ‘em up a bit more until the branches are shorter still and taper looks better.

,,, and so on. Reducing the number of branches per tier as you go up the trunk… third tier selected.

Third tier wound up…

Fourth Tier selected…

And wound up…

Fifth tier…

Wound up and top branches (only two?) prepared…

Hmmm… maybe more than two branches needed for the top bit, fold them over maybe..

Twist at the base of the fold to hold them together and cut to make four…

Oops, OK, three, one of them wasn’t twisted in well enough and fell off… no problems, three top branches it is…

Hmmm, the branches look a bit too long and out of proportion to the height of the tree…
A quick trim up with the track cutters..

And position the branches out, starting from the top and working down…

Bending into shape as required until we have the tree frame, with a couple of bits and bobs for scale…

The tree frame was covered in bark goop in the mass gooping shown above, allowed to dry and then painted.
The blobs of too wet goop are clearly evident in the photo below but as you will see disappear once the foliage is applied.
Now, some foliage, in this case Evergreen coarse turf scatter from Woodland scenics, never used it before so it’s a bit of an experiment.
Neat PVA, each branch stuck up the nozzle of the PVA bottle to allow a coating of PVA all over the branch.
Then sprinkle the coarse turf scatter onto each branch in the bottom tier. Tap off the excess as you go and making sure there is a clean sheet of paper or cardboard underneath to allow for catching and recycling of the unused scatter.
Work up the tree to establish the first layer of foliage on the branches.
Here are the first two done..

Allow the first layer to dry and then spray with hairspray or spray glue and repeat the application of the foliage until satisfied with the appearance.
Once again, less is more to allow the structure of the tree branches to show. It’s very easy to get carried away and fill up the spaces between the branches to get just a cone of foliage. To me that defeats the whole effort of twisting up the tree frame in the first place.
Anyway, what do you guys reckon… A Spruce?

Comments and suggestions welcome as always.
Posted
Guest user
suggestions.. keep going you are doing it right ..
:doublethumb
:cool:
Posted

Full Member
Brian(G)
Posted
Guest user
Woteesedcomments.. they look the biz,
suggestions.. keep going you are doing it right ..
:doublethumb
Posted

Full Member
Anyway, what do you guys reckon… A Bruce?
Comments and suggestions welcome as always.
Nah, deffo an old Grey Fergy…….
Nice work, my friend!
Doug
'You may share the labours of the great, but you will not share the spoil…' Aesop's Fables
"Beer is proof that God loves us and wants us to be happy" - Benjamin Franklin
In the land of the slap-dash and implausible, mediocrity is king
"Beer is proof that God loves us and wants us to be happy" - Benjamin Franklin
In the land of the slap-dash and implausible, mediocrity is king
Posted

Full Member
Don't get too carried away with trees so we can't see that lovely railway!!!
:pathead
Cheers,John.B.:thumbs
Posted
Legacy Member
reg
1 guest and 0 members have just viewed this.