Yard Security Lights
Posted
#69189
(In Topic #3794)

Inactive Member

As the wire is going to be attached to the rail with CA glue, it's best to get all of your soldering out of the way first. CA glue gives of unpleasant cyanide gas when heated. A 1 kOhm resistor will give a nice bright light on 12 volts without prematurely burning out the LED.

Bend the wire over the top of the rail and glue one end in place. The pegs are ordinary clothes pegs with the wooden parts reversed, and a little plastic one from my grand daughter's toy box.
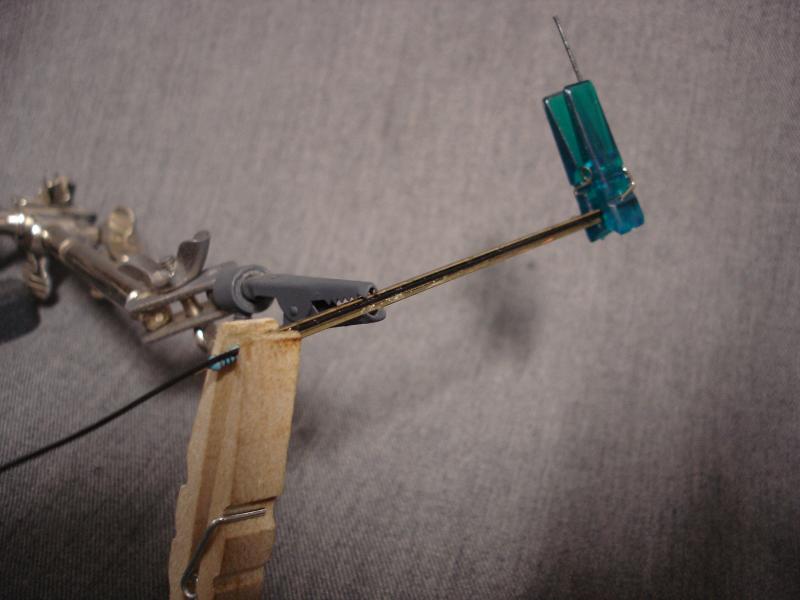
Once the top is securely anchored, the wire can be pulled tight and glued into the web of the rail, high up under the railhead.

The wire can then be bent up so it is in line with the centre of the rail foot.
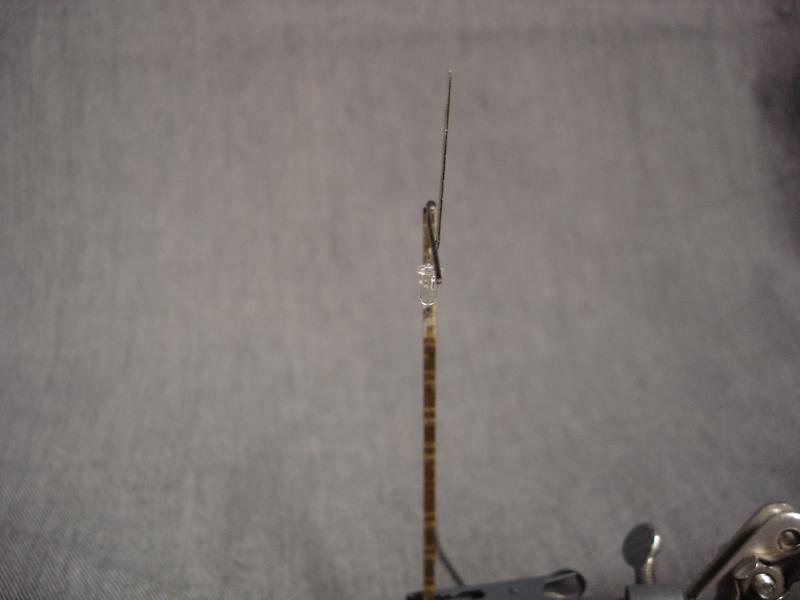
The legs of the LED are slightly off centre to allow the wire to be attached.
The anode leg (which is the longer of the two and near the round side of the LED), has been bent around and soldered to the rail. The short leg has been cut off. The wire has been cut off and bent down. By setting the LED up slightly offset, there is room to solder the wire next to the shortened leg and still keep the assembly looking balanced.

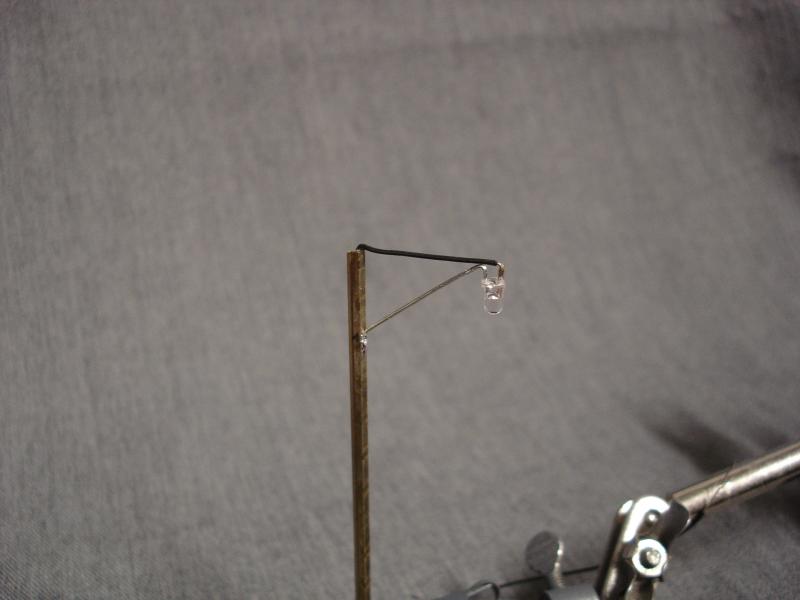
The positive wire is then soldered to the resistor and some shrink tubing placed over the join. Invert the assembly and put a dob of thick CA glue on the top of the LED. As the glue runs down, drop the washer over the LED. Washers are punched when they are made, so have the rounded side facing the sky and the flat side facing the ground.

I slipped a small piece of 3mm shrink tubing over the lens of the LED before I sprayed the finished article with grey etch primer. It might be necessary to hand paint a bit of grey over the top of the LED to stop the light showing through. Code 100 rail is just the right size for a 1/8" drill, and the resistor will easily slip through.
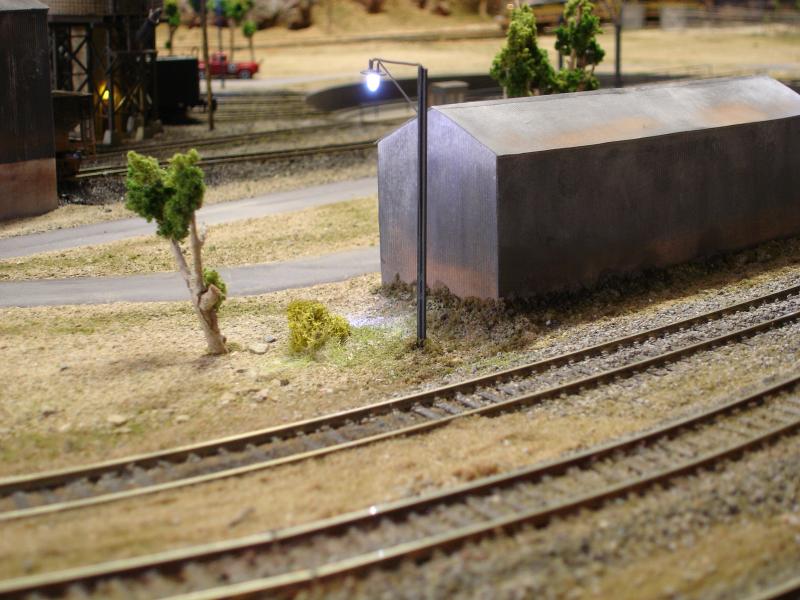
Now, I just have to find a place for it to live . . .
Here are some double lights I have made. In this case, the resistors are at the top. The anode wire is connected to them and runs down inside the tubing. The cathodes are soldered to the post in this case.
http://yourmodelrailway.net/view_topic.php?id=2669&forum_id=7&highlight=yard+lights
Max
Port Elderley
Port Elderley

Posted

Legacy Member
Posted
Full Member
If you dont mind a little feedback, it looks a bit bright (might be the picture) and the colour of the light is a bit cool for what is an old looking lamp. Try using either a golden white LED or alternatively you can get translucent paint that will 'yellow' the light a tad
HTH
Jim
Jim Smith-Wright
Rule 1 - Model what you really see and not what you think you know!
www.p4newstreet.com
Rule 1 - Model what you really see and not what you think you know!
www.p4newstreet.com
Posted
Guest user
Posted
Inactive Member
I used golden white and proto white in most of the layout to represent the lamps you're talking about. I deliberately wanted a blue looking white for the particular lamps I am copying. I have close on a hundred LEDs on my layout and I feel that I need some arc lights to break it up a bit.
Your point is well made. Perhaps I should post some of the others to show a bit of balance. Actually, now I look again, I can see a golden white above the door of the water tower in the background.
I understand what you mean about the style of lamp. Maybe I should develop a more appropriate lamp design to use with the blue/whites? Food for thought. Thanks very much for taking the time to comment. I appreciate it. :thumbs
Max
Max
Port Elderley
Port Elderley
Posted
Guest user
Mike
Posted

Legacy Member
Another thing to add to the list….:thumbs
 Last edit: by gordons19
Posted

Full Member
One silly question: What is 'shrink tubing' please?
I only ask because I know nothing.
That I know nothing is well known.
I know too because lots of people have told me.
Posted
Legacy Member
Useful stuff…:thumbs
Posted
Inactive Member
Gordon's right, dd. There is a yellow bit of it in the third to last photo. The only difference with the stuff I've got is that I have to rest my iron right on it to get it to shrink.
Max
Port Elderley
Port Elderley
Posted
Guest user
Posted
Inactive Member
Max
Port Elderley
Port Elderley
Posted
Full Member
Whatever will they think of next?
There must be other uses too.
Trousers for little figures?
Reinforcing little joins in scratchbuilds?
Posted

Full Member
Brian(G)
Posted
Full Member
I've done something similar and smaller using lolly sticks ( from Chup-a-chups) and using a sequin as the lamp shade. Cost very minimal and colouring taken care of! I do like the taller ones using rail though!
http://www.xdford.digitalzones.com and check the menu…
Regards
Trevor
PS After the next post… Thanks for the compliment Max but I already have a few projects involving your style lamp for the Melton MRC On30 layout station… so thanks Max for your suggestion! Regards Trevor (originally from Adelaide…)
Last edit: by xdford
Posted
Inactive Member
Max
Port Elderley
Port Elderley
Posted

Full Member
Posted
Inactive Member
Max
Port Elderley
Port Elderley
Posted

Full Member
Ditto - one question Max - what typr of washer did you use ? I assume it is non metallic so as not to create a short across the LED wiresjust found this thread looks great and im going to have a go .
Posted
Inactive Member
LEDs have a collar which stops the washer from going past. I hope that makes sense. See photo 7 at the start of this thread.
Max
Port Elderley
Port Elderley
1 guest and 0 members have just viewed this.