Weathering a Coal Lorry
Posted
Guest user
in fact coke sacks, coal are about half that size,i made the same mistake on mine
so i have both now,
good tip from Jim about the wheels,never noticed before but they do go off centre,
must glue mine.
 lol:
lol: :cool:
Posted
Guest user
Who would even think of that! An excellent tip Jim, thanks.Once dry I then rub the vehicle on some sandpaper to give a slight squareness to the bottom of the tyres. This helps to give a sense that the vehicle is heavy.
Posted
Guest user
Bob
Good job on the lorry, great weathering, I would be proud to have that on our layout. :doublethumb
Posted

Full Member
Phil

Posted

Full Member
I like the idea of using a wash to remove the gloss finish - I had visions of scrubbing mine with a fibre glass pen !!! You're also dead right about the rope - they never used them - too difficult to get the sacks off !!
'Petermac
Posted

Full Member
You'll know if you've overdone it because it will look like it has four punctures.
Posted

Full Member
Several regions had 'coke-rails' attached to ordinary open coal wagons extending the height by as much as 30%.
My Uncle Richard used to run a haulage firm near Warwick, and he would deffo describe your completed lorry as 'An ole' nail', i.e. it looks well hammered!
Doug
Edited to say good tips, i.e. wheels off square and sanded at the bottom…
 Last edit: by Chubber
'You may share the labours of the great, but you will not share the spoil…' Aesop's Fables
"Beer is proof that God loves us and wants us to be happy" - Benjamin Franklin
In the land of the slap-dash and implausible, mediocrity is king
"Beer is proof that God loves us and wants us to be happy" - Benjamin Franklin
In the land of the slap-dash and implausible, mediocrity is king
Posted
Full Member
Can't think they were very efficient.
Posted

Legacy Member
Posted
Guest user
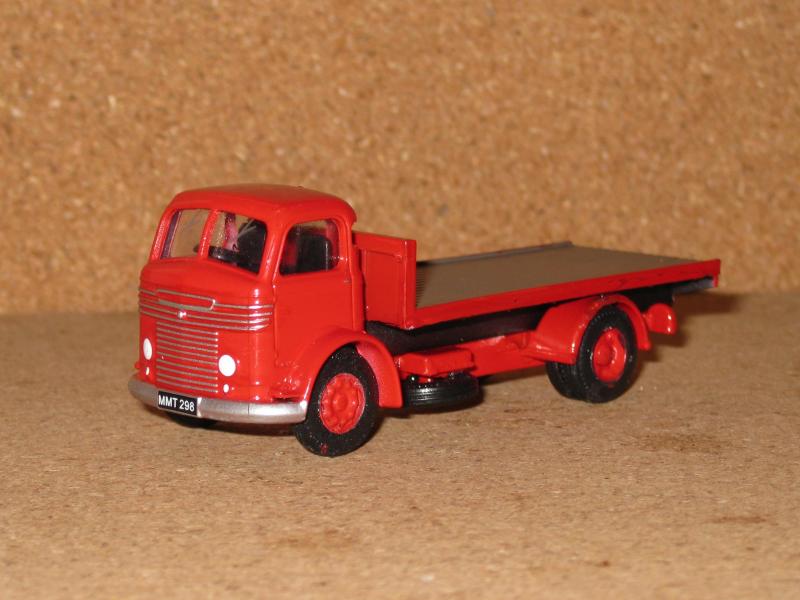
I plan to have a coal lorry next to my coal depot, sitting on the weigh bridge. I have been scouring the web for a suitable candidate without success, so I have decided to have a go at a flat bed truck and make it look like a heavily used coal delivery lorry.
The subject for this small project is a 'Base Toys' Commer Flatbed. It has no markings, other than number plates:
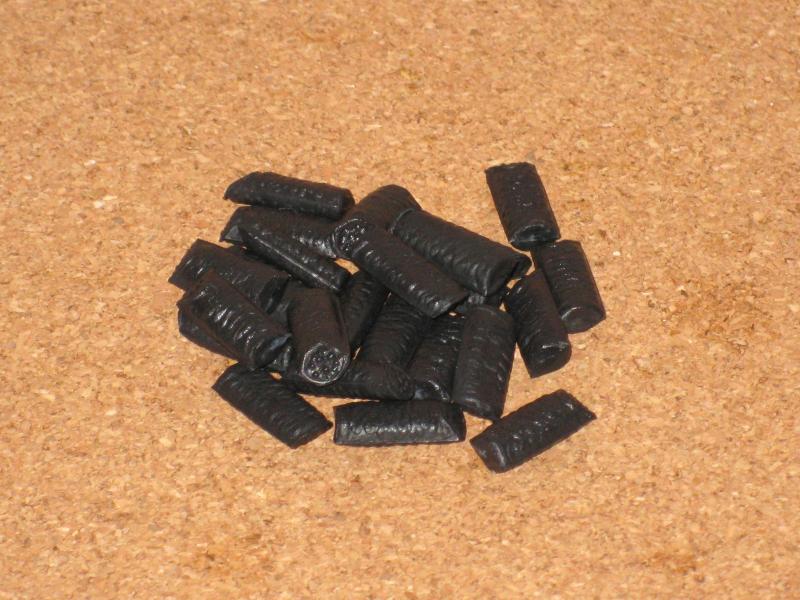
As a load I bought a pack of Model Scenes coal sacks. They needed trimming and a bit of flash cutting off:
The first task will be to wash the lorry in soapy water to help with paint adhesion, and then give the whole vehicle a wash in black acrylic.
Bob(K)
You must have taken sometime and trouble to get it just right.It
really looks great.Have you ever thought about
putting a drive in the cab.That would finish it off in my opinion
Posted
Guest user
Hi Bob
Once dry I then rub the vehicle on some sandpaper to give a slight squareness to the bottom of the tyres. This helps to give a sense that the vehicle is heavy.
HTH
Jim
i would never think of that:thumbs
ref the wheel turning, i read you saw the axle halfway across and bend it round, is this right?
Posted
Guest user
Posted
Full Member
'Petermac
Posted
Guest user
You must have taken sometime and trouble to get it just right.It
really looks great.Have you ever thought about
putting a drive in the cab.That would finish it off in my opinion
Posted

Full Member
Firstly the coal sacks - point taken, they are too large. I have now changed these for some Ratio sacks which are about half the size.
The idea of turning the wheels and rubbing them down on one side is an excellent suggestion. I have tried, but they are made of a rubbery material. I tried trimming them but concluded that they will be a mess and it was something that will be done next time when the vehicle is being prepared.
Turning the wheels too is tricky as their is very little play in the wire axles and with the rubbery wheels my attempts did more damage to the weathering, so I will leave it.
As for a driver? Something I considered, but this would only be possibly by drilling out the securing pins beneath the truck and taking the whole thing to bits. Besides, in my scenario my driver will be humping coal sacks.
An interesting project and some very useful comments, some of which I will certaily attempt to incorporate on my next vehicle weathering project. Thanks to all for the comments and encouragement.
Bob(K)
Posted
Full Member
You don,t get out of it that easy Bob.
WHAT ABOUT HIS LAZY OFFSIDER SEEN HAVING A QUICK CIGGY ?
John.
Posted
Guest user
Looking forward to more Pictures and updates !
Regards,
Fabien (ExmouthJunction)
Posted
Guest user
Posted
Full Member
 great work tho!!
Last edit: by Jim S
Posted
Guest user
All the best
JOhn
1 guest and 0 members have just viewed this.