H0 Scale - South Shore Line
Posted
Guest user
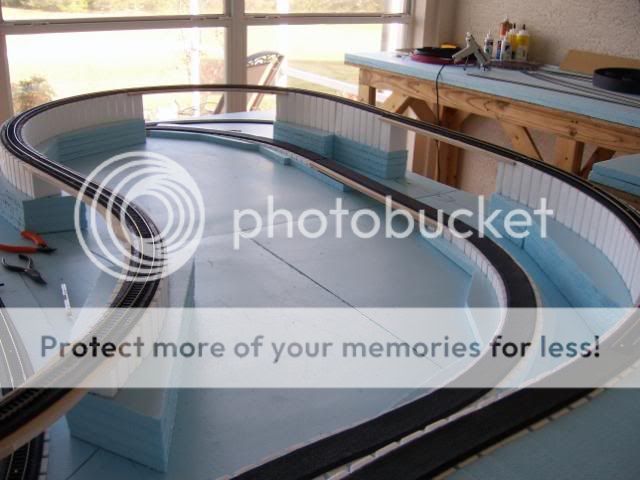
You can really see the size of your layout, in the photo showing some points layed down, this gives a real sense of scale, it really is going to be a great sight watching the loco's pulling up though the gorges and valleys.
Posted

Inactive Member
 Last edit: by MaxSouthOz
Max
Port Elderley
Port Elderley

Posted

Full Member
What little sanding labor I spent fixing it will in no way reduce the benefits foam is providing to the layout.
Wayne
Posted
Full Member
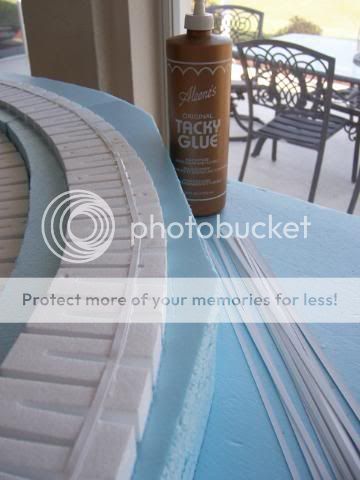
I have been debating on whether or not to put in super elevations. So I decided to compromise. I am putting them in but only half as high. On a tight radius the magazine recommended .04", well I have mostly large radius and I am putting in .02". I cut a thin strip of .010" card and glued them in place around the outer loop today. As I entered and exited the turn I only put down one strip of the card, in the middle of the turn I placed two of them.
Here is a picture of the supplies used. You can see the elevated area on the inclines already glued in place. I used Aleene's Tacky Glue to hold the card in place. I dries quite quickly and is just sticky enough to hold the card in place without pins or weights of any kind. The card even fought trying to bend around the curve, but the glue worked great.
I have just pinned down the track bed so you can see how it will be located.

On partial curves I only used one strip. In the background you can see the ramp up to the Terminal Yard has been completed. Still a lot to do "Up There", but by golly the trains will run first!
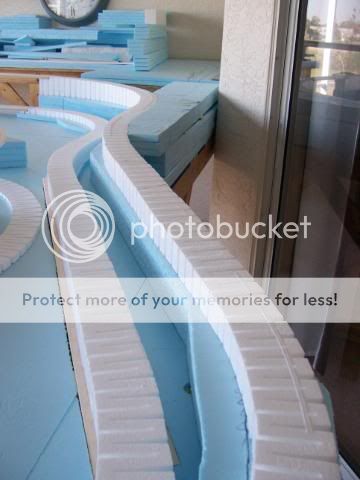
The outer loop is done, all that remains is the inner loop. That could get tackled tomorrow, then the track bed is next. :doublethumb

One more thing, I tried a test panel to verify if the white PVA glue would hold down the track bed. It did not work, after all night curing, I could separate the track bed from the incline very easily and the glue in the middle was still wet. Not sure I understand why the glue worked on bonding blue foam together, blue foam to the white incline, but not for the white incline and the track bed.
It pays to run tests!
Wayne
Posted
Guest user
I did find Liquid Nails was good at fixing trackbed to foam. Takes ages to dry though. But it's quick to grab while still allowing adjustments.
In many places I have used PVA and while I know it's not the strongest bond it seems ok for my gentle landscape. I can fully understand why you'd want something tougher.
Mike
Posted

Full Member
Posted
Guest user
Posted
Full Member
Wayne
Posted
Full Member

This picture shows the Woodland Scenics Track Bed box and the beginning of the laying process. I felt I needed to split the track bed to go around the turns. Turns out that I really did not need to do that. Just had to pin more often if I didn't. I had to place pins about every six inches when I split the foam and every four inches when I didn't. It looks much better (even though the ballast would hide it) without the split.
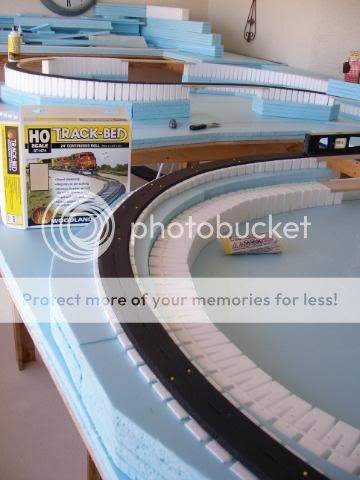
I ran out of Liquid Nails Project, so the Track Bed is not complete as yet. The Liquid Nails worked GREAT on the Track Bed. I did not use it where ever the Track Bed was on top of the blue foam. I already know what Liquid Nails does to the blue foam. :twisted:
I think my knees are beginning to shake with what is next! :shock: :shock: :shock:
Wayne
Posted
Guest user
Posted
Full Member
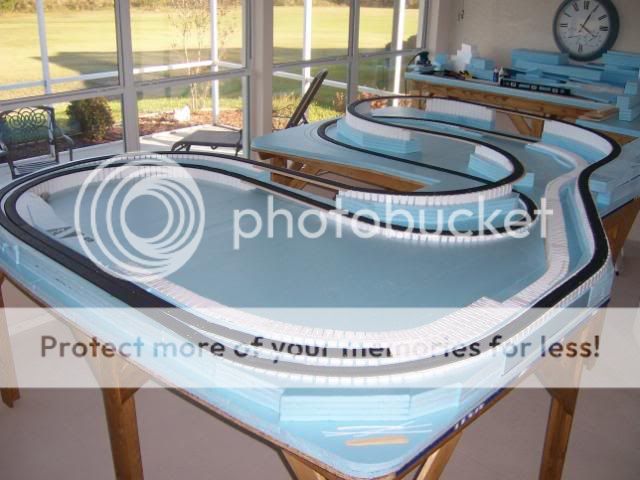
I am missing two 3-way points (I called them wye's in a previous post) that are still on order. Should have them hopefully next Wednesday. I am still also lacking about 14, 3 foot lengths of flex track to complete the layout. I use the term complete loosely because I still am not quite sure what is going to happen on the upper table (terminal yard).
Wayne
Posted
Full Member
How's your soldering?
The track plan is a lot clearer now that some of it is done… superb.
Posted
Inactive Member
Max
Port Elderley
Port Elderley
Posted
Guest user
You are using code 100 rail i presume you mean Peco code 100 did you not want to use the code 83 which is apparently more US style or is that the range of track they do not as much with the 83.
That Gp40 should be whoosing soon
cheers Brian
Posted
Full Member
I've been meaning to ask you why your clock is so low?
It's not that the clock is too low, the baseboard is too high! Of course all that stuff piled on top doesn't help the matter either.
Brian,
I choose the code 100 versus the code 83 because of three reasons;
1. It gave me more room to attempt the soldering, and I think that reason will answer Marty's question on how's my soldering.
2. It came highly recommended by the train store where I buy most of my "Stuff". Plus he heavily discounted the code 100 flex track.
3. It cost about 25% less than the code 83. That includes all the components like points, re-railer, etc.
Wayne
Posted
Guest user
Posted
Full Member
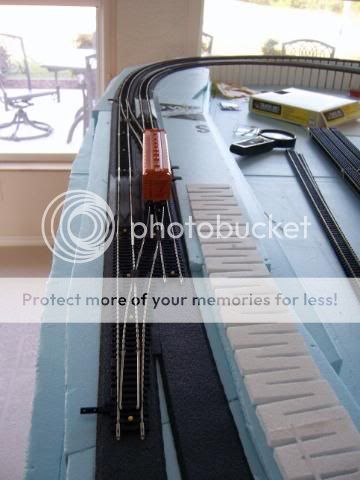
I'm sure you can see the yellow pins in this picture. That is what I am using to hold the track in place as I go along. The pins are rather large, had to be to hold the track on the curves. They are 1 1/2" and I need every bit of it. At the rail joins I need anywhere from six to eight of them to hold the curve through the joint.

This is where I have two tracks going through a gorge. I have made the wooden bridges removable (track and all), so that in the future I can remove it and put in it's place a trestle of some kind.

You can see here that I still have lots of track to put down. I had to stop on the outer loop because the 3-way points have still not arrived at the store. He is now saying next Tuesday or Wednesday. :twisted:
I have all that is needed for the inner loop, so will keep working on it. Maybe I can have it done by the time the points arrive.
Wayne
Posted
Guest user
perspective, it is going to be impressive .
:doublethumb

Posted

Full Member
That's great Wayne, it really makes a difference with some track down, you will soon be able to 'Test' some locos
'Kev
Posted
Guest user
It'll be a lovely mainline run though and pretty spectacular. Looking forward to seeing what locos you choose.
Mike
1 guest and 0 members have just viewed this.