H0 Scale - South Shore Line
Posted

Full Member
Lovely room Wayne, now shall we say Tuesday the 21st October 2008 for the first pic of the baseboards in there,
Don't I wish!
We'll see Phill maybe it could happen.
Wayne

Posted
Full Member
In the beginning there was a baseboard.
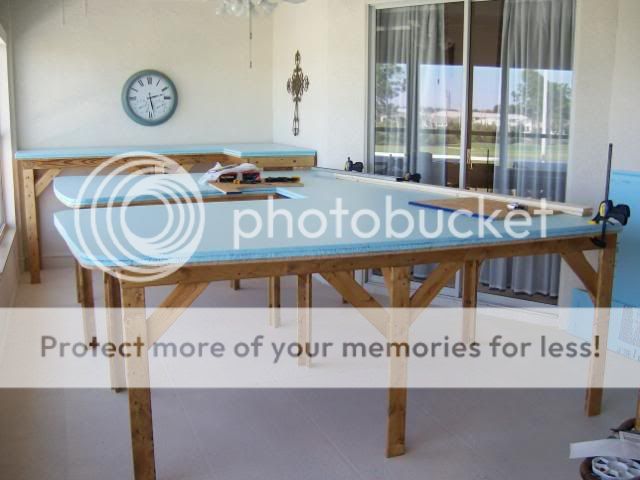
And things began to grow on the baseboards.
Then it started to become crowded.
OK, now it's all up to date, well except for what is coming next.
Wayne
Posted
Full Member
I won't bother showing you all the can goods that I had setting on the risers holding them down while the glue set. Suffice to say I emptied the pantry for two days. :shock: At least now we know what we have in the pantry!

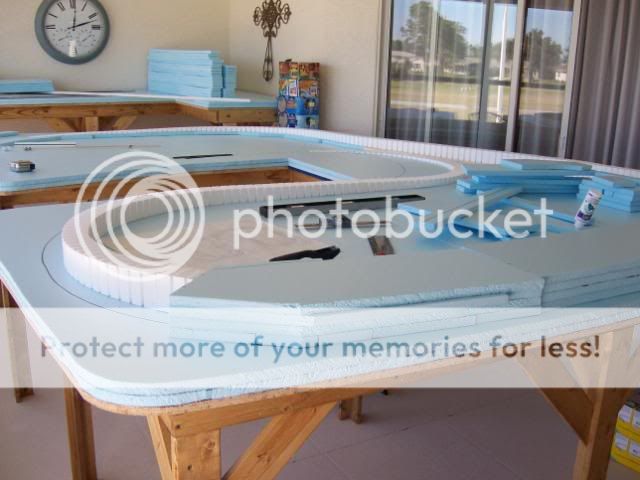
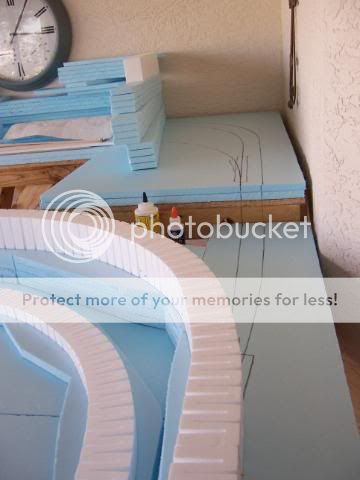
I am now beginning to bond in place the inclines (Woodland Scenics). Each Incline set is from 0" to 4" over 16 feet. In this picture I only wanted the inclines to go up to 3 and 1/8" (4 layers of 3/4" foam), so I found the spot where the incline measured the exact height to match my riser and cut it off. In this picture I am marking the location so I can apply the adhesive only where it's needed. Believe it or not but that pencil was new when I started marking all the blue foam.
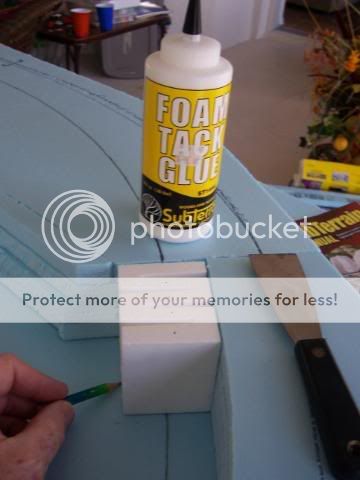
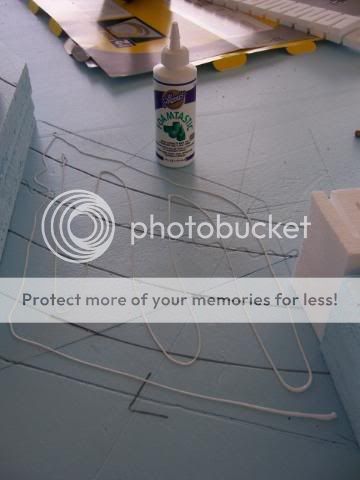
The instructions for the "Foam Tack Glue" (Woodland Scenics) says to spread out the bead of adhesive to a thin layer. Using a putty knife worked fine, but you must clean the tool every five minutes or else. I don't know what else is because I didn't wait to find out. Quite sticky stuff to clean off with water too.

Put in the incline and pin in place and wait for the glue to dry. I will wait overnight before removing the pins.

Each section of the incline set is 24" long. Here is the next one setting in place.
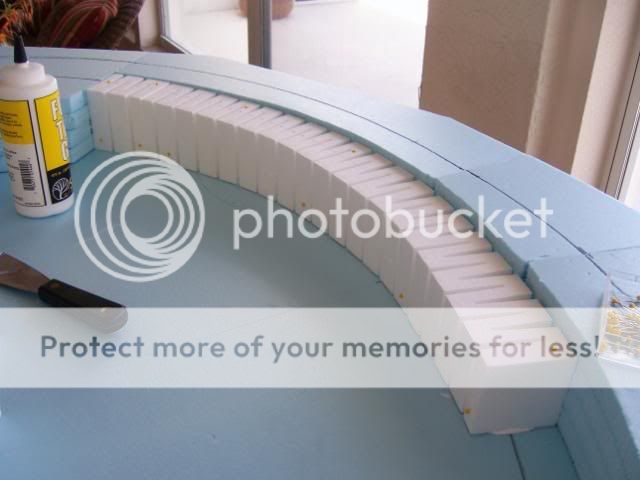
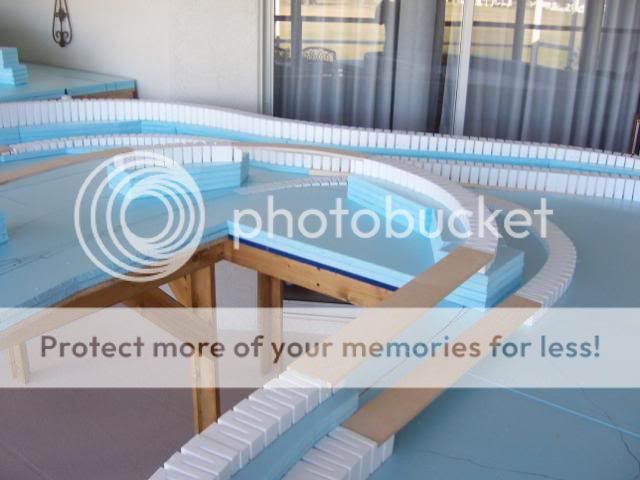
This is the first of five bridges (maybe 6) that are on the layout. You can see where I have notched out the incline foam to allow for the thickness of the temporary bridge platform. For the time being it will just set in place and allow me to lay track and run trains before I actually have to set down and build a bridge.
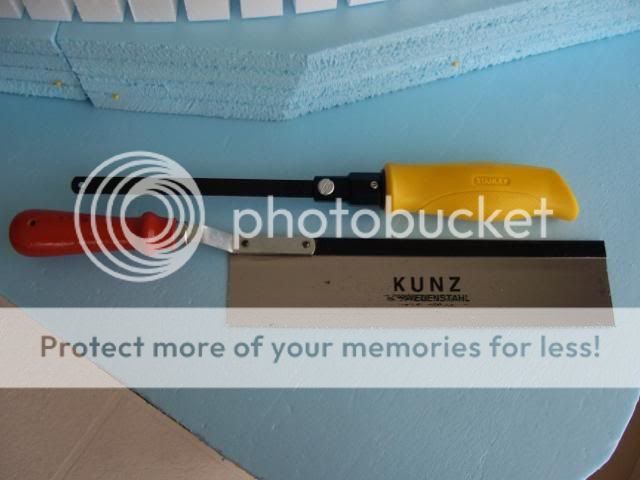
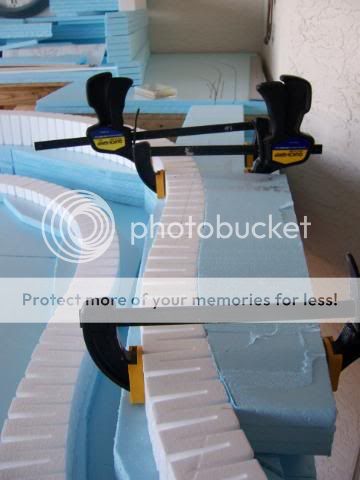
To back track a little bit here, I will show you what tools I used to cut the foam. When cutting the thick risers, I have to use this back saw. It allowed me to keep the cut vertical for just over half of the 3" thickness. I had to stop at this point due to the thickness of the saw.
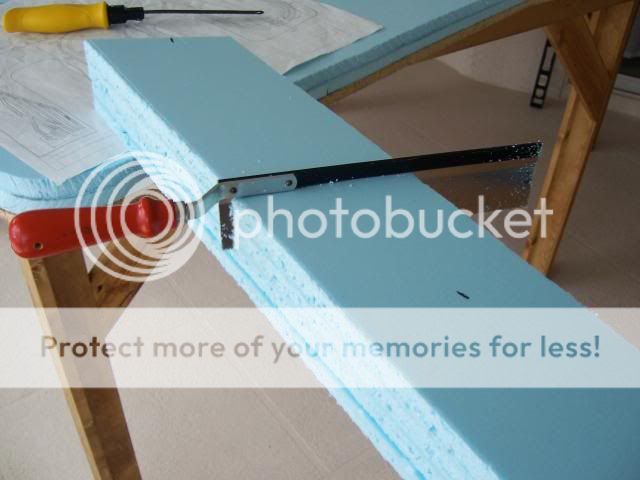
I then switched to using the yellow handled tool. Not sure exactly what you call this thing, but it sure works great. It uses a hacksaw blade. The blade can be adjusted in and out of the handle for different thicknesses of cut. It will not however make a straight cut by itself. With a grove in the foam from the backsaw it didn't do too bad in holding the line. I used a scraper to adjust the cut edge for squareness. (Forgot to take a picture of it)
I have completed this incline all the way down to zero inches. Monday will bring another day of gluing.
Wayne
Posted
Guest user
Posted

Full Member
Now you have got those base boards up you have made amazing progress and your layout is really starting to take shape. I am enjoying seeing how you are building up the terrain.
Bob(K)
Posted
Guest user
how do you plan on adding the track to the inclines?
Posted
Full Member
Wayne
Posted
Guest user
I really must say that I am enjoying watching you put together the basics of your layout, I have never built a layout with different levels, but the way that you are building yours is a real inspiration, and I think that I can imagine the look of it when your start to add scenics etc.
Posted
Full Member
I really must say that I am enjoying watching you put together the basics of your layout, I have never built a layout with different levels, but the way that you are building yours is a real inspiration, and I think that I can imagine the look of it when your start to add scenics etc.
I am glad you are enjoying this thread Alan. If you can imagine what this will look like, please explain it to me! There are areas that I have no idea what I'm going to do. Guess it will just have to develop. So hang on, because we are all going for a ride, and who knows where we'll end up!
Wayne
Posted
Guest user
will just flood out, "been there still doing it " !!
:cheers
 thumbs
 :cool:
Posted
Full Member
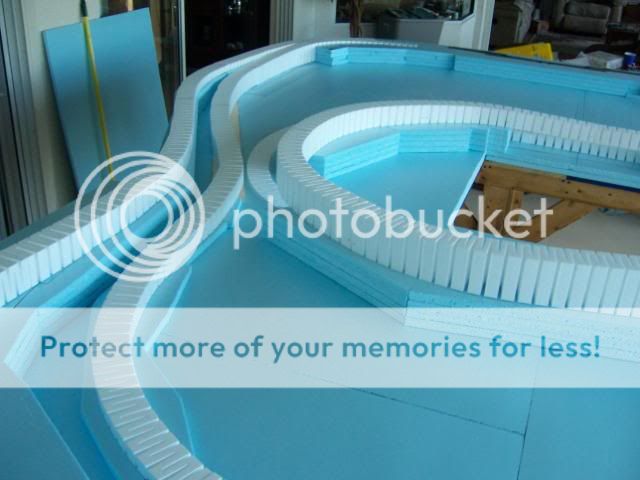
Been at it all day today, and have finished glueing down all of the inclines on the lower two tables. :Happy:Happy:Happy and my back feels like it too! :twisted:
Now you can really begin to see what the track shape is doing. With all the ups and downs you still have to focus close to follow the track around the layout with your eyes.
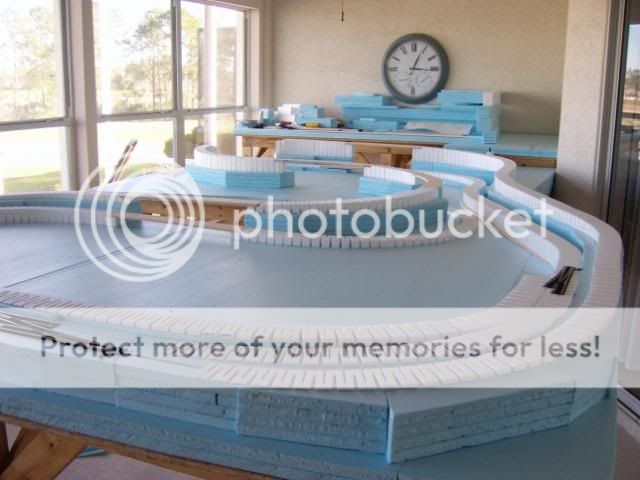
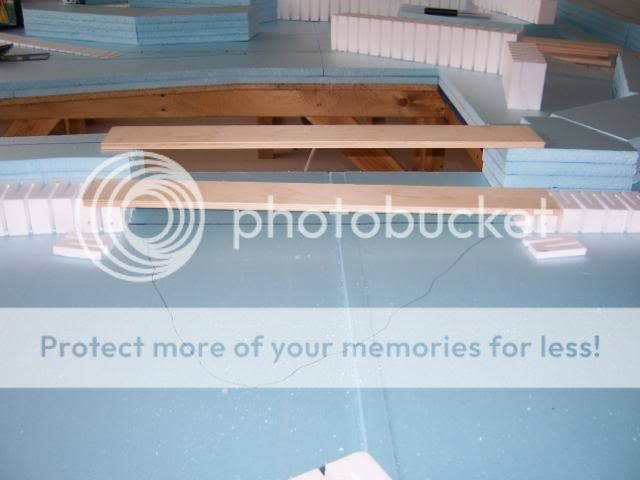
You can see now where the bridge trestles will be going. There are three in this picture, the one in the center at the top is an overpass that is mostly hidden in a mountain.
I bought two 3/8" x 12" x 24" sheets of 7 ply plywood for the bridges, but alas it was not enough to finish them all. Still one lacking in the lower front of this picture. Will have to make a trip to get the plywood, problem is they only had two pieces, so I don't know if they have reordered yet or not.
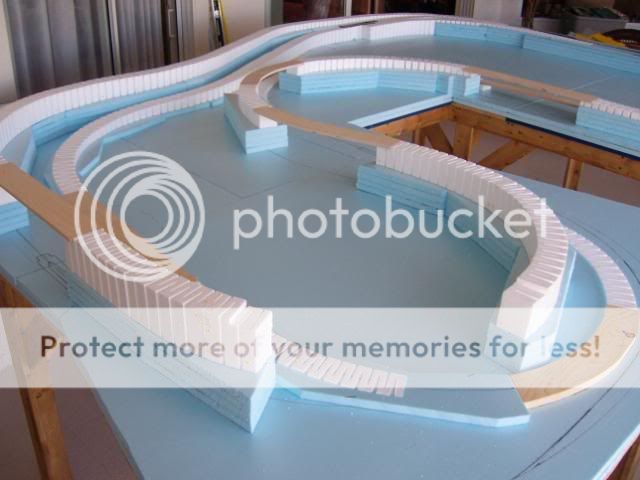
Here is my problem area. I have used up all of the incline sets that I have purchased, and I really do not want to buy two more just to get this area done, so I will get creative and make my own. If you all want a good laugh then stay tuned. :cool wink I can see at least two days work just in this area alone.
Wayne
PS: It's getting close to track bed time! :Happy:Happy:Happy:wow:wow:wow
Posted
Guest user
Will we be looking at rivers or gorges - or both - where the bridges are?
Mike
Posted
Full Member
Will we be looking at rivers or gorges - or both - where the bridges are?
Most definitely Mike, gorges for sure and I'm quite sure there will be a river or two somewhere in the works. My river will be mountain fed, so that is why I asked you in another thread about pristine rivers. I'll have some pretty fancy trestles to build too. One of them actually has a double curve in it. :shock:
Wayne
Posted

Full Member
Looking good to me Wayne.
I hear what you say about the inclines and knowing your attention to detail they will be fine.
Keep it coming mate, loving the thread.
Posted
Guest user
Unless I've missed it elswhere, don't forget to give some more details on the "how to" of cutting, shaping and glueing of the blue foam and the inclines.
Was the Woodland Scenics glue a success and have you found any different ways to cut the bends :question
Posted
Full Member
Today I worked on two things, the incline going up to the terminal yard and leveling out the inclines.
I had to make a tapered cut in the height of a foam block that was 8" wide by 48" long, and 3" thick. I used a band saw with a cutting height of only six inches, so I had to notch out a section so I could tilt the block through the bandsaw. You can see the notched out area in the back right side where the last two clamps are located. Once this glue has set overnight, I will glue in the piece I had to cut out. I had to cut the top surface of this on a taper to match the incline. Remind me to never do this again. Well it did work out ok.
You can see in this picture that I will have to do some carving out of the upper tables foam to align the track, but thats another day.
I went around all of the inclines with this two foot level, looking at the top surface. Wherever I found a "hump" I sanded it down to flat using a small hand orbital sander. This was probably not the best tool for the job, because it knocked some of the inclines bond loose. I will have to go around and re-glue them down. Once I realized it was breaking the bond I tried to hold the incline better while sanding and that did help.
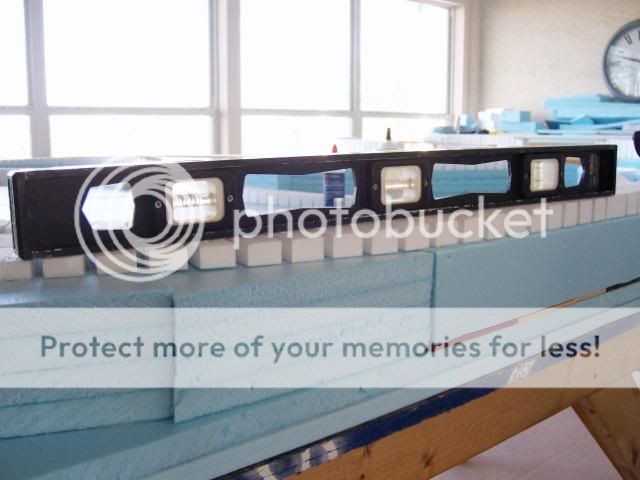
I was going to take a picture of one of the "humps" but got so involved in getting them flat that I forgot to. So I took this picture that shows a slight humps in the incline, but this "hump" is actually designed to be there.

The above "humps" is going into a siding, and I didn't want cars to be able to just roll out onto the main line, so I put in a 1/2" high slope that will trap the cars in the siding. The right side of the picture the inclines are going down hill, and the left side of the picture the incline is also going down hill.
Some things I have noticed about the glues I have used. The Woodland Scenics "Foam Tack Glue" while it worked great is the glue that came loose while sanding on the inclines. At the cost of $ 10.98 a bottle versus white PVA glue (Elmers Craft Glue) at $ 1.00 and something, there was no difference in how the two worked. Both bonded fine, both took just as long to cure, both bonds could be broken apart if needed without much damage to both surfaces. Really looks like a no brainer to me.
Wayne
Posted
Guest user
Interesting to note that the Woodland Scenics glue was no better than the cheap alternative. I've used both PVA and the WS glue for scenic scatter and although their scatters are brilliant, I'm convinced that the glues they produce are an expensive con. I guess someone will now mention another WS special purpose glue that is much better than a cheaper alternative and so make the exception that proves the rule :exclam:exclam
The other question in my mind is why the inclines come out with a less than perfect slope, involving sanding of the surface. Is this because of the substrate they are mounted on (i.e. would they be 100% perfect if placed on a MDF base) or am I missing something :question
Sorry for all the questions, but I see a lot of potential in this method of construction.
Posted
Full Member
The biggest reason why the incline were off a bit (about .05) was not because of the inclines, but because of the blue foam that I used on top of the baseboard. For some unknown reason to me, the ends of every sheet (both ends) from the edge in about 3" were compressed to a thickness less than the rest of the sheet. So everywhere I had an incline that went over a factory edge of the blue foam there was a misalignment of the inclines. It was all fixed in a short amount of time with the sander. Took three times longer to clean up the room though!
One point I'd like to mention, the width of the inclines varied quite a bit, up to + 1/8" in places. I'll see if I can get a picture of an example for you to see. If I forget, please remind me, if your interested. I did not notice the width getting narrower anywhere, so maybe that is where they allow the tolerance of manufacturing to fall.
Wayne
Posted

Full Member
I found exactly the same, Wayne, in a previous incarnation of the OCR. I even asked a builder friend who shrugged his shoulders and said something like, "Well it's made for building houses, not railroads." Great help :roll::roll::roll::roll:For some unknown reason to me, the ends of every sheet (both ends) from the edge in about 3" were compressed to a thickness less than the rest of the sheet.

Posted
Full Member
This would allow the wall, ceiling, etc to be flush and easier to panel.
Gyprock hardboard walling works the same way I think.
Useful when building walls or insulating ceilings, not so useful when modelling railways :roll:
 Last edit: by Marty
1 guest and 0 members have just viewed this.