Upper Hembury GWR Branch Line
Posted
Full Member
Updated plans and now moving ahead
Looking really good Colin. I've yet to find timber as straight as that in Bunnings up here. Looking forward to seeing this turn into a layout.
Cheers Pete.

Posted

Full Member
my builder went with me and he has a very good eye, I left selection of all the 2.4m runs to him.
I did buy the best grade then but on my return I found a pallet load of neatly stacked 42*19mm, regular grade in 1.2M lengths, ideal for my joists. Had no trouble finding perfectly straight ones there either. Must be my lucky day.
Perhaps it's all the humidity up your way?
 Last edit: by Colin W
Posted
Full Member
I worked for a coupe of years for a timber firm driving a crane truck, picking up, making up orders and delivering as well as serving customers and sorting. General dogsbody I suppose. Anyway, I'd pick up New Zealand pine from the docks and soon learnt to keep out of the way when cutting the strapping of these banana shaped timbers. I reckon you lot just got the pick of the crop.
Cheers Pete.
Posted
Full Member
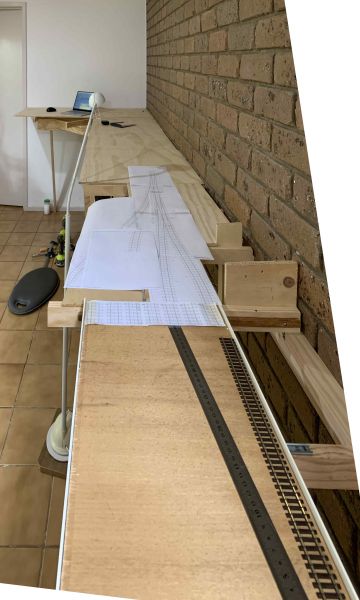
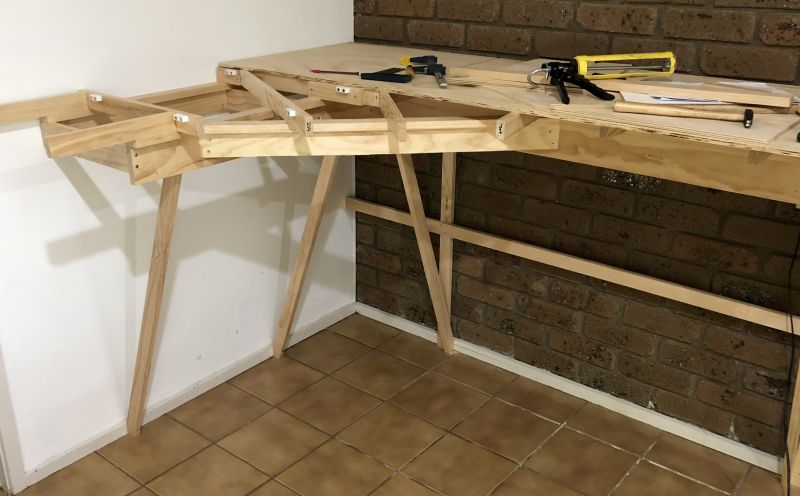
My traverser plate is 914.5mm long by 320mm. This allows for 7 tracks at a spacing of 44mm.
Since my top surface will be 9mm ply, I decided something more robust for the traverser surface was required to avoid warping. I have a long saved veneered particle board 19mm thick and hoped this would be fine, it has been stored as dead flat as I could manage. Still the length had a 2mm bow so I dug out another opportunity in search of a need, some old angle rescued when we did long forgotten renos. A length of this securely attached to each side got the plate dead flat with a big bonus, the angle was epoxy paint coated, giving me very smooth raised underside edges, of which more later.
In pic #1 the two joists which bound the traverser zone are shown after I've added two strips of very hard, seasoned 12 * 12mm hardwood. These will act as side supports and to minimise friction they were planed dead flat, sanded fine and polished with a high quality beeswax finish.
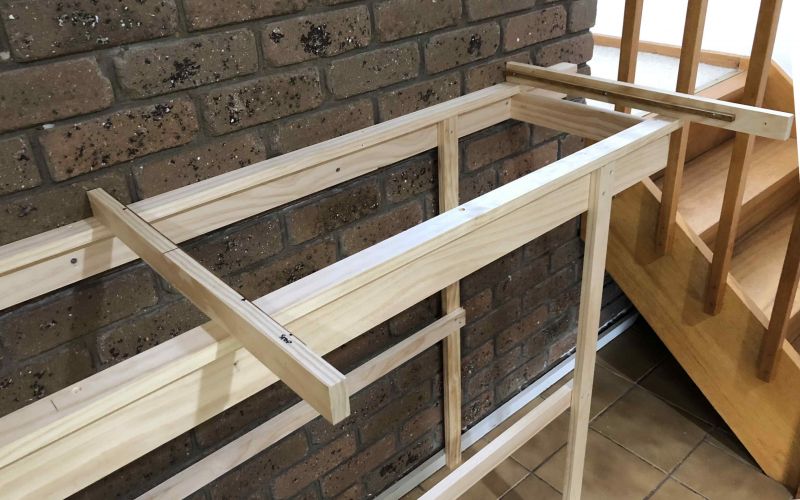
This first step gave me a level base to position the Traverser and only the ends of the epoxy coated angle slide on the side strips so the plate moved effortlessly.
Pic #2 shows the plate in situ but just sitting on the outer support rails
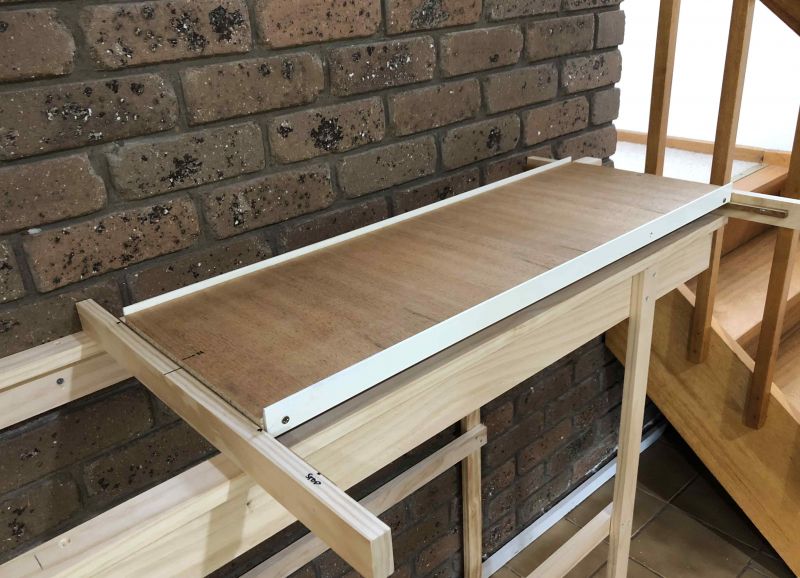
The final stage involved building the support frame for the ball race rollers, this I did back to front, first installing the rollers on the traverser so I could ensure they were at a perfect perpendicular, then the cross braces, pre-cut to match the gap between the "L" Girders, then made sure these were squared off with cross pieces and triangular corner gussets.
Done in this order the supports fitted straight into the main frame needing only a final tweak to get a perfectly square alignment before fixing. The block in the centre is the stop to prevent over-extension forwards.
Last edit: by Colin W
Posted
Full Member
Roger OO DC Steam
Posted

Full Member
Pop-corn at the ready…. carry on. n
Marty
Posted
Full Member
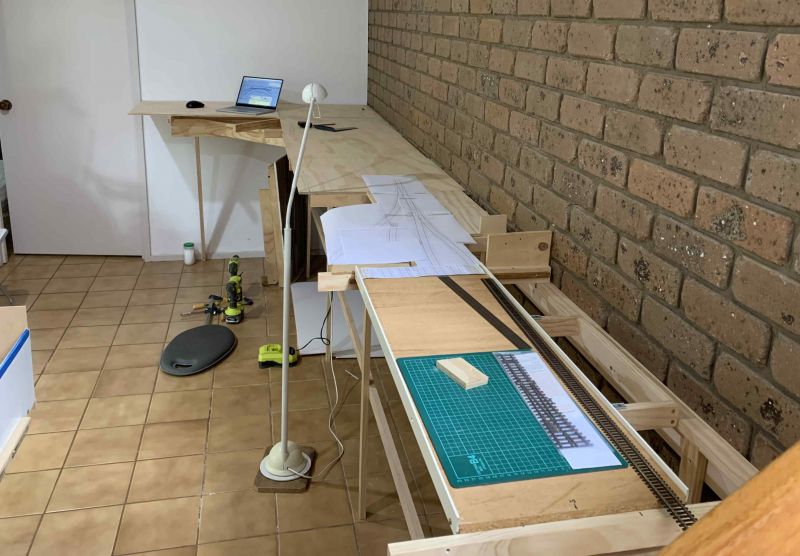
We went out to Bayswater, to a specialist board supplier for the top, B/BB grade 9mm ply, 2400*1200mm. A very nice piece was acquired and Kev was back the next day with it all neatly cut to specs. This shows some of the boards sitting on top of the L Girders for flat safe keeping while I work out the fitting details.
In the foreground are my first tentative steps with using some joists to elevate some scenery sections. This is just "playing around" for now while I work out how best to create the scenic areas. Some more details when I get something nearer a solution. Now I can see it for real, I can fully understand what the fuss is about and why the Open "L"- Girder system is so popular. I owe a great debt to the RMWeb-ber who loaned me his copy of the definitive guide :cool:

Last edit: by Colin W
Posted
Full Member
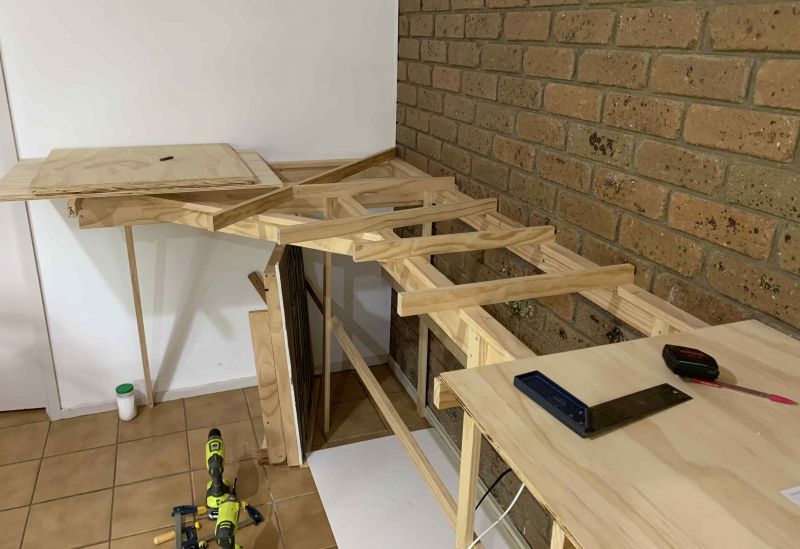
It feels like it's been a long week here, hard to believe it was just last Monday we bought the top ply sheet and Kev bought it back cut up Tuesday afternoon. Since then much water has passed under the metaphorical bridge, it's peak season for me in the garden, our mild wet spring has brought bounteous crops of berries and currants to tend and harvest. All the summer crops also are demanding daily "love and attention". Then to find time somewhere for Bridge sessions and building a layout.
So, what has been achieved is quite a bit by my standards. Here are three pics of the framework now with the majority of joists in place. Shown with / without top sheets in place. The Templot prints which can be seen in the foreground of #2 and #3, are proving to be worth their weight in gold, helping me to scope the line of the track-beds, something hard to do from a screen based plan.
Meanwhile, we had three most welcome visitors dropping by the other day. They announced their arrival by loudly cracking Hakea nuts in their beaks.
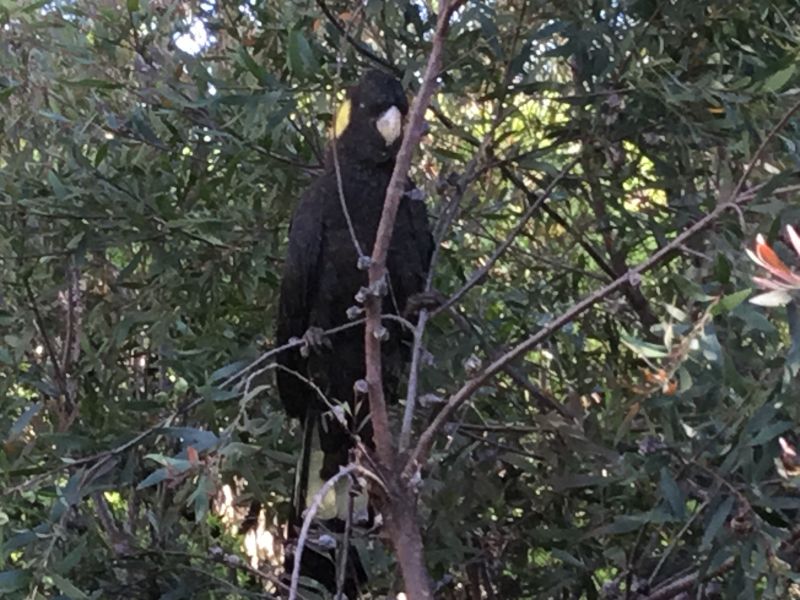
The yellow tailed Black Cockatoo is a big bird, 55-65cm long and a magnificent creature. I've seen them before but never up so close. For those who have no idea what a Hakea or its nuts are, the medium shrubs are native small trees, the nuts of which have evolved to survive extreme bush fires and then, only then, open. They make Macadamia nuts seem like peanuts in comparison. Well these cockies had great fun tweaking them open with their ferocious beaks!
Last edit: by Colin W
Posted
Full Member
Yours is an impressive bird.
Cheers Pete.
Posted
Full Member
In which a highly useful feature of Anyrail was exploited
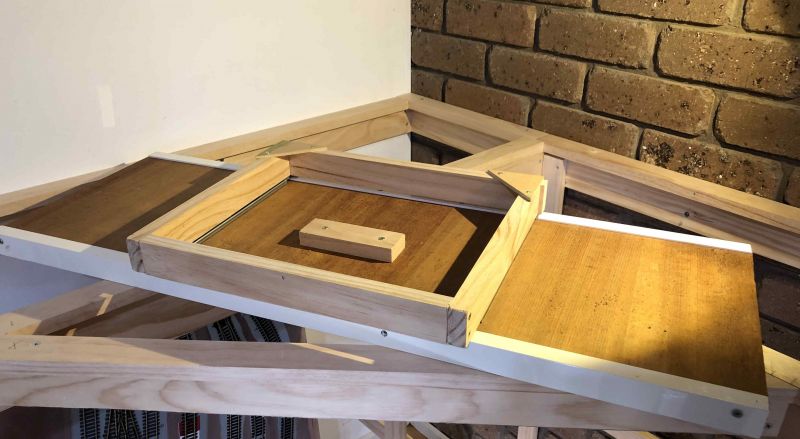
My challenge was that the top board I'd bought, 2400 * 1200 mm of high quality 9mm Ply only comes in that quantum and at the price paid it was one sheet, no more! So I needed a way to minimise wastage while getting everything I needed from the single board.
Returning to using Anyrail where I have a layout copy, I overlaid all the major top sections I needed on the design. Then I realised I could use another blank Anyrail template as a basic CAD device - set up all my shapes in the layout file as required and them copy them to the blank sheet Template.
The results are shown below (LHS) where the yellow boards represent the core of my L structure + the section in front of the Storage traverser. The two Blue strips are sections to be used in the traverser approach, leaving me just the pink offcut.
Out of this remnant, I needed two crucial shapes and this is where the CAD aspect of Anyrail helped me fit the imported elements onto my residual template, rotating etc to get the best fit. To do this by trial and error would have been a nightmare. The end result is shown on the right, picking the coordinates straight off Anyrail I could draw the shapes out on the timber without printing out.
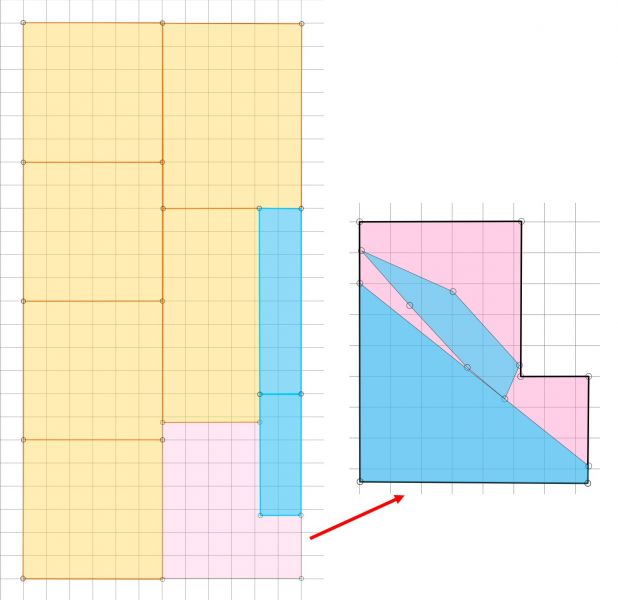
Note: the observant will spot that the grid in the RH image is out of scale (125%). There was a reason for this related to the image import, I simply read the dimensions out of Anyrail and scaled down by the appropriate ratio.
Last edit: by Colin W
Posted

Full Member
As I found out to my cost, when making several cuts in a large board to create smaller shapes, the effect of the width of the blade multiplies and the final board can be 1/4 inch shorter than you expect.
If this is not a problem, its not a problem but do bear it in mind
Barry
Shed dweller, Softie Southerner and Meglomaniac
Posted

Full Member
'Petermac
Posted
Full Member
The LHS is schematic; taking into account the sheet's true dimensions which were spot on at 2400*1200mm, the output dimensions were adjusted to allow for cut widths and produce the shapes I required. He even marked up the 4 squares for me so they'd go down in correct sequence. As a result they fitted on the base perfectly, at one point on the plan I have 4 sheets meeting at a point - I have a perfect match on a level base. Something I know I'd not achieve in 100 years.
The final cuts, the two blue strips and the odd shapes I cut by hand with a fine toothed saw and planed smooth. Good old "O" level woodwork came in useful, Mr 'Robbie" Robinson would be proud of me!
Last edit: by Colin W
Posted
Full Member
When some unforeseen issues arose with planning permissions
The tidy base structure assembled by Kev was part of Plan A where the front support legs provided a framework for a rigid structure and some handy shelving. However, in a situation reminiscent of various major Victorian (Australia) projects aborted by the endangered "yellow-bellied parrot", my shelving has hit a similar insurmountable wall of environmental and political resistance
 .
. It seems that various nasty arachnids will use any storage space, enclosed or otherwise, to wreak havoc on the downstairs room so my shelving is right out - The planning manager has spoken :roll: (SWMBO).
However, undismayed I returned to my loan copy of Westcott for some inspiration. There I found many solutions to wall mounting and at the same time some resolution of how to manage the support of the area in front of my traverser where I had an issue of how to best mount my joists.
This shows the replacement wall mounted supports, I must admit much tidier and far easier to get under
For the traverser end with its greater reach and weight I built the Westcott recommended reinforced arm.

As can be seen it allows for support forward of the traverser and for further extension into the lower forward section of river bank.
Posted
Full Member
Cheers Pete.
Posted
Full Member
'Petermac
Posted

Site staff
So whats plan B for storage now ?
Cheers
Matt
Wasnie me, a big boy did it and ran away
"Why did you volunteer ? I didn't Sir, the other three stepped backwards"
"Why did you volunteer ? I didn't Sir, the other three stepped backwards"
Posted

Full Member
Linn Westcott rides again. Although diagonal joists at the corner? Nice to see an L beam design.
Being a professional I am sure Kev trued up the sheet before getting to work. Cutting ply usually needs a thinner blade with lots of teeth to avoid splintering, loss due to kerfs is not that great.
If you think regular 5 ply sheets are expensive try 9mm Baltic birch.
Nigel
©Nigel C. Phillips
Posted
Full Member
Regarding tunnel dwelling arachnids, Westown-Heathfield has had a 1m long tunnel for 7 years and to my knowledge never been adopted as a home by said beasties. That due in part to its being mounted on a free standing table (of sorts) and the rigorous regime maintained in the downstairs room. This the very same regime reputed to be under assault if I have wall mounted shelving / cupboards.
Part of the problem is the brick wall with lots of nice crevices / potential homes, so that battle has been conceded while I work on plan B! A tactical retreat is often best I've found :twisted:
TBH the nearest I came to a resident on W-H was back when I had a footbridge and spotted a little black jumping spider heading up the steps in a scene which could have been straight from "Miniscule", e.g.
Spider Driver
Posted
Full Member
Hi Nigel,Hi Colin,
Linn Westcott rides again. Although diagonal joists at the corner? Nice to see an L beam design.
Being a professional I am sure Kev trued up the sheet before getting to work. Cutting ply usually needs a thinner blade with lots of teeth to avoid splintering, loss due to kerfs is not that great.
If you think regular 5 ply sheets are expensive try 9mm Baltic birch.
Nigel
The main diagonal major joist is an extra, it bisects two regular right angled corner joists - it was the only way I could see to bring a joist far enough forward into the centre of the curve without further major under-support. Two other joists are just angled off the perpendicular rather than being diagonal.
Kev's cutting was of the highest order, the cut sheets were not sanded but as delivered were as fine as you could possibly desire.
Last edit: by Colin W
1 guest and 0 members have just viewed this.