On Chubber's cutting mat
Posted
#251238
(In Topic #13805)

Full Member
'You may share the labours of the great, but you will not share the spoil…' Aesop's Fables
"Beer is proof that God loves us and wants us to be happy" - Benjamin Franklin
In the land of the slap-dash and implausible, mediocrity is king
"Beer is proof that God loves us and wants us to be happy" - Benjamin Franklin
In the land of the slap-dash and implausible, mediocrity is king

Posted
Full Member
http://www.rmweb.co.uk/community/index.php?/topic/83509-a-village-shop-from-a-scalescenes-cottage-row/#entry1383675
If not acceptable, mods please delete link and PM me.
D
PS There is a reference to problems involved in scratching glazing material when lifting the self adhesive lable paper used for window frames. I have now decided the best, least deletarious method is to use sharpened 2B pencil tip. No scrathes, any markes wipe off with a cotton-bud and eraser. I have since realised the raised panel on the shop door is over thick, but I am 'frit to try altering it. I might try sticking a newspaper headline poster and some fine wire mesh on it to make it look intentional.
D
 Last edit: by Chubber
'You may share the labours of the great, but you will not share the spoil…' Aesop's Fables
"Beer is proof that God loves us and wants us to be happy" - Benjamin Franklin
In the land of the slap-dash and implausible, mediocrity is king
"Beer is proof that God loves us and wants us to be happy" - Benjamin Franklin
In the land of the slap-dash and implausible, mediocrity is king
Posted
Full Member
I find the tip of a wooden toothpick is ideal for removing the self-adhesive label to reveal the window pane beneath. No scratching of the window surface.
Regards,
Terry
Posted

Full Member
Ian Lancaster
Please visit my OO Gauge 1930's LMS layout "Jencaster"
http://yourmodelrailway.net/view_topic.php?id=14622&forum_id=21&page=1
Please visit my OO Gauge 1930's LMS layout "Jencaster"
http://yourmodelrailway.net/view_topic.php?id=14622&forum_id=21&page=1
Posted
Full Member
D
'You may share the labours of the great, but you will not share the spoil…' Aesop's Fables
"Beer is proof that God loves us and wants us to be happy" - Benjamin Franklin
In the land of the slap-dash and implausible, mediocrity is king
"Beer is proof that God loves us and wants us to be happy" - Benjamin Franklin
In the land of the slap-dash and implausible, mediocrity is king
Posted
Full Member
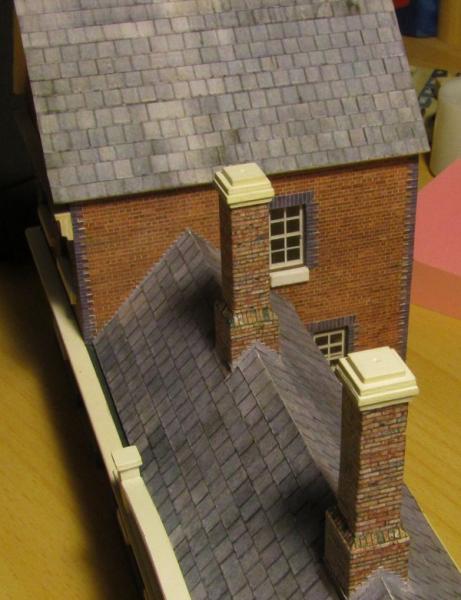
Herewith a photo I took on the W.S.R. some time ago, showing how thin the slates were. The rough edges lead me to believe they are older hand trimmed slates, probably from over the water in Welsh Wales.

It's possible to do a reasonable likeness [below] using Scalescenes TX 18, laid to give a sqaure appearance, like these below, where a line has been cut with a Stanley knife between each slate and then the whole treated with scraped black artists' pastel which I rubbed in with a short stippling brush to [a] generate a nice shine and to colour the edges of the cut paper and [c] brush away any excess PritStik adhesive The same trick can be used with an appropriately coloured pastel on red tile roofs. I find it much less messy than trying to colour the egdes of a single thickness of paper with the much vaunted felt tip pen.

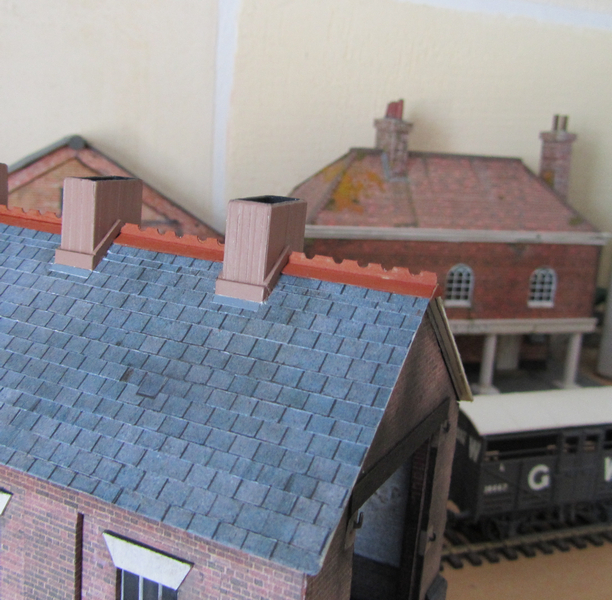
Laying with less overlap gives the impression of longer 'Queen' tiles like my old Plymouth terrace in St Budeaux, shown below in an 'in-build' station roof for the old Bear's End, I believe a style primarily used on more steeply pitched roofs.
Here, a double row of slates was used under the ridge, to support the weight of the decorative ridge tiles, shown on an in-build copy of Wallingford engine shed. Note the odd slipped slate, all adds to credibility.
.
To be sure that your strips of slates can be well stuck, you need a strong supporting layer to which they may be firmly pressed once they have been smeared with stick adhesive.
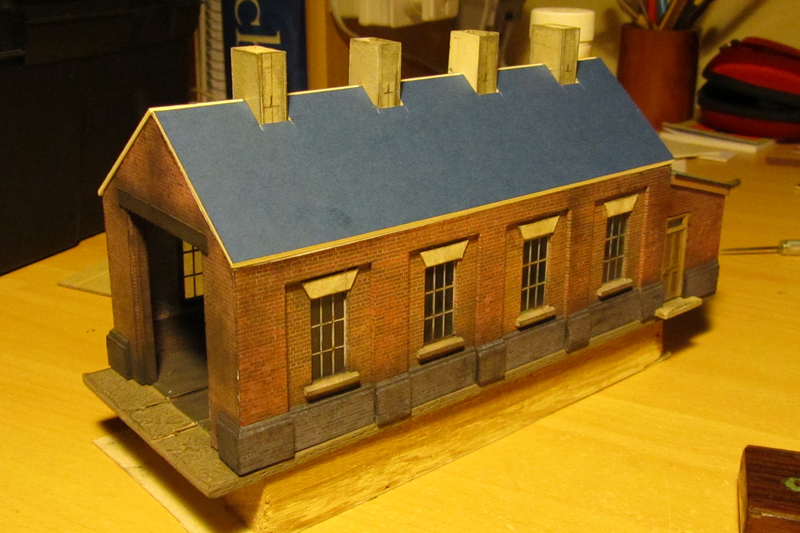
A viable alternative is to print the slate texture onto self adhesive label paper [SALP], then stick that whole sheet to another sheet of SALP befor cutting the strips [see the gable end below] giving a thinner edge appearance as in the gable end below.
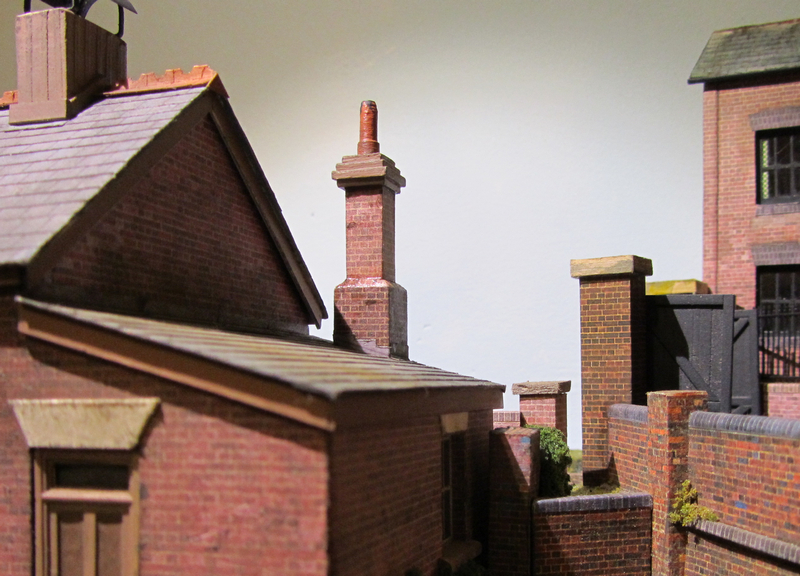
You can also leave a thinner look at the edges by laying single thickness slates slates on a piece of thin card [Packeto Cornoflako] to show the narrow thickness like the edges of the lean-to roof below.
Finally, two tips I think are worth repeating, [1] Consider printing slate papers in grey-scale rather than colour, so that you can use your own weathering tones if you wish. [2] Cut all the horizontal lines of sheet of TX 18, leaving the left hand side of the rows attached to the sheet, then cut off the right hand border of the sheet down the edge of the slates, before snipping off the strips one at a time. This ensures that the bond and the printed 'weathering' pattern stay aligned and consistant as they are applied.
I hope that this has been of interest to some members, and that the old salts amongst you will not think I am trying to teach you suck eggs!
Douglas
Last edit: by Chubber
'You may share the labours of the great, but you will not share the spoil…' Aesop's Fables
"Beer is proof that God loves us and wants us to be happy" - Benjamin Franklin
In the land of the slap-dash and implausible, mediocrity is king
"Beer is proof that God loves us and wants us to be happy" - Benjamin Franklin
In the land of the slap-dash and implausible, mediocrity is king
Posted
Full Member
I found these two whilst searching for something else, and thought they might be of interest…..
By clicking on the PDF file link below, you can download a printable version of this picture, ready scaled to reproduce it in 4mm - 1/76th scale.
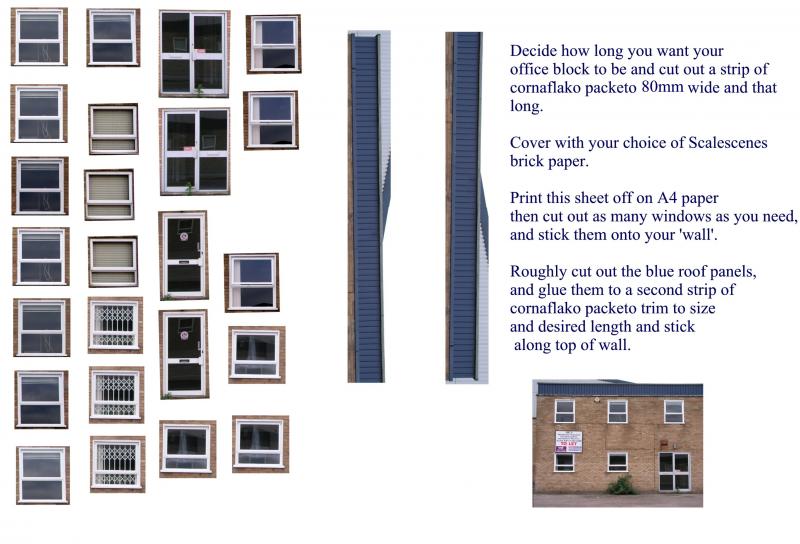
The pictures of windows and doors are designed to be cut out around their white window frames and sills and stuck onto a suitable brick patterned texture paper, for my example below I have chosen Scalescenes TXO3 Cream Brick.
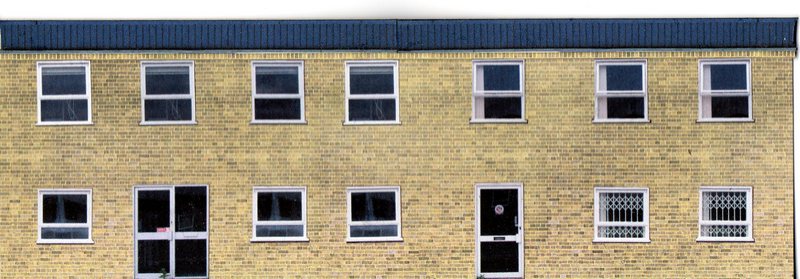
Have a close look at your sheet of texture paper, it may have a course of 'soldier' bricks, aline of bricks printed standing on their ends. Cut out and pasted to card as a separate layer they can add a subtle touch to your model, see below
You will need an 80mm wide strip of thin card, as long as your chosen size of building covered with texture paper. If you are using 'Cornoflako Paketo' then glue your paper to the dull side, the glossy printed side will help resist the tendency of the card to curl as the glue dries. I prefer to use 'Pritt-stik'. Allow to dry, preferably under a heavy flat weight.
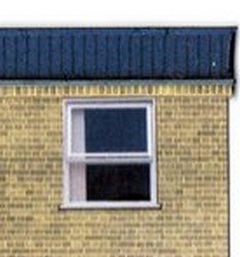
Whilst your glue is drying, cut out as many doors and windows as you need, roughly cut out the blue roof strips and glue these to the same sort of thin card. If you choose to incorporate a soldier course underneath your roof overlays, cut and paste these at the same time and allow to dry thoroughly before you attempt to cut them out. If you try to cut the strips whilst the glue is damp there is a very good chance that you could tear and drag the soft paper.
Arrange your windows and doors in a pleasing fashion. Mark their positions lightly with a soft lead pencil, or, use Post-it notes to mark the particular line of bricks they are to be placed on. Soft [2B-4B] pencil lines can be erased with a soft rubber. It is worth buying a Windsor and Newton Medium Kneaded Putty Rubber for this sort of job, it also cleans fingerprints and grubby marks off of paper without being too aggressive, and can be used to 'dull down' papers to help them regress into the background.
When all glue is dry, you may consider adding telephone wires on the face of the wall with a sharp grey/black pencil, burglar alarms etc and weathering the paper. Consider drawing a fine black line under each window sill to accentuate the shadow and add to the 3D effect.
Good Luck!
Doug
Attachment: Forum freebieamanded1.pdf (Downloaded 163 times)
With a bit of luck, the next attached file should print out as elements to make an older fashioned building 'Flat-scene', exactly the same way as the one above.
I think this would look good pasted up onto Scalescenes TXO1 red brick or TXO6 aged red brick.
I'd cut out the opening for the roller doors to whatever size or height you fancy [or leave them this size], then cut out the doors to match, glue them to a separate piece of card and stick that behind the wall opening. The small doors and windows I'd stick straight on.
Enjoy!

Attachment: oldfactory roofand doors1amended.pdf
Here's one done by Stubby…was it really 10 years ago????

Doug
Last edit: by Chubber
'You may share the labours of the great, but you will not share the spoil…' Aesop's Fables
"Beer is proof that God loves us and wants us to be happy" - Benjamin Franklin
In the land of the slap-dash and implausible, mediocrity is king
"Beer is proof that God loves us and wants us to be happy" - Benjamin Franklin
In the land of the slap-dash and implausible, mediocrity is king
Posted
Full Member
Following a request to explain how I weather Scalescenes papers with watercolours, I have decided to show how I have weathered a kit-bashed version of John's arched bridge. Much easier to build now, the latest version includes a fully printed arch which obviated the tiresome and difficult method of cutting a strip of individual bricks before 'bending' it around the opening.
I shall show some weathered-out soft bricks that plants have gained a foothold in, some lime washing down from the mortar, some mould and green partly obscuring the lower bricks and some dented bricks done by lousy drivers. My aim is to make it look 'dirty' yet still transparent, something watercolours does admirably.
WARNING - I am using genuine Epson 'DuraBrite' inks which have a reasonable resistance to water, the printed paper is wetable, but the inks don't run. Before you try this on your masterpiece, have a little trial splash somewhere out of sight. All is not lost if you are using cheapy inks, a VERY light spray with Lidl waterproofing spray, sold for suede shoes and anoraks [O.K. here then…] may help, but too much will make it too impermeable for these techniques.
The colours I am using are Windsor and Newton 'Cotman' colours, very reasonably priced and available in a huge range of colours. I've chosen Burnt Sienna [a brown], Ivory Black [a less inky black colour], Cadmium Yellow and Paynes Grey. The latter, though a 'grey' is based on a very dark mix of blues, as you will see, when mixed with yellow, it makes…yes, green!
You'll need two brushes, a Number 6 soft for splashing on watery mixes, and a Number 1 for putting little blobs of colour here and there. Synthetic are fine, but neither will cost more than £2-£3 for a really good one, and well looked after will last years and years.
Don't mix up a great dollop of whatever colour you think you need, put two colours alongside each other on a white surface like the inside of a margarine tub lid or an old saucer, and 'draw' them together with a moist brush. Then, each time you go back for more you'll get a natural, subtle difference in your colours.


You'll also need some tiny scraps of foliage stuff, I keep all my waste bits……and some PVA

Right! Cut out some brick shapes…

and with the side of your larger brush dipped in clear water wet the cut-out area and the whole distance from there to the 'ground' . Everything else happens while the paper is still visibly wet, so with the little brush, blob some white paint into the cut-outs and quickly draw it down the wet stripe to the ground.


Mix some blacky-brown and dab a little in the wet white cut-out, add a tiny bit of PVA and stick on the plant material of your choice…

Now for the dirty area at the bottom where earth slashed up has gone greenish [this works all round buildings, too] wet up about 1/4"- 6mm
and as we are adding a 'bushy thing' which in turn will attract moisture and dirt, do a big splash, add a dollop of your green and watch it spread out naturally without any unrealistic brush marks.

Add some more 'bush' and allow to dry.
The finished result is a subtly dirtied finish with no deliberate brush marks. The original printing shows through, and the Chinese white has sedimented on top of the paper like efflorescing salts really do. All the white stains have been applied 'wet-in-wet' as a watercolour artisit would say, and looking at the joins of the wing walls and pillars the dark staining has been added in the join by the same technique.
Clumsy drivers have dented the arrises either side of the entrance, shown by pressing the edge of a steel rule against them into the underlying card. The width markers were in fact made from steel strip in the pre-plastic age and as such show rust marking where the fastenings go through them. The signage is chipped as little boys knew very well that they gave a satisfying 'clang' when hit with a stone from a catapult…..tee-hee!

I hope this will encourage some of you to try watercolours as a means of weathering texture papers,
Douglas
Last edit: by Chubber
'You may share the labours of the great, but you will not share the spoil…' Aesop's Fables
"Beer is proof that God loves us and wants us to be happy" - Benjamin Franklin
In the land of the slap-dash and implausible, mediocrity is king
"Beer is proof that God loves us and wants us to be happy" - Benjamin Franklin
In the land of the slap-dash and implausible, mediocrity is king
Posted

Full Member
On the subject of slates, I have just found out (as part of my planning application) that a slate roof should be set at a minimum of 18 degrees whereas clay tiles can be set onto a 15 degree slope.
Minor factoid for slate roof users.
Barry
Shed dweller, Softie Southerner and Meglomaniac
Posted

Full Member
N gauge Laser Cut Model N-TILES01 Slates / Tiles (choice of 4 colours) - York Model Rail
00 gauge Laser Cut Model Tiles, Slates and Ridges - York Model Rail
0 gauge Laser Cut Model Tiles, Slates and Ridges - York Model Rail
Cheers MIKE
I'm like my avatar - a local ruin!
I'm like my avatar - a local ruin!
Posted
Full Member
I've found the laser cut tiles by York Models to look the best, - self adhesive strips which you lay overlapping. Plain tiles and decorative, various colours
00 gauge https://yorkmodelrail.com/product-category/00-scale-ho-scale/tiles-slates-and-ridges-00-scale-ho-scale/
Very nice, Mike, but 'AAAaaagh!' The prices… they bite deeply into the S.L.W. fund….
Doug
'You may share the labours of the great, but you will not share the spoil…' Aesop's Fables
"Beer is proof that God loves us and wants us to be happy" - Benjamin Franklin
In the land of the slap-dash and implausible, mediocrity is king
"Beer is proof that God loves us and wants us to be happy" - Benjamin Franklin
In the land of the slap-dash and implausible, mediocrity is king
Posted

Full Member
Even slate adhesive-backed laxer-cut ones (2 sheets of 4.5 x 12 inches). $8.95. Gives 45 square inches of coverage with 50% overlap.
Nigel

©Nigel C. Phillips
Posted
Full Member
D
'You may share the labours of the great, but you will not share the spoil…' Aesop's Fables
"Beer is proof that God loves us and wants us to be happy" - Benjamin Franklin
In the land of the slap-dash and implausible, mediocrity is king
"Beer is proof that God loves us and wants us to be happy" - Benjamin Franklin
In the land of the slap-dash and implausible, mediocrity is king
Posted
Full Member
See
http://yourmodelrailway.net/view_topic.php?id=3290&forum_id=14
D
'You may share the labours of the great, but you will not share the spoil…' Aesop's Fables
"Beer is proof that God loves us and wants us to be happy" - Benjamin Franklin
In the land of the slap-dash and implausible, mediocrity is king
"Beer is proof that God loves us and wants us to be happy" - Benjamin Franklin
In the land of the slap-dash and implausible, mediocrity is king
Posted

Full Member
Michael
Posted
Full Member
For corner strengthening I use off cuts of plastic angle and often also fit "floors and ceilings" to keep things square.
Cheers MIKE
I'm like my avatar - a local ruin!
I'm like my avatar - a local ruin!
Posted
Full Member
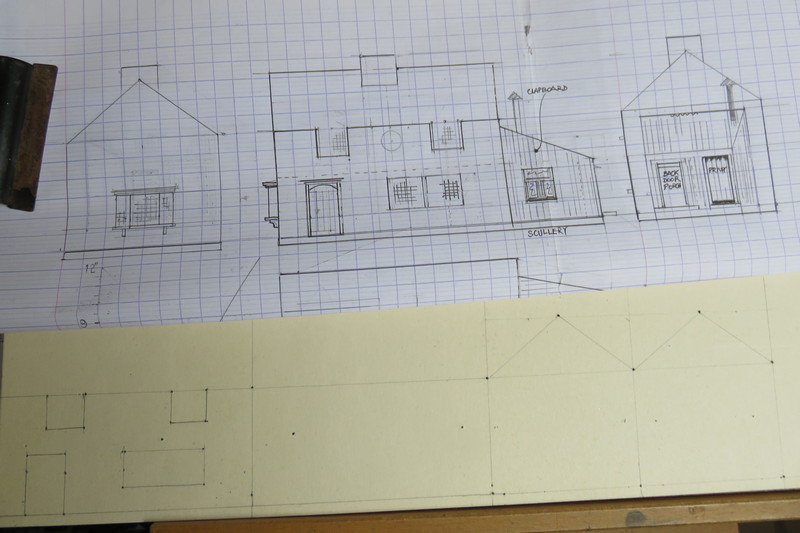
So….[that'll annoy Gastwo
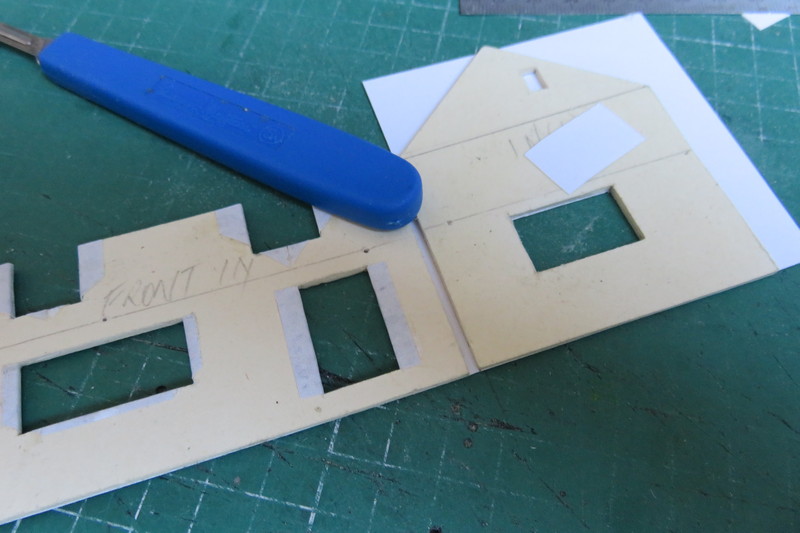
 ] here goes. First a few sketches, the a plan to scale from which to take off sizes straright onto the card, 2mm Finnboard, with dividers. As a cheap rubblestone building, sharp corners have no place, so the exposed corners window and door reveals are sanded over deliberately roughly.
 In order to make a seamless wrap with Scalescenes Limewashed stone TX 50 on the viewing sides, the front is glued to the texture paper then the end walls glued on leaving a succinct fold gap so that the front and end walls can be laid out flat for working up, and installation of the bay window. The windows will be glazed with leaded glass, made by printing a simple 1.8mm grid onto O.H.P. sheet.
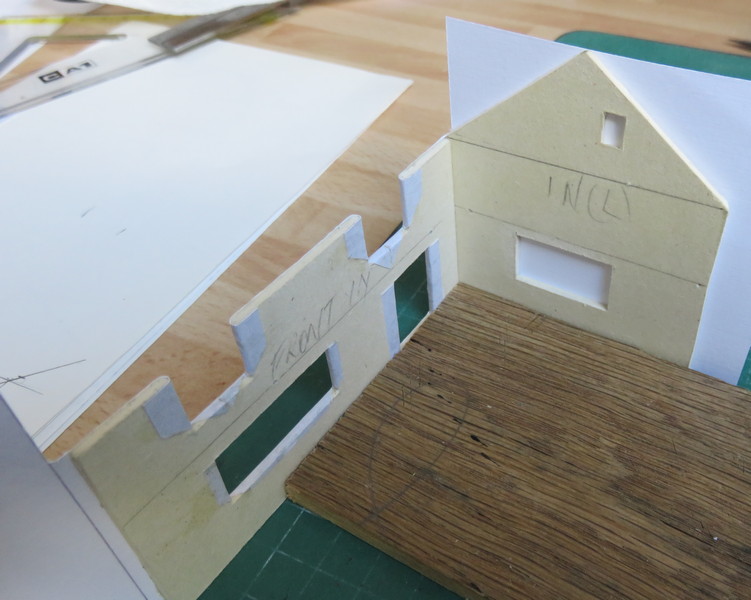
Aligning end and front walls using the texture paper. The join between the wall elements remain unglued at this stage, as seen below.
Showing how the rounded corners are covered by the single wrap.
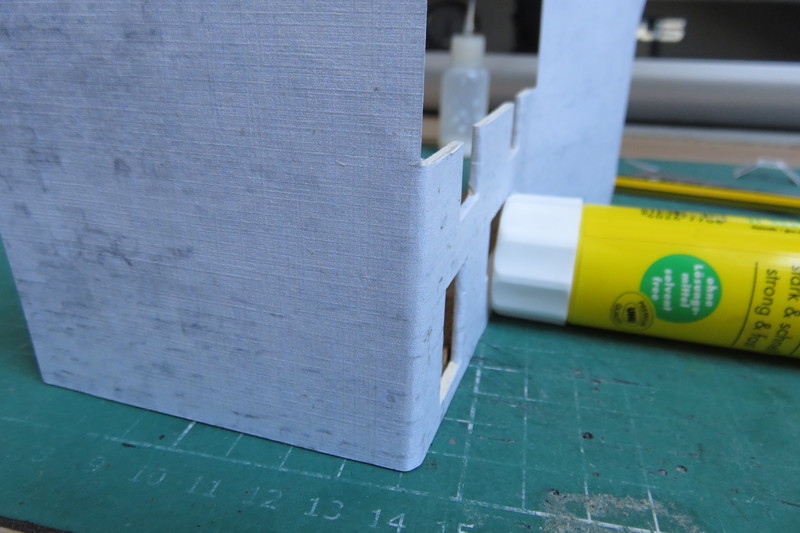
This allows the walls to be opened flat to allow the fitting of the bay window, some flashing to add in due course.
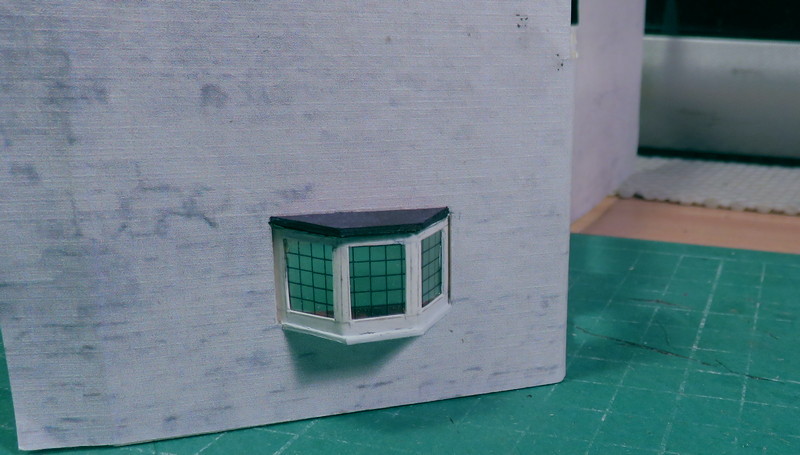
Next I'll have try at putting in the other windows.
Last edit: by Chubber
'You may share the labours of the great, but you will not share the spoil…' Aesop's Fables
"Beer is proof that God loves us and wants us to be happy" - Benjamin Franklin
In the land of the slap-dash and implausible, mediocrity is king
"Beer is proof that God loves us and wants us to be happy" - Benjamin Franklin
In the land of the slap-dash and implausible, mediocrity is king
Posted
Full Member
Posted
Full Member
Michael
Posted
Full Member
Before I show you the windows, here's my top tip for accurately cutting window reveals. If you have a window opening or any other opening you want to fit with a parallel edged 'liner' then place the required material underneath the opening, and run a pencil around the inside edges. Obvious? Well, if as in this case I want a 1mm wide inside edge to represent the wooden frames, I place the tip of my pencil lead in a spacer, in this case a 1mm nut, and draw around the inside. The line can't help but follow the exact outline of the opening. The same method can be used to mark a border edge for a wavy component, or when you are DIYing, using a penny washer and a big pencil to scribe a worktop to fit exactly the profile of a less than straight wall….
Simples!

Windows below

When the window sill glue is well and truly set I'll beast over the lower edge to ensure the card is well and truly pressed in to represent a beam of wood.
Door is next, need to find a good example to model. Poop-poop!
Last edit: by Chubber
'You may share the labours of the great, but you will not share the spoil…' Aesop's Fables
"Beer is proof that God loves us and wants us to be happy" - Benjamin Franklin
In the land of the slap-dash and implausible, mediocrity is king
"Beer is proof that God loves us and wants us to be happy" - Benjamin Franklin
In the land of the slap-dash and implausible, mediocrity is king
1 guest and 0 members have just viewed this.