Wombat Creek Tramways
Posted

Full Member
The year is 1963 somewhere in Victoria, Australia
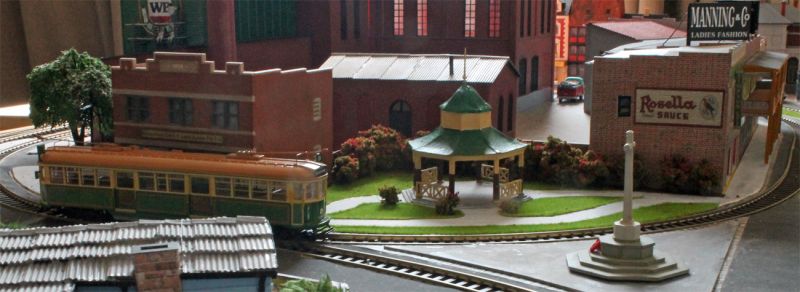
Wombat Creek Memorial Park
It has been a while since I have posted on the progress of Wombat Creek Tramways. Holidays in Taiwan and work have taken up time, but some construction has taken place.
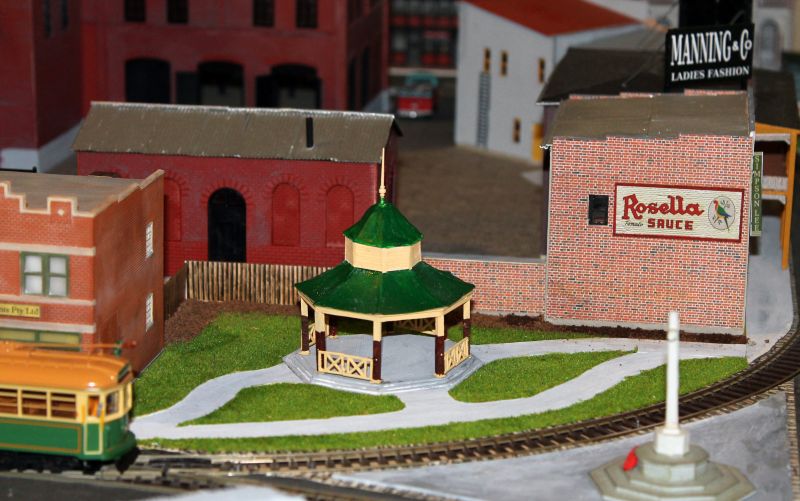

After completing the bandstand only one major feature is missing from this part of Wombat Creek (I will eventually draw a detailed track plan) – a water tower next to the tram barn. Why the tram barn in Elwood had a very prominent water tower is a bit of a mystery to me. Perhaps it served a nearby powerhouse. I will enquire at Melbourne Tram Museum.
 Last edit: by Claus Ellef
Cheers,
Claus
www.flickr.com/photos/ellef/
Claus
www.flickr.com/photos/ellef/

Posted

Full Member
Are you going to have a band playing in there ?
'Petermac
Posted
Full Member
Maybe on Australia Day 😉Nice bandstand Claus.
Are you going to have a band playing in there ?
Cheers,
Claus
www.flickr.com/photos/ellef/
Claus
www.flickr.com/photos/ellef/
Posted
Full Member
Most tramways will have scrubber cars and Wombat Creek Tramways is no different. 'Real' tramways will convert old trams into scrubber cars but Wombat Creek has no surplus of old cars, so I came up with another solution – a diesel locomotive and a tank wagon. I know it is not a solution, you will find at an Australian tramway, but it will serve the purpose here in Wombat Creek. The tracks will be cleared of dust!
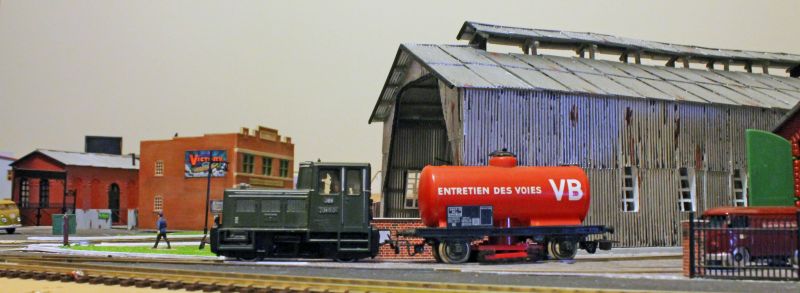
On a holiday in Austria some 40 years ago I bought the Kleinbahn locomotive. It has not had a lot of use being in storage most of the time. The wheels and gears had become stuck but a dose of WD40 made it running again. The number '56' comes from a small Victorian shunter, V56, with the same wheel configuration and an almost similar look. It was once used to shunt Metro trains through a washing complex. And yes, the gauge is not right! You may think the colours are the old VR livery, but it is not. They symbolise Wombat Creek with the blue being the 'creek' and the yellow being the gold.

Last edit: by Claus Ellef
Cheers,
Claus
www.flickr.com/photos/ellef/
Claus
www.flickr.com/photos/ellef/
Posted
Full Member
Everybody in Wombat Creek is busy getting ready for Christmas, but the council workers have managed to plant some mature bottle-brushes along the back of the Memorial Park.
A closer inspection reveals the shrubs are made from sisal rope, brown paint and Woodland Scenics foliage and flowers.
On behalf of all the people – young and old – in Wombat Creek: MERRY CHRISTMAS!
Cheers,
Claus
www.flickr.com/photos/ellef/
Claus
www.flickr.com/photos/ellef/
Posted
Full Member
Oh yes, nearly forgot - the bottle brushes look great - nice idea using the sisal.
'Petermac
Posted
Full Member
Chris
Posted
Full Member
I haven't done a proper drawing of the lay-out, as it stands at the moment. Since all tracks are down there is no real purpose for a drawing, so I'll give you a photo of the control panel instead.
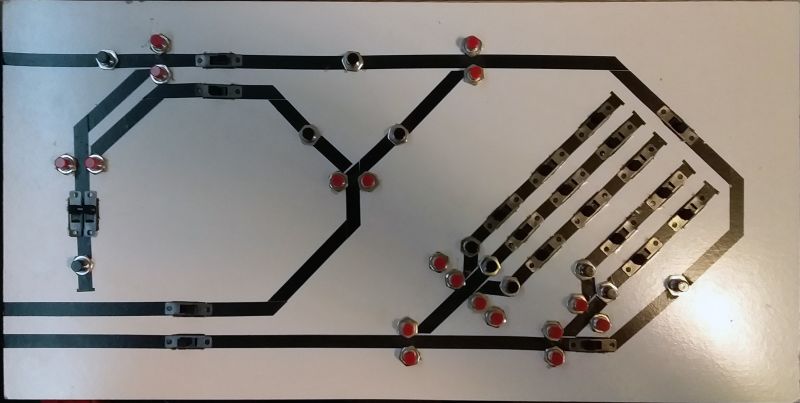
Obviously the black lines are the tracks. The reason for three tracks going right to the left edge is the tramways will eventually be extended depending on time and room. The necessary points and crossing are in storage.
The red push buttons control the points. Three points are still not connected and one points is unfortunately very unsteady.
The black push buttons control the power to the tram-stops. The tracks are under constant power and the trams will come to a stop, unless the black buttons are activated.
The slide switches are normally on, but they make it possible to stop a tram between stops.
Last edit: by Claus Ellef
Cheers,
Claus
www.flickr.com/photos/ellef/
Claus
www.flickr.com/photos/ellef/
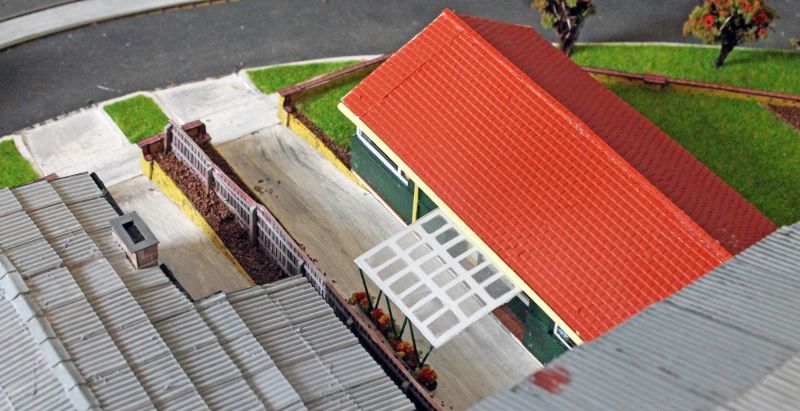
Posted
Full Member
Around six months a finished the two fibrohouses. Well, almost finished the green one. The roof over the entrance didn't get its supports,which are set on angles. I considered that to bee too 'tricky', so the project ended up in the 'too-hard-basket'. But the fact is – thought is worse than reality.
Cheers,
Claus
www.flickr.com/photos/ellef/
Claus
www.flickr.com/photos/ellef/
Posted
Full Member
During summer holidays quite a bit of work was done on the lay-out of Wombat Creek. Most of the 'projects' still needs the finishing touch, but the photo shows one being almost finished.

The garden around the blue fibro house deliberately looks somewhat un-kept because the family has other interests. The newest addition to the garden are the two tall gum-trees. They are made from florist wire, 'no-more-gaps' filler, some paint and Woodland Scenic material. They came up all-right even though the canopy is a bit wide. The cubby house is made from gum-tree bark and a piece of corrugated iron (plastic). The bark has the right texture and colour, so no weathering was needed. The rope ladder hanging from the cubby house is a very thin slice of corflute panel. A dive into my wife's sewing supplies gave me the materials for the hammock. To finish the scene I only need to find a person for the hammock and a child to climb up the ladder.
Last edit: by Claus Ellef
Cheers,
Claus
www.flickr.com/photos/ellef/
Claus
www.flickr.com/photos/ellef/
Posted
Full Member
Life in Wombat Creek is going on nice and quiet. Not of new-build for the time being. Only to more 'major' structures are planned – a water tower behind the old tram shed and probably Leaky's plumbing will get a building on a vacant spot next to the Mug Punter Hotel.
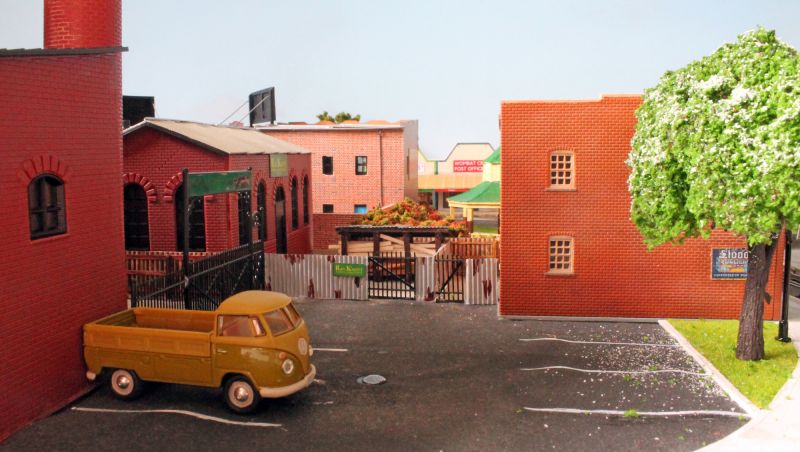
The parking lot is a bit uneven because of tree roots (read 'bad glueing') and appears worse on the photos than in real life.
Cheers,
Claus
www.flickr.com/photos/ellef/
Claus
www.flickr.com/photos/ellef/
Posted
Full Member
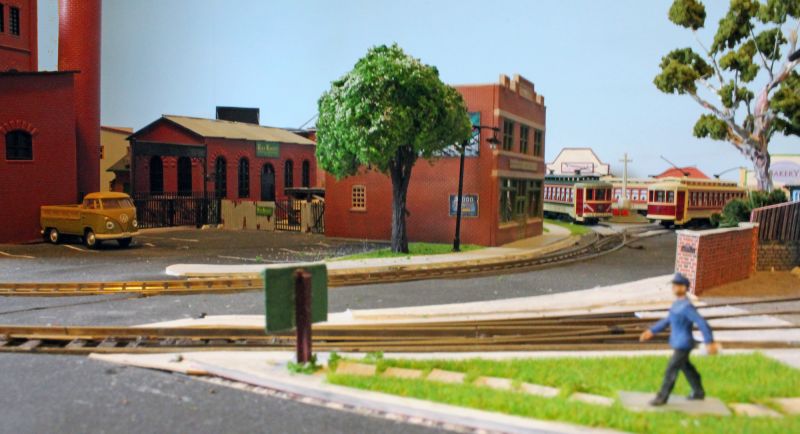
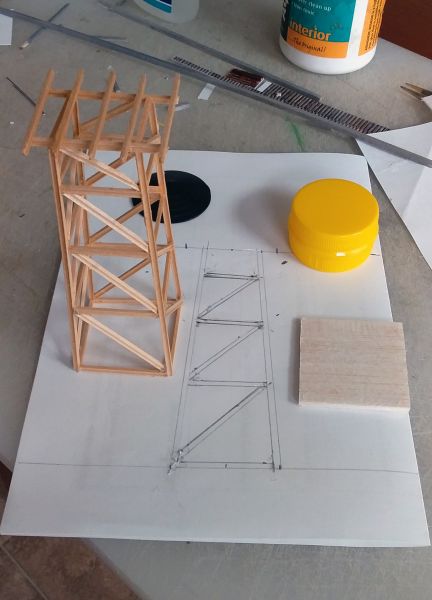
The water tower next to the tram barn in Elwood was a prominent feature. It is somewhat unusual with a water tower at an electric tramway, but a fire in 1907 destroyed the barn and the entire fleet. Perhaps the water tower was later installed in case a new fire should break out. Anyway – Wombat Creek Tramways now have their own water tower. The first photo shows the tower under construction. The tower itself is made from wooden I-beams from 'North-eastern Scale Lumber Co.' The beams come in 11'' lengths and are easily cut with a sharp knife. The base for the water tank is a square of balsa wood. The tank consists of two caps from juice containers. The black top is another left-over from the Heljan Brewery kit.
After additional details like reinforcements at the joints, water pipes and a ladder the towers is painted 'metal grey' before the water tank is added. Like the water tower in Elwood the tank is clad in an advert for Peters Ice cream.
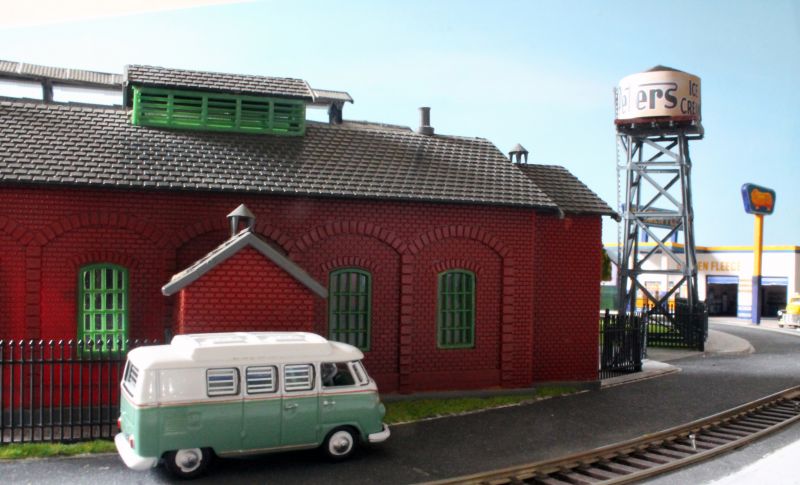
The third photo shows the view from the front of the tram barn. Road numbers have been added to the barn and 'speed restriction' (5 mph) is in place at the entrance. A while ago I ask for help regarding road signs from the 1960's. Trevor (Xford) was the man to help me out. He dug out his old book of 1970 Road Rules and emailed me copies of the relevant pages. Thank you very much, Trevor. More signs will be put up in the near future.

Last edit: by Claus Ellef
Cheers,
Claus
www.flickr.com/photos/ellef/
Claus
www.flickr.com/photos/ellef/
Posted
Full Member
I love the water tower - very "American" and, as far as I'm aware, such a structure didn't exist in UK but it really does look the part there.
I am slightly surprised there's a water tower at a tramway depot - water and electricity don't make good bed-fellows ……………. :roll:
'Petermac
Posted
Full Member
Thank you very. I was inspired by a few photos. This is the link to one from the Public Record Office Victoria:That's looking great Claus. :thumbs
I love the water tower - very "American" and, as far as I'm aware, such a structure didn't exist in UK but it really does look the part there.
I am slightly surprised there's a water tower at a tramway depot - water and electricity don't make good bed-fellows ……………. :roll:
https://prov.vic.gov.au/search_journey/select?keywords=rs/0820
Cheers,
Claus
www.flickr.com/photos/ellef/
Claus
www.flickr.com/photos/ellef/
Posted
Full Member
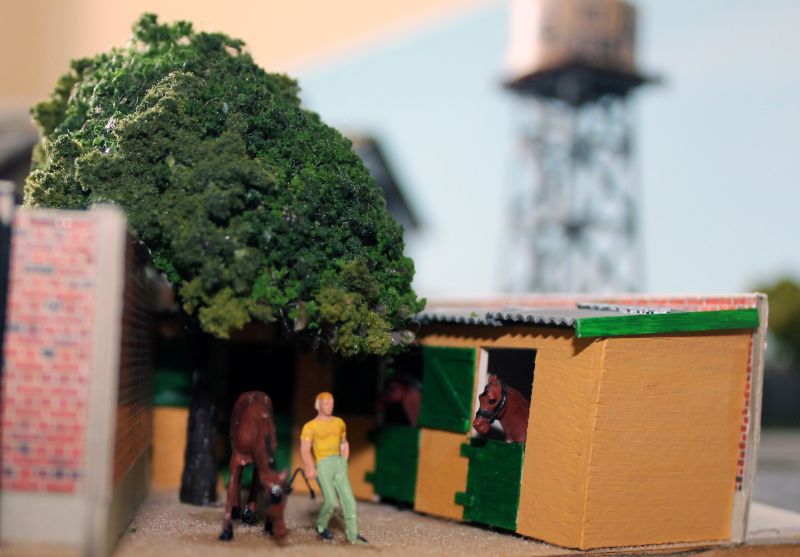
Being on school holidays usually means at least a few days of travelling but not this year. Thanks to COVID-19 I am confined to the house and garden. Which of course gives me time to read books, to mow the lawn, to repot a lot of plants etc. Fortunately I also have time to work on Wombat Creek Tramways. A few minor tasks have been accomplished. Among them some constructions at the Racecourse.
An odd-shaped, walled-in area between the entrance to the Racecourse and Racecourse Road has been a bit of ‘problem’. From the street-side it looks fine but sitting at the edge of the lay-out the area itself needed some attention. The solution was the construction of a few stables for the racehorses.
The stables are made from cardboard with corrugated roofing from leftover plastic card. The horses come from my childhood train layout, so they will be around 45 years old. Probably too old for racing. To give them a bit of shade during the hot summer months a cheap tree has been planted after being improved with extra foliage and colouring to reduce the bright green.
Last edit: by Claus Ellef
Cheers,
Claus
www.flickr.com/photos/ellef/
Claus
www.flickr.com/photos/ellef/
Posted

Site staff
Ron
NCE DCC ; 00 scale UK outline.
NCE DCC ; 00 scale UK outline.
Posted
Full Member
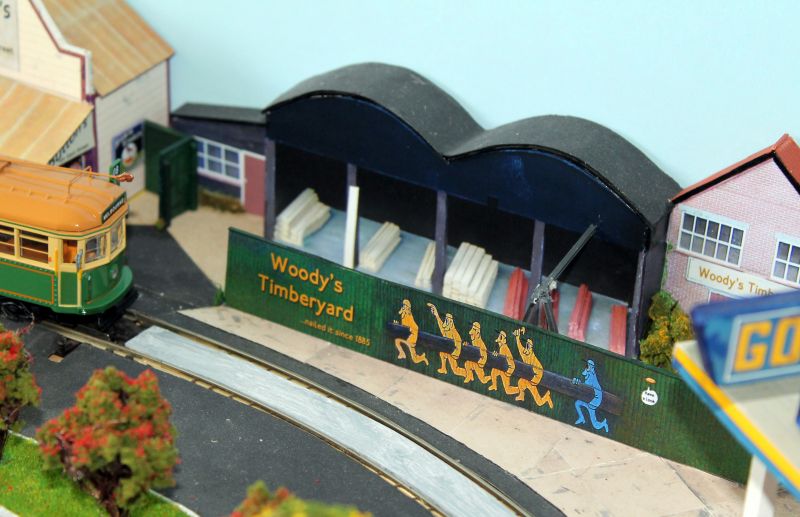
Woody’s timberyard has been completed for quite some time – except for the crane used to haul in and out large pieces of timber. The timberyard sits right at the back of the layout, so the buildings are only a couple of centimetres deep.
Cheers,
Claus
www.flickr.com/photos/ellef/
Claus
www.flickr.com/photos/ellef/
Posted
Full Member
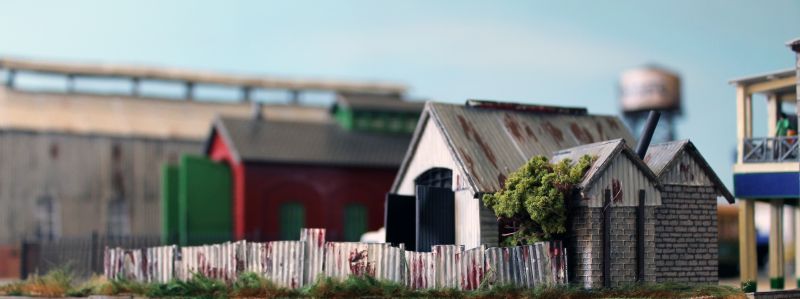
Leaky's Plumbing Service
My third project during my stay-at-home holidays dealt – like the horse stables – with an odd shaped area. This time it is next to the ‘Mug Punter Hotel’. I often search the internet for images I can use as inspiration for future buildings. I came across a few photos of a South Australian blacksmith shop advertising horseshoeing. They gave me the idea to construct this small building. Due to the size of the spot the proportions of the building is much smaller the original, but the features are pretty much right. 
Cheers,
Claus
www.flickr.com/photos/ellef/
Claus
www.flickr.com/photos/ellef/
Posted
Full Member
If you have a colour printer, you can get sticky label paper in A4 size with 1 Peel off strip. The trick is to build up enough signs to put onto one sheet to run it through the printer! That would only involve 1 trip to Office Jerks to get a pack of about 20 sheets for around $12.20 - just checked the website
https://www.officeworks.com.au/shop/officeworks/p/quirkii-a4-adhesive-paper-20-pack-aumsa420p
I used this stuff to make the building sides shown on
http://yourmodelrailway.net/view_topic.php?id=9679&forum_id=14
and fill in the spaces with other signs or loco number boards,
Hope this helps
Regards
Trevor
Last edit: by xdford
Posted
Full Member
Hi TrevorClaus,
If you have a colour printer, you can get sticky label paper in A4 size with 1 Peel off strip. The trick is to build up enough signs to put onto one sheet to run it through the printer! That would only involve 1 trip to Office Jerks to get a pack of about 20 sheets for around $12.20 - just checked the website
https://www.officeworks.com.au/shop/officeworks/p/quirkii-a4-adhesive-paper-20-pack-aumsa420p
I used this stuff to make the building sides shown on
http://yourmodelrailway.net/view_topic.php?id=9679&forum_id=14
and fill in the spaces with other signs or loco number boards,
Hope this helps
Regards
Trevor
Thank you very much for your reply. I have some self-adhesive transparent sheets, I can put through my printer. It works quite well. I have used them for my 'scrubber car'. The challenge will be the corrugated surfaces of the building. How to get the sticker to follow the actual surface so it looks like it is painted directly on the walls and not stuck on. I will test it out and let you all know, how it goes.
Cheers,
Claus
www.flickr.com/photos/ellef/
Claus
www.flickr.com/photos/ellef/
1 guest and 0 members have just viewed this.