The art of compromise.
Posted

Full Member
Finally gettiing out of my system.
Hi Terry. I do like the weathering on your track, it really looks dirty in a nice sort of way, and with a shiny railhead .Would you let me, and anyone else that doesn’t know how to get such a good result into the secret???Best wishes Kevin
Staying on the thread Kevin.

Posted
Full Member
Hello Kevin. If you are looking at the track in post 75, that is not my photo. Send Ken a PM and I'm sure he will enlighten you.
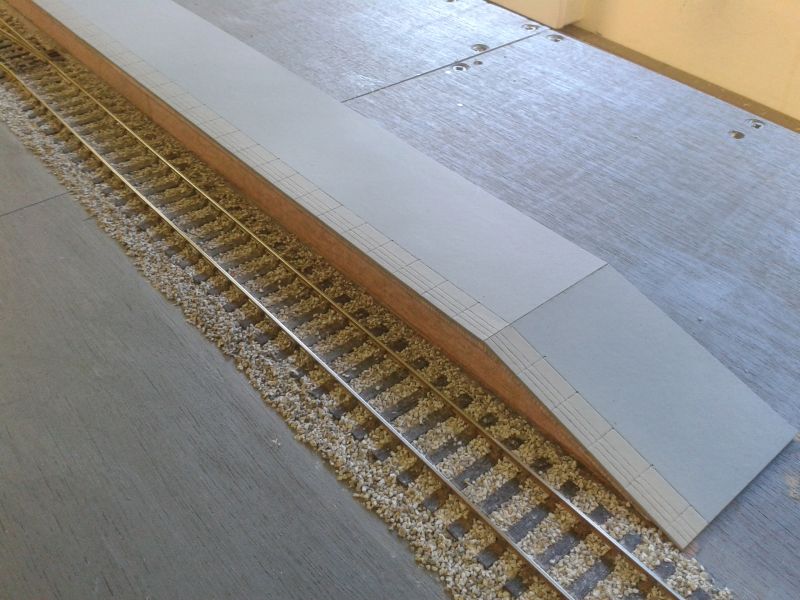
Disaster! Last night I decided to get on with the boring job of laying the ballast. Despite varnishing the platform faces, as soon as I dropped the diluted PVA onto the ballast, it wicked up the front of the platform destroying the printed brick surface. I had no option other than rip up the whole platform, including the top surface and consign it to the bin. A lesson to be learned here. In future, ballast the track BEFORE fitting the platform.
On the plus side, I wasn't totally happy with the platform as the printed brick was a slightly different shade than the nearby bridge.
I have noticed this with some Scalescenes kits. Print two different models in 'red brick' and they come out in different shades which isn't very good if you are trying to have some uniformity across the buildings. Or am I doing something wrong?
I have noticed this with some Scalescenes kits. Print two different models in 'red brick' and they come out in different shades which isn't very good if you are trying to have some uniformity across the buildings. Or am I doing something wrong?
Anyway, I have already cut out the new platform surface and have drawn the edging stones, ready to be scribed. It has had a coat of french polish to harden the edges. I will try to cover the platform faces with a shade of red brick which is closer to that on the bridge, more of a pinkish red as opposed to a brown red on the previous platform.
I installed the remaining magnets yesterday. It really doesn't take very long, about fifteen minutes from start to finish for each magnet location.
More soon.
Terry
 Last edit: by col.stephens
Posted

Full Member
As to the colour printouts, it could be the ink levels when you printed. I have found new cartridges have a greater depth of colour, but if I am printing a lot of brick colours, they become increasingly pinkish. Colour reproduction is one reason why I moved away from card models….. the other being that I wasn't very good at making them! I could never get the beautiful sharp edges you have made - your bridge looks superb and I know it will be even better when the scenery around it is done…. seriously envious!
Michael
Posted

Full Member

Posted
Full Member
Right, we are back in business with the platform following the disaster mentioned previously. I thought the previous specimen was a tad too dark, having been sprayed with Halfords' grey primer. The new platform was also given a coat of the grey primer, but once dry was also given a spray coat of light grey acrylic paint from Humbrol. I mixed some grey with a dollop of flesh colour to produce a shade akin to concrete. The edging stones were painted with this colour. The white line will be painted shortly. Here is the platform placed in position. This one will be kept well clear of the layout until the ballasting is well and truly finished.
Terry
Posted
Full Member
Michael
Posted

Legacy Member
Mix used 25% Pva then 75% water then add then same 75% of Isopropol alcohol to the mix.
Brian
OO gauge DCC ECOS Itrain 4 computer control system
Posted
Full Member
Thanks Michael.
Good tip Brian. Thank you.
Terry
Posted

Full Member
Always try to look on the bright side of life!
Barney
Barney
Posted
Full Member
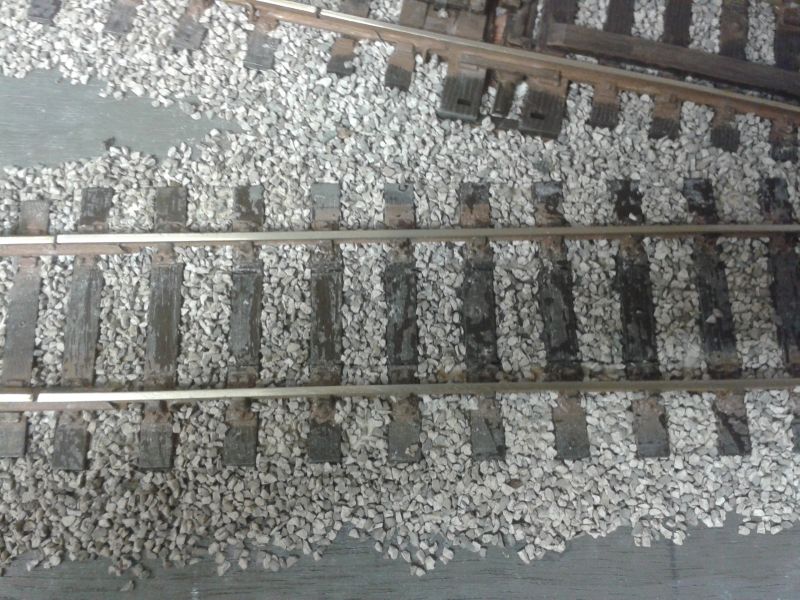
Thanks Barney. When the ballast is dry, I give it a gentle rub over with one of those foam sanding blocks which you can get from the local £1 emporium. They usually come in packs of three or four. The sanding block removes most of the ballast which is standing proud and from the sleepers.
I also clean the track with the same item. Much cheaper than the usual rail cleaners. Someone will probably tell me that I shouldn't do it as I will wear away the rail. It hasn't happened so far!
Terry
Last edit: by col.stephens
Posted

Full Member
'Petermac
Posted
Full Member
You shouldn't do it - you'll wear away the rail ……………………………. :cool wink :cheers
:Red Card :Red Card :Red Card

Posted
Full Member
Touché !![user=6]Petermac[/user] wrote:You shouldn't do it - you'll wear away the rail ……………………………. :cool wink :cheers
:Red Card :Red Card :Red Card
'Petermac
Posted
Full Member
Always try to look on the bright side of life!
Barney
Barney
Posted

Full Member

Posted

Full Member
Never mind a bit of wear, it's the scratches you need to worry about. Unless you are using 800 grit or above. Big, deep scratches reduce traction and are dirt, fluff and grease traps. Which means more work in the future. Unless you are planning on battery power…
Nigel
©Nigel C. Phillips
Posted
Full Member
Progress has been a bit slow as I have been completing the boring task of ballasting. It hasn't been helped by the glued ballast coming away in patches, presumably due to the glue/water mix being too weak. This has now been rectified and a weak wash of brown acrylic paint has been applied to the track to tone down the rather clean looking ballast.
Earlier I posted some photos of the steps taken to fix the uncoupling magnets beneath the track, having already glued the track in place. I thought I would share with you a picture of the end result. I am happy to report that, in spite of being buried beneath both sleepers and ballast, there has been no ill effect on the power of the magnets.
My thoughts are now turning back to baseboard construction. I need to get boards in place for the backscene and also need to work out how the layout will be dismantled for storage and transport to exhibitions (assuming it will ever get invited to any!) Of course, all of this should have been worked out at the baseboard building stage, but having got the baseboards erected, one feels compelled to press on and get cracking with the modelling. This morning might see me visiting the local timber merchant for some plywood for the backscene.
Terry
Posted
Full Member
Staying on the thread Kevin.
Posted
Full Member
'Petermac
Posted
Full Member
Hello Peter. The ballast is made by Woodland Scenics, medium grade. I believe that it is made from ground walnut shells.Regards, TerryWhat did you use for ballast Terry ? It looks just about the right size from France ………………… :thumbs
1 guest and 0 members have just viewed this.