Newton Regis, it'll never be finished, hopefully!
Posted

Full Member
A GWR journey through the 1920s and 30s
Hi Bill,Hope you didn't return any solvent from said yoghurt pot to the can. It will contain dissolved plastic.
Nigel
©Nigel C. Phillips

Posted

Full Member
No worries on that score, but it was a good reminder not to take short cuts, as I have and normally use glass dishes to decant solvents into during modelling, normally when airbrushing.
This incident was when I decanted a very small quantity of thinner into the yoghurt pot in order to reduce some enamel paint and then clean the paintbrush. By morning, all liquid had evaporated to leave the yoghurt pot sculpture.
Lesson leaned and I will not be so lazy again.
I've also learned to now wear a two stage filter mask when handling solvents, as I really don't like the odour reminding me what might happen to my lungs if I were to take no precautions. My only exception to this rule is when doing clean up outside, after painting building stuff.
As well as the mask, I also use a spray booth with extraction to the outside air when airbrushing and am upgrading to a professional spray extractor when I build the railway room.
Stay safe and good luck with the new home search.
Bill
 Last edit: by Longchap
At 6'4'', Bill is a tall chap, then again, when horizontal he is rather long and people often used to trip over him! . . . and so a nickname was born :)
Posted

Full Member
Scary story with the solvent……..acrylics and weathering powder seem a bit safer although I do admire the results you have achieved with spraying
Best wishes
John
Posted
Full Member
Nice to hear that appropriate precautions are being taken with solvents. One of the reasons I switched to acrylics, even then masks on! Other solvents get disposed of at The local recycling center.
The new accommodations are not really the issue, it's which country!
Nigel
©Nigel C. Phillips
Posted
Full Member
Changing country of residence is certainly more of a challenge, particularly in these changing times and I wish you every success in achieving everything you need.
Best,
Bill
At 6'4'', Bill is a tall chap, then again, when horizontal he is rather long and people often used to trip over him! . . . and so a nickname was born :)
Posted
Full Member
I then thought I’d just check on the size of the exposed slates I wanted to see on the shed and one thing led to another, as often happens when researching and I found myself looking at the 4mm scale slate roofing on the Farthing Lane layouts https://www.rmweb.co.uk/community/index.php?/blogs/entry/18221-a-shed-and-a-lock-up/ which led to others https://www.rmweb.co.uk/community/index.php?/blogs/entry/20092-gwr-park-royal-stable-block/ and I think we probably now have a change of plan.
Provided it’s cooler tomorrow morning and I may need to get up before the sun to guarantee it, I’ll get busy with my drawing board and aim do a quick test piece and if successful, will continue slating until the modelling room becomes uncomfortable.
My next photo post is therefore rather dependant on meteorological factors. Hmm, some rain would be really welcome!
Be cool,
Bill
At 6'4'', Bill is a tall chap, then again, when horizontal he is rather long and people often used to trip over him! . . . and so a nickname was born :)
Posted

Full Member
Michael
Posted
Full Member
Real slate tiles are between 1/8" and 1/4" thick (3.175 to 6.35mm). In 4mm to the foot that's around 0.04 to 0.08mm thick.
I have some slate grey craft paper (S-Line, 80g/M2, 0.1mm thick) that I plan on using as slate tiles when cut into strips and half cuts are made (printed out on the laser printer). Imperfections and mottled areas easily done at the computer stage.Old slate roofs are full of imperfections such as cracked, chipped, misplaced/half hanging or missing tiles, easy enough to reproduce. And a PITA to repair in real life unless you cheat.
This is the paper I use to make corridor connections between coaches, it is a lot tougher than regular copy paper. Glues well, and doesn't bleed paint. Slightly glossy surface.
Nigel
©Nigel C. Phillips
Posted
Full Member
My plan B, after the original printer paper plan was all set to go, was to use 10 thou white styrene (0.05mm), painted and overlaid in cut strips, but that's a lot of painting, so I dug out some 120g black drawing paper, having never found any slate grey near where we live, and I think it will be less hassle than styrene, although will still need lighter tones of paint and weathering.
For the sake of completeness, I looked at the results from plotter/cutters, which are impressive, but I can't balance the benefit against the cost.
Anyway, it is still far too hot for any modelling at the moment, as is normal for August, so my plans are holding on until it cools down to low 20s, rather than mid 40s!
Be cool,
Bill
Last edit: by Longchap
At 6'4'', Bill is a tall chap, then again, when horizontal he is rather long and people often used to trip over him! . . . and so a nickname was born :)
Posted
Full Member
The paper is by Artoz, color is Bogen Graphit. 15% cotton content. Swiss company. Should be available at art and craft supply shops in France. I see they have upped it to 100gm2
I have used it for slates, gangway accordions, and wagon tarps. The cotton content makes it more durable than regular paper.
Nigel
©Nigel C. Phillips
Posted
Full Member
In the meantime, I've fettled some of the guttering. It's okay, but will be fiddly to fix, which is not a problem, but will remain fragile. I then received Modelu's newsletter yesterday and they now do a comprehensive range of guttering in different sizes in half round and ogee (rectangular) section. The fixing is simple and robust and the images look good, so I ordered some last night. https://www.modelu3d.co.uk/product-category/detailing-components/architectural-detailing/guttering/
The good news with Modelu is that they are currently offering free shipping on orders over £50, which includes France and probably lots of other countries, largely due no doubt to the very small weight of the product.
So by the time I'm close to finishing the slates, the guttering may well be on its way.
Onwards . . . now fettling the interior to relieve the repitition of cutting slates!
Bill
Last edit: by Longchap
At 6'4'', Bill is a tall chap, then again, when horizontal he is rather long and people often used to trip over him! . . . and so a nickname was born :)
Posted
Full Member
I suspect they’ll turn up tomorrow, while I’m working on the roof, so I’ll be extra careful not to drop anything on them!
Have fun,
Bill
At 6'4'', Bill is a tall chap, then again, when horizontal he is rather long and people often used to trip over him! . . . and so a nickname was born :)
Posted

Full Member
To be honest, I'm still not absolutely 100% sure …………………………… :hmm
If you let some scrub grow up along the bottom of the wall, it would clinch it. :pathead
'Petermac
Posted
Full Member
There's still the cinder and ash ground cover to add and yep, poss some weeds if they can get past the toxic ash!
Best,
Bill :thumbs
Last edit: by Longchap
At 6'4'', Bill is a tall chap, then again, when horizontal he is rather long and people often used to trip over him! . . . and so a nickname was born :)
Posted
Full Member
Michael
Posted
Full Member
Cheers
John
Posted
Full Member
The far too hot for modelling temperatures of mid-August had been replaced by cooler gardening / modelling weather and I got stuck heavily into the gardening side for a while and cleared much unwelcome vegetation, helped considerably by my lovely neighbour who brought his tipping trailer, to help clear the devastation I’d wrought! However, no sooner than I returned to the modelling room, the hot weather returned, so I’ve been mainly practising my retirement by reading under a shade tree in the garden with a cat sleeping on my lap and a cool beverage at my side.
Strips of paper slates had been cut though and I finally returned to start laying them and after a disappointment with B&Q PVA, so good for a multitude of tasks, found that Rocket card glue is just the job for fixing the strips in place.
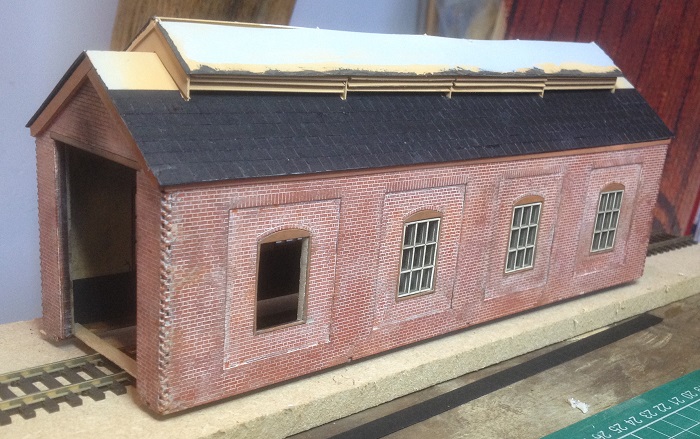
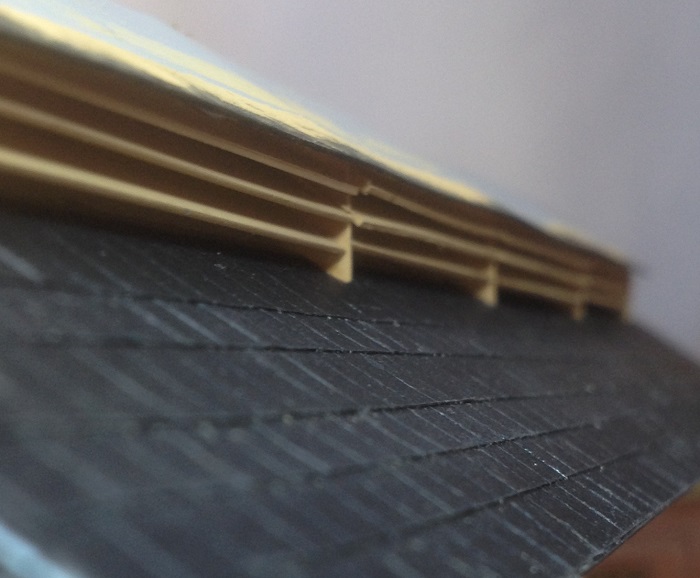
The cruel closeup is a great aid for showing up deficiencies which can often be rectified, although the louvres are so firmly entrenched in their composite construction, that they’ll just have to live out their life like a teenager with wonky teeth, full of character!
Rocket card glue dries very quickly and dries pretty much transparent, but it’s inevitable, no matter how careful you are, that there will be some blemishes. Fortunately, these can be largely ignored and generally welcomed, as combined with the weathering process, they help enhance the final effect of a used building by adding age and character.
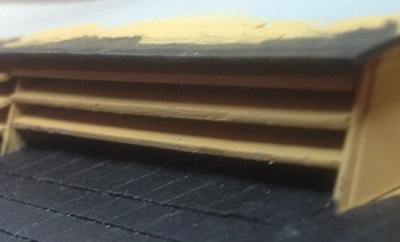
Some fettling was required to fit the paper strips around the supports on the louvre banks, with several slates on the final row disappearing up inside the lowest louvres needing to be fitted as single slates, as the fast acting Rocket glue made full strips unmanageable, providing insufficient time for adjustment in such a confined space.
I’ll finish off the slates up to the ridge later today and then start all over again with the other side of the roof tomorrow, leaving the tops of the vulnerable to handling louvre section until last. I know this is slow going and in madder moments, I sometimes look forward to weeks of ballasting, but then I’d be deprived of the full joy of the modelling process, which despite the sometimes repetitive nature, I find most relaxing.
Onwards,
Bill
Last edit: by Longchap
At 6'4'', Bill is a tall chap, then again, when horizontal he is rather long and people often used to trip over him! . . . and so a nickname was born :)
Posted
Full Member
I’ve been holding back on this one for a long time, that is until my intentions became sufficiently clear in my mind to make any attempt to draw lines on paper meaningful enough to represent what I want to build.
I must start by expressing my gratitude to fellow railway modellers, including the many members here, for helping me make sense of how things work and of course for providing so much ongoing inspiration.
In essence, I’m building a continuous run twin track main line with hidden storage loops under a branch line, all to GWR practice and in recent weeks I’ve revisited many favourite layouts from across the net and shamelessly borrowed good ideas to help create the through station side of the layout, where there will be passenger services and facilities for handling goods, livestock, loco facilities, carriage sidings and industry, including some private activity. That of course could cover a multitude of sins, but I’m aiming for a busy, not overloaded scenario.
The branch will climb from the mainline, meandering along a narrow baseboard, serving a halt along the way and around most of two sides of the railway room to level off for the terminus for the area.
Baseboards will be modular and lightweight, to help facilitate an easier relocation when the time inevitably comes to downsize, yet years away, but best to prepare now.
The room is 6 x 4 metres and besides baseboards, needs to accommodate the main workstation, much storage for books, tools, materials and of course stock. Most of the stock should be on the storage sidings, although with my interest in both the 1920s and 1930s periods, I’ll also be considering cassette storage for the 20s stock, mainly for the branch. I’m looking to site the spray booth in the workshop where any escaping odours can’t disturb modelling or running sessions.
I’ve tried track planning software in the past and never gained sufficient expertise to use them productively, so graph paper and pencil produced the indicative outline which will be finessed, eventually with full scale templates at the appropriate time.
Trackwork is Peco code 75 bullhead, of which I have three boxes and a half dozen left and right large radius points in stock. Peco keep promising crossovers, slips and medium radius points, but without any serious indication of availability, despite admitting to have restarted production. Hopefully my expectations of 2021 deliveries will not be dashed, so fingers remain crossed.
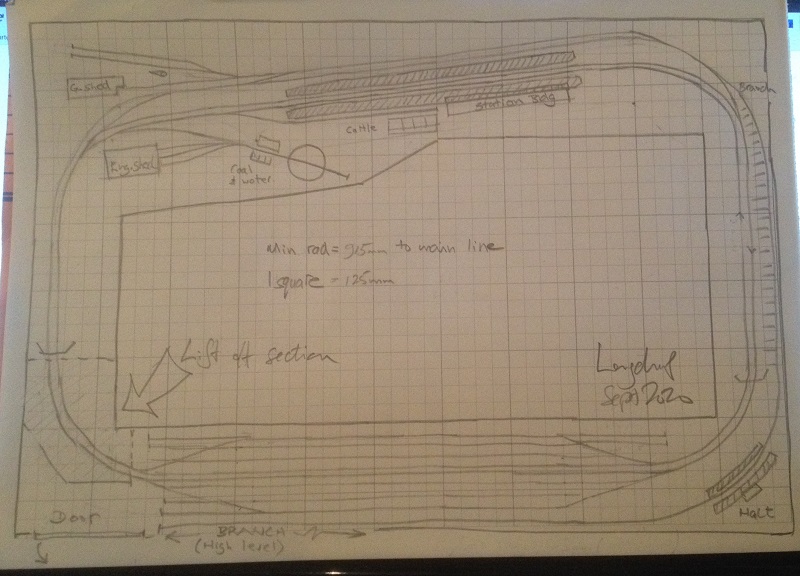
INDICATIVE PLAN FOR THE 6 X 4 METRE RAILWAY ROOM (Graph paper only scales 5.5metres long!)
There will be a lift out / up section adjacent to an outward opening door and separate control panels for the mainline and branch line stations. DCC control will be handled by an NCE system and I need to research whether I need to upgrade my 2 amp, to a 5 amp setup, as there will easily be instances of three engines on the move simultaneously.
I’ll need to gen-up on the electrical aspects, particularly on short circuit protection and power districts and then there is the question of point operation and control. I can see myself asking many questions on this particular aspect.
I’m aiming for large radii trackwork and am imagining a private enterprise with a line linking the production plant to a transhipment point, possibly water based for added interest. That’ll be a task for the small but delightful W4 Peckett I never knew I needed.
All the preparatory building works are now complete for the railway room, although there is still the need to physically relocate two cars from the workshop before I can build the separating partition from the workshop space. The 2cv is moving to a barn I’ve just re-roofed and the TR3 is being sold. However, the classic car market has dropped this year rather significantly, so I’ll be keeping it a while longer, but wall lining and baseboard modules can be started, so I can get a better idea of how the track plan will best work.
Please feel free to offer comments, critique or suggestions, all of which are welcomed, particularly with me being a reclusive sole UK outline railway modeller here in rural France.
Bill
Last edit: by Longchap
At 6'4'', Bill is a tall chap, then again, when horizontal he is rather long and people often used to trip over him! . . . and so a nickname was born :)
Posted
Full Member
Where did you find the parchment scroll? On the Ipad I thought it was a medieval map of the Loire!

Fortunately I have a new all singing all dancing monitor in the railway room and all was revealed
It looks to be a very interesting plan….lots of operating potential and not at all cluttered in fact with the use of large radii turnouts "elegant" springs to mind :thumbs.
I am rather envious as it incorporates a number of features I wish I had used and you have this large green field in which to build them.
I suspect there will be a lot of discussion about the detail of the track layout but for now I will confine myself to some fundamentals.
Power: I think an upgrade to 5 amps would be prudent
Short Protection: Three if not Four Power Districts each protected by a PBX. Best investment I ever made.
Point Control: You are not planning computor control so unless you envisage multi turnout route setting I wouldnt use DCC to control turnouts. I would avoid the Giant Wurlitzer master panel………better to have a number of mini sub panels positioned around the layout .
Have you determined which type of turnout to use?
Signals: I regret not installing working signals. If starting again I would try to be economical in their use but link them to turnouts. More effective (and realistic) control mechanism than LEDs on a panel ………what are your plans
Branch: I really like the look of your branch…….what a lovely meandering by-way. I spend a high proprtion of my time operating my (much shorter) branch while the main line trains do circuits……I suspect you will do the same.
Is the branch terminus being modeled or is it off scene? I wasnt quite clear from the map.
Storage: What is the plan for hiding the storage tracks? I find visibility and easy access essential and I have block occupancy detection. As you know I hide the front of mine with terraced houses but they are on easily moved modules
Wow……long reply …..my apologies. As you can tell I am quite excited by your plan and look forward to following its development
Best wishes
John
Posted

Full Member
Looks good
Have you considered moving the sidings to the nearside of the baseboard - perhaps pushing the loco yard to the back? I have found that shunting in the back corner (unless you use automatic uncoupling) can be a pain.
Barry
Shed dweller, Softie Southerner and Meglomaniac
1 guest and 0 members have just viewed this.