Newton Regis, it'll never be finished, hopefully!
Posted

Full Member
A GWR journey through the 1920s and 30s
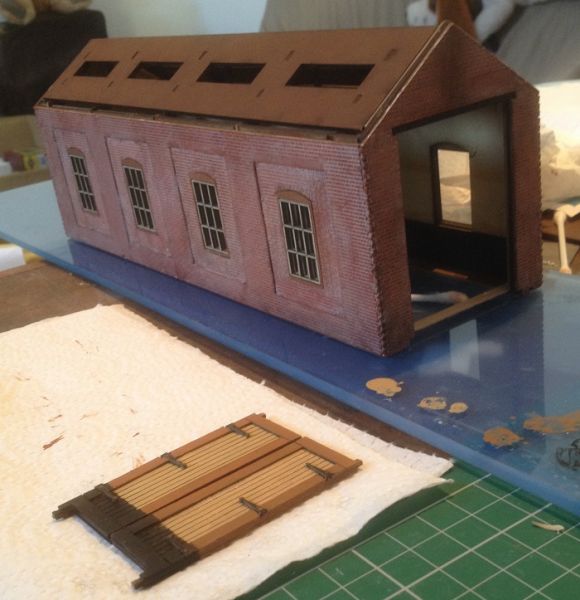
Today was full-on with real life duties, but I managed to squeeze half an hour to complete the small kit bashing bit of a straightforward Wills kit for a small garage premises and install the remaining external wall skins to the engine shed.
I’m not sure why the manufacturer of the laser cut shed doesn’t give tips on how to better finish their product, as although interlocking brick corners are a fine idea, the factory painting process can only colour the surface of the wall skins, these being attached to the frets, leaves much to be desired. It would probably be better to leave everything unpainted, but this was a bargain kit and it's always fun making it a little different.
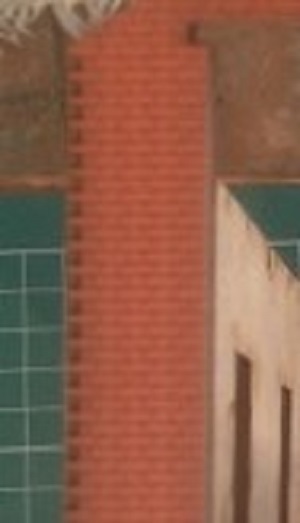
I’ll repaint the brickwork, add lighter coloured mortar joints and weathering in an effort to achieve a consistent lived in appearance, not forgetting of course, that it has to reasonably match other company buildings.
I hope to be able to spend more time at the workbench after Thursday to progress both these builds, notwithstanding other real life items creeping onto my ‘to-do’ list!
Bill
At 6'4'', Bill is a tall chap, then again, when horizontal he is rather long and people often used to trip over him! . . . and so a nickname was born :)

Posted
Full Member
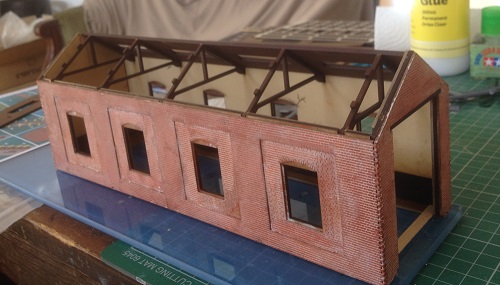
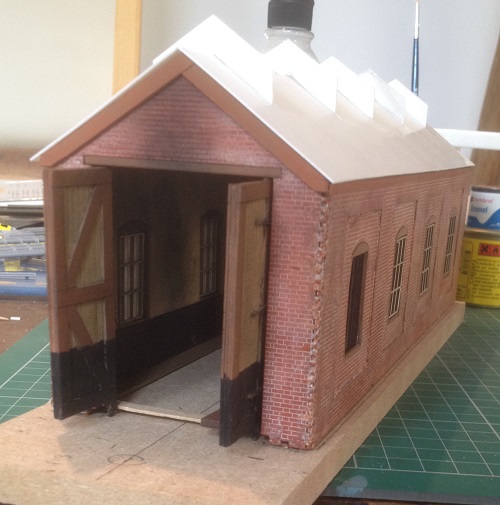
The brick quoins need a little filler and then the whole thing weathered with powders, then windows and doors painted and rainwater goods added.
Slowly getting there.
Bill
PS. Hmm, should have moved the glue!
 Last edit: by Longchap
At 6'4'', Bill is a tall chap, then again, when horizontal he is rather long and people often used to trip over him! . . . and so a nickname was born :)
Posted

Full Member
Michael
Posted
Full Member
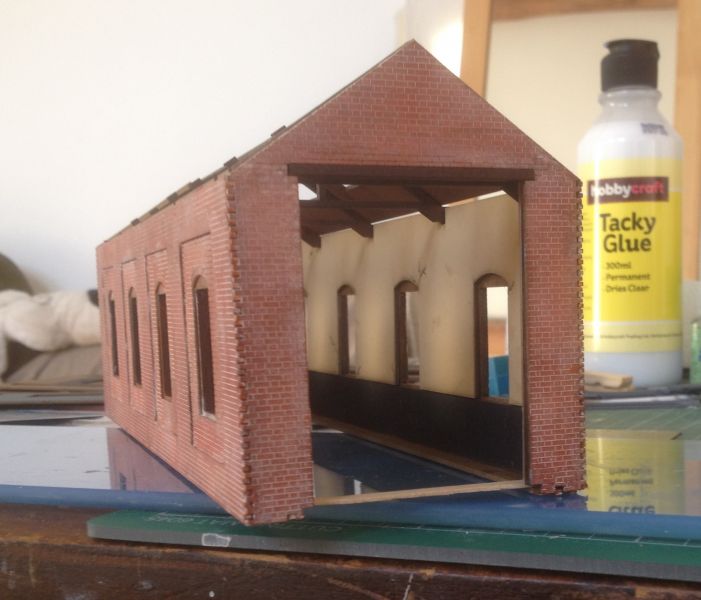
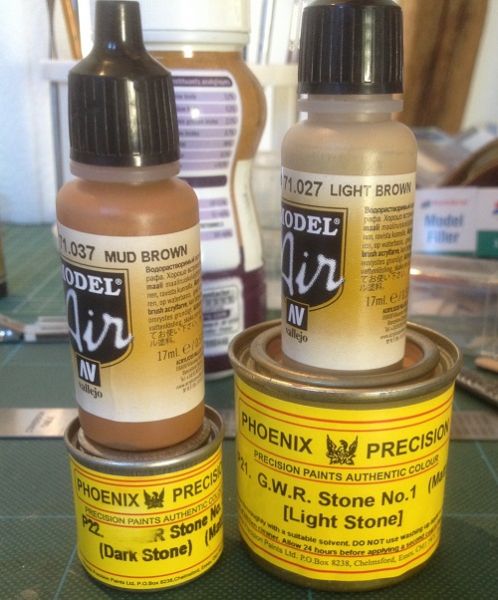
I’ve been studying Richard North’s book, ‘Great Western Railway Structure Colours 1912-1947’ from the GW Study Group, to check the paint colours and fortunately I had supplies of Phoenix’s enamel stone colours for the job, but unfortunately, they didn’t take well to the MDF. Vallejo to the rescue though, as I found close enough substitutes from their acrylic range, which went on a treat.
Noticing that shed doors normally had the bottom 5 feet painted black, I followed suit, this also following the regime applied to the internal walls. I rather like the GW attention to propriety by painting surfaces prone to excessive grubbiness in black. This even extended to black painted finger panels to heavily trafficked station doors.
If you think those doors look big, then they really were and not surprising, as even the humblest of engine sheds for a small tank engine will have been larger than most railway workers houses and they always had to cope with a larger visiting loco, even if a tender loco had to sleep with the doors open, much to the discomfort of the engine cleaners on a winter night!
I’ve ordered some guttering from Model Scenery Supplies and will build the roof vents while I wait for them to arrive, as well as ponder on whether to cover the roof with cut slate strips or individual slates. I’m sure that Michael will be back from even a long holiday if I go down the latter route!
Be safe,
Bill
At 6'4'', Bill is a tall chap, then again, when horizontal he is rather long and people often used to trip over him! . . . and so a nickname was born :)
Posted

Full Member
I knew about the GWR practice of painting heavily used areas in black from Stephen Williams trilogy but I didnt know about its application to shed doors……makes perfect sense of course. Wish I had known that a few years ago when I renovated my shed :sad:
I think individual tiles on that roof may be a step too far……Michael’s are brilliant But its a very different building and the pantile effect created by the thickness of the tile looks authentic….less certain how well it would look on an engine shed.
Not sure if you are going to build a maintenance walk way on each side as per Didcot for example…….it can look very effective and draws the viewers eye away from the the strip tiling.
Are you going to model the interior? Phil and Doug created some superb cameos…..I keep meaning to do some retro work on the ancient Ratio branch shed
Best wishes
John
Posted
Full Member
Definitely yes to an interior, which I hope to start over the weekend and with such large shed doors, it’s a must and Doug’s shed was my original inspiration to do so.
Have a good weekend,
Bill
At 6'4'', Bill is a tall chap, then again, when horizontal he is rather long and people often used to trip over him! . . . and so a nickname was born :)
Posted

Full Member
it's a fine shed you're building there and it raises a question for you and those knowledgeable about engine shed doors. My Metcalfe kit double engine shed is now suffering "door envy"; did every GWR shed have doors? If so I'm wondering why the usually meticulous Metcalfe folk have omitted them from their GWR kit?
Not that I need any more to do but it is a little bit "eeeeritating" as John "Otto" Cleese would say, to find I'm a little short in the door department.
Colin
Last edit: by Colin W
Posted
Full Member
I’m not aware of the absence of doors on any of the standard GWR pre-nationalisation prototype designs, except for accidents or bomb damage. There were several pre-grouping sheds taken into company ownership which may have an odd exception, but this was not GWR practice.
I note that the current Metcalfe kit is based on Settle / Carlisle design practice, so not strictly GW, however, it’s most curious about the disappeared doors on the double road shed, as Metcalfe have them on their single road version and Scalescenes have them on both, so perhaps it may have been an error, not noticed before release and now too costly to rectify. Another reason for the omission may be the fact that Metcalfe do not include a floor structure on their kit, so there is no foundation to support the column between the doors. An easy enough fix though, with some card, textured paper and weathering. The doors are straightforward to build from card or styrene strip with peg and hole fixings for posable doors if required.
I'm with you and John Cleese, but perhaps Michael Cain’s oppos were listening more carefully on this occasion and just blew the bloody doors off!
Have fun building the doors and don’t forget the 5 foot black bit at the bottom.
Bill
Last edit: by Longchap
At 6'4'', Bill is a tall chap, then again, when horizontal he is rather long and people often used to trip over him! . . . and so a nickname was born :)
Posted

Full Member
Your comment about the first 5 feet being black prompted me to have a look at a few sheds. Kingham shed, built in 1913, had walls and interior of the doors in what looks like black on the lower half, walls and doors above white or cream. Malvern Road shed looks to have the same treatment in 1913, with the exterior in black considerably higher than the interior. In BR days painted all white/cream. Banbury shed (4 roads) however did not appear to have doors in the 1940's. Edit. Angle of the photo. One color.
Tetbury shed was all white with black hinges in 1947, with the small access door in tan. All black or dark brown in 1955. Wallingford was black/white in 1925. What looks like black/brown in the 1950's. Watlington shed in 1905 was all white. Wells in the 1960's had one pair of doors with one side bicolor, the other side white.
Black and white photos of course. Many of the doors could be tan or brown. I have a feeling black and white was only for a specific time-frame. Given the parsimonious GWR board, only when lamp black was cheap and plentiful or White lead too expensive. Or no other pigments available. Or whatever was available was used.
Nigel
©Nigel C. Phillips
Posted
Full Member
Arrrgh! Another step back.Hi Colin,
I note that the current Metcalfe kit is based on Settle / Carlisle design practice, so not strictly GW, ….
Bill
Now, not only am I missing doors but you tell me it's not even GWR! I'd made a foolish extrapolation purely from many of the Metcalfe Railway Buildings kits I'd bought stating they were based on GWR designs.
Well, I'm not changing settings and the lack the motivation to build another Engine shed means I'm stuck with what I've got. I might look at what can be done with some Scalescenes papers and creativity.
Colin
PS I couldn't find any reference on my kit or their website to the design info. Where did you find this Bill?
Last edit: by Colin W
Posted
Full Member
I wouldn’t worry unduly, as many a generic kit has called itself one thing or another over the years and frankly, when something is said to be in the style of a particular company, it will be to a degree, as it must, with form following function.
My own single road shed above is a kit following no particular prototype, but I snapped it up at a bargain basement price and used it as a practice piece to avoid making a mess of the larger GWR standard running shed for the main line in the future. The branch shed will continue to look after its allocated small tank on the yet to be named branch.
I saw the Settle/Carlisle reference on the Metcalfe site https://www.metcalfemodels.com/product/po337-00h0-scale-settlecarlisle-double-track-engine-shed/ and when I returned this morning to copy the link, also saw a much more GWR looking version which I missed yesterday and assume it will be the one you have https://www.metcalfemodels.com/product/po313-00h0-scale-double-track-engine-shed/ This latter version does not say GWR, although you can make it more so with some simple enhancements (basically repainting woodwork and add doors).
I kept away from my modelling bench yesterday, but will return shortly to start on the shed interior and when the rainwater goods arrive in the post, I’ll get back on the roof.
Happy modelling,
Bill
Last edit: by Longchap
At 6'4'', Bill is a tall chap, then again, when horizontal he is rather long and people often used to trip over him! . . . and so a nickname was born :)
Posted
Full Member
Hi Bill,Hi Colin,
…..
I saw the Settle/Carlisle reference on the Metcalfe site https://www.metcalfemodels.com/product/po337-00h0-scale-settlecarlisle-double-track-engine-shed/ and when I returned this morning to copy the link, also saw a much more GWR looking version which I missed yesterday and assume it will be the one you have https://www.metcalfemodels.com/product/po313-00h0-scale-double-track-engine-shed/ This latter version does not say GWR you can make it more so with some simple enhancements (basically repainting woodwork and add doors).
Happy modelling,
Bill
That rings a bell now, their Settle Carlisle range are newer introductions. What a relief.
Meanwhile I did some research and found some photos of GWR double sheds (Leamington, Stratford) which suggest I'm not too far off the mark. Both have a Porthole window in the end and more exhaust flues but I can live with those discrepancies once I fix the doors and black paint!
Thanks for the help.
Colin
Posted
Full Member
You also have spotted some of the many delights of research. I am so pleased my comment led you to post further information.
I have two photos of Banbury shed and both have live locos in front, the steam and smoke completely obscuring where the doors should be, so I didn’t realise there weren’t any! I also have 2 further GWR shed reference books waiting for me in the UK, but need to wait a while longer before getting my hands on them, grrr.
Research is absorbing and great fun and I never tire of it and the differences between certain instances and circumstances being fascinating and sometimes cryptic as to why, only prompting more research. This is where membership of the Great Western Study Group can sometimes help and I’ve taken advantage of their periodicals and other publications, available to members at discounted prices. Their latest book is a detailed one on GWR signalling practice. It’s a substantial volume which I’ve yet to immerse myself into it, as I’m a way off modelling signalling yet.
Colour photos are rare for prototypes during our modelling periods and the accuracy of structure colours have also caused debate. The structure colours publication mentioned above is therefore particularly useful, as so much meticulous research has gone into it and valuable evidence saved for prosperity, including carefully referenced colour images from the 1950s, of original GWR applied paint finishes.
All the best with your continued search for a large railway room by the lake with accommodation attached,
Bill
Last edit: by Longchap
At 6'4'', Bill is a tall chap, then again, when horizontal he is rather long and people often used to trip over him! . . . and so a nickname was born :)
Posted
Full Member
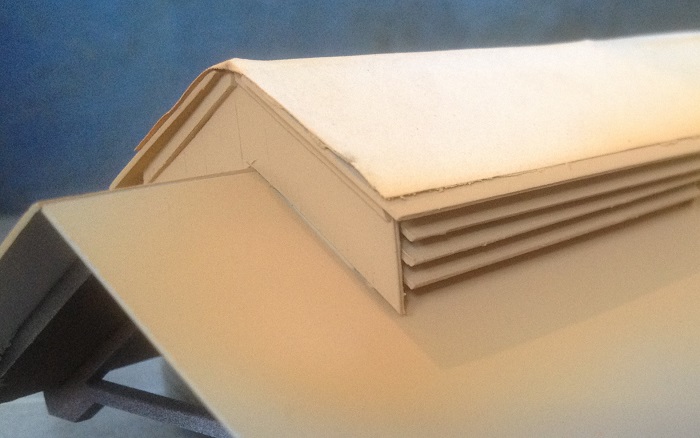
The holes for the sky lights in the kit were infilled, as small GWR sheds seldom had such expensive luxury, normally associated with larger running sheds, where as much natural light as possible was needed for the more extensive work carried out there. I received the rainwater goods in the post, so made up fascia and barge boards, painted and fitted them and offered up the guttering and will fit them when the roof is finished, as I’m bound to knock them off while the shed is still being handled so much.
Next came 20 thou styrene sheet to the roof to take the slates and then the thinking cap came out to ponder how to build the roof louvres, but as often happens when you sleep on things, the answer presented itself and was so simple, I could have kicked myself, as once the styrene sheet was on and the ridge bonded together, one simply built up the layers of louves with alternate layers of two widths of plastic sheet either side of the ridge and butting up to the vertical end caps and intermediate supports. These represented the louvres (larger thickness) with narrower spacers in between. The whole lot is eventually weathered dark smoky black, so you don’t see the spacers, just the edges of the louvres. Simples. Once painted, it will be fine.
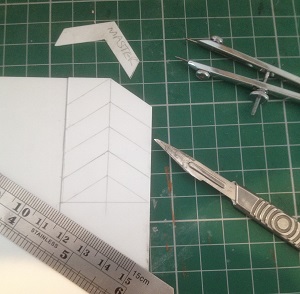
Once a master upstand was made, it was easy enough to batch cut them and polyfix them in place.
I'm still cutting and sticking dozens of strips of styrene into place for the louvres and the solvent is irritating, even in my well ventilated room, so they're still work in progress and I’ll post a photo when the unit is finished.
Bill
Last edit: by Longchap
At 6'4'', Bill is a tall chap, then again, when horizontal he is rather long and people often used to trip over him! . . . and so a nickname was born :)
Posted
Full Member
Before I can start laying slates, I need to spray those louvres and finish with sooty weathering. I hope there’s a rattle can of grey primer in stock, as it’s too hot for acrylic primer, as it will clog up the airbrush in no time in our 30 degree plus heat, with the forecast getting hotter next week.
I’ve still got the floor, pit, interior and door posts to do, if too hot to spray.
Bill
Last edit: by Longchap
At 6'4'', Bill is a tall chap, then again, when horizontal he is rather long and people often used to trip over him! . . . and so a nickname was born :)
Posted

Full Member

'Petermac
Posted

Full Member
Posted
Full Member
I must admit that now the shed is nearing completion and with more layers of construction added, it has turned into a heftier structure than I had imagined, so it's certainly substantial Peter and just as well it's mainly paper roof slates to add, although I have found an anvil and grindstone to add to the interior!
I'm still struggling with the heat Dave as the week progresses (high 30s today, forecast much higher Friday), so I now need to schedule my modelling sessions to first thing right after breakfast. Mid-morning today saw me, paintbrush in hand, adding a deep background of dark sooty brown to the inner most depths of the louvre units, as I'd never manage to get this colour there once I airbrush the louvre blades GWR light stone. Not half way through, a bead of perspiration conspired with others to run down my forehead, cascade onto the inside face of my glasses to muddle the view of the work piece! Note to self: must finish my modelling by mid-morning in this heat!
All is set though for a 20 minute slot of comfortable airbrushing tomorrow morning, followed by helping my neighbour Robert with his car, who has finally realised after several weeks of using my compressor to repeatedly blow the same tyre up on his car every few days, that he has a puncture! A quick top up tomorrow then, see him off for the dash to the tyre place to get it sorted. Then I’ll try and endure a pleasant day in the garden under the sunshade with a good book and the cat.
This reminds me why I don’t railway model in the summer, but with the pandemic and us not opening for visitors this year, a chap’s gotta do what keeps him happy.
Take care, stay sane, speak soon,
Bill
Last edit: by Longchap
At 6'4'', Bill is a tall chap, then again, when horizontal he is rather long and people often used to trip over him! . . . and so a nickname was born :)
Posted
Full Member
Whilst my unit is air-conditioned, I haven't had much spare time to spend in there recently. Today, I thought I'd just pop in for half an hour to solder some droppers to a newly installed bus under the baseboard. As the area in question was close to the air-con unit, I decided to leave it off to avoid it cooling the iron.
Within 15 minutes, I was like a drowned rat so gave it up as a bad job, spending a further 15 minutes trying to get up off the floor under the baseboards ! The only thing left was to jump into the pool to cool off. Talk about thermal shock - it felt freezing but in fact, was a tad over 30C !!
I'll turn the air-con on next time and do my soldering further away !!!
'Petermac
Posted
Full Member
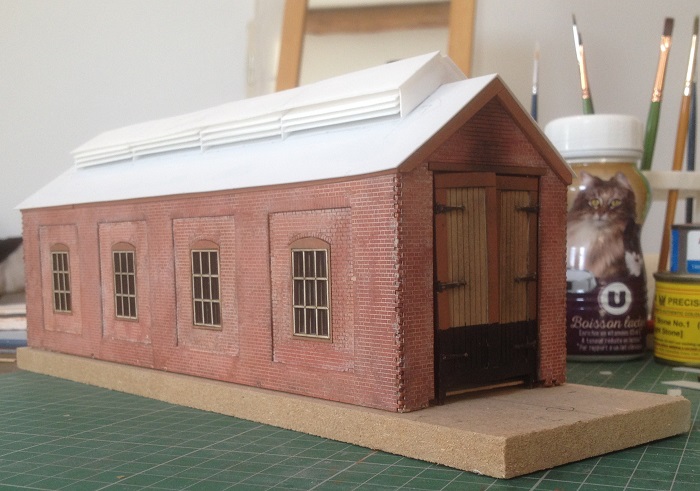
Back in the modelling room, I found a can of Tamiya light grey fine surface primer, which covered the louvres most satisfactorily in a just a couple of passes. I’ve been very happy using this product on both white metal and plastic, so will stock up on some more as soon as I can, perhaps from a new found supplier in Belgium (https://www.passion132.com/gb/1436-maquettes ), who rather oddly, have their web site in English and deliver rapidly to France at reasonable cost.
After adding some detail to the ends of the louvres, out came the airbrush and on went several mist coats of Precision enamel GWR light stone, diluted as usual with white spirit.
I’ll now add weathering at the same time as the slates are done.
As an aside, when I packed up after my modelling yesterday morning, rather than returning a little white spirit left in a useful yoghurt pot, I covered it for use today and found this interesting sight this morning:
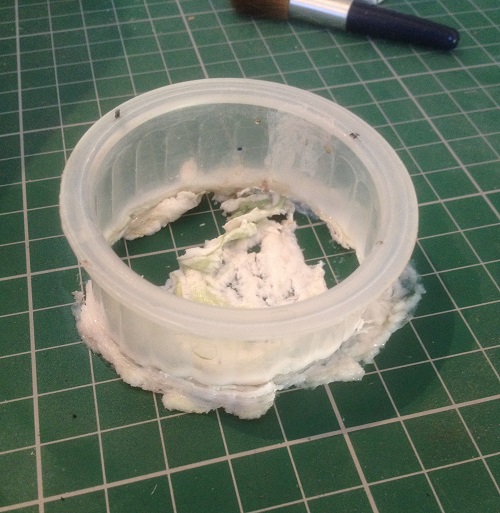
Much reduced in height, it was nonetheless easy to scrape up from the impervious cutting mat and on finishing the clean and tidy up following spraying, I returned all unused thinner back to its original container! Yoghurt pots will still be used, but never for solvents!
Slates next.
Bill
Last edit: by Longchap
At 6'4'', Bill is a tall chap, then again, when horizontal he is rather long and people often used to trip over him! . . . and so a nickname was born :)
1 guest and 0 members have just viewed this.