Waddlemarsh
Posted

Full Member
Somewhere SW of London. Somewhen before today
While waiting for the new point, and while waiting for the art shop to open tomorrow as I need some flexible board, I can still take pictures. A lightly weathered Merchant Navy and a grimy gronk share siding space under the glare of the workstation lamp.


 Last edit: by Gwiwer

Posted

Full Member
Michael
Posted
Full Member
Posted
Full Member
New ID photo backscenes arrived during the week to complete that task. I cut a groove in the cork tiles to act as a guide for the mounting board which has the photo-scene glued to it. I used MDF for the straight areas but the scene has to come around the same curve as the tracks meaning I had to find something which would take and hold the curve without creasing or bowing. The groove was filled with glue, the backscene placed into the groove and held for several minutes until secure.
There are gaps and a couple of pegged areas but the bulk of that task is now done.
I shall fit wood uprights behind the card later and also tie-strips to firm up the joins between card strips.
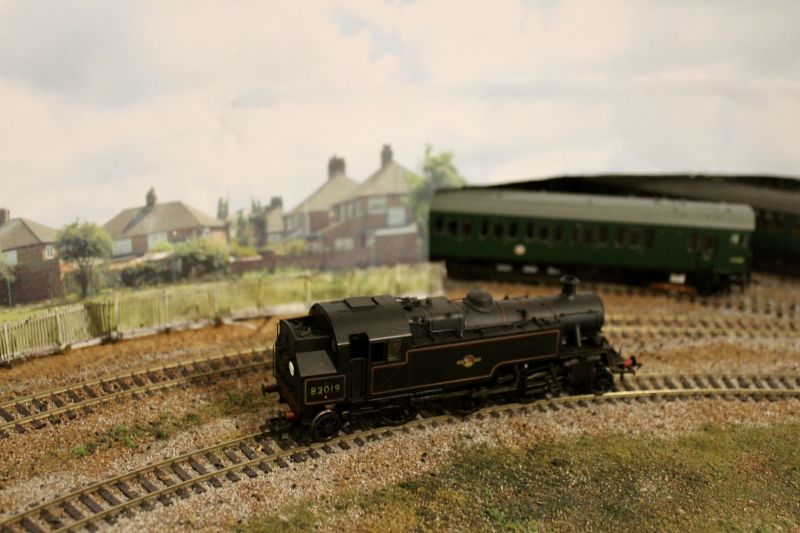
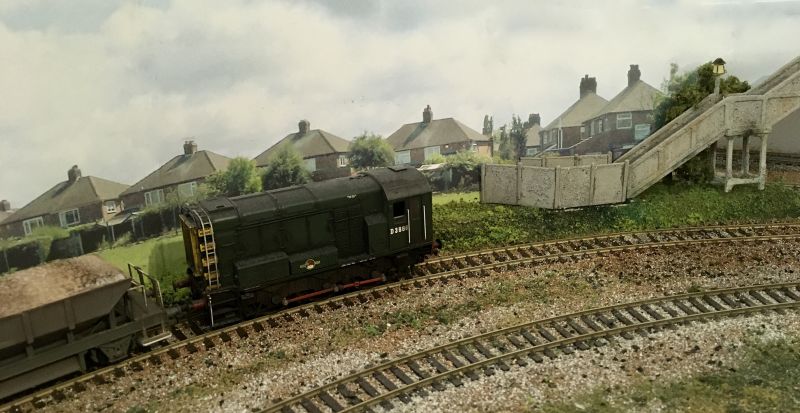
In what is still a busy and chaotic scene a Crompton leads a short parcels rake from fiddle yard to goods yard. The running isn’t as smooth as it needs to be but this is still a work in progress.
https://gwiwer.smugmug.com/ModelRailway-1/Model-railway-videos/n-S4bmc/i-pkPZBbG/A
Posted
Full Member
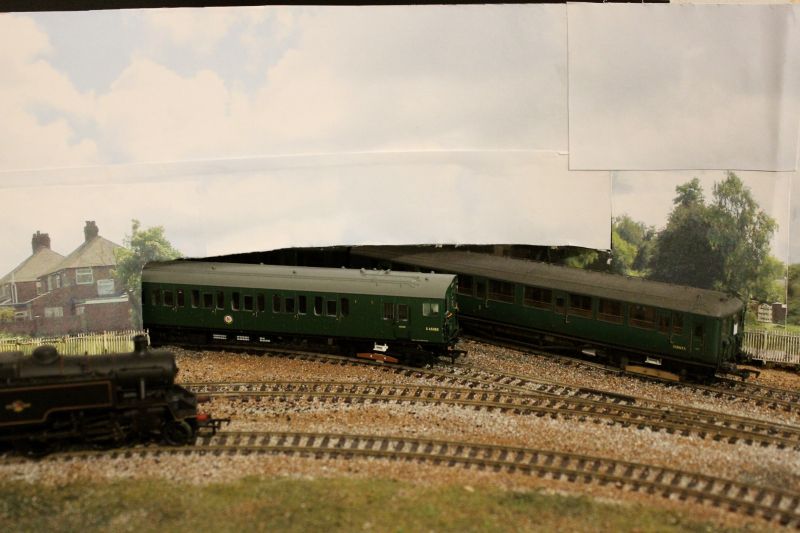
I am not sure about the trains appearing to run off the scene through the back of a house but I wasn't able to arrange it any other way. And the other side of the aperture also requires more attention as there is a line where I don't want one between sky and scene.
However …..
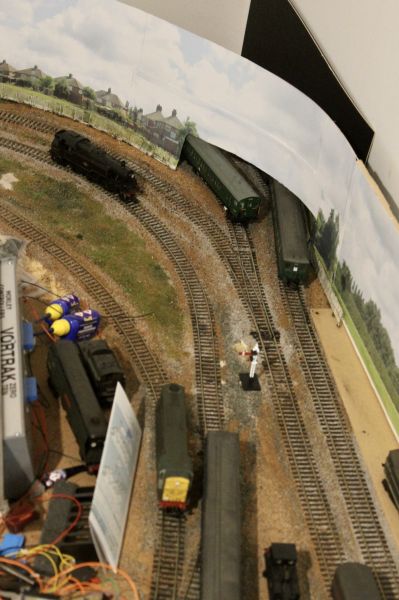
From top to bottom we see the "naked eye" view and all the joins in the printed backscene, then an edited version to remove them, a side-on view illustrating my point about the train running through the house and an overhead view giving an impression of where I am up to. The two electric units run around the outer curves which are now hidden to reach the two reversing sidings which have been hidden for some time now via a short length of single track which acts as a crossover.
Keen eyes might also recognise the dirty white fence placed along the base of the backscene. It has been repurposed from Penhayle Bay and was originally the lineside fence above the loco shed and goods yard.

Posted
Full Member
Michael
Posted
Full Member
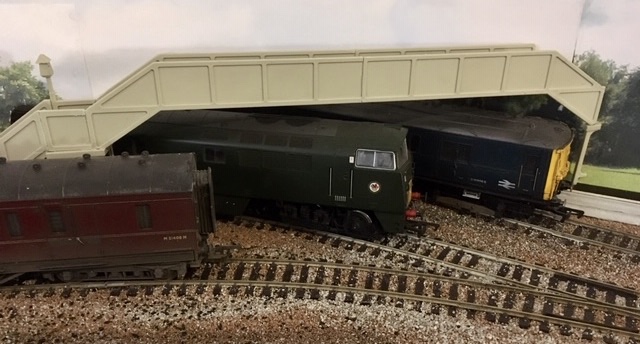
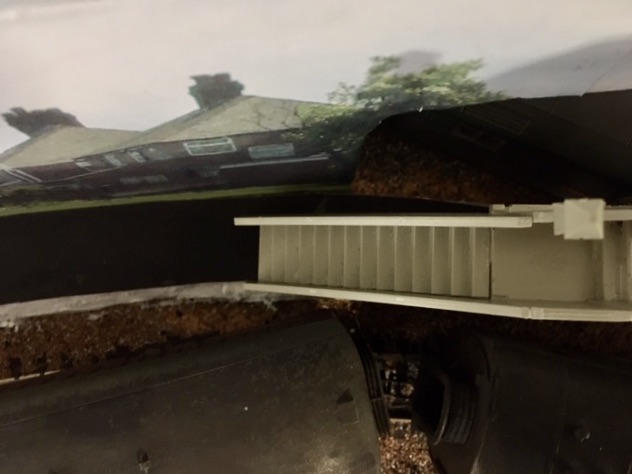
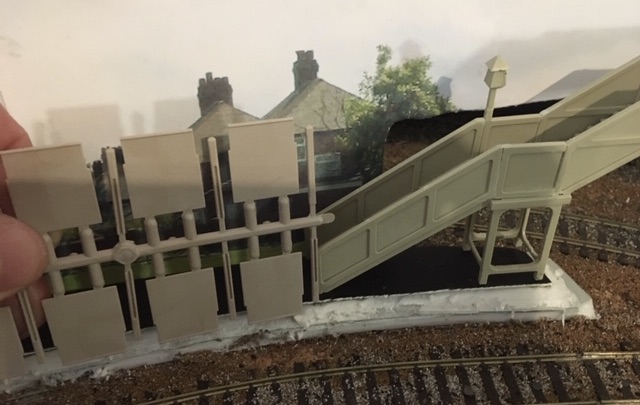
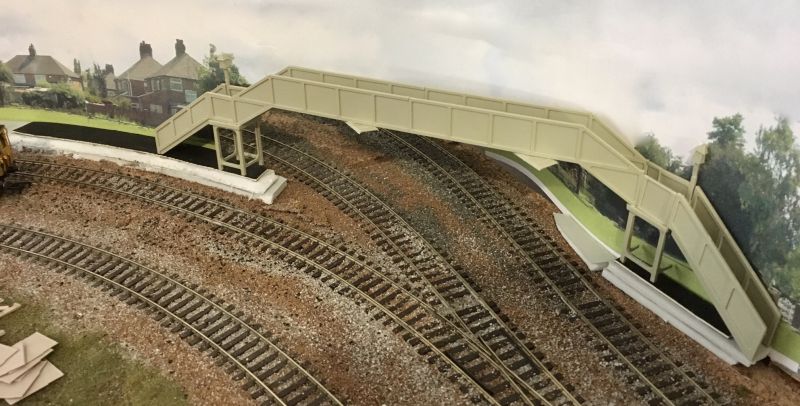
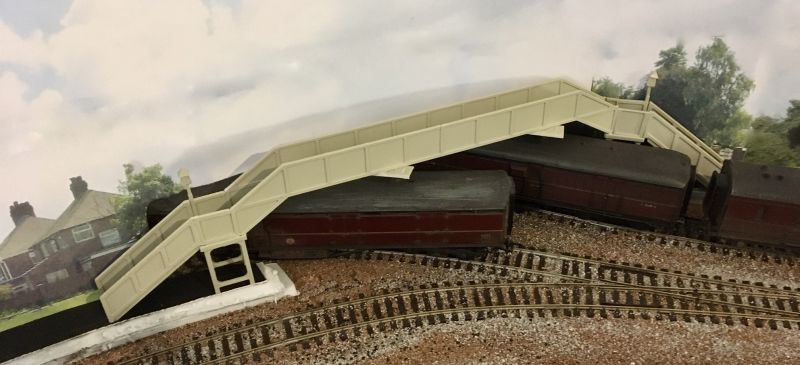
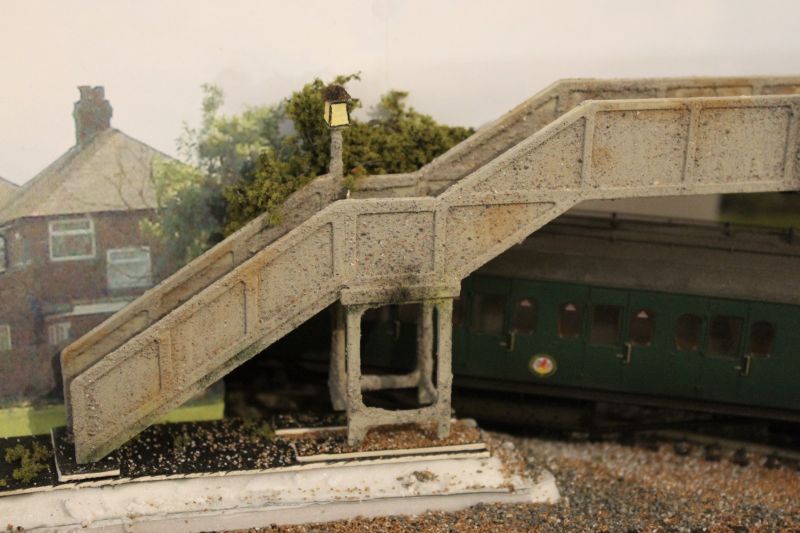
I have taken some good advice and have been steadily kit-bashing two Ratio SR concrete footbridge kits into one double-length span to fit across the "sky exit". The angle and curve of the tracks makes this a particularly tricky location and a millimetre-perfect fit is required.
The kits are designed to sit on a platform; mine will be ground-mounted so in order to elevate the bridge sufficiently for trains to pass beneath I have had to create a couple of small risers of land in an already very confined space. The result is trains pass with no more than 1mm clearance in a couple of spots.
Far from finished here is the work in progress. The kit builds to a station footbridge with a 90-degree turn halfway up the steps; mine has been re-worked into a straight ascent on one side to fit the location and a cut-off where it meets the backscene on the other where some missing detail will have to be carefully painted in.
I propose to coat the bridge with a very fine sand which will resemble the concrete finish of the prototype. Detailing the area will include making use of Ratio SR concrete fence panels shown in their "as supplied" form to provide secure separation between railway and footpath.
Posted
Full Member
Posted

Full Member
You must be enjoying how it's all comming to life now.
Best,
Bill
At 6'4'', Bill is a tall chap, then again, when horizontal he is rather long and people often used to trip over him! . . . and so a nickname was born :)
Posted

Full Member
'Petermac
Posted
Full Member
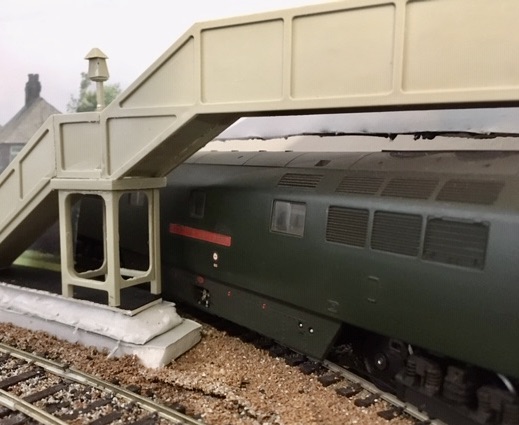
The long span isn't unique - they existed at locations such as Seaton Junction and Exeter Queen Street (Central) and no doubt many other places. The unusual angle of the smoke deflectors likewise isn't unheard of in reality. There is or was probably an "Exmouth Junction" style concrete bridge somewhere which had a flight of steps angled at 45 degrees to the span rather than 90 or 180 but I cannot think of one.
What matters is that it does the job for me in this location and as plastic kits go it doesn't look so bad. Space is extremely restricted; I even had to trim the lamp down to half-relief on the right-hand side so that it sits flat against the backscene in order to achieve vertical legs which don't foul passing trains.
The good folk living in the houses across the railway will now have direct access to Waddlemarsh Halt.

Last edit: by Gwiwer
Posted

Legacy Member
Brian
OO gauge DCC ECOS Itrain 4 computer control system
Posted

Full Member
Nice bit of screening there.
Nigel
©Nigel C. Phillips
Posted

Full Member
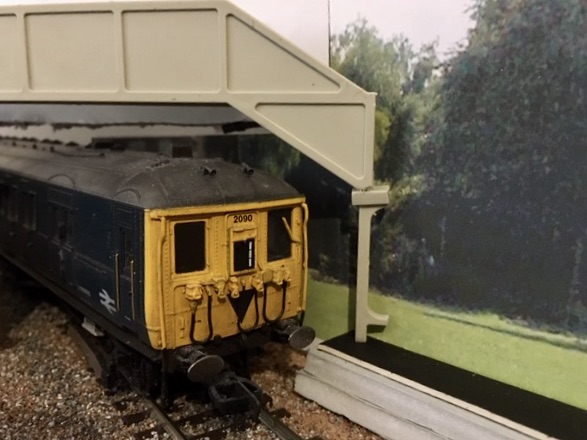
I don't know that I'd like to step through that gap in the stairs on a dark, unlit night! Aaaaahhhhhhhhh!

Selective compression is actually a very successful technique. I have seen it done in several ways by other modellers to great effect. From normal viewing angles, the narrower width is effectively invisible.
I have to do something similer to get passenger access to my Underground platforms from the high side at Newton Broadway. I have the Ratio footbridge with the iron trellis style to hack into something rather similar in angles and spans to what you have done.
I also have one of the concrete footbridges but it was built as per the kit instructions to be at right-angles to the lines. However, like you, I have discovered that it is too low for ground mounting, and needs ramps or steps added to raise its height, so at present is unused, even though I know where it is intended to go.
:cheers
p.s. You and Sharon, stay safe.
Jeff Lynn,
Amateur layabout, Professional Lurker, Thread hijacker extraordinaire
Amateur layabout, Professional Lurker, Thread hijacker extraordinaire
Posted

Full Member
You need the following spray paints, grey primer, red oxide, white & black.
You basically spray they grey as your base then spray short bursts from a distance the other three colours so that the paint lands on as big drops until you get the effect you like.
I used it on the concrete hut below

Cheers
Andy
Andy
Posted
Full Member
My own method involves using an old, very stiff paint brush and stippling the brown onto the base grey coats.
Jeff Lynn,
Amateur layabout, Professional Lurker, Thread hijacker extraordinaire
Amateur layabout, Professional Lurker, Thread hijacker extraordinaire
Posted
Full Member
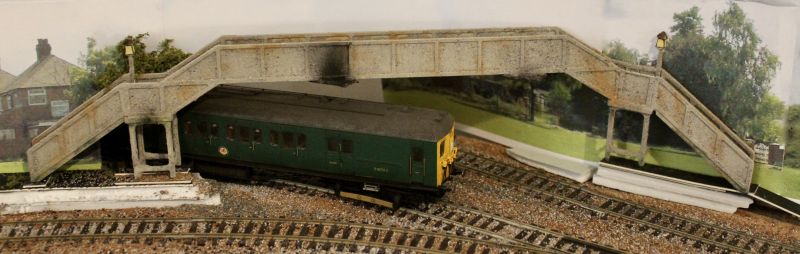
"Rickery" alert!!!
After some trial-and-error on the hidden side of the bridge I settled for a mix of Peco weathering materials to achieve the desired "rough" texture common to most well-worn concrete structures. It wouldn't adhere with PVA nor hairspray, I didn't want to use that much poly-cement which might also have damaged the surface so I tried shaking the material over a layer of wet paint. It holds.
The entire bridge was therefore painted with a mix of three Woodland Scenic base colours stiffened with a goodly amount of gesso. While that was wet I coated the visible parts of the bridge in the mix of "ash" and "cinders". When dry I shook and then lightly brushed the excess off and saved it for another time.
After I was happy enough with the result I then added some weathering powders including soot black around the smoke deflectors and some light rust and pale green to represent age and staining.
The camera has probably cut through a bit too much of the coating which to my eyes appears as a fairly even allover layer and is a reasonable approximation of the colour and texture I see on some 1930s panels at Twickenham station. The eyes also don't see the weathering quite as strongly as the photos show - it appears more muted and realistic.
The lamps are painted a mix of "unbleached titanium" and "Turner's yellow" picked out with a mapping pen and finally a piece of Woodland Scenics "Fine Leaf Foliage" is tucked in behind one lamp to conceal the remaining gap between bridge and backscene.

Posted

Full Member
Shed dweller, Softie Southerner and Meglomaniac
Posted
Full Member
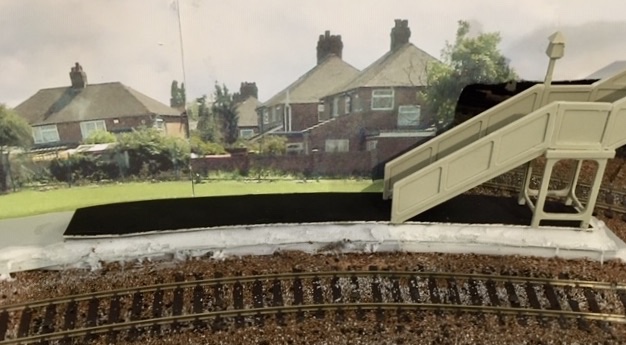
Work is also under way at the other end of the bridge where more footpath will lead onto the halt. Parts for the platform have been ordered from Dart Castings and will arrive when they get here allowing construction to begin.
A class 08 shunter fusses with some ballast wagons - Heljan "Dogfish" recently arrived from our friends in Camborne. I know they have TOPS panels which is a little too late for my 1960s theme but the heavy manufacturer's weathering almost blots them out.
Posted

Full Member
1 guest and 0 members have just viewed this.