Building Elvenhome, my first N Gauge layout
Posted
Full Member
 Last edit: by Barchester

Posted
Full Member
That kit near the end of the video looks incredibly complex! I struggle with 00 gauge stuff! Good luck.
Posted
Full Member
Very nice. It’s really coming along.
That kit near the end of the video looks incredibly complex! I struggle with 00 gauge stuff! Good luck.
Thanks very much Chris. I hope the kit won't be too bad. The main thing will be folding it accurately. I will only get one shot at it. Stephen
Posted
Full Member
Last edit: by Barchester
Posted
Full Member
Last edit: by Barchester
Posted
Full Member
[/yt]
Last edit: by breakage
Posted
Full Member
Last edit: by breakage
Posted
Full Member
[/yt]
Last edit: by breakage
Full Member
Elvenhome
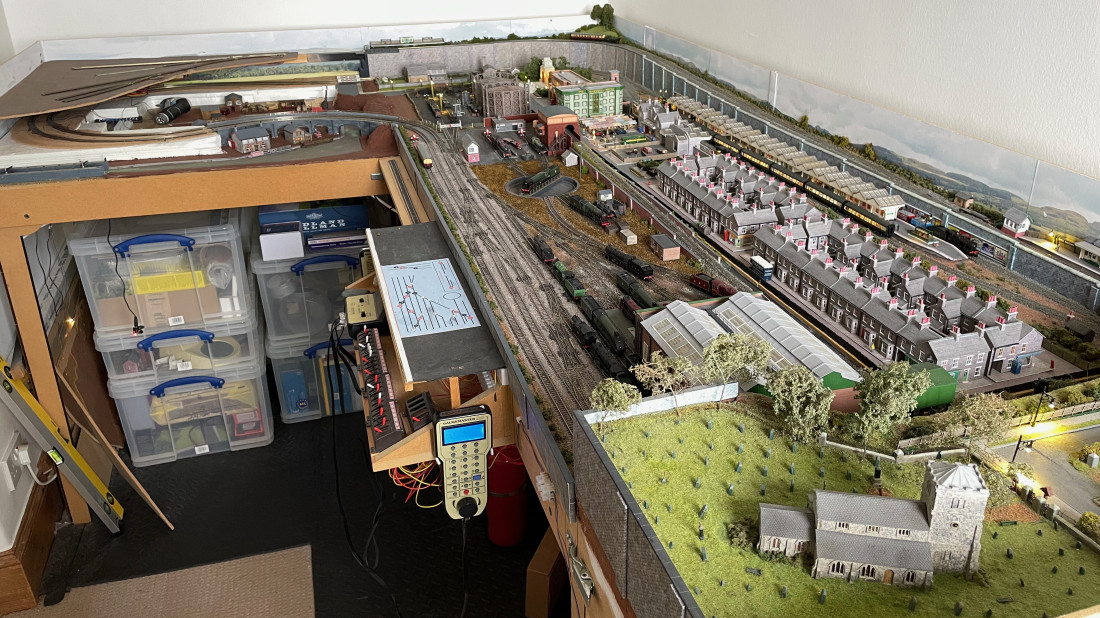
(Click to enlarge)
I am currently working at the far end of the layout on installing a canal and canal basin with a timber yard that will sit below the village of High Elven which is the terminus for the branch line. This is a much revised area of the layout. First the area for High Elven has been cut back. The board for the village covered the whole area where the canal basin now sits. I also finally had to accept the viaduct that had stood there for five years had to be scheduled for demolition. It was early scratch build It served its purpose but it was beginning to show its age and my inexperience as a scratch builder. Although I couldn't have known it at the time, it had also been built with too tight a radius and was also too narrow. As I bought new rolling stock and locomotives, particularly a 9F and a 8F, I was forever having problems with derailing or bridge strikes. I couldn't keep gently moving the track any longer. A new bridge was built which also required a relaying of the whole curve to make all the radii gentler.
As part of the redesign at this the end of the layout I took up the Gas Works that I had installed and raised the level of the base board up to that of the surrounding area. The Gas Works was reinstalled but this time, with more experience and confidence, I think have been able to do a much better job of it, including have it connected to the railway. I have also been able to match, as much as you can in an N scale model the key elements of a town gas works (what I don't now now abut the process of making town gas simply isn't worth knowing). Putting the Gas Works in allowed me to put pavements and street lights in, including some working traffic lights to control a blind bend.
Settling on the arrangements for the bottom end of the layout also allowed me to complete the depot. In my last post I was in the process of building the Engine Shed for the depot. That is now complete and in its place including its lighting
I also, as a consequence of the width of the 9f and 8F again, had to replace the island platform of Weathertop station. I had already installed a Market place outside the station fitted with lights, and with the station platform needing to be replaced, and with more confidence now in fitting lighting on the layout, I fitted lights in the station together with people and other things on the platform.
I am still doucmenting the build on my channel on YouTube and putting up vidoeos roughly every two weeks. I will continue to post updates in this thread.
Finally a picture of the layuot wiht subdued ambient light so you get a sense of the lighting so far installed.

Posted

Site staff
Good to have you back Stephen, nice pictures 👍
The links to your YouTube channel are not working in your old posts as unfortunatley they didn't convert when transferring to the new forum software, so could you post a new link to your channel please.
Ta
Ed
Posted

Breaker of Things
I'd i can find a way to do them on mass I'll fix them all up
Signatures? Where we're going we don't need no stinking signatures!
Posted

Site staff
Cheers
Matt
Wasnie me, a big boy did it and ran away
"Why did you volunteer ? I didn't Sir, the other three stepped backwards"
"Why did you volunteer ? I didn't Sir, the other three stepped backwards"
Posted
Full Member
Barchester said
Great to see you back Stephen. All your videos SHOULD be linking properly again. If anyone isn't seeing them please let us know 👍
Cheers
Matt
From “Post #287,621”, 2nd May 2023, 1:59 PM
Thanks very much Matt, that's very helpful.
Posted

Site staff

Regards
Alan
Born beside the mighty GWR.
Alan
Born beside the mighty GWR.
Posted
Full Member
spurno said
Thanks for the prompt Alan
Full Member
Posted
Full Member
Posted
Full Member
Posted
Full Member
Posted
Site staff
Ed
1 guest and 0 members have just viewed this.