Braughing to Standon branch design for N gauge
Posted
Full Member
After researching (you’ll hear that phrase a lot in these posts) the ballast topic I decided on using ‘Legacy Ballast Light Grey Blend’ which felt a good match for the GER/LNER type used (and seen still to this day in remote places) on the disused old Buntingford branch line. The light grey blend also lends itself well to being faded and weathered to match the worn, tired and neglected ballast effect I was after. Ballast was therefore applied in sections and glued into place using the established method ie. wet the ballast using a spray bottle containing water and a dash of washing up liquid .. then apply using a pipette a 50:50 PVA / Water mix.
Once the ballast was dry and hard to the touch, I set about planning a weathering colour scheme. I again researched many You Tube videos & model railway forums on the topic, trying to work out the best approach for my needs and for my layout. It is generally recognised that two key methods are normally used … namely manual brush weathering or investing in a good quality air brush & compressor. I could not (currently) see myself getting the required regular use of an airbrush to warrant the cost so, as an old A level art student (long ago now) and more recently a fairly accomplished watercolour artist, I decided to trust in my painting and shading skills and went ahead and dug out some suitable brushes and purchased some RailMatch paint pots for track weathering. Some additional paints were also acquired in readiness for weathering various locos and wagons at a later stage but for the ballast itself, the paints used were Sleeper Grime and Matt Black.
After some paint application tests on my short stretch of ballasted rail track, I finalised the ballast weathering ratios as follows using syringed measures :-
1ml Sleeper Grime : 20ml water – used all over the ballast to form a very light shade of base weathering. Allowed to dry.
1ml Sleeper Grime : 14ml water – used only on the inside of the rails/sleepers and also on approx. 5-10mm of ballast on the outside of the rails, to form a slightly darker weathering. Allowed to dry.
1ml Sleeper Grime : 10ml water – used only on the inside of the rails/sleepers to form the darkest weathering.
Below shows the left side with the initial 1:20 mix of base weathering and on the right with no weathering at all.

The finished effect creates a nice shaded weathering; dark and dirtiest inside the rails/sleeper area and gently fading out towards the ballast edge. It also does not matter if the very edge of the ballast has some un-weathered spots.
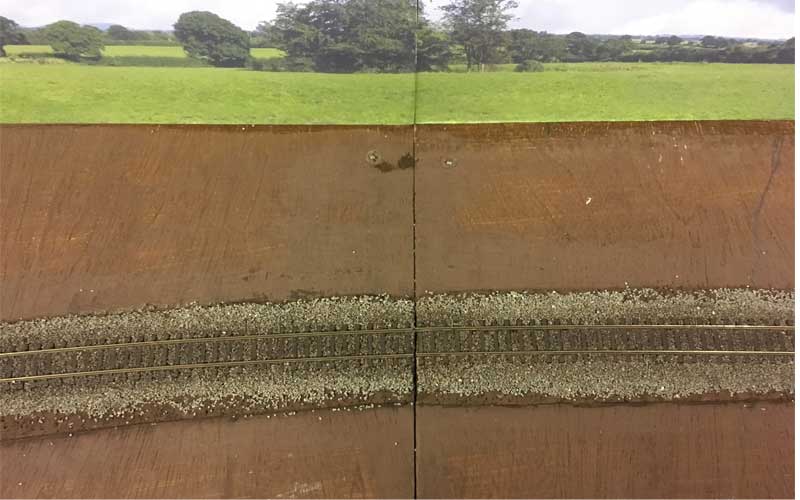
The last stage is to add some Matt Black weathering to indicate oil dripping over the years added to the inside the rails at station platforms and sidings, where locos were often stationary, and also at point sections to indicate where maintenance lubrication occurred for added realism. As a first effort of track weathering, I am really pleased with the result and it has the look and feel I initially sought.
Thanks for reading
Paul
 Last edit: by Padster

Posted

Site staff
Ron
NCE DCC ; 00 scale UK outline.
NCE DCC ; 00 scale UK outline.
Posted

Full Member
Diesels and multiple units tend to stop and start in the same pkace. The oil contamination is such that the sleepers and ballast is filthy black where the engines leak. With MUs the pattern is repeated every car length. Check out the photos I took of this at Banbury station.
Nigel


©Nigel C. Phillips
Posted
Full Member
thanks
Paul
Posted
Full Member
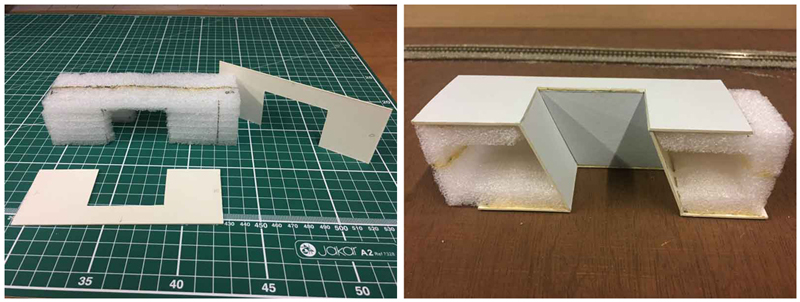
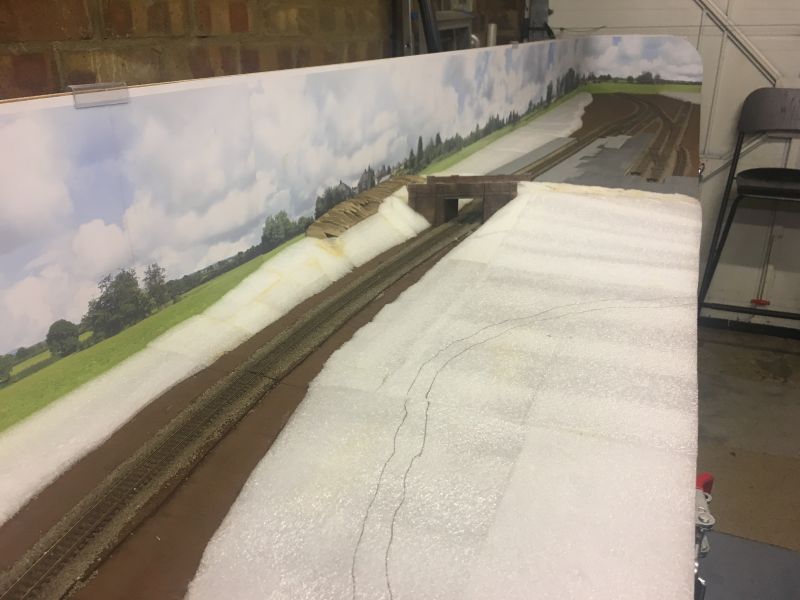
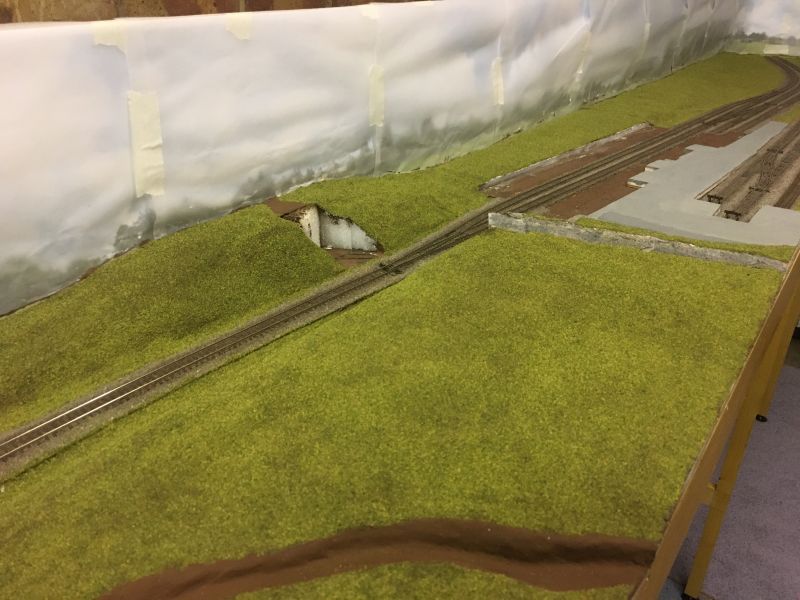
The section of the old Buntingford branch line I am modelling was/is generally flat terrain but broken up somewhat with a road bridge cutting and gently sloping farmland. There is also a small River Rib snaking through in part. As such, I didn’t need too much landscaping structure to build other than creating a road bridge cutting, some gentle inclines of land from the tracksides up to join the backscene imagery and create enough land rise to create a small river.
For the height of land surrounding the road bridge (and therefore forming the cutting) I used some honeycombed cardboard packing I’d saved and cut to the desired length and width. To further extend this and also begin forming the gentle slope effect, I used many offcuts of EPE Foam packaging material sheets I’d retained from kitchen appliances or office desk deliveries. These were also shaped and stuck into place using Copydex to form the overall shape of landscape to support the road bridge and create the cutting either side.

The remaining landscape of gentle inclines along the layout was also done using 1-2cm thickness EPE Foam packaging material sheets, cut and shaped with a sharp craft knife to a very obtuse angle where they abutted close the trackside edge. These were also glued into place on the baseboard using Copydex. The section of layout that will host the small, meandering River Rib I made sure I used at least 2cm depth of EPE Foam – this allowed me to cut out the desired river width and angled depth to form the river.

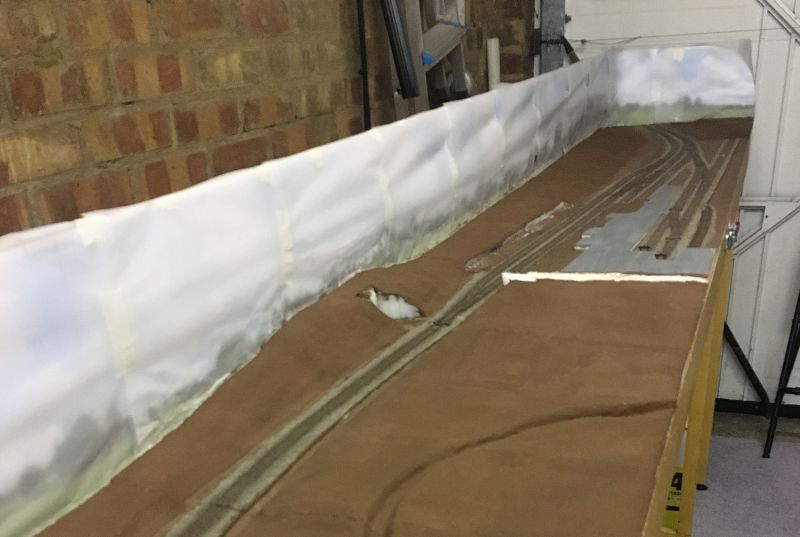
Once all the landscaping structure was in place, I began covering it all with plaster cloth sheets cut into small sections and smoothed to created natural rolls and form of the land. Although a naturally messy process (where covering the track and ballast is highly recommended), I was very happy with the results and only needed a second layer of sheets to complete the job. Minor joins of the sheets that were too proud were smoothed or ‘lost’ with some watered down Polyfilla added in places.


As the cold weather started to bite in the garage, it took quite a while for all the plaster sheets to completely dry to a pure white finish so I will leave it now until the early Spring to seal it all with PVA and start he next phase of painting the landscape base in earth colours and then start to bring the layout to life with the detailed scenics of grass, trees, hedgerows, etc.
Thanks for reading
Paul
Last edit: by Padster
Posted
Full Member
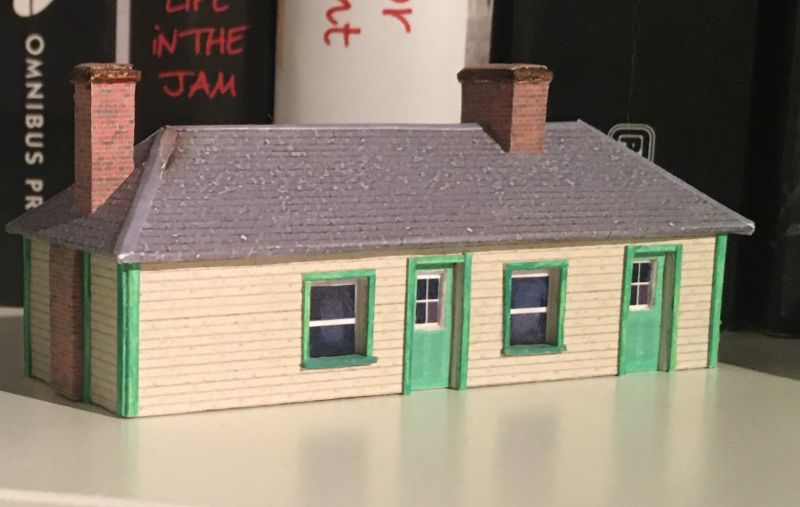
As my layout is based on a real section of a local disused railway, I wanted the shapes of the platforms to be as identical as possible to the real thing – therefore any ‘off the shelf’ N gauge platform product would not suffice.
I decided on creating my own and used 9mm off-cuts of plywood, cut and shaped as required, which meant some careful jigsaw and fretsaw trimming was required as one platform is delicately curved. All looked well so next was to test the platform height against a DMU placed on the rails of the proposed station. Using real photographs of Standon and Braughing stations during operating days as a reference (the latter stills exists as a converted home with both platforms fully intact), I was able conclude the correct platform height against a DMU – my platform was approx. 2mm too low! I was already expecting this and had planned to glue some 2mm cork track underlay to the plywood to achieve the desired height.


Using the cork underlay also provided additional benefits. 1) it allowed me to create the typical slight overhang at the platform edge and 2) after using some smooth filler in places and using several coats of children’s paint (blended for a base light grey concrete effect), many – but not all – holes in the cork were filled to create a naturally worn and tired looking platform effect, where pieces of platform concrete have broken away.
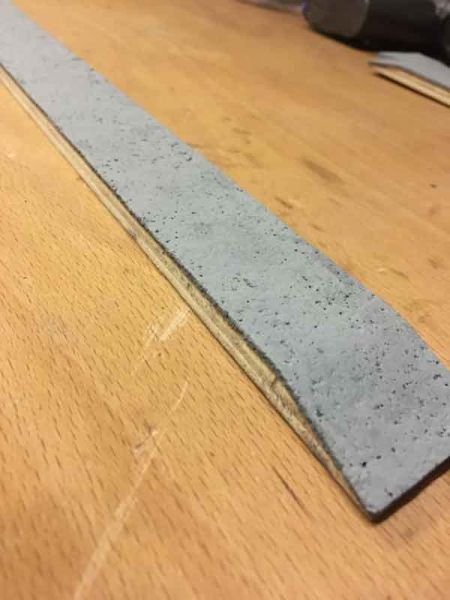
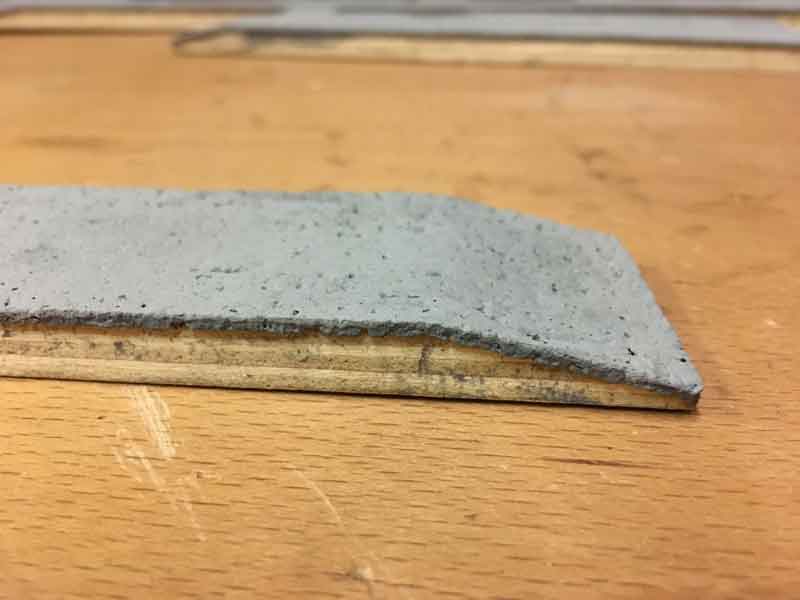
I still need to colour the concrete effect further to make it appear more naturally ‘patchy’ where repairs were made over time and also glue some aged red brick paper to the track side fascia (suitably weathered to look almost blue/black with soot and grime .. and the last phase will be to paint the platform edge in a white washed, worn out and flaky style.
Thanks for reading
Paul
Last edit: by Padster
Posted
Full Member
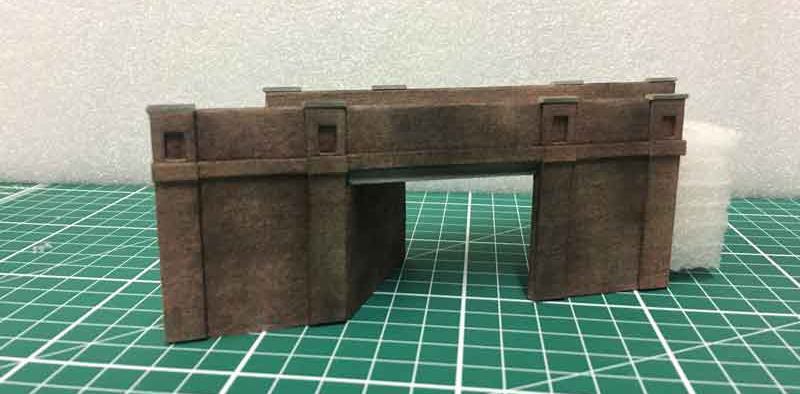
After looking at all the available Plasticard & card kits available for N Gauge road bridges, I could not find anything that close to the style required – yes, I could have bought one and hacked it around a lot but that still seemed counterproductive to the realism I required. I opted for scratch build which hopefully would mean a very close replica to the real thing however, I had never scratch built anything in terms of modelling before!!
On the plus side though, I have many reference photographs of the road bridge in question during operating days, all the dimensions and an added bonus, the bridge still exists to this day and is unchanged.
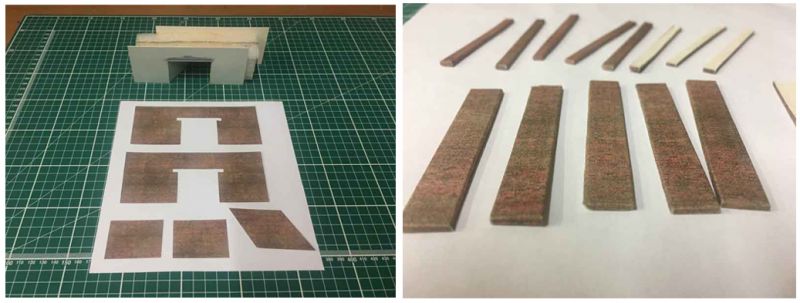
Once again, for a novice scratchbuilder YouTube, Model Railway magazines and Model Railway forums are essential in terms of materials, technique and creating realism. I opted for card and as this was my first attempt at an N Gauge structure and I needed a confidence boost on creating a good end product, I chose Daler Rowney ‘Graduate Blue’ card 1.25mm thickness which was on offer at Hobbycraft. This seemed to offer relative ease of cutting and solid enough to ‘stay put’ when finally fixed to the layout. I had some spare & sizable EPE Foam packaging material lying around which can be easily shaped and is extremely lightweight – these were cut to the desired shape and size to form a loose looking road bridge which would provide the supporting structure to glue the proper shaped card to that will form the road bridge itself. This all worked well but to be certain I used Copydex adhesive to ensure the card and EPE Foam were solid.
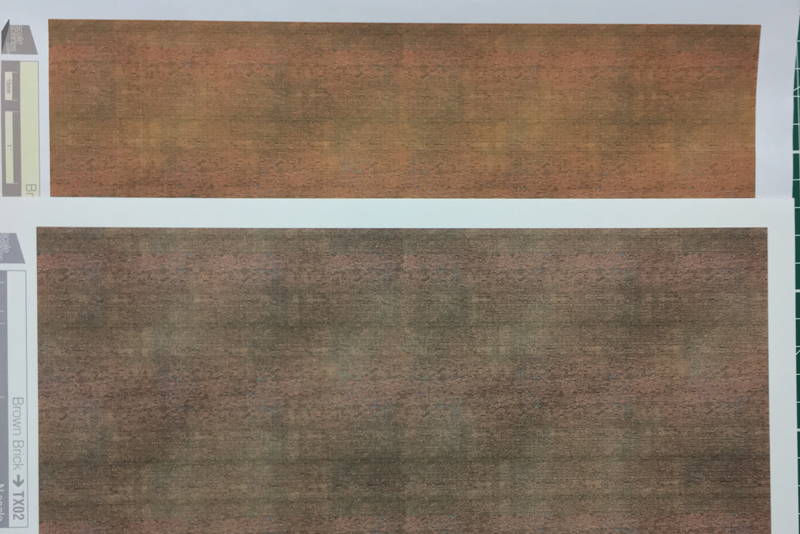
To start adding to the realism I used some cheap N Gauge girders bought on EBay on either side of the bridge span. I actually found it pretty difficult to find suitable weathered & worn blue engineering bricks in printed sheet format anywhere, so I opted for Scalescene’s TX02 Brown Brick downloadable sheets which looked suitably aged and dirty. I found that my inkjet printer was more than capable but I found the key to getting the right print colourisation & shade is the paper you use. As a test I printed on sheet on standard 80gsm paper – this came out far too reddish in colour and looked somewhat ‘washed out’ (probably the ink seeped into the poorer quality paper too easily) and was not the effect I wanted. I then printed another sheet using 150gsm Ice White A4 paper from Hobbycraft and this resulted in a nice, rich, red/brown brick colour that looked worn and weathered – perfect!
After cutting out the required sections of TX02 Brown Brick and sticking them to the card scratchbuilt road bridge (including any pillars & artefacts) using Pritt All Purpose Adhesive 205g bottle, the finished article looked really great for a first effort.

The final part of this build was the weathering and for this I decided to use Carre’ Pastel sticks (traditional) bought on EBay, scraping the sides with a craft knife and collecting the powered dust into small containers – this formed my weathering powders in various earth type shades. Using an old (and small) makeup brush, dark power was brushed on in various depths of shade and in various places to really darken down the bridge and give it the effect of being discoloured and aged by years of grime and soot.
I’m really chuffed with the end result.
Thanks for reading
Paul
Last edit: by Padster
Posted
Full Member
Nice work.
Modelrailwayscenery.com does downloadable N scale blue engineering brick sheets. The other way is to use OO scale downloads and shrink appropriately when printing. If you have 2D software you can do your own. Or take a photo of the real brick and use that as the template.
Nigel
©Nigel C. Phillips
Posted
Full Member
Your suggestions are good … I never really considered taking a photo of the old bridge brick - that could have worked for me but a moot point now - another lesson and tip learned.
The trouble I found that many of the available blue engineering brick downloads available were too new and perfect looking and I had never weathered anything before - probably now I have the confidence to turn the new looking brick into something really old … and yes, another good tip about using OO gauge downloads and shrinking the print to 51% to get N gauge scale. Actually I just did this for some aged, cream wood slat downloads I found that look really suitable for GER/LNER colours used on many platform buildings and signal boxes .. with good results and look really authentic.
cheers
Paul
Posted
Full Member
After my successful first scratch build attempt at a road bridge, I now embarked on the rather daunting project of scratch building every platform and station building for both Braughing and Standon stations. I did think I’d bitten off more than I could chew but decided to go for it!
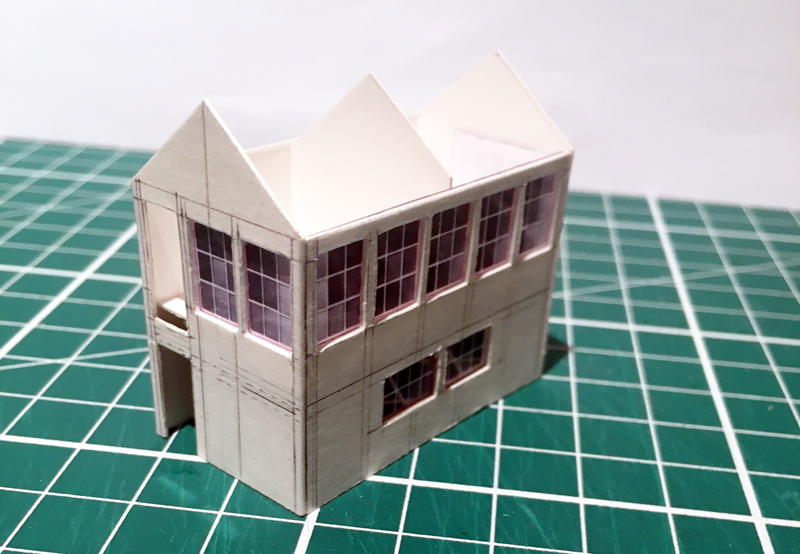
As with the road bridge, I stuck with the Daler Rowney Blue Graduate card 1.25mm thickness, using a Swann Morton craft knife and several packs of ultra-sharp blades … and Pritt All Purpose Adhesive 205g bottle. The Graduate Blue card served well and does lend itself to forming good depth window and door recesses for N Gauge building models …. but it does need a few ‘passes’ of a sharp blade to cut neatly. It also wasn’t so easy to cut and leave thin door or window frame elements that I wanted, so for some of the buildings (notably the 2 signal boxes and small platform waiting rooms and various roofs) I switched to using 0.6mm white card – an A4 size I found lying around in my home office but cannot recall where it came from. This was still sturdy enough yet easier to cut and retain thin frame pieces – see the signal box photo as an example – and in some of these models I also used right angled 1.25mm card pieces in the internals corners for added strength.
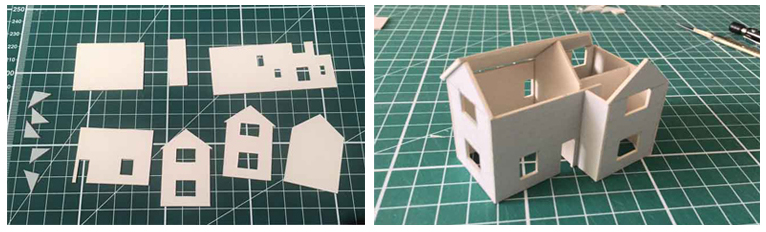
For doors, on various buildings, these were just recessed and filled with card, where I intend to paint and shade the required door panels to make them look a little 3 dimensional. For the windows I decided I could scale them accurately using Photoshop, print them and then stick them to some very thin transparent plastic – the type you see on various food and home-ware packaging. I used this technique with success for the larger Braughing signal box & Braughing booking/waiting room however, it seemed to mean extra unnecessary time and effort if I were to do this for every building. I therefore decided to simply scale and print the window panes directly onto glossy photo paper – this saved time and also worked really well on all the remaining buildings, giving them the ‘window shine’ I required for some realism. There were added benefits to using the printing technique and glossy paper – I could slightly adjust the window pane shades to give the effect of different reflection conditions plus, by using a cotton bud I could gently rub the printed ink forming the window colour and make it further ‘fade’ the shade to suit.
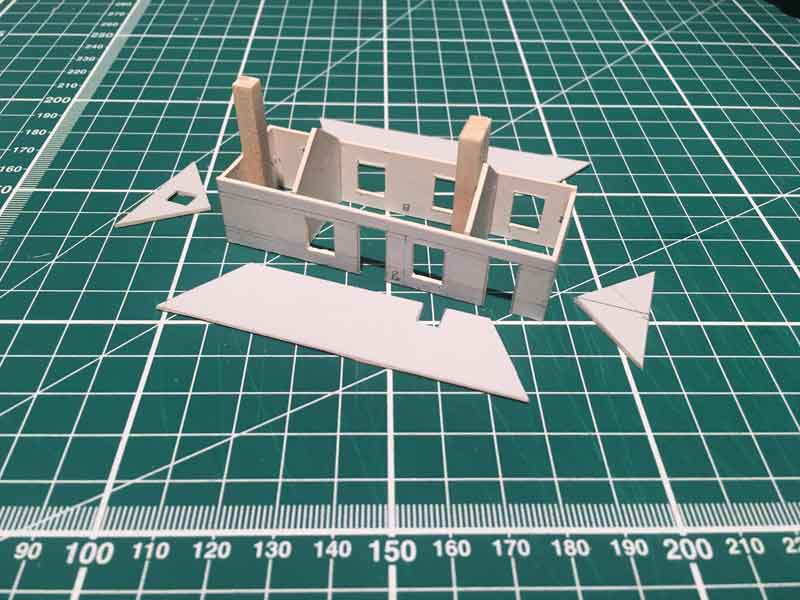
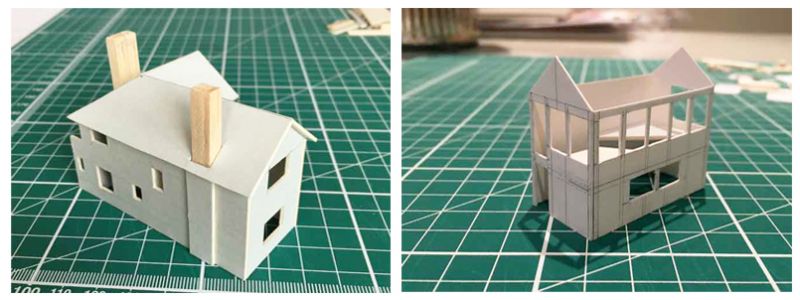
All chimneys that are depicted are also set to scale and formed using various small sized balsa strips – these also need to be worked on further to add the required brickwork detail for realism.
To date, I have now scratch built 14 station & platform buildings/structures to 1:148 scale and will begin shortly on the cosmetics of each, also using scaled down Scalescenes and Railwayscenics brick and wooden plank printable sheets ….oh, and build a 4 story flour mill that was served by sidings at Standon station.

Thanks for reading … this is the last update in the current series but more to come as things progress over the winter.
Happy New Year and all best wishes for 2020 to you all
Paul
Posted

Full Member
Michael
Posted

Full Member
Staying on the thread Kevin.
Posted
Full Member
Other than the obvious pandemic & various lockdowns, I’ve generally been pretty busy with life with various other unforeseen responsibilities coming my way to help others and of course dedicated time with the family …. Oh, and I also took voluntary early retirement … yippee!! And so, sincere apologies for no updates but I hope to put that right now.
Throughout my period of absence, work has continued on the layout which now looks almost unrecognisable from the last imagines I shared. I would say now it is 85% complete and into the ‘last few stops’ before reaching its planned destination. I have maintained a photographic diary of all the build processes (formerly the finished station and platform buildings) and now the scenery, plus all the details I have been adding to hopefully create an authentic sense of a run-down Hertfordshire branch line in its last year of passenger service. It did feel strange to create all the track work, buildings, platforms, fencing, other artefacts, etc as new … and then set about making them tarnished, worn out, broken, weed-ridden, rusty and dirty … but the end results I’m happy do really start to make the ‘place’ come alive.
So without further ado, I’ll try to continue where I left off and make various posts in sequential order the highlights of progress to bring you all up to date. So for this post, I’ll continue with an update on the layout buildings.
Regards to all, Paul
Station and platform buildings with basic wood, brick, slate coverings and windows in place - April 2020

Braughing ticket office and signal box taking shape - May 2020
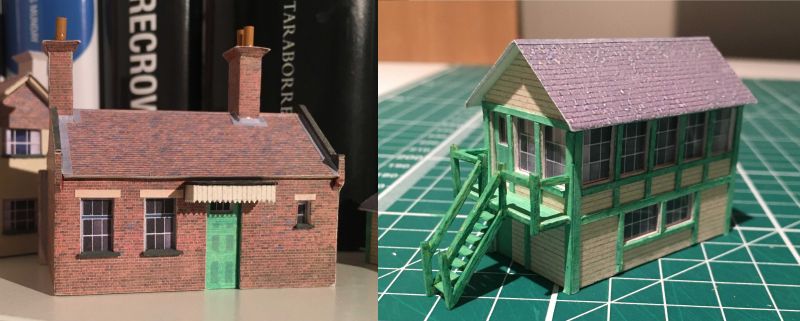
Standon station building beginning to look the part - May 2020
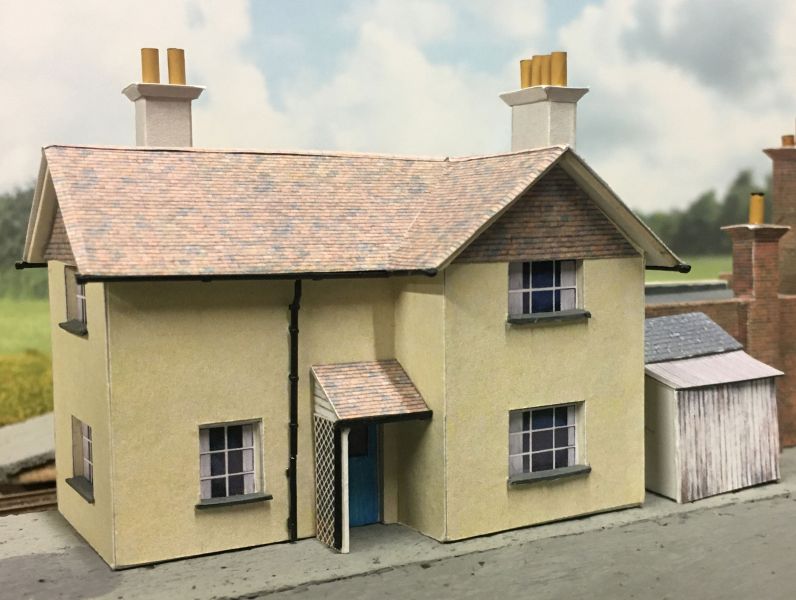
Braughing station masters house and its lean-to out buildings
More to follow ..
Last edit: by Padster
Posted
Full Member
Early 2020 saw the backboard fixed in place along the whole layout and the back scene successfully glued into place. Then began the work on designing the required terrain and landscape using plastic packaging and cardboard or various sizes and depths, building up the landscape to the desired features.
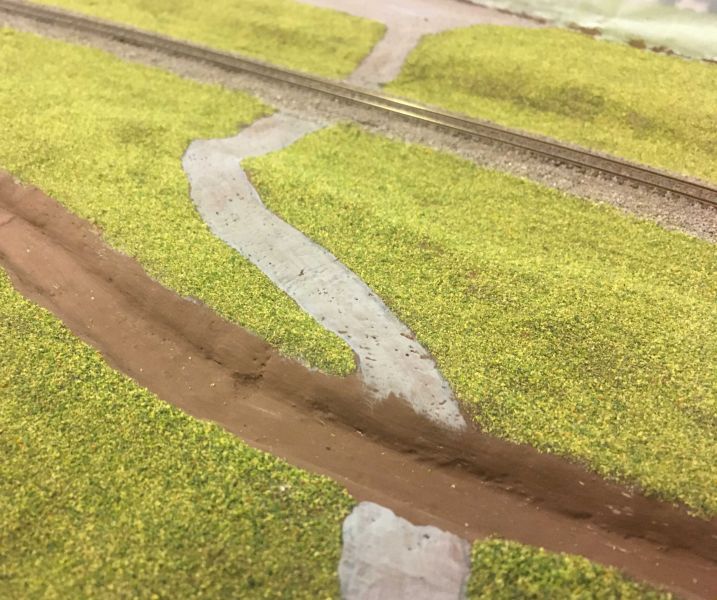
The same view but now with a steady soil colour painted on all over the landscape - note the small River Rib in the foreground has now been extracted to the desired depth.
Then came the first covering of green blend and earth blend mix for all the landscape fields and cutting / banks
Further into 2021 now and the scenery takes shape with trees, shrubs, trackside weeds, hedgerows and lineside posts and fence wire all in place. Note that many of the station platform buildings and fencing has also been added with increasing details added and more still being worked on.
Posted
Full Member
In Sept 2020 I was conscious the weather would soon start to cool very quickly in the evening, especially in a garage, so I dropped everything else on the layout build and focused all efforts on the small River Rib that ran alongside various parts of the Buntingford branch - notably in the part of the layout I was building. I had researched various methods and techniques to create realistic rivers and streams (YouTube has some great videos of this topic) and as my layout was to have a relatively small amount of water to depict, I decided on using Deluxe Materials 'Aqua Magic' 250ml. This product is ready to use direct from the bottle and appeared to be pretty straight forward to use - ideal for me as I have never created realistic water ever before and considered the task to still be somewhat daunting. I also hadn't exactly made life easy for myself as the layout placement meant the river would actually span two baseboards … not exactly a big 'no no' but probably best avoided if possible.
I made all the necessary preparations ie. river bottom sealed with UPVC/water (70/30), brown base colour on the river bottom and banks, variation of acrylic colours to give depth & realism to the river and banks, sealed the ends of the river with masking tape and a UPVC extra seal. All good … or so I thought.
Brown base colour applied
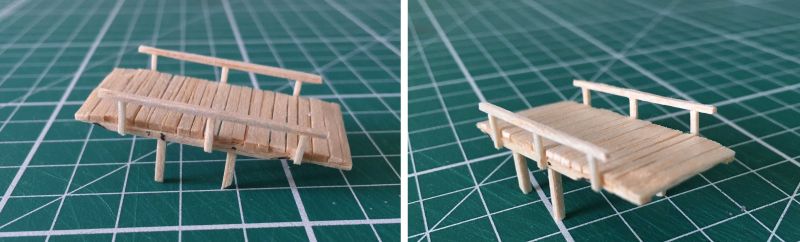
Before work on adding Aqua Magic to the river, I had to first rather quickly build the small wooden plank bridge for access to the farm house on the layout. This was delicately constructed using small and thin strips of balsa, mindful that I wanted it to look 'tired and rather neglected in the finished build. Once happy with the look and feel, it was painted with various brown / grey variations of acrylics for the sun bleached wood effect. After only a few minor alterations to the supports to get it fitting just right, I was all set.
Farm track bridge before painting and weathering
The first layer of Aqua Magic was gently yet quickly poured into the river and pushed gently into any nooks and crannies, especially around the support legs of the farm track bridge. I was as careful as possible to ensure the depth of Aqua Magic was only a max 2-3mm as recommended. This went well and was left to set properly for 24-36 hours.
The following day I quickly checked after 12 hours which resulted in huge disappointment - at various places Aqua Magic had split across the width of the river forming a widened 'gash' at the centre as it had dried! I did think about trying to fill these with more Aqua Magic hoping they would be hidden within the rivers volume but as I had no experience with fake river water and tricks to solve such problems, I carefully removed all the Aqua Magic as it was still quite pliable and rubberised at this stage. Took a little time but it worked …. and yet left the bottom and banks of the river with a very different look and feel. In fact, as it turns out, this is one of those 'happy accidents' because the river looked really realistic in its colour and texture - as if it had been drained and revealed its slimy, muddy, rocky and stony appearance for all to see. To be honest, without a lot of experience I do not feel I could have created this on purpose so I was really happy at this outcome.
The Happy Accident results
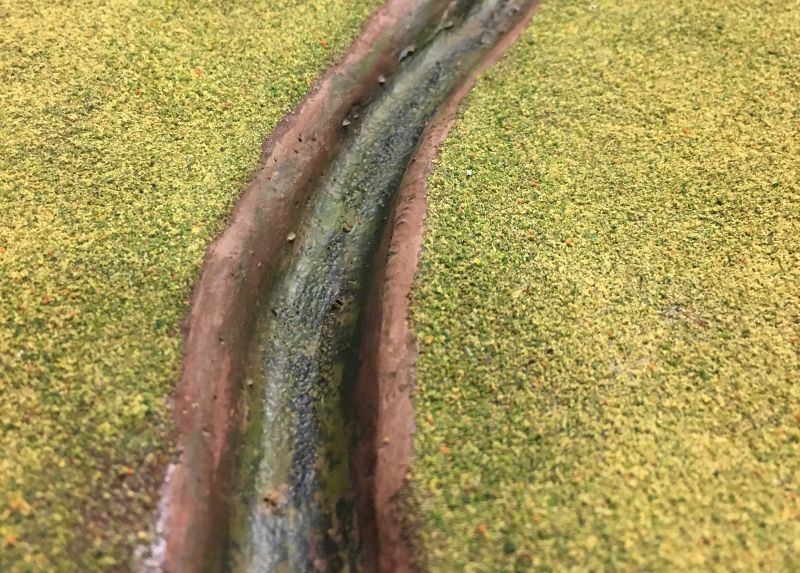
After some further research into what went wrong with my application of Aqua Magic, I believe it could have been several things - application deeper than 2-3mm, reaction to the acrylics I used, UPVC applied before painting the river base not sufficient … and a few more possibilities besides. I admittedly also ignored the product recommendation to seal the river base with a thin brushed layer of Aqua Magic before starting - I would not normally have done that but had read various forums that suggested this was not necessary as pre sealing with UPVC and acrylics should suffice in their own experience. After more research I decided to use Humbrol Enamels (matt) for the river banks (which I wanted and little darker than current) and applied neat Evo-Stik PVA to the river bottom. Allowing 72 hours to ensure these where 100% dry and sealed, I set about using Aqua Magic once again making sure I was absolutely 2mm max at any given point and let it dry. With some trepidation, I again checked in 12 hours and so far so good - no splits across the width of the river and no 'drying gaps' at the river banks.
First layer successfully applied - no splits nor shrinkage
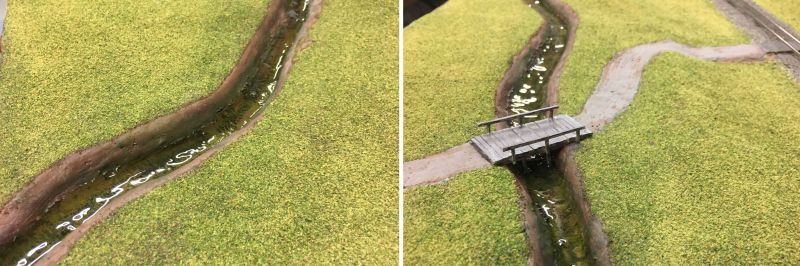
After 48 hours it was dry to touch and all looking perfect - phew! With renewed confidence I then added another 2-3mm layer to build up the depth and even used the 'blowing into a small tube' technique to try and create some gentle water ripples - with partial success.
The finished river and farm track bridge - more surrounding scenery still to be applied.

Compared to other experienced modellers with greater expanses of water features on their layouts, mine was certainly very small in comparison but that said, I think I have the confidence now to tackle something more complex in future and probably try using other methods for creating realistic water.
Cheers
Paul
Posted

Full Member
Your stream looks very good and certainly encourages me to have a go.
Barry
Shed dweller, Softie Southerner and Meglomaniac
Posted
Full Member
Cheers
Paul
Posted
Full Member
During the pandemic periods during earlier 2021, the scenery was my key focus - from trees, bushes, undergrowth, lineside foliage and general weeds. Just a selection from that period for your interest.
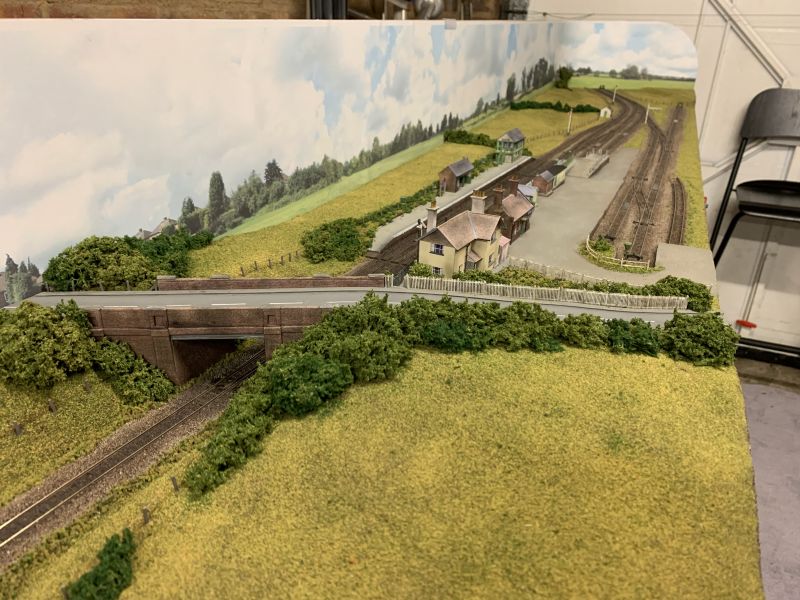
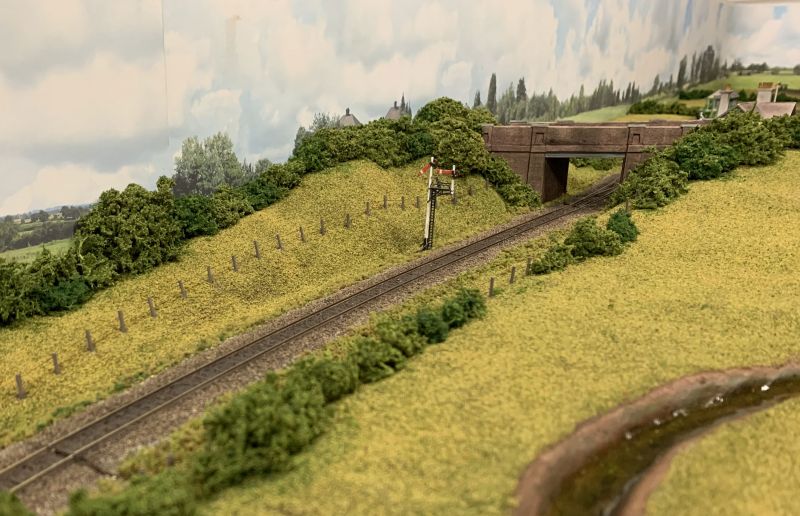
Braughing station approach - the initial road bridge scenery is in place, as is the lineside fencing. You can also just see the down platform used by passengers heading towards Buntingford.

The same view but set further back with more foliage captured - the down lower quadrant junction signal is now constructed, painted and in place (Ratio 262 kit)
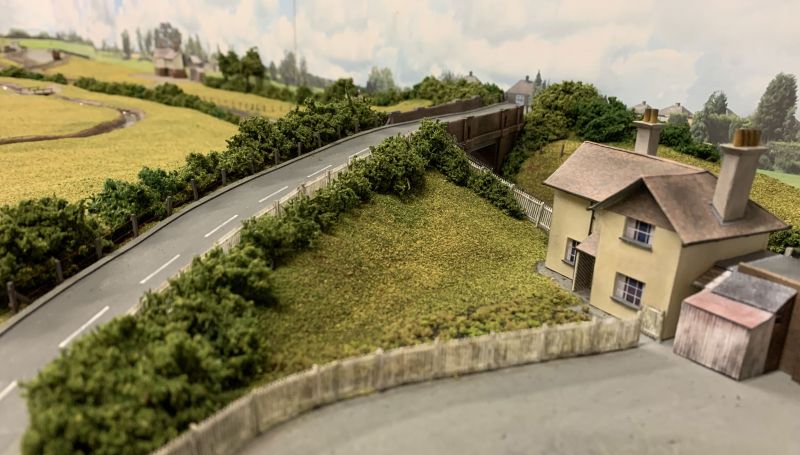
Braughing again but now the 'Up' view of the road bridge and the B1368 road also captured. The station masters house, its shed 'lean-to' and the garden fencing also now in place.
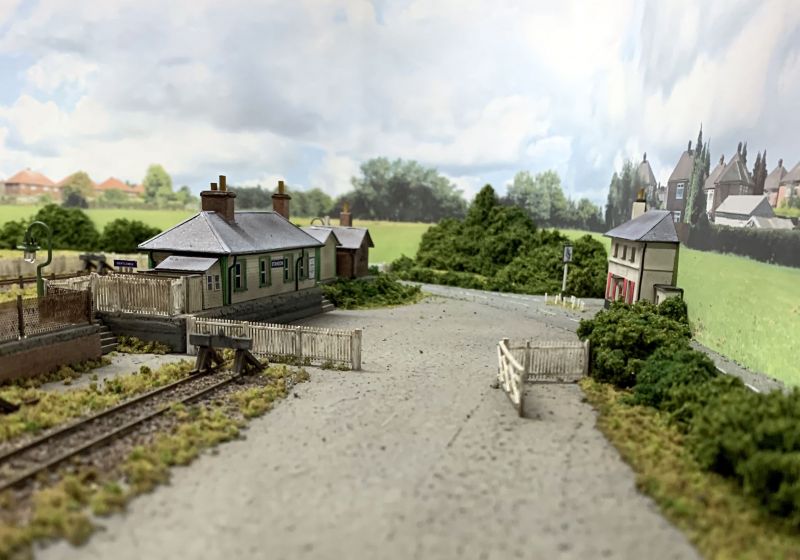
Braughing station from the north looking south in the 'Up' direction. The down platform shows the signal box and waiting room in situ along with the overgrown old flower beds full of weeds and shrub. You will also note that the station lamppost lighting & fencing have been added - also the Up platform cattle dock starts to take its basic shape

Standon station looking south. Lots of scenery and foliage already added but still being worked on. Station forecourt and sidings entrance still needs some more weeds, etc but the station buildings themselves are really starting to look the part. Note the Heron public house (low relief building) to the right, alongside its tiny pub sign on a post. Even smaller are the chain link fence posts on the small green verge outside the pub … and no, I did not scratch build any microscopic chain links :-).
If you look real close to the left, you can see my rusted chain link fencing at the edge of the goods siding - I'm rather pleased with that.
More to come … thanks for looking
Paul
Posted

Full Member
Hi Paul,Landscape & scenics start to take shape.
During the pandemic periods during earlier 2021, the scenery was my key focus - from trees, bushes, undergrowth, lineside foliage and general weeds. Just a selection from that period for your interest.
Braughing station approach - the initial road bridge scenery is in place, as is the lineside fencing. You can also just see the down platform used by passengers heading towards Buntingford.
The same view but set further back with more foliage captured - the down lower quadrant junction signal is now constructed, painted and in place (Ratio 262 kit)
Braughing again but now the 'Up' view of the road bridge and the B1368 road also captured. The station masters house, its shed 'lean-to' and the garden fencing also now in place.
Braughing station from the north looking south in the 'Up' direction. The down platform shows the signal box and waiting room in situ along with the overgrown old flower beds full of weeds and shrub. You will also note that the station lamppost lighting & fencing have been added - also the Up platform cattle dock starts to take its basic shape
Standon station looking south. Lots of scenery and foliage already added but still being worked on. Station forecourt and sidings entrance still needs some more weeds, etc but the station buildings themselves are really starting to look the part. Note the Heron public house (low relief building) to the right, alongside its tiny pub sign on a post. Even smaller are the chain link fence posts on the small green verge outside the pub … and no, I did not scratch build any microscopic chain links :-).
If you look real close to the left, you can see my rusted chain link fencing at the edge of the goods siding - I'm rather pleased with that.
More to come … thanks for looking
Paul
You write 'More to come…' Can't wait! Hard to believe you model in scale N.
Cheers,
Claus
www.flickr.com/photos/ellef/
Claus
www.flickr.com/photos/ellef/
Posted
Full Member
1 guest and 0 members have just viewed this.