My new layout
Posted
Legacy Member
On30 - again
Have to say what a superbly ( and humorous ) written thread that compliments the superbly built models.Can't wait for more.

Posted

Full Member
Allan, thankee kindly, much appreciated.
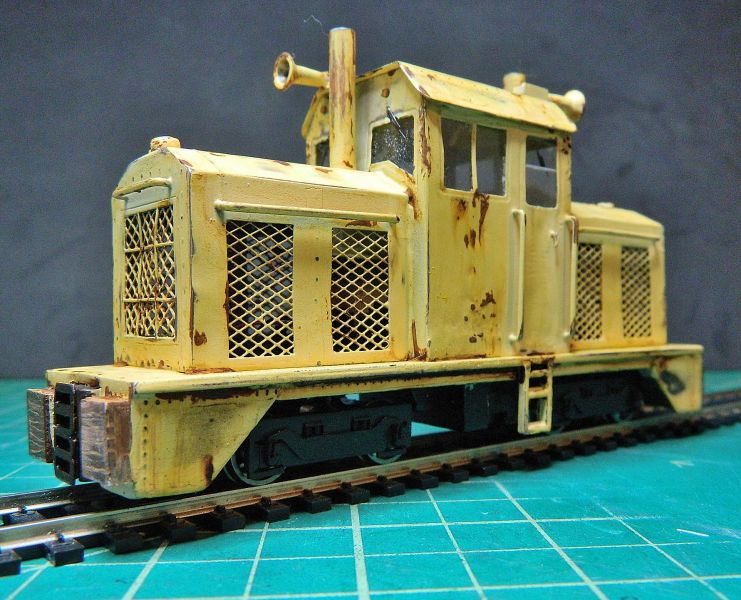
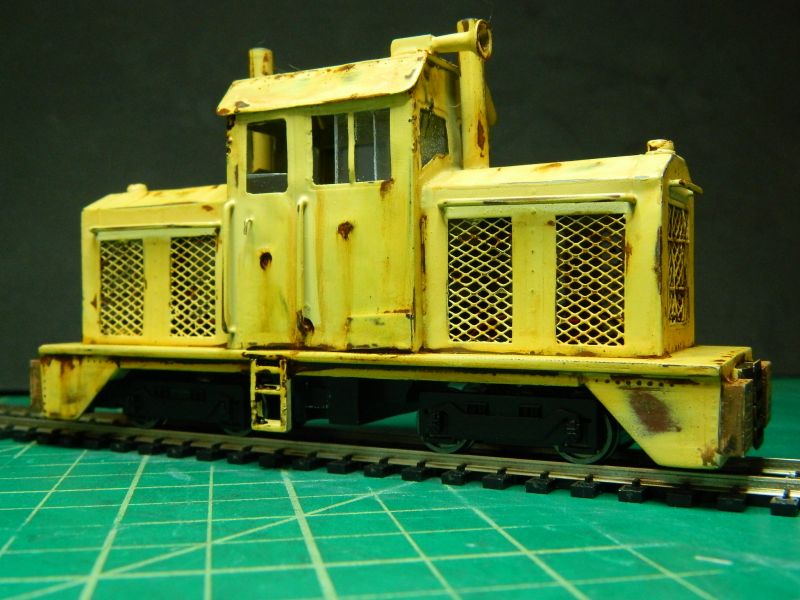
Slow week on the modeling front so far, but I did manage to add a couple of radiator caps (couple of screws with the bit slots filled with solder, then filed flat, no expense spared as usual), and get a bit of rustification in over the weekend on the center-cab model prior to an attack with the weathering powders. Better make some masks for the swept areas of the windscreens before I do that. The rustogoblins have well and truly had a field day. I used a combination of "rust" and "rusty red" weathering fluids and a box of Q-tips. Those bogie/truck sides need some oily black and grease on them as well. I'm currently debating whether to add a couple of air filter inlets on the hoods now that I have the micro lathe up and running.
Box 'o scenery came in the mail today, so no excuses, I'll have to get on with the layout. Currently in stock are 3 baseboards, total length 10 feet by 1 foot wide. Narrow is good, less of that expensive scenery to have to deal with.
Nigel

©Nigel C. Phillips
Posted

Site staff
VBG Nigel :pathead
Ron
NCE DCC ; 00 scale UK outline.
NCE DCC ; 00 scale UK outline.
Posted
Full Member
VBG - Venous blood gas? (For those not familiar, very big grin - text precursor of Mr. Smiley the emoticon). Thanks.
Onto the electrickery and DCC pokery.
The original DCC boards are on eebygum at the moment along with the body shells, so I need something to put the decoder, stay-alive and speakers on. Blodgit and Fudgit recon a shelf from some of the scrap lying around would do the job, who am I to argue with these precision master craftsmen after their masterful job on the exhaust stacks?
Strips of styrene were cut and glued, various holes drilled, rattle can for 2 coats of matt black, as usual no expense spared (or time wasted). The 44 ton chassis had the PCB board/decoder attached with holes for plastic inserts, they will get filled with 2-part epoxy, and holes drilled and tapped for some 2-56 nylon bolts. The 70 tone chassis has some convenient pegs and holes, although I might just drill out the existing holes and tap for -2-56 nylon bolts. Just to be on the safe side.
Wiring next. I don't seem to have any 8 pin (as opposed to 8 socket) wiring harnesses around, so it's a direct wire job for the decoder unless I use the mini block terminal I have going spare. Must find the heat sinks to clip on the wires to the decoder if I go the hard-wired route (big metal clothes pegs with flattened ends). I got rid of the electrical noise bits on the 70 ton chassis (the 44 ton didn't have any), not necessary with a decoder and they can mess up BEMF control.
Nigel
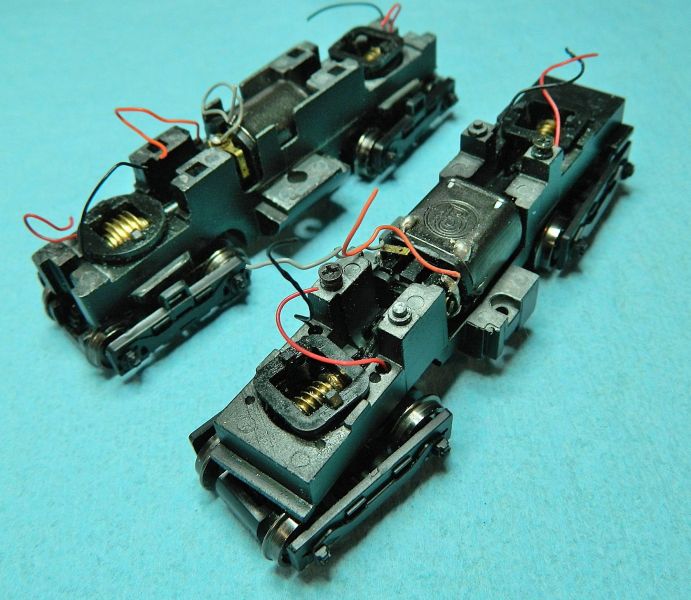
44 ton at the back, 70 ton at the front.
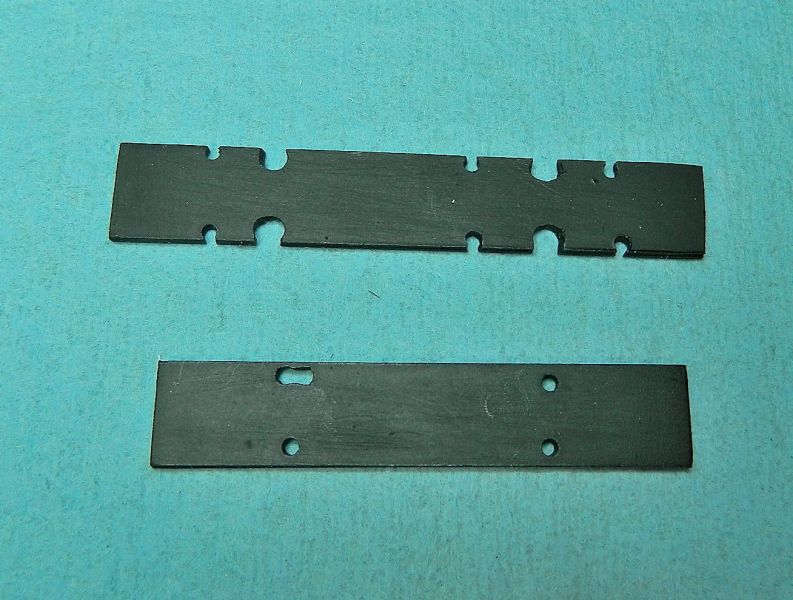
Plastic shelves cut, drilled and painted.
In place on the 70 ton.
In place on the 44 ton.

Holes where the clips went in, to be filled with epoxy and drilled/tapped for 2-56 nylon bolts.
©Nigel C. Phillips
Posted

Site staff
Cheers
Matt
Wasnie me, a big boy did it and ran away
"Why did you volunteer ? I didn't Sir, the other three stepped backwards"
"Why did you volunteer ? I didn't Sir, the other three stepped backwards"
Posted
Full Member
Thanks. There are alternates for VBG, but having worked with three Australians for 13 years they never came up (venous gas levels excluded), so I'm pretty sure Ron was using the polite one. I could be wrong…
Nigel
©Nigel C. Phillips
Posted
Site staff
In Oz, VBG usually meansHi Matt,
Thanks. There are alternates for VBG, but having worked with three Australians for 13 years they never came up (venous gas levels excluded), so I'm pretty sure Ron was using the polite one. I could be wrong…
Nigel
very bloody good

Ron
NCE DCC ; 00 scale UK outline.
NCE DCC ; 00 scale UK outline.
Posted

Full Member
John
 Last edit: by Brossard
John
Posted
Full Member
Ron, VBG, never came up, although most of the time it was technobabble, not 'strine, so live and learn.
John, Thanks. Turned out a lot better than I expected. Sound is very much in the plans. I have Soundtraxx Tsunami decoders (full function loco control, 6 aux functions) with GE caterpillar diesel sound suites with the usual 50 choices of horns for both, next job on the list once the shelves are in.
Filled two holes on the 44 ton chassis with 2-part epoxy this morning, drill and tap tomorrow when it's cured. No photos, unless somebody really wants to look at epoxy curing. Sold the two body shells, pcb boards and decoders as well on eebuygum, so the overall cost is reduced.
Having got back into scratch building and bashing, I really fancy having a go at converting a UK Bachmann 2-6-0 GWR prairie I have going spare (OO)into a 2-6-4 On30 Forney. This was a locomotive with an articulated bunker/tender that was designed to go around tight curves on the New York and Chicago elevated railways, and which were subsequently used in many industrial settings, including my modeling topic. Most were 2-4-4, but there were some 2-6-4 designs. More on that in the new year.
Nigel
©Nigel C. Phillips
Posted
Legacy Member
How dare you abuse a GWR loco, Nigel ! :twisted:Hi all,
Ron, VBG, never came up, although most of the time it was technobabble, not 'strine, so live and learn.
John, Thanks. Turned out a lot better than I expected. Sound is very much in the plans. I have Soundtraxx Tsunami decoders (full function loco control, 6 aux functions) with GE caterpillar diesel sound suites with the usual 50 choices of horns for both, next job on the list once the shelves are in.
Filled two holes on the 44 ton chassis with 2-part epoxy this morning, drill and tap tomorrow when it's cured. No photos, unless somebody really wants to look at epoxy curing. Sold the two body shells, pcb boards and decoders as well on eebuygum, so the overall cost is reduced.
Having got back into scratch building and bashing, I really fancy having a go at converting a UK Bachmann 2-6-0 GWR prairie I have going spare (OO)into a 2-6-4 On30 Forney. This was a locomotive with an articulated bunker/tender that was designed to go around tight curves on the New York and Chicago elevated railways, and which were subsequently used in many industrial settings, including my modeling topic. Most were 2-4-4, but there were some 2-6-4 designs. More on that in the new year.
Nigel
Allan.
Posted
Full Member
Without shedding a tear. Just like Churchward in fact. Quite apt that a narrow gauge chassis lives on as a narrow gauge locomotive. It's been a test bed over the years for my evaluations of sound systems and speaker location, the body us held together with CA, styrene glue, screws, bits of string, brown paper, sealing wax, blue tack… and no market for it here and too expensive on postage to sell in the UK. Now if only I could do something with that Hornby 14xxx model. Apart from bin it.
Nigel
©Nigel C. Phillips
Posted
Full Member
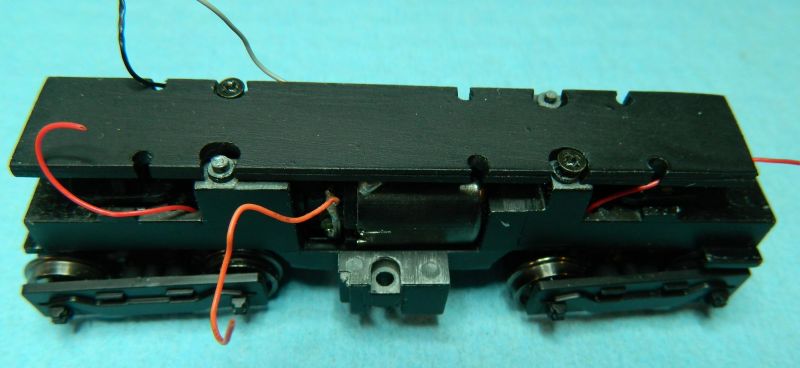
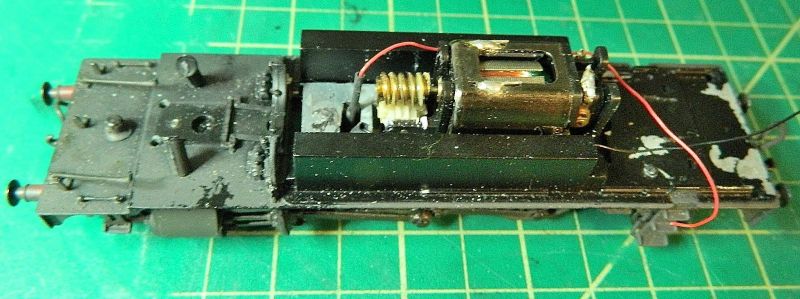
I finally made a start on installing the electronics into the locomotives. I started with the center cab, double hood one, as this requires a bit more work with respect to the speakers.
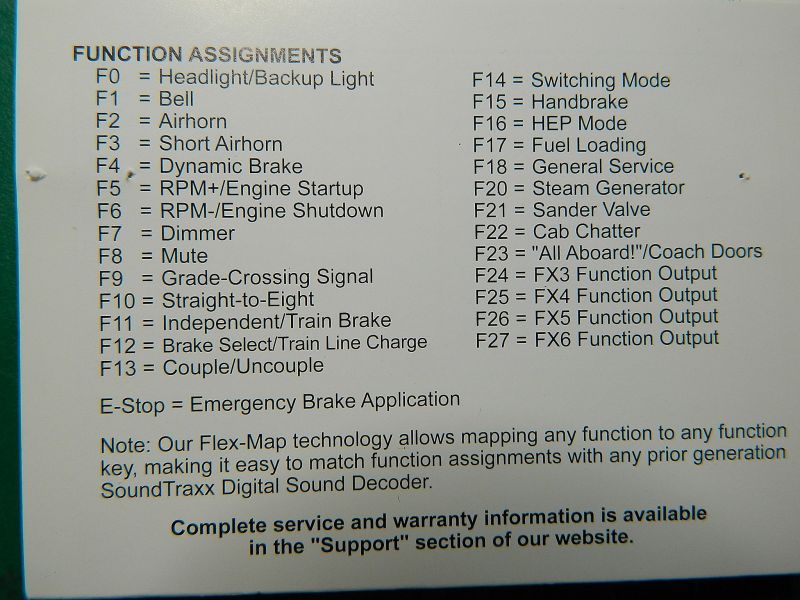
I'm using a Soundtraxx Tsunami 2, #TSU-1100 with 16 bit sound for GE diesels. This is a 1 amp, 6-function sound decoder with a ton of options - see below. Not sure I need ditch or Mars lights, but you never know. The important thing is that it has sound files for dual Caterpillar diesels and a single Cummins diesel. I'll use the dual Caperpillars for this one. On sale for $64, so not bad. The online manual is very readable.
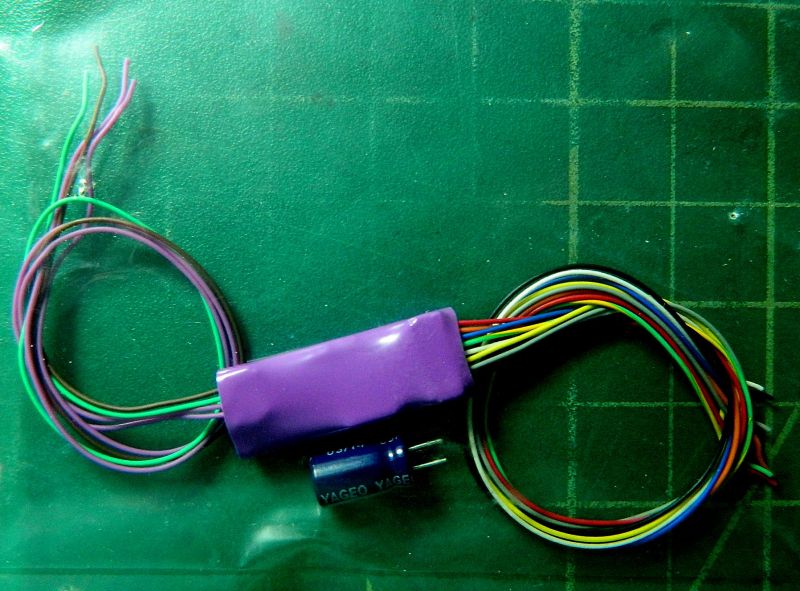
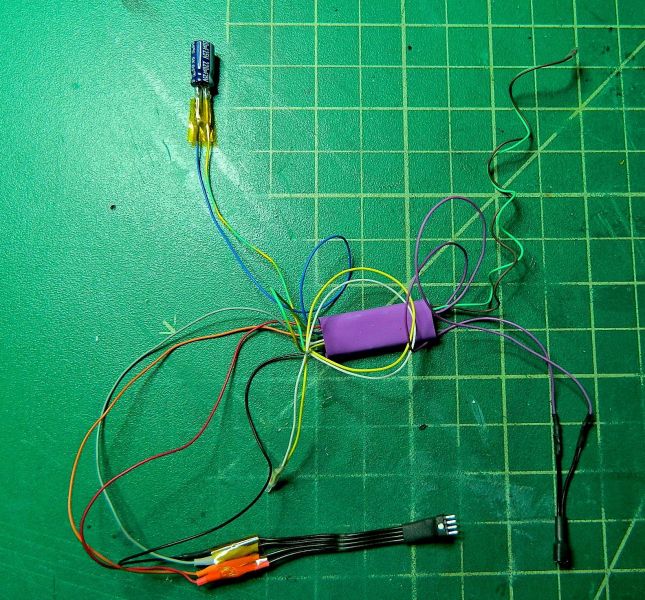
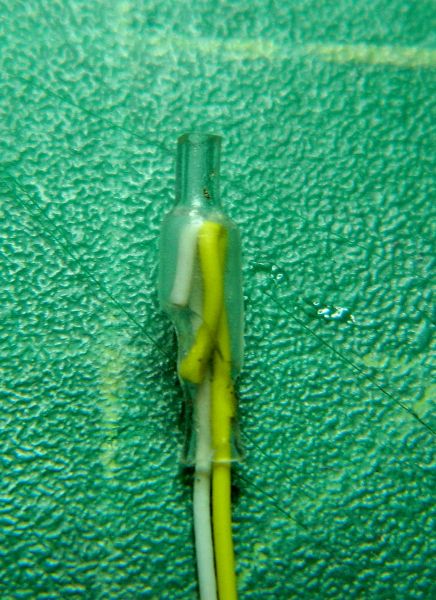
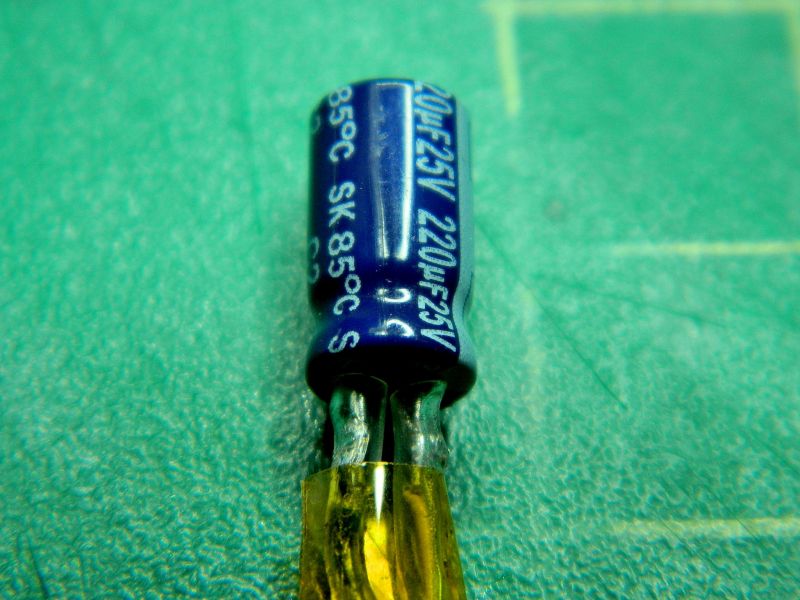
The decoder comes "bare wires", shown below with the included capacitor (220 µF, not sure how far that will get it without power, probably an inch or two, this is more to supply power on dirty track so the decoder doesn't cut out), conventional practice is to hard wire the decoder directly to the pickups and motor.
 I
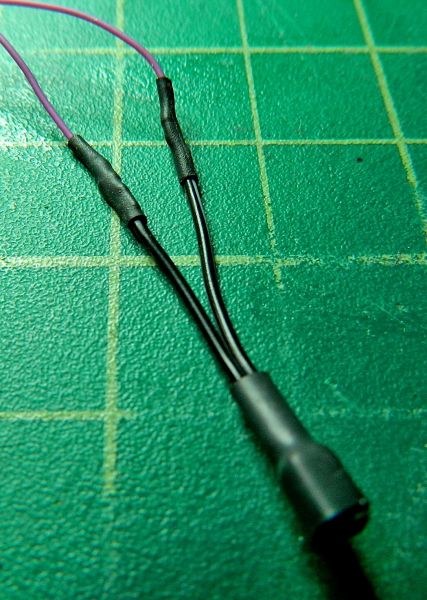
I I generally use a modular approach to decoder installation, where the decoder and speaker(s) can be removed separately and independently. In this case I used Microtronics 2 and 4-pin ribbon connectors, rated at 1 amp, The connectors are handed, convenient white dots on the coupling and a white stripe on one wire, and I used colored heat shrink tubing just to make sure the wiring was correct (black/red pickups, grey/orange to motor). The wiring will be coiled and held together with Kapton tape before installation. I used a large, flat ended metal clothes peg as a heat sink to protect the decoder when soldering. The end result is shown below.
The "heat sink". Indispensable when soldering wires connected to sensitive electronic components. This is a metal clothes peg with the ends flattened in the vice. I get these from Lee Valley in Canada in bags of 25. Made in Italy, so they or something similar should be available throughout Europe. Very effective, lots of mass, the wire from the soldering gets hot, to the decoder it's cool. Also useful as "third hands" for tinning wires, etc., when laid on their side.

Close-up of the wires from the decoder below. Back to front: Black, grey, orange, red. Held together with Kapton tape, less messy than electrical tape, and easier to see what's being held together.
 I I
I I I used transparent heat shrink to protect the ends of any unused wires (lights for the moment, and the spare FXs), bent over and of slightly different lengths to make sure there are no shorts. Definitely no wiggle room here. Again, easier to see what's going on.
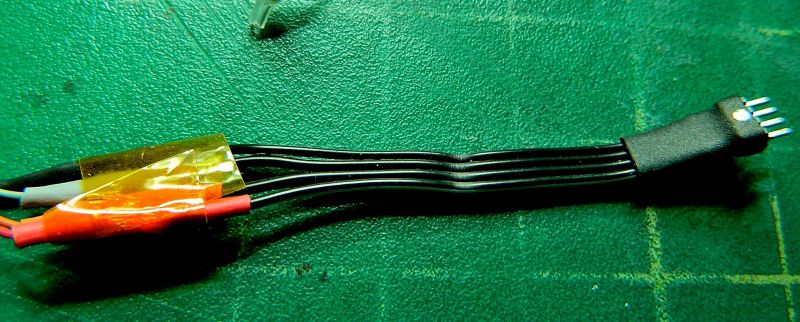
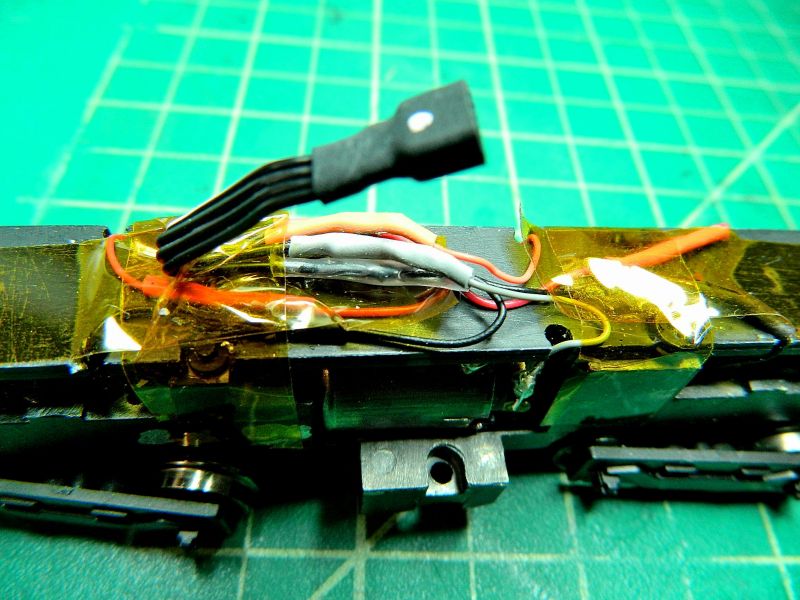
The chassis has the corresponding female plug connected to the left and right side pickups and the motor. Color coded heat shrink as for the decoder.
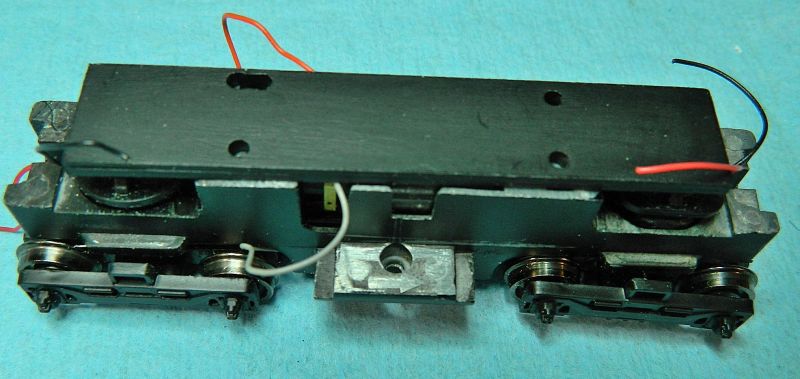
I'm using two 8 ohm speakers, wired in series to give 16 ohms and a maximum of 0.5W per speaker, as recommended by Soundtraxx.
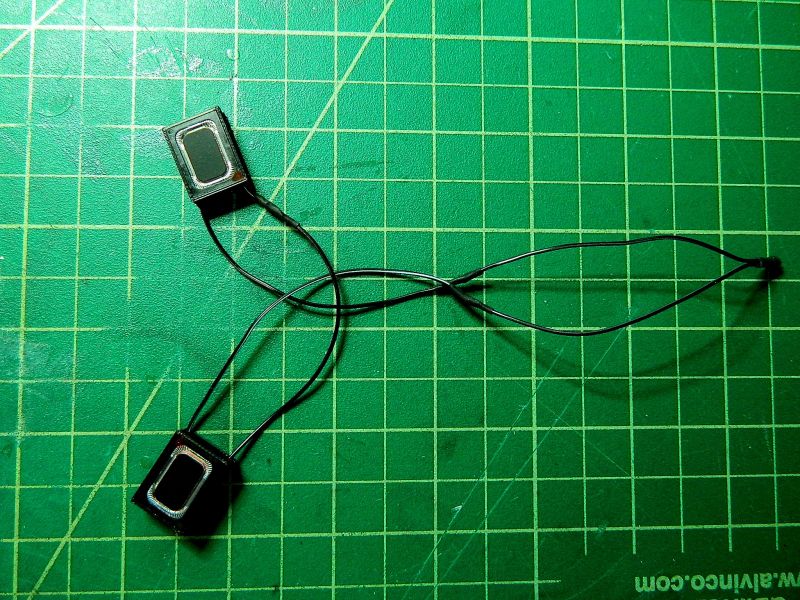
These are connected to the decoder amplifier outputs using the 2-pin connectors.
The connections to the capacitor were protected using transparent heat shrink, along with some Kapton tape to minimize stress on the soldered joints
It was a pleasant 60 minute job last night. Next up will be the end cab locomotive, that one will be getting a single mega-bass speaker in the cab.
Nigel
©Nigel C. Phillips
Posted

Full Member
Oh, Dr Beeching what have you done?
There once were lots of trains to catch, but soon there will be none.
I'll have to buy a bike, 'cos I can't afford a car.
Oh, Dr Beeching what a naughty man you are!
There once were lots of trains to catch, but soon there will be none.
I'll have to buy a bike, 'cos I can't afford a car.
Oh, Dr Beeching what a naughty man you are!
Posted
Full Member
Thanks.
The wiring is actually pretty simple, Soundtraxx did all the hard work, I just connected the wires - pickups from chassis to decoder, power from decoder to motor, decoder to capacitor, decoder to speakers (wired in series), spare leads for lights, TV, fridge, beer cooler…
Although this is O narrow gauge, the locomotive is only around 6" long, so it will get a bit crowded. It helps to keep it modular and the wiring color coded. That way the decoder and speakers can be removed without the hassle of undoing hard wiring.
Nigel
©Nigel C. Phillips
Posted
Full Member
So checked the chassis in DC, it worked fine, reconnected the decoder and wires, stuffed the chassis and electronics into the body, plonked it on the test track, fired up the NCE system, and…nothing. A dear me, well I never moment ("What did you just say? Good job the grandchildren are not here" says my wife). Oh no, not a dead parrot. Not quite, the diesels are now chattering away quietly in stereo. Now the horns work, then the bell. Then it goes forwards and backwards. Turns out the capacitor has to charge up, then current is allowed to go to the motor and the full range of sounds.
Nigel
©Nigel C. Phillips
Posted
Full Member
Almost the last post of the scratch/bash builds of the two yellow diesels. I had to rethink the speakers in the center cab, running 2 at 0.5w didn't give enough sound (the decoder only has a 1w output amplifier, so even at full output the speakers were only getting 0.5w each), so I switched to just one. Much better. I also had to use a smaller speaker in the end cab, the mega bass was too big to fit, and it was a 2w model. Sounds fine.
Apart from these minor adjustments, I now have 2 On30 diesel critters pretty much ready to go. I'll deal with the lights later on when I have sourced/made them. Excellent slow running, at speed step 1 (out of 128) they both ran at just under a scale 2 mph (12" in 1' 05", 1:48 scale) with no jerkiness. Running both with DC and a blanking circuit was jerky at around the minimum voltage (3.5v-4v) with a scale speed of around 4 mph. They both have small motors, and no flywheels. A situation where DCC really scores over DC (where pulse width modulation is normally a compromise, and my DC powerpack is a full bells and whistles model).
Quick You Tube video of the end cab diesel (sound on my Nikon is not that great, not too bad though):
https://youtu.be/yjRaqIBoHvI
Next up in this "how not to do it" series - a Bachmann GWR 2-6-2 Prairie chassis into a Forney 2-6-4 or maybe even a 2-4-4 (technically a 4-6-2 or 4-4-2 as they ran bunker first). Sort of a silk purse into a pigs ear build. Those 2 shop ruffians Blodgit and Fudgit are rubbing their mitts with glee, never before has there been this much scope to show their talents (or singular lack thereof). I ordered some black styrene sheet especially for the impending (some might say imploding) build. Seemed appropriate. Much effort, time, and as usual on this penny-pinching line as little money as possible, will undoubtedly be spent on this masterpiece, accompanied as usual by a few "well I never" and "would you just look at that" moments. The chassis worked fine this morning, that will probably change once they put their plates on it.
Nigel
©Nigel C. Phillips
Posted

Inactive Member
Max
Port Elderley
Port Elderley
Posted
Full Member
Right chuffed in fact. It was quite enjoyable after the disappointment of that 3D nylon body shell. Those little Bachmann chassis run very nicely with the Soundtraxx decoders. Much better than the ones that came with the donor locomotives in fact (which I believe are reduced function decoders supplied by Soundtraxx).
I have a few OO/HO models doing nothing that are candidates for conversion, so this topic could go on for some time.
Some lessons learned (in this case forgotten, it's 10 years since I last did O-scale narrow gauge): On30/On16.5 locomotives have pretty much the same space limitations as HO/OO locomotives. Big speakers require big holes to go in. OK for tenders, not so good for diesel hoods/steam boilers. Big speakers also need big amplifiers. I will be adjusting the dimensions of the next critter to accommodate the above, and will be switching to a 2w output decoder. Having built some rolling stock it would be nice to have a layout to run them on - green cutting mat and a foot of HO track gets boring (backwards/forwards…). That will be the subject of a separate topic.
Nigel
©Nigel C. Phillips
Posted
Full Member
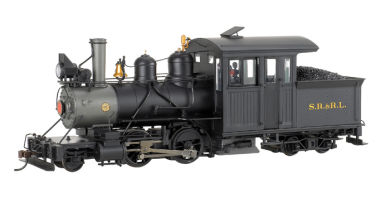
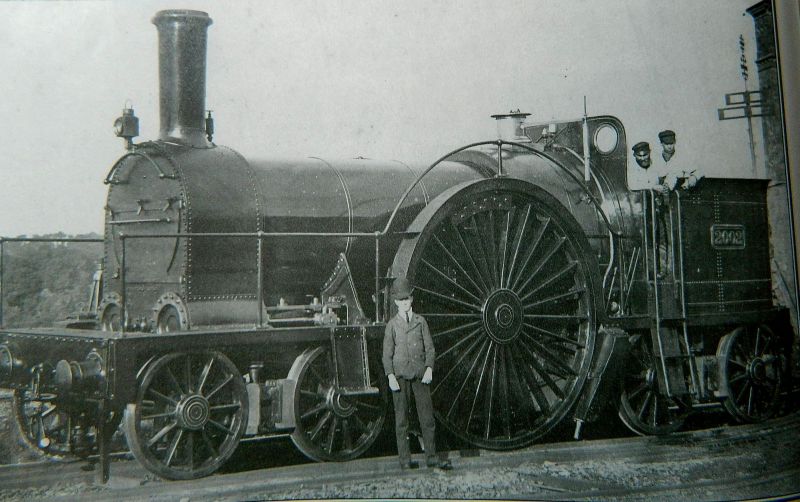
Next up is a Forney steam locomotive. These small steamers were the invention of Mathias N. Forney, and as patented in 1866 were 0-4-4T engines, with the back truck/bogie carrying the tender/bunker. They were intended to run forwards/backwards, hence the truck/bogie under the tender/bunker, and were used extensively in the elevated railroads of Chicago and New York before electrification. Built by many companies (Baldwin and Porter for example), they were useful in narrow gauge settings because of their light weight and ability to take on sharp curves with their flangeless second driver wheels. I found an example of a 2-6-4T Forney with a gauge of 3'6", close enough for me and in the correct industrial setting. I'm waiting copyright permission before posting a photo of the 2-6-4T engine, so in the meantime a picture of the Bachmann On30 model, which is a 0-4-4T, no longer available, and fetching silly prices on eebygum. Just imagine 2 more divers for the moment.
The B&ER in England had a similar broad gauge design running in the 1850's - the Pearson 4-2-4, built in 1853-4, flangeless driving wheel diameter 8'10"-9'0", and designed to run in either direction. Bogies at either end, and for a while the holder of the world speed at 81.8 mph (down Wellington bank, where else). Wonder who borrowed the idea from who?
So what chassis is going into the build? A Bachmann GWR 2-6-2 Prairie of course. Taken from my DCC test bed locomotive, the body of which was much abused, and held together with CA, epoxy, PVA, string, a five pound note, and a few additional screws here and there. It seemed apt to me that what was a narrow gauge chassis in OO should end up as a narrow gauge chassis in On30.
The chassis runs quite well for an early Bachmann Branchline Locomotive (it must date from around the year 2000). It has a 5-pole motor but straight armatures, which meant clagging at low speeds under DC and some resultant jerkiness as the armatures rotated and stopped momentarily as they passed the magnets. No flywheel to help things move along either. A DCC decoder resolves that issue. Body work (primarily the cab and bunker/tender) is being designed in CorelDraw, it will be printed and used to cut out the styrene pieces. The boiler will come from a section of plastic plumbing pipe or copper pipe (I haven't decided yet), and I have some white metal castings in the spares drawer for the chimney and domes. Either that or a RTR body shell from Bachmann with all the bells and whistles (literally). I need a long wheelbase truck for the bunker/tender as well.
Lots of hackery and butchery are in the plans of course (Blodgit and Fudgit the shop mechanics are as happy as Larry), but one of the challenges is going to be elongation and widening of the chassis, it's MAZAC/ZAMAC, and I don't solder that alloy (a witches brew of a flux that generates fluorine gas is required, that took the smiles off their faces). Brass or styrene sheet and drill and tap for 2-56 machine screws should work.There may well be side tanks as I have a couple going spare in 3D printed acrylic.

That's it for the moment, updates as they happen.
Nigel
Edit: It's a 3-pole motor. No wonder it's rough on DC!
©Nigel C. Phillips
Posted

Full Member
Thank you very much for sharing your previous freelance pair, including the videos. I enjoyed the build very much, so am looking forward to the Prairie giving birth to an interesting Forney. I know you'll do it justice.
Thanks to a YouTube diversion, starting with your yellow diesel, I ended up with two superb On30 layouts with skillful detailed modelling. Slater Creek features a bogie tank loco and also one with ingenious looking vertical connecting rods and shaft drive
The attraction of On30 has struck me as being a great way to incorporate much more detail.
Will you keep the 3 pole motor even with DCC?
Best,
Bill
At 6'4'', Bill is a tall chap, then again, when horizontal he is rather long and people often used to trip over him! . . . and so a nickname was born :)
1 guest and 0 members have just viewed this.