New member - and initial baseboard dilemma
Posted
#229503
(In Topic #12544)
Full Member
I will also store the layout during construction and as its home in the garage which is dry and not damp but of course cold in the winter months.
So, would the more experience amongst you think the construction plan of materials above what be fine to use … and apologise for bringing up the topic again.
Many thanks
Paul

Posted

Full Member
http://yourmodelrailway.net/view_topic.php?id=14385&forum_id=5
http://yourmodelrailway.net/view_topic.php?id=14643&forum_id=21
I suppose I have my own funny ideas about baseboard construction. For stability, I favour plywood, not only for the tops but the sides and ends as well. This is a lesson learned from my early experience where DIY 1x2 pine was always warped and made the board warped too.
I use 4" strips of 25mm Russian ply for the ends and 4" strips of 0.5" cheap ply for the sides (the lumber merchant cut them for me for a modest fee). Good 3/8" ply is used for the tops.
For an exhibition layout, I use steel dowels. These will keep the ends and rail ends perfectly aligned. Another lesson learned from a club layout that relied on C clamps with track ends requiring endless adjustment.
Nice to hear that you're taking the plunge.
John
 Last edit: by Brossard
John
Posted

Inactive Member
Welcome.
No need to apologise for raising the subject again. It's the foundation of our hobby.
There are many designs for building baseboards. I use MDF unpainted and it has served well for many years without any warping. My design is built around aluminium tubing with nylon corner blocks, and steel de-mountable legs.
If you click on the Port Elderley link below my signature, you will be able to see the method.
Cheers
Max
Port Elderley
Port Elderley
Posted

Full Member
Welcome to the club.
I use Baltic ply (also known as Finnish or Russian ply) made from birch, which is what I think you are referring to. B or BB grade. Top and sides, with cross members every foot or so with holes drilled for wiring. The taller the sides the more stability. I use 3.75" high sides with a 0.25" top. Cross members have 2.5" holes with 1" spacing (think aluminum alloy spars for wings). Unlike construction ply there are no voids or lumps where the layers of birch overlap. More layers than regular ply, and much, much stronger. Plus it's usually made with formaldehyde-free glue.
12mm/0.5" for the sides is more than adequate, and 6mm/0.25" for the top likewise. I've built lightweight and stable modules using 6mm for the side and 3m for the top with 12" spaced cross members. Stainless steel screws, or as John (Brossard) has used and I now use wooden carpenters fluted dowels and yellow glue for the sides. I screw the top to the frame, but do not glue. Easier to replace if necessary. If you need to reinforce the ends use two pieces of ply glued together (I don't bother, if the sides and ends are square a couple of C or D clamps holds it all together). One essential in all of this is a good set of clamps (at least 3) that will cover the width of the module, a means of making sure the corners are at 90° when gluing-up (I use corner clamps) and a true flat surface. I can lift my 2 x 4 foot modules with one finger. What you do need is a pad fixed to the bottom of the top at each end to take the terminals for the power bus and the DCC bus. A precision of ± 1/16" is usually fine (a 2H pencil width is about 1/32").
If you have a lot of point work planned consider an open frame design, that way you won't have to keep adjusting the plan because a point motor is fouling a cross member. An open frame design means you can put them where you want, rather than where the frame dictates.
If you have access to a decent table saw that helps things along. I'm lucky, my local community center has a fully equipped workshop with a commercial grade table saw and a nice big radial saw. Don't trust the lumber yard to cut to the sizes you want for the tops or to cut the sides and ends square. Their precision is usually ±1/8" or worse. Cut oversize at the yard and have the top squared or square up at home and then cut to size.
I've built some 25+ modules over the years using the above method. Light, strong and rigid. I avoid sawn wood as much as possible (pine or hardwoods such as oak or poplar), it will warp unless adequately braced (even hardwood). The best I've found is Radiata pine from New Zealand, consistently at a low moisture content and little warp as it's straight sawn. Very few knots as well. Not cheap though.
Unless your garage is temperature controlled you will have some variation in humidity over the year, so seal the modules with acrylic paint or varnish when built.
Hope the above helps.
Nigel
©Nigel C. Phillips
Posted
Full Member
Welcome to the club.
Nothing to add to the sound advice already given.
Jeff
Jeff
Posted

Site staff
:Welcome
If your planning on buying the plywood from that local DIY store whose name begins with a W, it ain't square (guess how I know)

Ed
Posted
Full Member
(also N)
For my base board I used MDF mainly because I removed an old cupboard and use the MDF from that to make the board.
My board has two levels, one for the dock side and another for the sea bed, which a intend to cover with resin for the water.
I have put cross supports made from 2"X1" to prevent warping and I have edged it with 5"X1" to which the temporary legs are screwed
The intent is modular as is yours from your first post but I haven't got to the second board which will probably be ply or floorboard (I used this in a shed and once screwed together is very ridged).
To connect the two boards together I intend to use heavy duty door hinges rather then dowels. The method: I will line up the new board to the existing one and clamp (screw) in place. Then fit the hinges across the gaps. At least two of them. Then grind the top of the pin off the hinge. Thus to assembly the two boards you just offer the hinges into the correct position and put the pin back in. The advantage over dowels: the dowels are only as good as the surrounding material and as it is only wood it is likely to become 'wobbly' and not give good location. With the hinges I have 5+ screws per half holding each half in position and the pin is metal on metal. if a hinge becomes damaged over time then I can replace it, up or down a bit from the position of the old hinge and still have 5+ screws holding it in location.
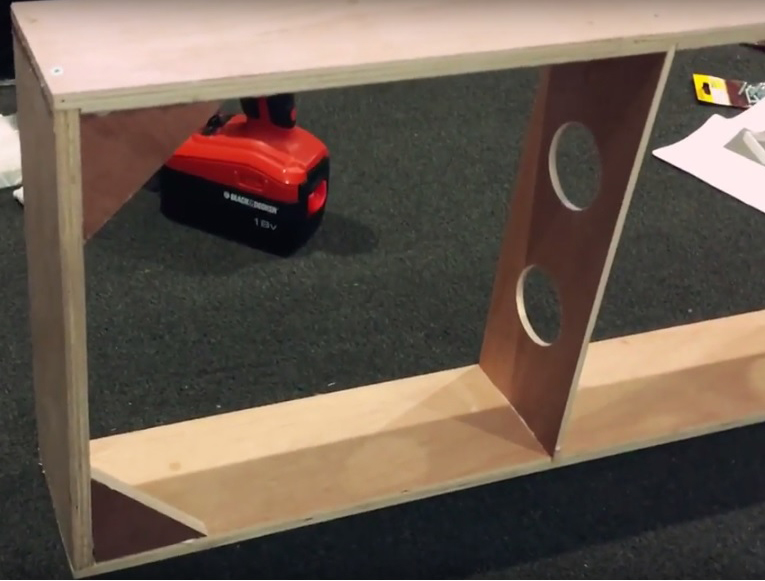
here is an overview of my board with some of the layout in position, the next stage (probably a year or two down the line) will but onto the short edge on the RH side.

Hope this helps.
Chris.
Posted
Full Member
Posted
Full Member
Posted
Full Member
Open frame is a frame to which is attached vertical risers, the track bed is then attached to the risers. The open spaces are then filled in with the base for the scenery (chicken wire, cardboard formers for example, to which is attached plaster cloth or similar). This means rivers or ravines do not impact the frame. Same for point motors. In N you only need about 3 inches above the frame. You should however have the ends as high as the risers where they cross to the next module. Most folks profile the ends and sides to match the scenery. Cross members need to be around every 12", so a 4' module would have 3. Plan where the motors will go, adjust riser positions to suit. Easier just to use a flat top of course.
Nice framework so far.
Nigel
©Nigel C. Phillips
Posted

Site staff
Regards
Alan
Born beside the mighty GWR.
Alan
Born beside the mighty GWR.
Posted
Inactive Member
Welcome to the club .
If you are having problems with your layout ,
have a look at this link . It is a bit drawn out ,
but there is a lot of info .
Model railway Siebwalde Part 1
Regards Ted
Posted
Full Member
Posted

Site staff
Thanks Ted .. but what link do you mean please?
I typed Ted's line into You Tube
Ron
NCE DCC ; 00 scale UK outline.
NCE DCC ; 00 scale UK outline.
Posted
Full Member
Posted

Full Member
Last edit: by Passed Driver
Staying on the thread Kevin.
Posted
Full Member
Posted
Full Member
I can’t help on the light weight construction, as mine is pretty fixed in place I used a simple pine and chipboard construction.
Good luck.
Chris
Posted

Full Member
How are things going?
Bill
Last edit: by Longchap
At 6'4'', Bill is a tall chap, then again, when horizontal he is rather long and people often used to trip over him! . . . and so a nickname was born :)
Posted
Full Member
1 guest and 0 members have just viewed this.