Teasel Bay

Post

Posted
Rating:
#263226
Avatar
Full Member

Early construction of a simple 00 garage layout

[user=2057]TeaselBay[/user] wrote:
I very much rather dislike soldering! :brickwall

It gets better Chris, honest!

I struggled for ages, until I began to understand the science of what has going on and then applied more appropriate techniques to suit what I was soldering. Still no expert, but always learning.

Good luck,

Bill

At 6'4'', Bill is a tall chap, then again, when horizontal he is rather long and people often used to trip over him! . . . and so a nickname was born :)
 
Online now: No Back to the top

Post

Posted
Rating:
#263227
Avatar
Full Member
Hi Chris.   I hope you are well, I have trouble holding the iron in place, well I I did the last time I did any soldering.But apart from that you need a clean joint and maybe a dash of Flux.  Best wishes Kevin 

Staying on the thread Kevin.
Online now: No Back to the top

Post

Posted
Rating:
#263238
Full Member
I know the theory of soldering, but I’m not very good in practice…. Maybe a newer soldering iron would probably help, but it’s an extra expense.. I’d rather spend money on more exciting things!

Anyhow. After some rather bad language, we now have all lines running and sidings powered on the narrow gauge railway. 


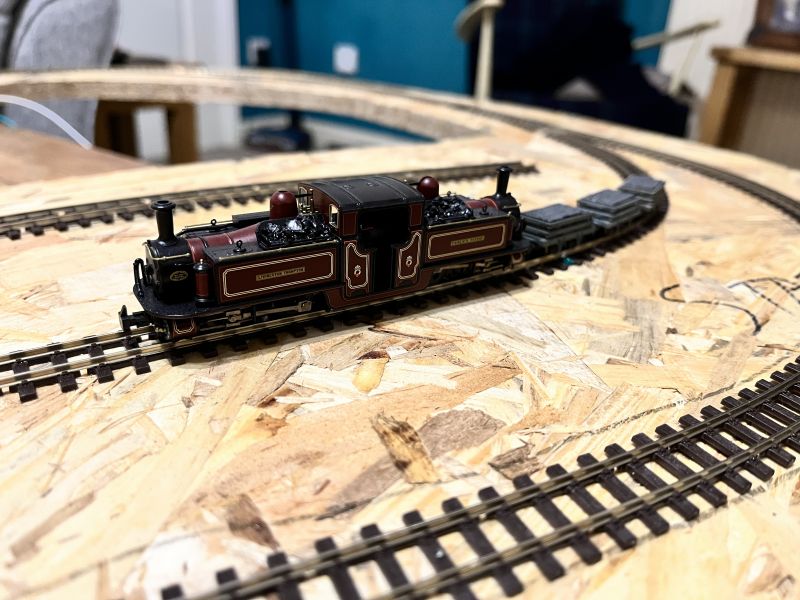
The Double Fairlie makes light work of travelling around. It’s very nice to watch on the layout! 
Online now: No Back to the top

Post

Posted
Rating:
#263240
Avatar
Full Member
I'm with you on the soldering Chris.  Mine seems to be more luck than judgement.  I did buy a decent soldering iron though, and it definitely helped.  And some non-corrosive flux.  That improved my previously very poor efforts to amateurish.
Great to see the narrow gauge running.  Is the Double Fairlie DCC fitted? If so, it looks like it was quite an achievement.  It's a very nice looking model and quite unusual - at least to my ignorant eyes.  I can imagine Santa riding in that at Christmas!

Michael
Online now: No Back to the top

Post

Posted
Rating:
#263241
Full Member
Yeah it’s DCC fitted, which is a bit of a feat on Bachman’s part. It really reminds me of my childhood on the Ffestiniog which I guess is why I like it so much. 
I bought the wrong width board, so I’ve taken the middle out to decrease weight. It’s very strong even without the middle. I’ll replace it with some far lighter foam to build up the landscape. It is quite nice having a project to do indoors during the colder months. As the evenings warm up and brighten up I can move it into the garage. 

Online now: No Back to the top

Post

Posted
Rating:
#263242
Full Member
Noooooo. Back to Bachmann it goes :-(

Online now: No Back to the top

Post

Posted
Rating:
#263243
Avatar
Full Member
Crickey Chris, what a disaster. All you were doing was playing trains, so I'm sure Bachmann probably should have considered this.
   
  Hope you get a rapid and completely satisfactory resolution..
   
  Best,
   
  Bill
  

At 6'4'', Bill is a tall chap, then again, when horizontal he is rather long and people often used to trip over him! . . . and so a nickname was born :)
 
Online now: No Back to the top

Post

Posted
Rating:
#263247
Avatar
Full Member
Oh!  That is a bit of a disaster - I thought those kind of things only happened to me.  I wrote off a shunter with similar effect, although it was entirely my fault (it's now the one does all my initial test runs, so not a complete right off).  It was how I discovered new models are not like the virtually indestructible ones of my youth.  But what on earth caused your railway catastrophe?
Michael
Online now: No Back to the top

Post

Posted
Rating:
#263250
Full Member
[user=1512]Headmaster[/user] wrote:
But what on earth caused your railway catastrophe?
Just running it! Nothing else…
Online now: No Back to the top

Post

Posted
Rating:
#263253
Full Member
[user=2057]TeaselBay[/user] wrote:
[user=1512]Headmaster[/user] wrote:
But what on earth caused your railway catastrophe?
Just running it! Nothing else…
Loose screw. It's probably on your layout somewhere. Good luck with finding it.

Cheers Pete.
Online now: No Back to the top

Post

Posted
Rating:
#263265
Avatar
Full Member
They seem to be better at fitting decoders than they are are fitting screw !!  Maybe the screw is not technical enough for today's "mechanics" …………….  Ask an automechanic to check the points and he wouldn't know what you were talking about !!


'Petermac
Online now: No Back to the top

Post

Posted
Rating:
#263282
Full Member
Just replaced the Hornby clips with some Hunt Couplings on the APT set. 


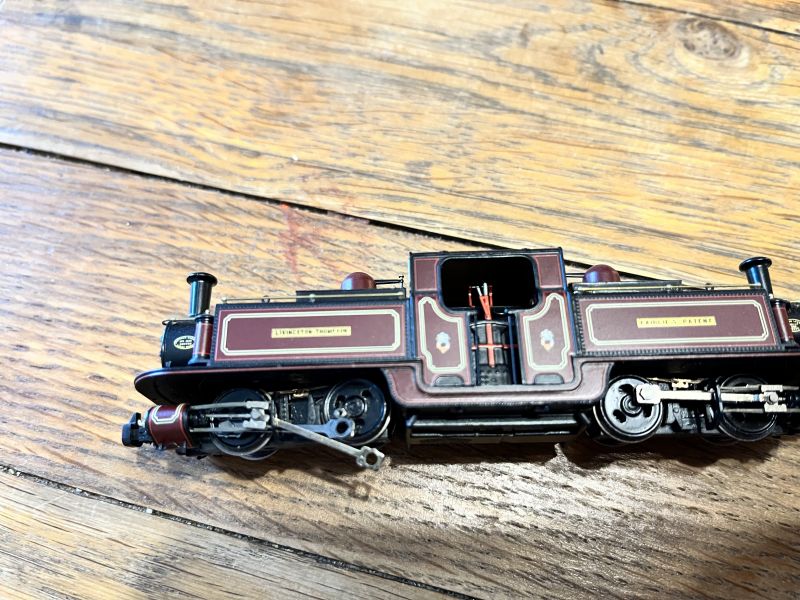
The Hornby couplings look complexed compared to the simplicity of the Hunt magnets. They also provide a very snug link between the carriages. 


Makes handling the APT set far easier! 


I’m not considering a major change to the APT set to repaint the interiors and improve the lighting and add some passengers…
Online now: No Back to the top

Post

Posted
Rating:
#263283
Avatar
Full Member
What's wrong with the inside of the coaches, Chris? To need a repaint I mean.  And the lighting for that matter.  The couplings are very smart - I had not heard of those. 
Michael
Online now: No Back to the top

Post

Posted
Rating:
#263286
Full Member
[user=1512]Headmaster[/user] wrote:
What's wrong with the inside of the coaches, Chris? To need a repaint I mean.  And the lighting for that matter.  The couplings are very smart - I had not heard of those. 
Michael
The moulds in the coaches and red or blue depending on first or third class. As it’s the whole of the inside, it gives them a different colour glow. At first I thought they’d used white light and yellow light bulbs. If I repaint the inside white and make some coloured seat covers to match the Class it would look better. It may be a pipe dream though, as given the other jobs I’ll never get around to it :mutley
Online now: No Back to the top

Post

Posted
Rating:
#263296
Avatar
Full Member
If you have a magnet you may be able to find that little screw by running it around the track area.

Last edit: by Campaman


Cheers

Andy
Online now: No Back to the top

Post

Posted
Rating:
#263420
Full Member
Finally, spring as sprung and it’s no exception on Teasel Bay. 


Clocks change at the weekend as well! Brilliant. 
Online now: No Back to the top

Post

Posted
Rating:
#263422
Avatar
Full Member
Hi Chris.  Last time I didn’t bother to alter the clock in the Railway room which obviously means my undecorated Inglenook Junction layout doesn’t need to be put forward. And I may even get something done, background first as long as I work out my modus operandi.  Best wishes Kevin 

Staying on the thread Kevin.
Online now: No Back to the top

Post

Posted
Rating:
#263424
Avatar
Full Member
Look everyone, the tulips are out at Teasel Bay…. Winter is over and Spring is here!!
Looking very pastoral Chris.  Those photos really help me to get an idea of the lay out of the erm… layout.  You take some clever pictures, I didn't realise the watermill was so near the rear of the board.  The new mainline run looks great cutting through the countryside too.  I really like all the different angles and shapes you have created, it all looks extremely natural - I'm a bit guilty of straight lines and right angles (although I blame the width of my boards on my current sections) - the lane, barn, hedges and paths look like they have evolved over time, well before the arrival of the railway, which has now cut a swathe through it all.  Not an easy effect to pull off but you have done it wonderfully.

Michael

Last edit: by Headmaster

Online now: No Back to the top

Post

Posted
Rating:
#263430
Full Member
Thank you. Rule number 1 when I set out to build Teasel Bay is that I didn’t want the landscape to look like it was built on to a flat board. So many layouts have this problem in my opinion. Other than the running tracks, I decided nothing should be flat, so I tried to imagine the undulations of the land and as you said think about how the railway would run through it. 
Next job is to paint the track and then ballast. I need to re-do research on a good way to do it and the mix to get it to glue down nicely… 
Online now: No Back to the top

Post

Posted
Rating:
#263433
Avatar
Full Member
Not sure how much you have t do on the ballasting front, but will just mention the ballasting tool I bought from "Bexhill West" on YouTube… such a time saver, makes my ballasting look half decent and turned a chore into a pleasant task.  and i reckon I would get my money back if I sold it on Ebay too.  And I have no connection to the the designer other than my delight with the little tool.
Michael
Online now: No Back to the top
1 guest and 0 members have just viewed this.