Kent Coast Railway (formerly Faversham Creek)
Posted
#227454
(In Topic #12411)

Full Member
OO Gauge, end to end, Museum line, Broadly based on the Kent Coast line
edit 23/04/2021The layout started life as Faversham Creek, but then changed to Kent Coast Railway in April 2021. The story of part two of the layout begins on p74, if you want to jump to that, otherwise, the whole journey begins here.
Michael
Welcome readers
This is the start of my first "proper" layout, The Faversham Creek, based on the Kent market town of Faversham. Originally, the Faversham line ran on the Chatham line to London, but was later extended to Whitstable and then Herne Bay. The plan was to extend it to Ramsgate and then join up with the Southern Railway and return to Faversham via Canterbury, creating a lovely loop. I would love to have the space to model that, but sadly I do not!! Nor did the loop ever happen!
However, Faversham also had a branch line that ran to the creek, a busy little harbour famous for its exports of bricks, cement, fruit, cattle, gunpowder and beer. The Shepherd Neame Brewery is the oldest exporter of beer in the country - at least as old as 1669 - still producing on its original site. I can personally recommend both its 1669 ale and its famous "Spitfire" bitter!! I now live in Faversham, but there is a long family history here, on my mother's side.
My grandfather was the last horse drawn drayman at the brewery, taking over from his father who was tragically killed by one of the horses. My mother lived here during the war and was regularly bombed and on one occasion, machine gunned by a Messerschmitt! She gained a little fame by identifying the last two unknown airmen of the second world war, and their crash sites, after a number of archaeological digs, and became an honorary member of 603 squadron.
So "Spitfire" beer has a special place in my family's hearts! In fact the Shepherd Neame T-shirt, emblazoned with "No Focke Comes Close†has almost become the unofficial garment of the surviving pilots!!
My father was a Cornish blacksmith who moved from the South West to work on the Kentish railway after his national service (in Paris) and although he was based at Ashford, he regularly worked at the simple coach repair works at Faversham. Obviously he would prefer that I modelled “down homeâ€, but Faversham is an agreed compromise and an area I at least know!
Anyway, the line from Faversham to Whitstable was built before the branchline to the creek. However, ideally, the line would have run from Faversham Town, to the Creek and then on to the coastal towns. Google Earth shows that this track was a near perfect oval - perfect for my needs.
So, I imagine that the track did indeed run in an oval to the creek before running on to the mainline to the coast, while at the other end it travelled to London. My intention is to build this proposed line - a busy mainline station (somewhat truncated) with a branchline to the busy creek. Most of the industries, except for farming and beer were closed before the 60s, but I might imagine that they had continued to prosper, thus giving me plenty of freight opportunities too. And some shunting! It will not be a prototypical model of the area, but an imaginary "what if…" And in the 60s it was experimenting with electrics and diesel as well as the end of steam and the southern ports meant that there were all sorts of locomotives in operation, so I can pretty much run whatever I fancy!! Perfect!
I will keep you posted on my progress, but it will be a marathon, not a sprint as SWMBO seems to have plenty of other plans for me.
And then there is the granddaughter!!
Warm regards
 Last edit: by Headmaster

Posted

Site staff
Regards
Alan
Born beside the mighty GWR.
Alan
Born beside the mighty GWR.
Posted

Site staff
Great intro. Michael
Ed
Posted

Full Member
Great story board. Looking forward to more.
Nigel
©Nigel C. Phillips
Posted
Full Member
It is still strongly based on the historical route though….

Posted
Full Member
So, although pretty much everything is in a temporary state, I have had to start the scenic in my tricky corner. I wanted to have some sort of theme hidden throughout the layout, and have decided on literature. Each scene will, I hope, reflect, hint at or downright copy something from novels I have read. Although one or two movies might sneak in too!
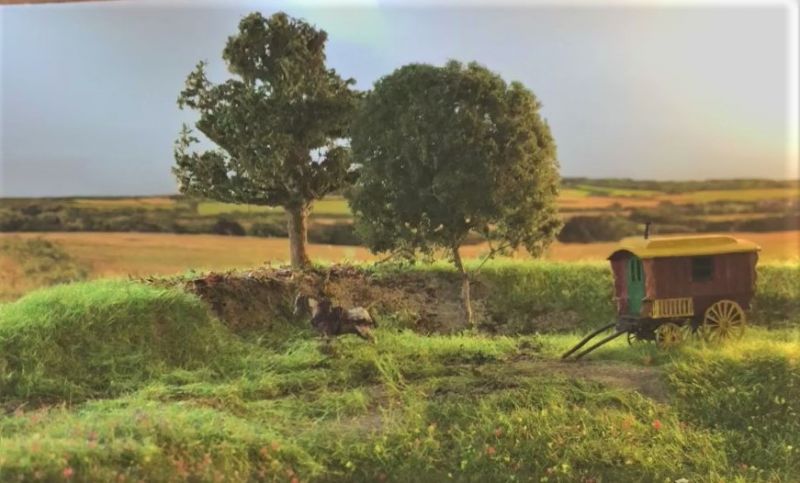
For my A levels (many moons ago!) we studied DH Lawrence. For my first scene I have chosen The Virgin and The Gypsy as my inspiration. A white metal kit, a bit of scenery and a backscene I created…. I'm quite pleased with the outcome…..
Last edit: by Headmaster
Posted
Posted
Full Member

It works in black and white too. I once read that if black and white looks better than colour, then you probably have your colours wrong. Hopefully you will agree that both photographs look ok! Please excuse the beam at the top of the picture, I didn't bother to crop it…… I'm a loft dweller!
Posted
Full Member
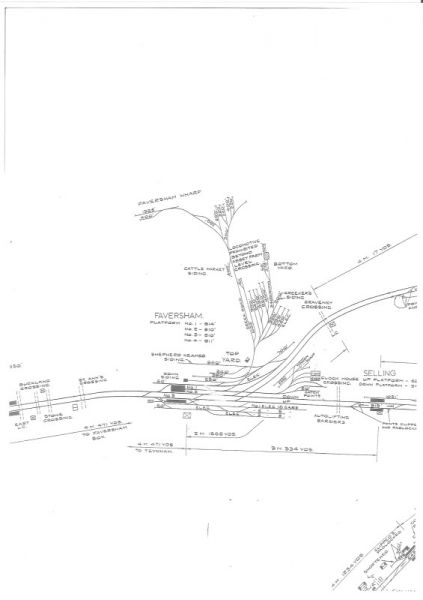
So, in effect, while the real route turns to the left at the creek, mine will turn to the right and so can go off to the existing mainline, all of which is off scene, but allows me to have a large oval track.
The length of the run is about 5 metres, with a 2 metre turn at each end into the fiddle yard.
Posted

Full Member
The virgin and the gypsy scene looks fantastic and blends in very well with the backscene.
Posted
Full Member
it's amazing how a photo can show things the actual scene doesn't! The tree is a bit wonky and some of the grass needs tidying. But I am pleased with the overall effect. I have some figures to add and might throw in a fire pit or something to give it a bit of life…..
Posted
Full Member
The "flowers" in the scene are home made flock from kitchen sponge. Again, I think the general meadow feel works quite well. I chop the sponge up and put it through a blender with some water, then take it out and let it dry (a squeeze and microwave speeds up this process). Then I create little pots of the sponge and add some colours to dye it. For this scene it is yellow, red and purple - chosen from a photograph of a meadow scene. I scrape the sponge through a sieve to get the pieces as small as possible and just let them fall on the grass. Then I give it all a good coating of cheap hairspray. The scene looks quite soft but is actually as stiff as a board! The hairspray even holds the caravan in place.
Posted
Full Member
Posted

Full Member
Cheers
Posted
Full Member
Michael
Posted
Full Member
I certainly learned a lot from the process and experimented with a few techniques - some which worked and some which didn't. Also took my first steps in card modelling from kits…..
Posted
Full Member

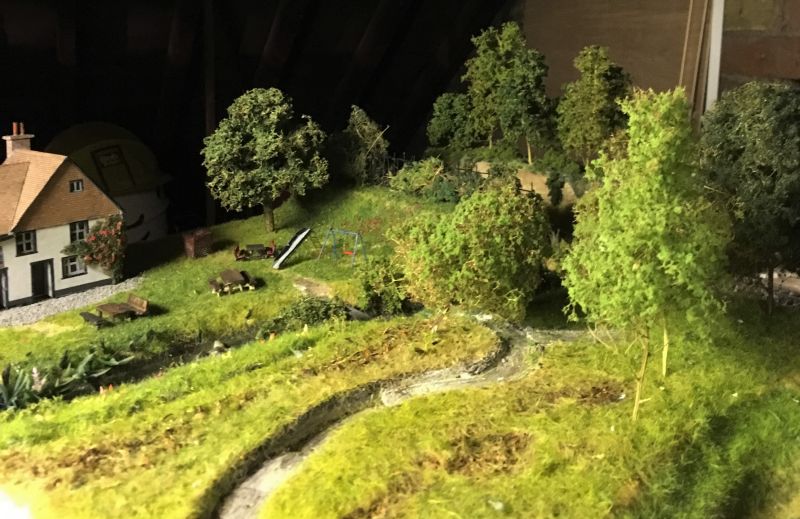
I tried all sorts of things for the stream. Modelling water proved a challenge. I tried, PVA, varnish (which is what is in the scenes above). Eventually settled on a shop product - E Z water, I think it was called.
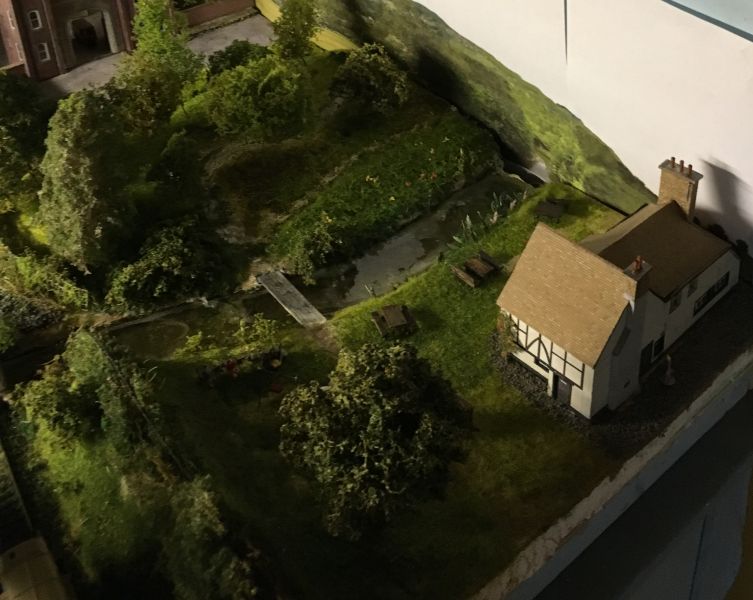
The backscene is just propped up in this photo and was my first prototype for creating a photo backscene by stitching photos together from the internet. That's something I am still trying to do better!
Posted
Full Member
A piece of foamboard, cut to size and shape so it can be removed to work on…..

Polystyrene added and roughly cut. Thankfully the hot weather means the glue dries quickly!
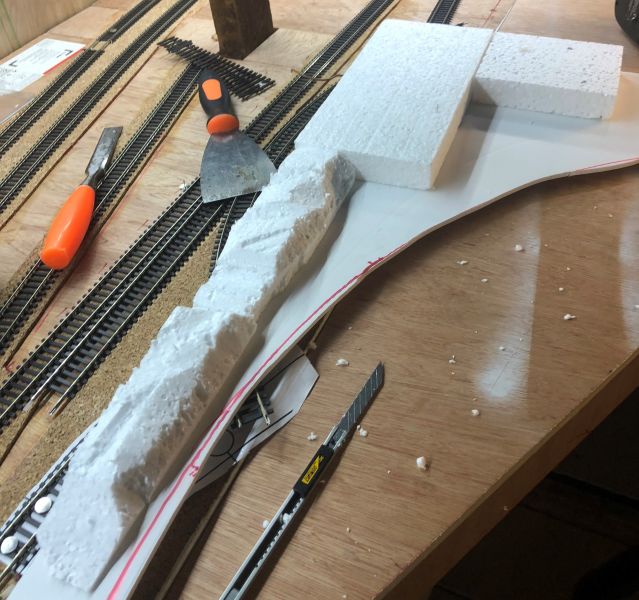
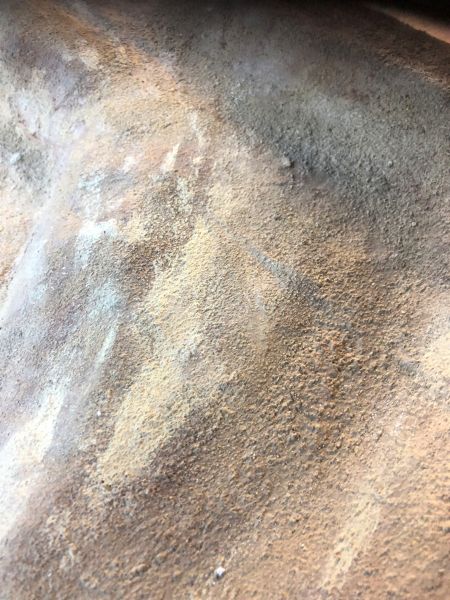
Modroc over the top, to which I add some texture and then paint in a variety of tones
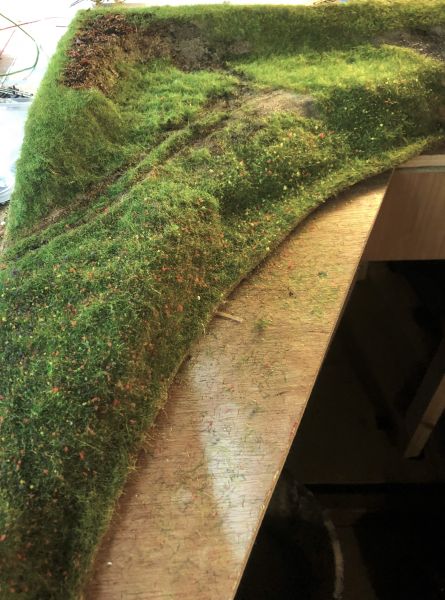
Then add some 2mm static grass as a foundation, which is then scrunched up to give it a bit of shape, so it doesn't look too much like a lawn! The colour doesn't really matter at this point. This is some horrible "spring grass" which I won't be buying again….

A variety of shades and lengths are added in layers over the top. I experimented with some flowers on this - they got replaced!

I worked in small sections, rather than trying to do the whole thing in one go. I find this stops everything having a uniform look. Some areas were left bare which allows the texturing of the ground to show through. I've added a the dirt track and some wheel marks for where the caravan will eventually be placed
The final scene is almost finished - just a few things to add and it will be done! Then back on with the track….

Michael
Last edit: by Headmaster
Posted
Full Member
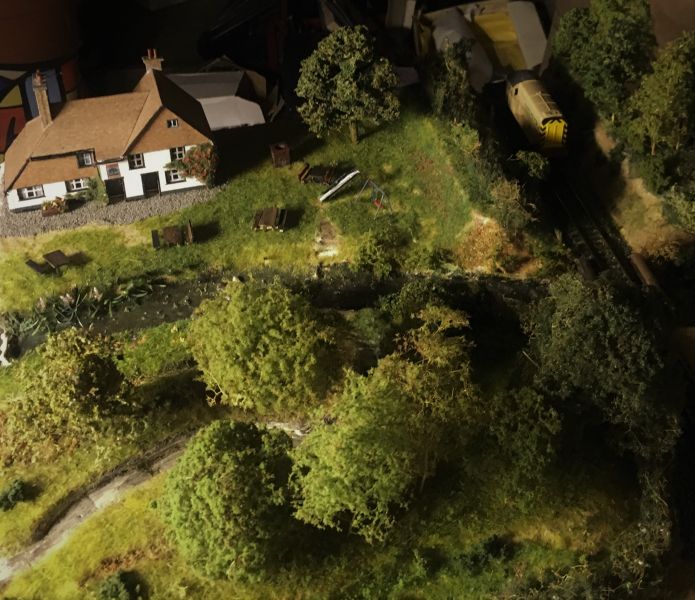
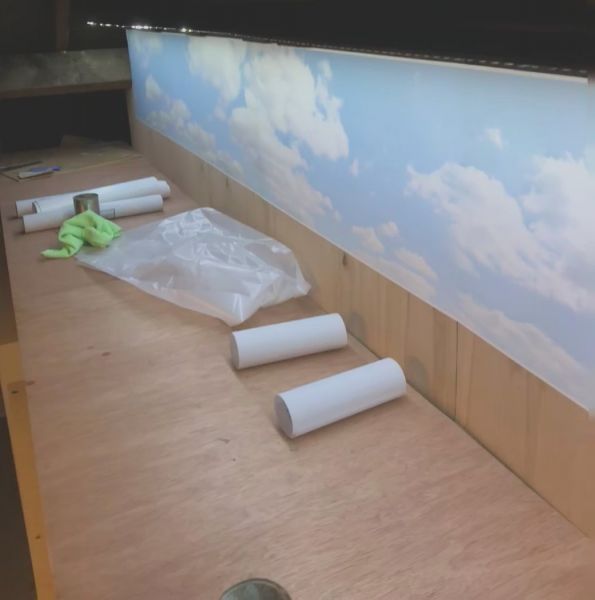
Baseboards for the main scenic areas are built, with the backboards in place and overheard lighting fitted.
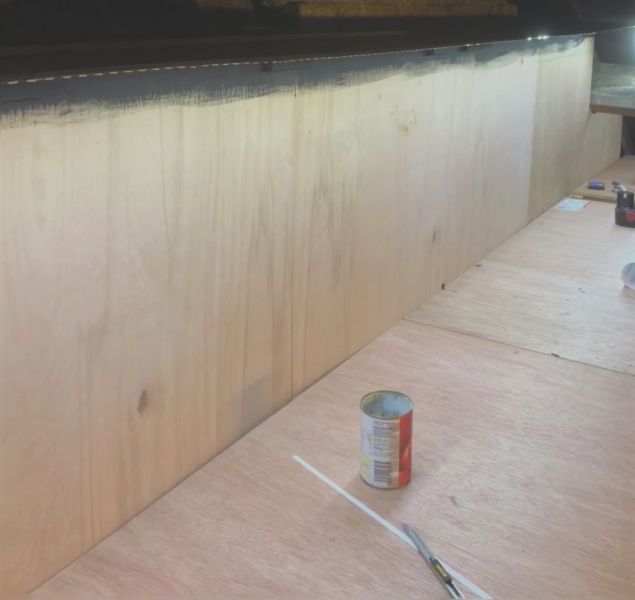
The sky back drop is in place. I will be creating my own scenes for the land, and adding terrain, hence the gap!
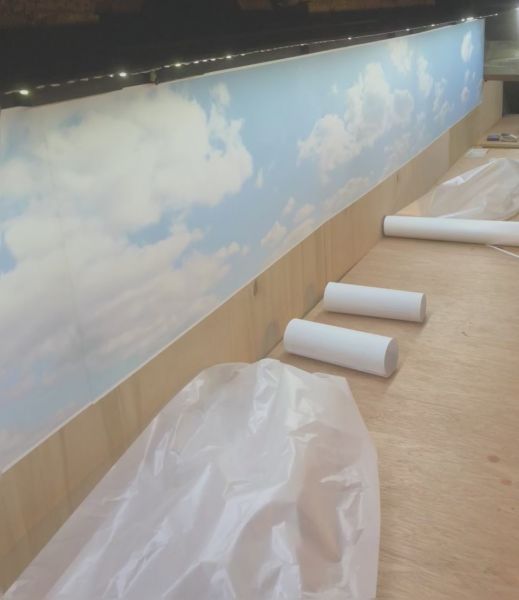
And looking at the opposite end…..
The track plan was printed out and pieced together and transferred to the boards. All the cork bed has now been laid and I have tested the track…. so now it is a case of painting track ready for final laying. I much prefer to paint before laying, even if I have to touch it up again later…. it is so much easier working at my bench rather than on the baseboards.

Michael
Posted
Full Member
So, I bought some fine brown ballast, trying to get a light brown, rather than dark, but it has a sparkle to it which will need to be toned down a lot if I am to use it. I did a test piece, but I ended up making it look….grey!
Does anyone have any suggestions?
Regards
Michael
1 guest and 0 members have just viewed this.