Pine tree
Posted
#14443
(In Topic #1241)
Guest user
This is the first one I've tried. It needs a little tidying up here and there.


It's a pretty simple process. If anyone's interested I'll show some photos of the next one. Not an original idea of mine, by the way.
Mike
Posted

Full Member
And Yes, I'm always interested in how you do things!!!
Wayne

Posted
Guest user
Fun to do. I'll show some pics of the next tree being built. Maybe tomorrow….
Mike
Posted
Guest user
And again, it's not my idea - I've borrowed it from elsewhere online.
Start with a length of wire doubled over to the height you want. Cut some sisal rope strands and roughly separate them out, then insert between the two legs of the wire. Wise modellers will do this outside, because it'll make a mess. Guess where I did mine.
 Try to vary the spacings. Lengths can be adjusted with scissors later. Some people recommend masking tape to hold the clumps in place, but I couldn't find any around the house so I made do without it.
Insert the open end into the chuck of your drill, and the looped end into the vise, then slowly wind it up with the drill, to get this:

The one on the left has been trimmed afterwards.
It seems the look of the tree will vary according to the amount of twisting you do. If the wire snaps off in the drill, you've overdone it [again!]
The rope fibres constitute the branches of the pine, not the needles, which in our scales would be near impossible to see anyway.
Next step is a bit of DAS on the lower part of the trunk, followed by some paint :D
Mike
Posted

Full Member
I'll give that method a go.
cheers
Posted
Guest user

A bit more…
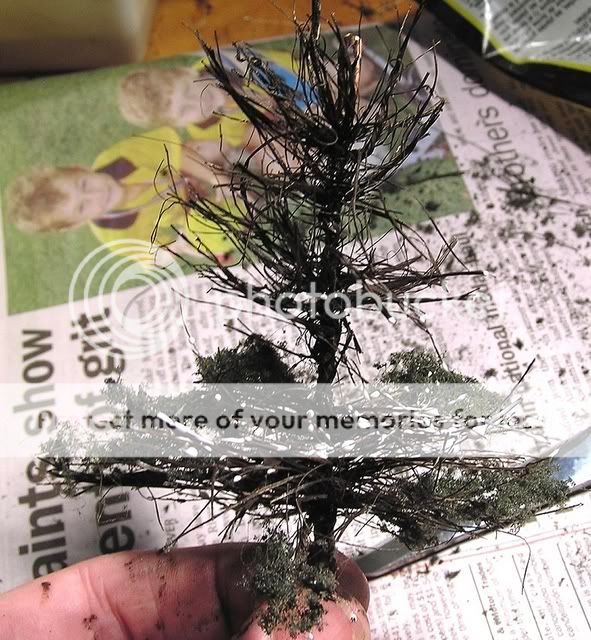


All the handling damaged the DAS clay which I hadn't allowed to set.
Mike
Posted
Full Member
Will you trim some of those "Dead" branches off or leave them?
Wayne
Posted
Guest user
Yes, I like the variation you can get this way. I'll have to do some tall, thin ones too, with less foliage. So far they've been sturdy specimen trees.
From my schoolboy science days, I seem to recall that pines sprout branches radially rather than alternately, so this method is ideal. And from my bonsai days I seem to recall that they are reluctant to sprout from old growth, which in their natural state leaves them with branches that are quite bare close to the trunk. If we can't model needles, it's important [in my opinion] to at least model the tree's habit. I'll keep working at it, anyway.
I think there's also scope to adjust the foliage colour with a bit of paint - maybe some brown or even some blue-green.
Mike
Posted

Full Member
One question: The wire that forms the trunk. Can you say some more about what you used, what gauge etc :?:

Posted
Guest user
Mike
Posted
Full Member
Posted
Guest user
I've used both 0.7mm and 0.5mm quite sucessfully and have had no breakages due to twisting.
The stuff I'm using is non-galvanised, which seems to be more flexible, so maybe this is why it isn't breaking.
I'm taking some photos as I go and will post the first results as soon as I've completed the first batch of four trees.
Posted
Guest user
Yours sound interesting, Jeff. I look forward to seeing them.
Mike
Posted
Full Member
It will need cleaning up a bit and dusting off :!:
Posted
Legacy Member
reg
Posted
Full Member
Posted

Full Member
rector said
…………………………… The fact I have ten feet of sisal hanging up in the garage hasn't influenced me one bit ………………………………
Just make sure it won't be needed for the bells Tim !!! :roll: :roll: :roll:
Petermac
'Petermac
Posted

Full Member
Have you ever done a weeping willow Mike?
I need one or two for my layout and haven't seen any commercial options that really strike me. Hand made tress seem to be better from what I've seen here and elsewhere.

Posted
Guest user
They looked OK to me when I was shown them early April.
I have photos if you want to se them.
Posted
Full Member
Sol said
Neil, have you sen the weeping willows from DCCconcepts?
They looked OK to me when I was shown them early April.
I have photos if you want to se them.
Is it in their catalogue Ron? I have a catalogue at home which I can have a look at if they are.
1 guest and 0 members have just viewed this.