Rob P's Coaching Stock Workbench
Posted

Full Member
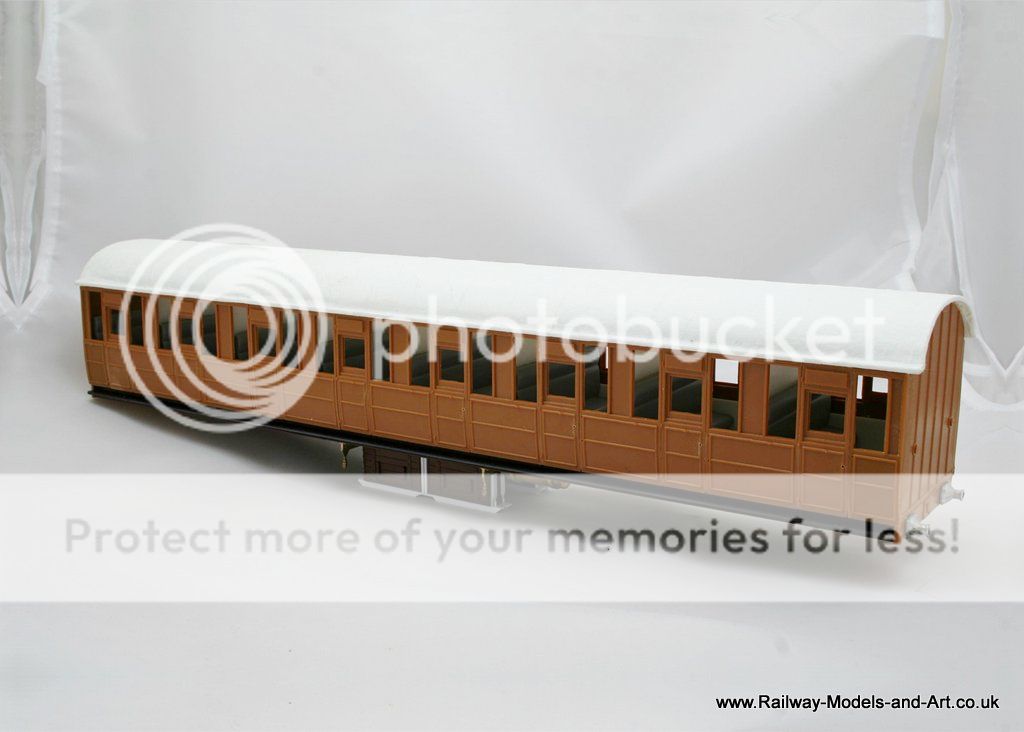
Hi John,What did you do to your roof? Looks like you glued tissue to it. I started the roof on my 3rd today and it's taking quite a bit of nurdling. I installed a gutter strip on the coach body from Evergreen. My idea is to insert the roof so as to help stop the sides from bowing.
John
I cover the roof in lens cleaning tissue (for cleaning spectacles) stuck on with PVA. I would be interested in seeing how you have done your roof because I am currently contemplating how to make the roof removable. I don't bother too much on BG's because the top lights are so small they are unlikely to get pushed out by handling but the all 3rd will be a different thing with it's bigger windows.
Regards Rob

Posted

Full Member
John
John
Posted
Full Member
Nice idea with the tissue, does look like canvas. I'll take a shot of my 3rd and its' roof and post.[user=565]Brossard[/user] wrote:Hi John,What did you do to your roof? Looks like you glued tissue to it. I started the roof on my 3rd today and it's taking quite a bit of nurdling. I installed a gutter strip on the coach body from Evergreen. My idea is to insert the roof so as to help stop the sides from bowing.
John
I cover the roof in lens cleaning tissue (for cleaning spectacles) stuck on with PVA. I would be interested in seeing how you have done your roof because I am currently contemplating how to make the roof removable. I don't bother too much on BG's because the top lights are so small they are unlikely to get pushed out by handling but the all 3rd will be a different thing with it's bigger windows.
I'm not sure about making the roof removable, although I bought some hardware. I've been reading Mike Cawthorne's article "Assembling Ian Kirk Coaches" from the GoG archives - he shows how to make his roofs removable.
I've ordered some passenger figures from Omen-Miniatures. Installing these will enable me to secure the roof with glue.
John
John
Posted
Full Member
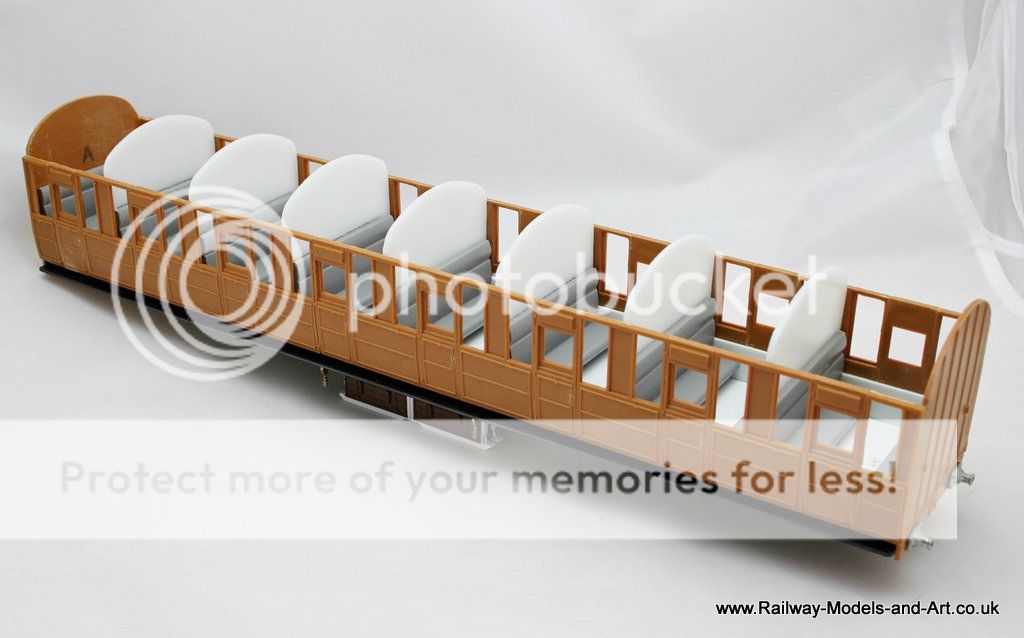
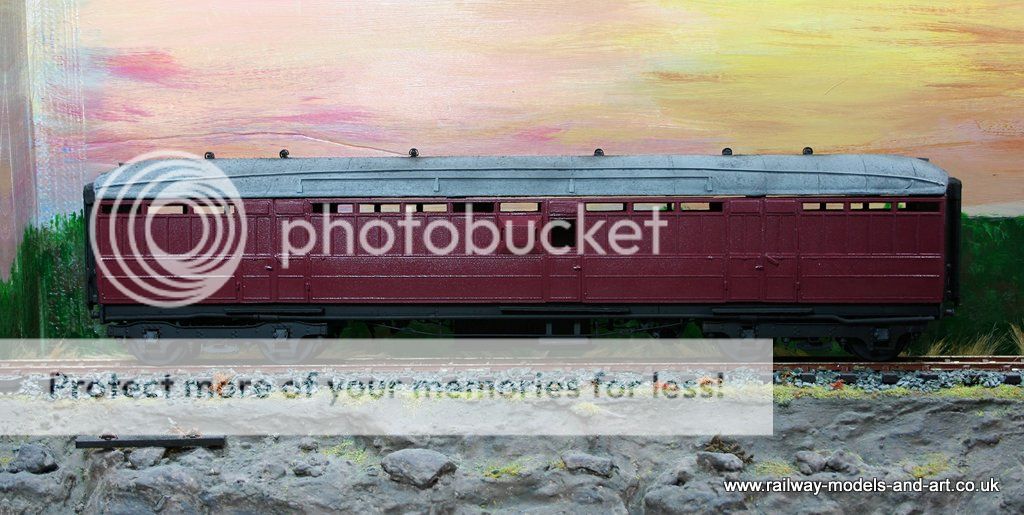
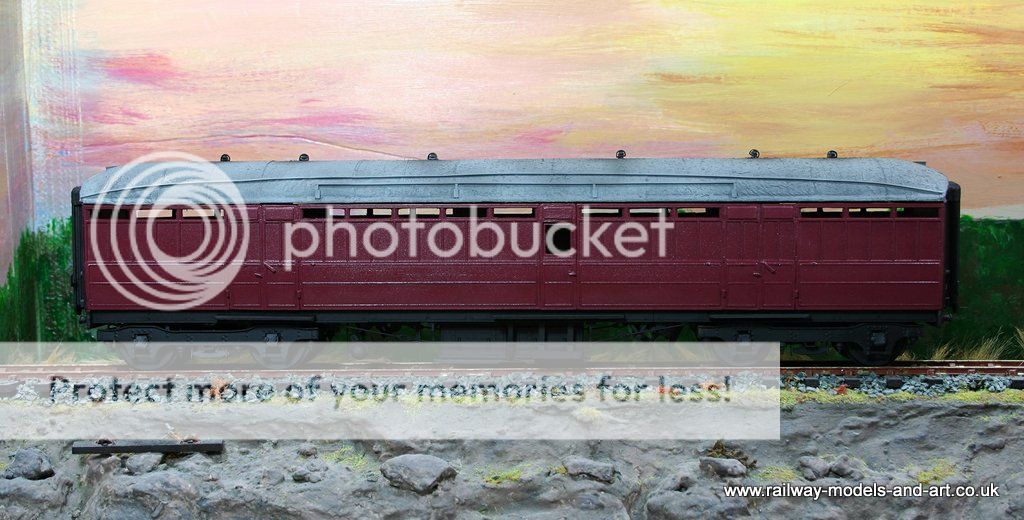
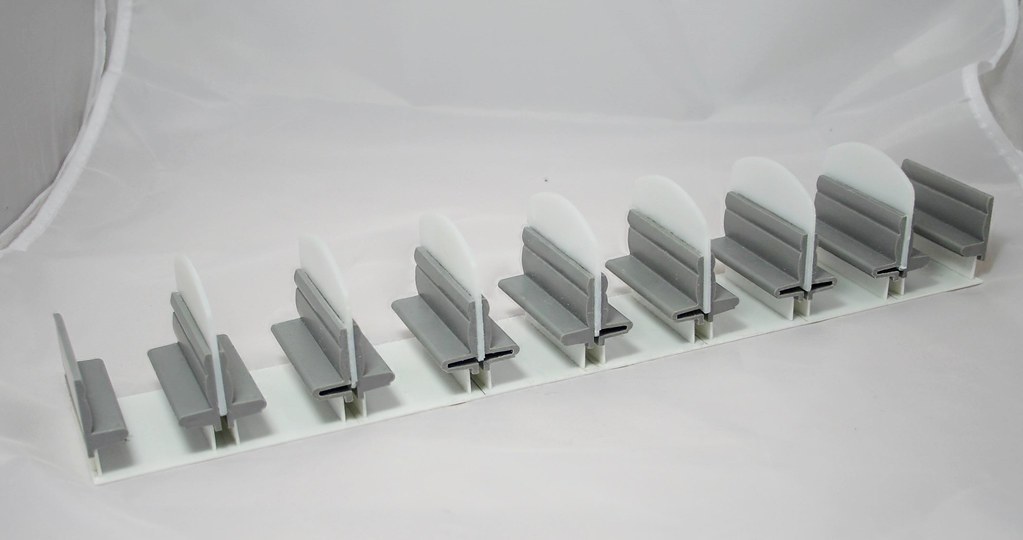
The seating is assembled for the all third and the roof made ready to fit.
Conversations on a few forums around how to attach the roof, have had the side effect of making me think about fitting passengers (which neither Don or I had considered/discussed). Due to me having already glued the floor in ( I won't do that on future builds) I was exploring unobtrusive ways that I might make the room removable.
Having consulted Don who agreed that we should make provision for the fitting of passengers. - Albeit not that many due to the decline of passengers using the line in Don's modelled period. I was still mulling over various ways of fixing the roof when I realised that the roof ends don't quite match the profile of the ends of the coach. This is due to the way that Ian makes them by vacuum forming. When I say don't quite fit I am sure that the discrepancy will be taken up by gluing the roofs on as originally planned. But if I attempted to screw them on in any way, I would be left with an unsightly gap at either end.
A bit more head scratching and looking at the way that windows fit I decided that I could make it so that the windows cannot be dislodged by handling (which was another fear of gluing the roof on) and that if I fitted some passengers before gluing the roof down, it would mean that Don didn't need to gain access to do it later.
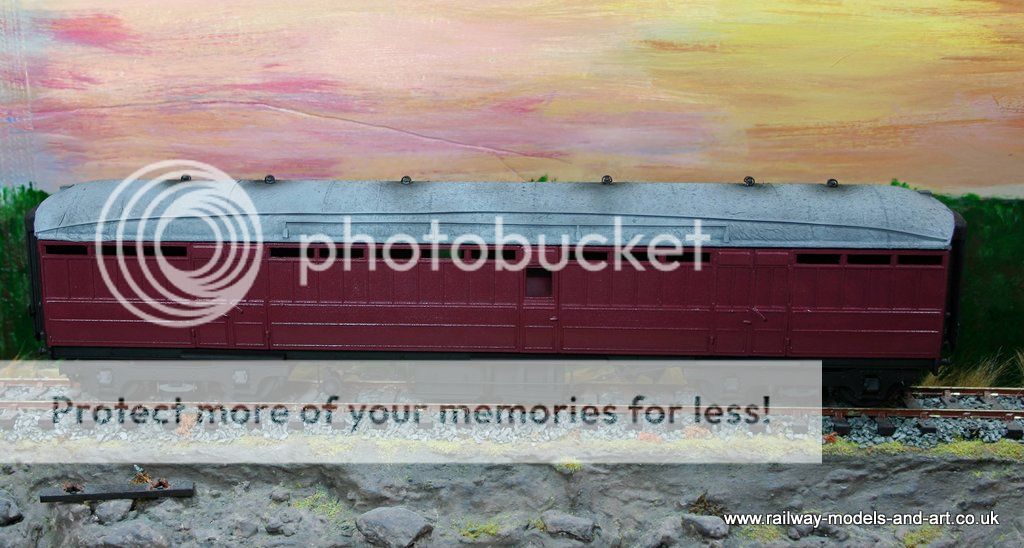
I had some Slaters seated passengers to hand and they provided a welcome distraction and rekindling of interest,which I have to confess due to pressures at work was waning a little.
While the painting of said passengers (particularly the faces) isn't as good as some on here, I am pleased with how they have come out and they will certainly pass muster inside the gloomy interior of the coach once matt varnished.
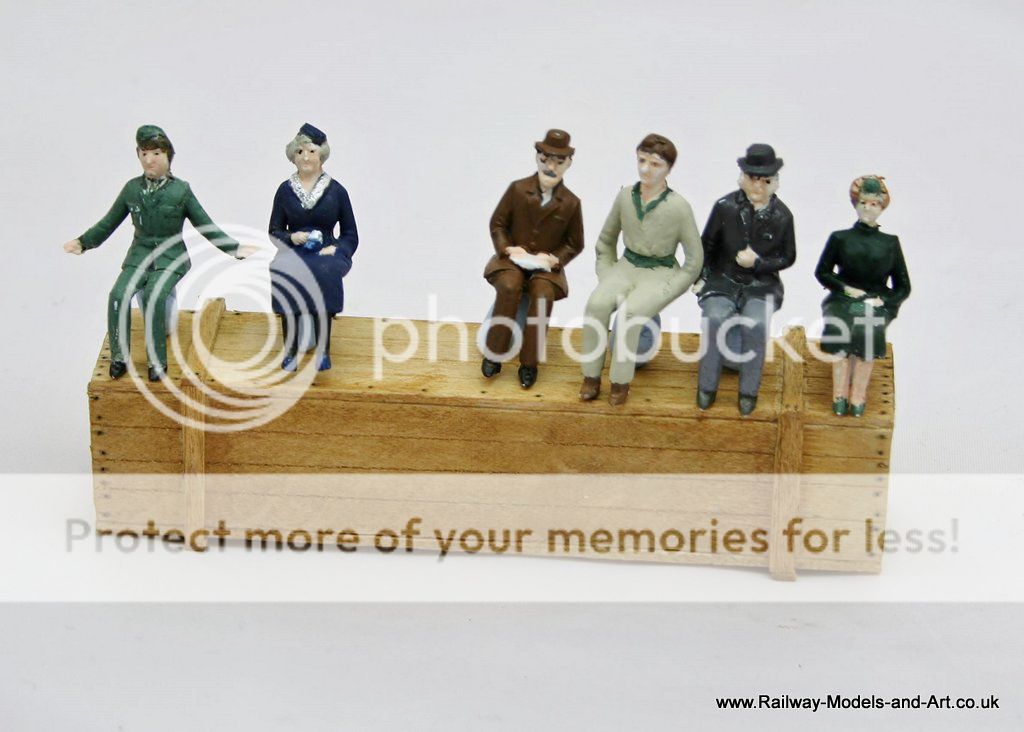
If you wonder why they are sat above the box instead of on it, that's because I have inserted a length of plastic rod to enable me to old them while painting and and it will help in making them securely fastened to the seats when fitted.
Regards Rob
Posted
Full Member
Will you be adding further detail to the compartments? Or is that beyond the scope of this build?
John
John
Posted
Full Member
Yes, I plan to add more detail in the form of luggage racks. Like you, I just cant help myself.
Although I will use the upper panel prints that you sent me, I have decided to spray the seats themselves rather than use the printed coverings. This is because I would need to hand finish the seat edges and match them to the colour of the print so for this it's much easier to spray and then finish with the printed upper panels. I am fortunate in that a few years ago I got a hold of some A4 sized laser labels so I plan to print straight onto them to save messing about with adhesive.
Regards Rob
Posted
Full Member
John
John
Posted
Full Member
I still need to glaze it and fit the guards handrails etc. but it getting there.
Regards Rob
Posted
Full Member
John
John
Posted
Full Member
I learn something new about getting the sides together neater with each one that I do.
I had some fun mixing the paint because I made the mistake of using a red oxide primer. I would have been better using either dark grey or black primer.
The final colour is made up from Humbrol acrylic Carmine with a blob of Vallejo Oxford Blue added to that ,and then a tiny amount of Vallejo Burnt Red and Crimson to get the final colour that worked.
Regards Rob
Posted
Full Member
I too plan to use Humbrol acrylic carmine on my coaches. The passenger coaches will be carmine and cream. I had planned to use carmine on the BG (as I did on my CCT), but the colour could be maroon, is that what you're getting at?
John
John
Posted

Inactive Member
Max
Port Elderley
Port Elderley
Posted
Full Member
Hi John,Your comments on paint are interesting Rob. I've always used Red Oxide primer under red. I've seen grey primer give red a purplish hue.
I too plan to use Humbrol acrylic carmine on my coaches. The passenger coaches will be carmine and cream. I had planned to use carmine on the BG (as I did on my CCT), but the colour could be maroon, is that what you're getting at?
John
Yes, I was attempting to create Maroon rather than Carmine. Which is why you need the purplish hue.
Like you I would use red oxide under Carmine
Regards Rob
Posted
Full Member
Thanks Max.While UK outline isn't my "thing" Rob, I can recognise good work when I see it. :thumbs
Regards Rob
Posted
Full Member
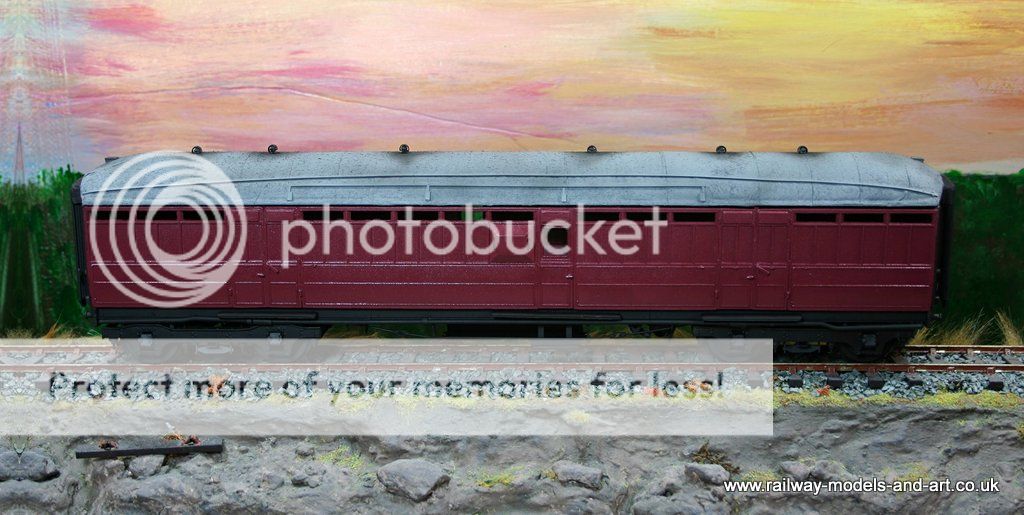
It looks like Ian has now run out of the colour pigment that he used to use to colour the LNER coach pieces because they came in white so I had to give them a quick spray to get them to show anything.

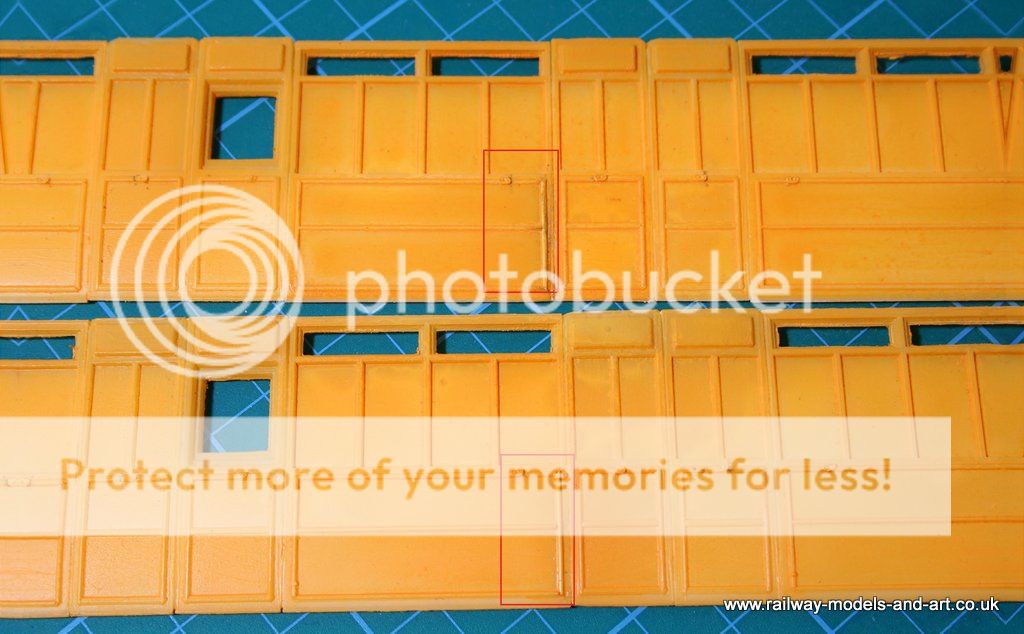
I have marked which beading I replaced with a red square. For some reason the top one picked up some much in the solvent (Limonene) which has made it look a bit ragged in the photo but I am sure that it will disappear once I apply the teak varnish to it.
Although it doesn't look it in the photo the base colour is orange.
Regards Rob
Posted
Full Member
John
John
Posted
Full Member
Strangely it's not physically rough but it appears rough if that makes sense. I still don't really know where the dirt came from either.
The sides will get a couple more coats of orange before I start on the teaking and since I am doing two I need to get the others out of bare plastic too.
I am also trying to do something a little different on these to give more strength to the sides in that I have lined the insides with styrene up to the bottom of the upper lights just cutting around the window in the door. That said I really should have cut out for the ducket before I stuck it on but hey ho.
Regards Rob
Posted
Full Member

 ]
]
Regards Rob
Posted
Full Member
You're further ahead than me on this one. Must get back to mine soon. I'm running out of goods wagon kits.
John
John
Posted
Full Member
Regards Rob
1 guest and 0 members have just viewed this.