Johns 7mm Coach Workbench
Posted

Full Member
John
John

Posted
Full Member

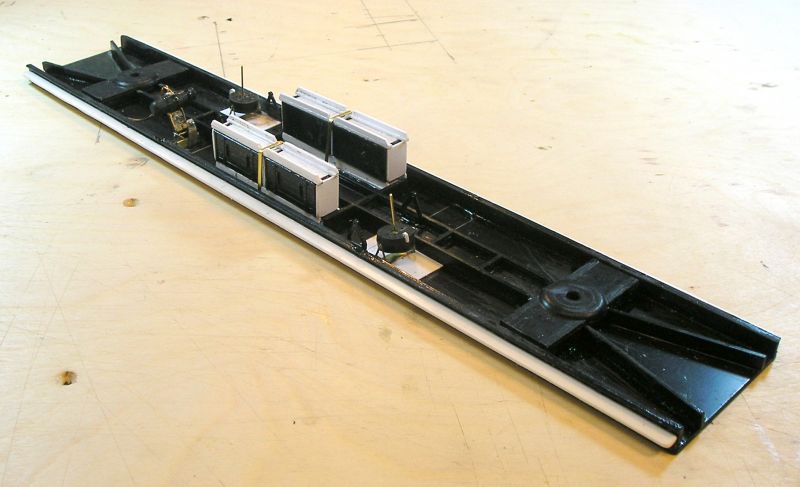
I had to cut out the floor from black plastic provided. There spine parts that need to be cut to length. The bogie bolsters are glued down. I had previously installed a captive 4BA nut in these to secure the bogies. The splayed members are cut and glued down.
The dynamo comes in two halves which are glued together. The pulley is also two halves. I used Kemilway instructions as a guide to make a dynamo support and adjustment screw. This was done by scaling the drawing in the instructions and using scrap brass to cobble up a representation of the support. Copper wire was added.
Vacuum cylinders were mounted on a trunnion made from some 4mm brake etch V hangers. They were drilled out and 0.032" wire inserted. The white thing on the cylinder is a connection for the vacuum reservoir which this coach doesn't have. The cylinders are angled slightly. I will fit the rod, lever and crank (all made) later.
Footsteps are 5mm wide plastic strip. I had a lot of trouble getting them straight. I think they are acceptable now.
Battery boxes are a lot of work. You only get the front face and have to make up everything else. Robs pictures of his coach build were very useful. Note the strap made from brass strip. I'm not sure whether there were threaded rod supports at the battery box ends, something else to think about.
Still a ways to go with steam pipe and vacuum pipe runs that I'm mulling. There's the truss too and I'm trying to make turnbuckles for that.
I found some marvellous photos here:
General Items under LNER Projects.
If anyone has drawings I'd love to hear from you.
John
John
Posted

Full Member
Did your pack not contain the battery boxes themselves - plain panelled front with an open back? all the four coaches that I have played with so far have had them. I just faced the open side with styrene sheet and then added the planked doors to that.
What sort of drawings are you after?
Regards Rob
Posted
Full Member
As for drawings, I like the works drawing copies that sometimes appear in books, so that's what I hope for. I'll take what I can get though. For clarity we are discussing the Dia 25, ex GER, 52' 6" 7 comp't 3rd.
Cheers
John
John
Posted
Full Member
I have been away for a few days - By coincidence working on Kirk coaches
I will have a look through to see if I have anything that might help.
Regards Rob
Posted
Full Member
John
John
Posted
Full Member

Credit to Rob for taking an excellent closeup of a turnbuckle in his Kirkby Stephen album.
For those who might be interested:
Start with 2mm plastic rod (I don't know if there is tube), slice off 1mm and 2mm thick pieces - drill it for 0.032". Start with 0.020" since you have a reasonable chance of getting the hole centered if you start small. This may take some practice.
Thread some 0.032" wire through a 1mm and 2mm slice and space these at 5mm (I marked a ply offcut). Attach 0.020" rod to each side of the tubes using liquid solvent. Tease into position and LEAVE it. After about two hours attach two more pieces of 0.020" rod and let harden overnight.
When dry, remove the assembly from the brass rod - it will have stuck so hold the brass with pliers and gently twist your turnbuckle until it loosens and slides off.
Trim the excess 0.020" rod and use a sanding stick to shape.
Viola!
John :pathead
 Last edit: by Brossard
John
Posted

Full Member
I'm not! I'm 25!Alan, based on the demographic poll from a bit ago, I'd say we're all old farts here.
John
25 and loving how this project is going. Thanks for sharing the turnbuckle-making process, will have to keep that in mind
Last edit: by ZeldaTheSwordsman

Posted
Full Member
Great fun this quasi scratch building.
John
John
Posted
Legacy Member
Posted
Full Member
If you scroll down you'll see the turnbuckle truss:
GNR 2701 Restoration 2008
John
John
Posted
Full Member
Much better than my efforts - I tried to use tube and then drill out the cross section to leave the side frames. I wasn't happy with the results.
Regards Rob
Posted
Full Member
John
John
Posted
Full Member
I couldn't agree more, I am sure that if more people had hobbies there would be less suffering from dementia.There's more than one way to do it Rob. Paint and weathering covers all sorts of sins. The best way is for someone else to make them. Nevertheless it is good to exercise ze leetle grey cells.
John
Regards Rob
Posted

Inactive Member
Max
Port Elderley
Port Elderley
Posted
Full Member
I think you're on to something there Rob. Keeping the mind active keeps old age at bay.[user=565]Brossard[/user] wrote:I couldn't agree more, I am sure that if more people had hobbies there would be less suffering from dementia.There's more than one way to do it Rob. Paint and weathering covers all sorts of sins. The best way is for someone else to make them. Nevertheless it is good to exercise ze leetle grey cells.
John
John
John
Posted
Full Member
- the battery boxes are too long (my fault for not checking more carefully) and
- the distance between queen posts is too short (kits fault)
I've already cut up the battery boxes and made a fresh start on those.
Rob put me onto a range of Gresley castings available from JLTRT so I'm going to try to get some better queen posts. I also hope to get some better examples of dynamo and brakes. Waiting for a reply to my email now.
In the meantime I made a start on the bogies for the 3rd brake.
Some time ago (Robs advice here too) I ordered some packs of 3' 7" wheel dia. brake gear details from Parkside. I shall use those instead of laboriously making them as I did on the first pair of bogies.
I've assembled the basic bogies and had a review of the parts:
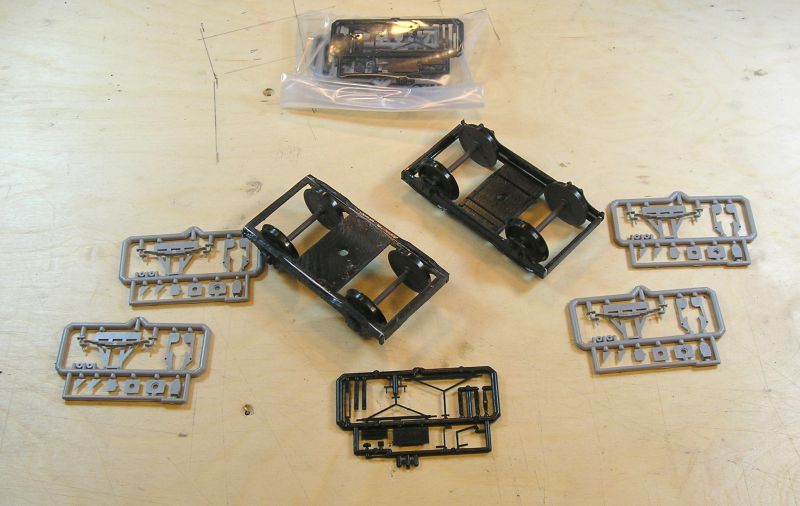
I need the clasp brakes from the grey frets and yokes and hangers from the black one. The rest will go in the spares box.
John
Posted
Full Member
One I will probably make use of myself at some point in the future. I find the Parkside Sprues to be really good value.
Regards Rob
Posted
Full Member
John
John
Posted
Legacy Member
Allan
1 guest and 0 members have just viewed this.