Johns 7mm Coach Workbench
Posted

Full Member

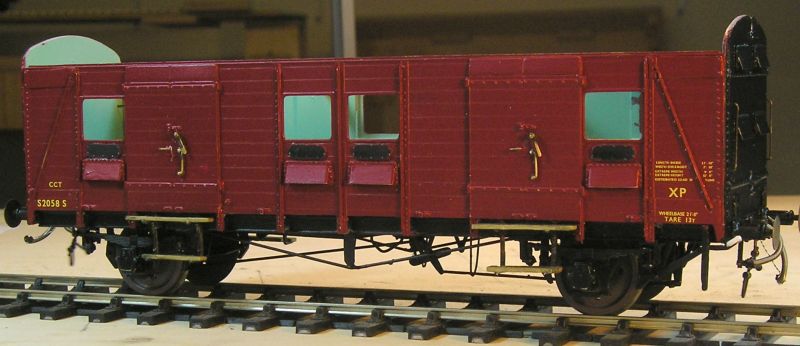
The first obvious thing is that the ends are now black. This is typical of BR crimson/red stock.
I got the steps installed and evidently not perfectly. I'll go back and see if I can't tweak them.
Ironmongery is installed with commode handles, lever handles and T handles on the doors. I chemically blackened these and then, after installation polished the used surfaces.
Chalk plates are done in grimy black.
Note the vacuum pipe is attached to a strut. I used black tack to stick the connector in the socket.
The steam pipe (for which there was no hose in the kit) is attached by a chain (made by twisting wire strand) to a small hook that I made.
The final task this evening was to spray with gloss varnish to give transfers something to stick to.
These are on order from Cambridge Custom Transfers.
John
John

Posted

Full Member
Eyeballs - Rotring pens ($$$) or similar drafting pens for the iris (blue, brown, green). Come on different diameters. Then go in again with a needle for the pupil (black). Have the eyes facing the direction of the hands. Not easy in 4mm, not that difficult in 7mm. Check out the military modelers, it's where I picked up the above.Getting the white correct is the difficult bit. rather than try and limit where the white goes, over-paint onto the brow, nose and cheeks, go in afterwards with flesh.
Somebody has eyeball decals, found it, Archer, they do a sheet suitable for 1/32-1/35 (AR990001). Just needs the white painted in. Something you could easily do yourself on the printer. Fiddly to apply I suspect, an eye loupe would probably come in handy.
Nigel
©Nigel C. Phillips
Posted
Full Member
I did actually start the way you say by painting a swath of white over the face and painting the flesh colour outwards. My big error was using neat flesh paint - I ought to have thinned it so as not to fill in the crevices. I'm thinking that Humbrol enamel might be a better way to go.
John
 Last edit: by Brossard
John
Posted
Legacy Member
Eyeballs and eyebrows apart, I thought you might be interested in these people who make absolutely brilliant lamps and, in comparison, right on your doorstep (if you can call a trip across the outback and back again as being on your doorstep ) and, in comparison, you probably knew about them before I did !
Anyway…
DCC concepts australia.
+6189437247*Sales@DCCconcepts.com
Allan
Last edit: by allan downes
Posted
Full Member
That said, Gaugemaster do the very same lamps under their own brand for quite a bit less.
John
John
Posted

Inactive Member
I only deal with Richard as a last resort.
Max
Port Elderley
Port Elderley
Posted
Full Member
The transfers are very good and I am pleased with the results. I sprayed a coat of Dullcote to tone down the gloss.
Glazing next.
John
John
Posted

Site staff
Must say the detail in 7mm is quite stunning :thumbs
Ed
Posted
Legacy Member
Allan
Posted
Full Member
Dream on Allan! :cheers
John
John
Posted
Full Member
Here are the parts:

There are ten etched partition overlays. GWR pattern but I shall use them I think. There are also parts for luggage racks with fine mesh that isn't in the picture. Oval mirrors and sepia prints. The strips are window straps.
Nice stuff indeed.
John
John
Posted
Legacy Member
Allan
Posted
Full Member
John
John
Posted
Full Member
The bars were another story. I initially used canopy glue but it wicked between the bars and glass making an unsightly mess. Out they came. After refreshing the paint which had chipped with all the abuse I did them again but used black tack to stick them in. This is similar to blue tak but much stronger.

Roof went on without too much trouble.
John
John
Posted
Legacy Member
Allan.
Posted
Full Member
John
John
Posted
Legacy Member
Now where's that cornflakes packet….
Allan
Posted
Full Member
John
John
Posted

Full Member
Where do you find the price list on the CPL site - or am I just being blind/daft?
Regards Rob
Posted
Full Member
John
John
1 guest and 0 members have just viewed this.