Johns 7mm Layout
Posted
Legacy Member
Well John, cars in those days were made out of good, heavy gauge steel (unless it was a Vauxhall ) and not recycled soup cans so whilst they certainly rusted ( paint technology wasn't all that it should have been ) they did nevertheless hold together pretty well and, even in the diminutive Austin 7, you could walk away after a hefty crash.Thanks for this, a great story. It also confirms my belief that these were still around in the 60s. The model cost more than the car. My next task is to figure out how these would have looked unrestored in 1962 - pretty ratty I'm guessing. All the photos I've found so far are of restored examples.
John
I once ditched a Ford 8 in a duck pond ( couldn't see it for fog ) dragged it out, removed the plugs, poured a little oil down the bores, dried the plugs out, swung it over a few times with the starting handle and away it went. Try that with my Benz and I'd be looking at a couple of grand just to lift the bonnet ! ( cue for an arghhhhhhhh )
Allan
 Last edit: by allan downes

Posted

Full Member
I just paid an arm and a leg to have my subframe replaced in my 12 year old Maxima - aaaarghhh! indeed.
John
Last edit: by Brossard
John
Posted
Legacy Member
I only had it a week when some drunk slammed into the back of me when parked to let my girlfriend out and just as she had her legs out of the door.
The impact twisted the back axle out of shape thus writing it off , injured both her legs and ruined her nylons. I got the blame of course.
Allan
Posted

Full Member
I paid £12k on stuff done to my car last year £980 of that was for investigating a bonnet release switch which stopped working, turns out a mouse had got to the wiring harness :shock:Ah they don't make things like they used to - some would say "thank goodness". These vehicles are full of character. Now let's hope Oxford do a Ford 8.
I just paid an arm and a leg to have my subframe replaced in my 12 year old Maxima - aaaarghhh! indeed.
John
My father's first car was a Standard 10…ten HP! I remember it well ;-)
Phil
Phil
Posted
Full Member
Right shame about them nylons. :roll:One of the best little cars I ever had John was a 1937 Morris 8 Series E.
I only had it a week when some drunk slammed into the back of me when parked to let my girlfriend out and just as she had her legs out of the door.
The impact twisted the back axle out of shape thus writing it off , injured both her legs and ruined her nylons. I got the blame of course.
Allan
John
John
Posted
Full Member
Given my cars age, I had a debate with myself. The cost to me for this repair was $2,000 so not in your league at all. They gave me a Micra while waiting for parts - I'm pretty big but I found the car quite comfortable and it had all the mod cons.[user=565]Brossard[/user] wrote:I paid £12k on stuff done to my car last year £980 of that was for investigating a bonnet release switch which stopped working, turns out a mouse had got to the wiring harness :shock:Ah they don't make things like they used to - some would say "thank goodness". These vehicles are full of character. Now let's hope Oxford do a Ford 8.
I just paid an arm and a leg to have my subframe replaced in my 12 year old Maxima - aaaarghhh! indeed.
John
My father's first car was a Standard 10…ten HP! I remember it well ;-)
Phil
Standard 10, another make to be on the lookout for.
John
John
Posted
Legacy Member
Bought the missus a Micra when they first came out.[user=753]Phil.c[/user] wrote:Given my cars age, I had a debate with myself. The cost to me for this repair was $2,000 so not in your league at all. They gave me a Micra while waiting for parts - I'm pretty big but I found the car quite comfortable and it had all the mod cons.[user=565]Brossard[/user] wrote:I paid £12k on stuff done to my car last year £980 of that was for investigating a bonnet release switch which stopped working, turns out a mouse had got to the wiring harness :shock:Ah they don't make things like they used to - some would say "thank goodness". These vehicles are full of character. Now let's hope Oxford do a Ford 8.
I just paid an arm and a leg to have my subframe replaced in my 12 year old Maxima - aaaarghhh! indeed.
John
My father's first car was a Standard 10…ten HP! I remember it well ;-)
Phil
Standard 10, another make to be on the lookout for.
John
Our dustman walked a wheelie bin into it and it almost folded in half.
When they rubbed it down for the respray it exposed " Hienz Baked Beans, economy size "
Allan
Posted
Full Member
My Maxima has lasted 12 years with no surface rust - under structure is another matter - :twisted:
John
John
Posted
Full Member
I've tested it with a wagon, coach bogie and a Terrier - all seem happy.
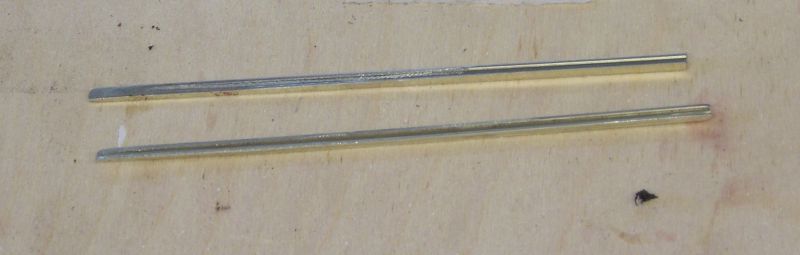
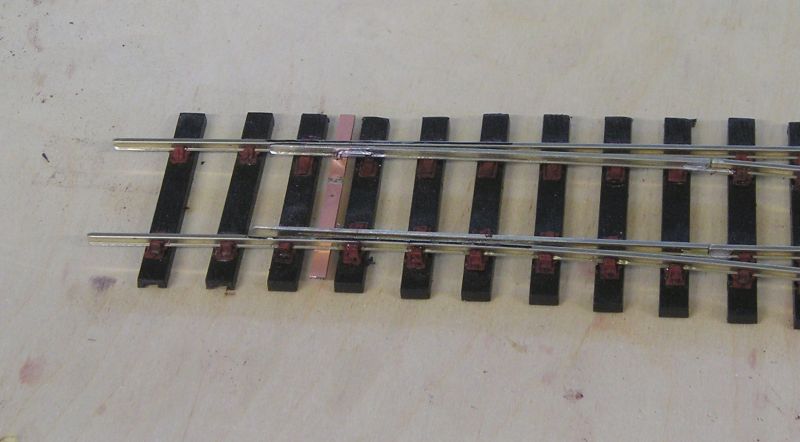
The tiebar is made using principles from Norman Solomon:
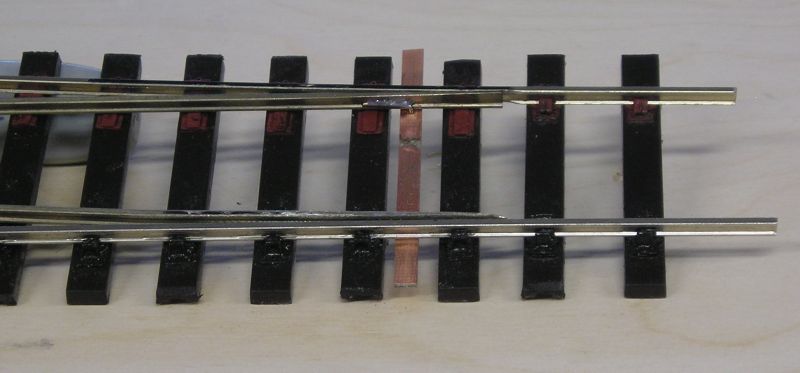
I used copper clad strip. This is Mk 2 since the first attempt got the pin holes wrong. I used a cutting wheel to scrape the copper off. Cutting a slot weakens the strip. I managed to find some brass pins yesterday and these were inserted and bent as shown. The pins were soldered - job done. There is a 0.032" hole in the middle of the tie bar - the actuator wire from a Tortoise will go there.
You can solder the rail direct to the tiebar but, from what I've seen, the joint fatigues over time and breaks. Not difficult to repair but why not do a proper job to start with?
John
John
Posted

Full Member
I like the pins. Looks easier than rivets. Presumably they're not soldered to the tie-bar, only the rail? If so is that more a slot rather than a hole? (or an oversized hole). Head underneath? Not sure I would want to do it in HO/OO (my copper-clad is the same thickness as the ties). I'll give it a try though. Should have small picture-hanging brass pins around somewhere. Hardened brass though, tends to snap, not bend. Slots or scrapes, they both weaken the copper-clad. There is a way to minimize this, which I'll post.
Fatigue sets in when there is not enough slop at the other end of the blade where it meets the closure rails. And if hard solder rather than a softer one is used. If you watch the tie-bar closely it traverses a curve (radius being the length of the blade from the closure rails), rather than always being at 90° to the stock rails.
Looks really good with the decent tie sizing and spacing.
Nigel
©Nigel C. Phillips
Posted
Full Member
You are right of course, any hole or slot you put in the strip will weaken it. I countersunk the pin hole under the tiebar.
This can also be done for OO/HO.
I discovered that my loose heel is too loose and soldered both ends. The force to move the blades after that is very small.
I can only say that we will see in service.
John
John
Posted
Full Member
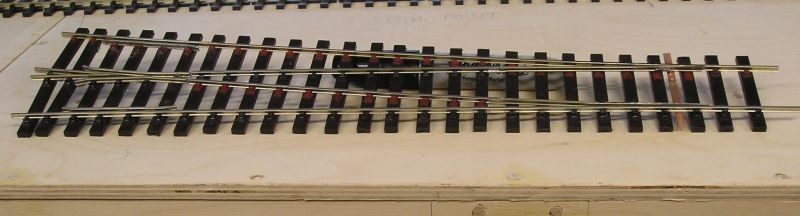
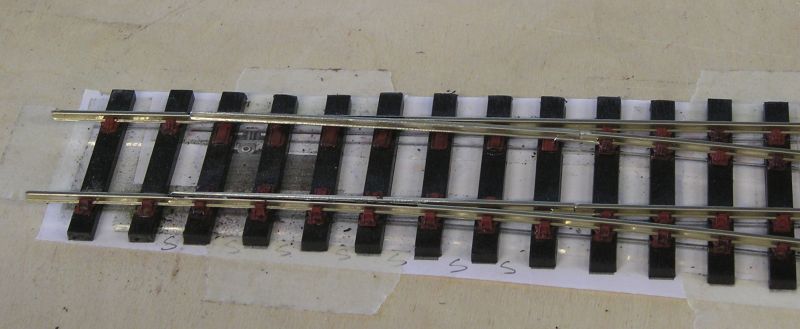
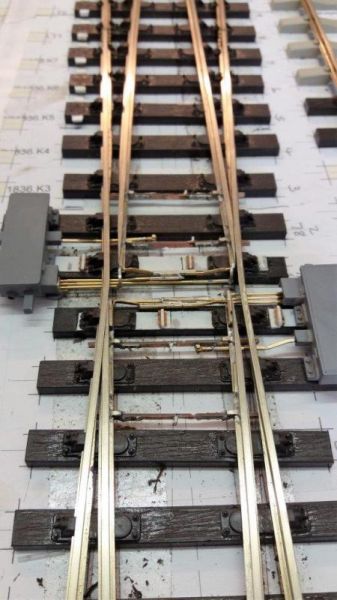
Prepared the timbers and positioned them on the template:
Next I positioned the common crossing and secured it with chairs:
Then I prepared the straight stock rail, this time remembering to grind a rebate for the switch blade.
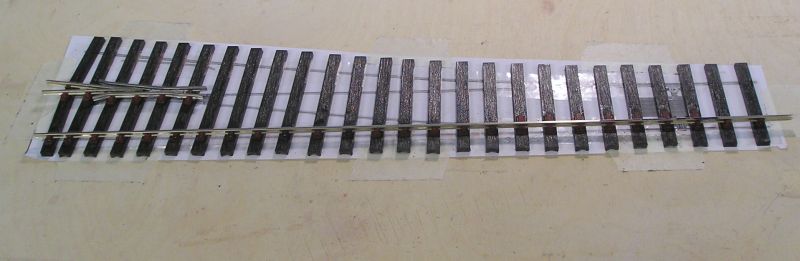
The rail at the left is gauged to the crossing. I squinted down the rail frequently to ensure it is straight.
The running chairs are a great faff needing to be poked and prodded into place.
John
John
Posted
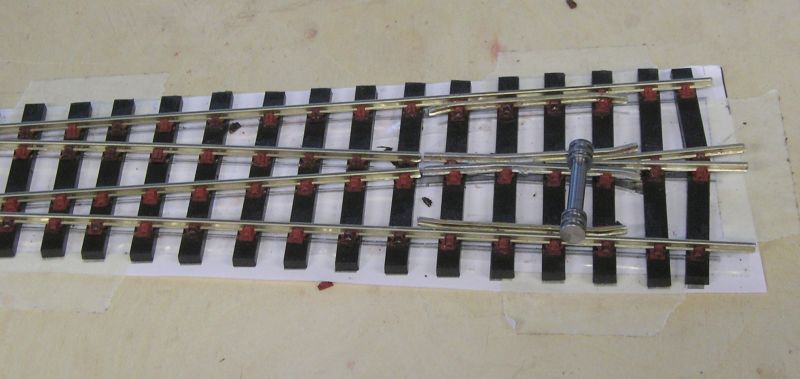
Full Member
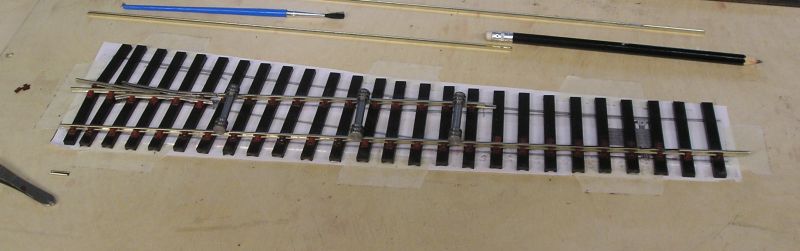
Lots of gauges and ensure that the left rail end lines up with the wing rail. Note the code 100 rail joiner on the right.
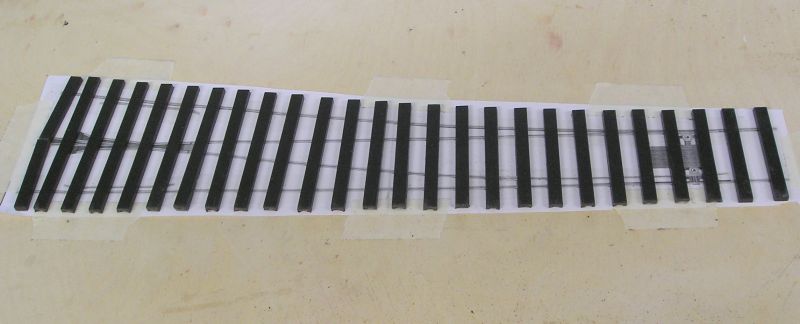
This morning I did the curved stock rail:
Put the curve in the rail by holding it between thumb and finger and running the rail through them while applying gentle pressure in the direction of the bend.
Lots of gauges again. The middle gauge on the right has the end flange ground off on one side so that it sits over the vee. The gauge on the left next to it has the inside flange ground off so it can sit over the wing rail.
John
John
Posted
Full Member
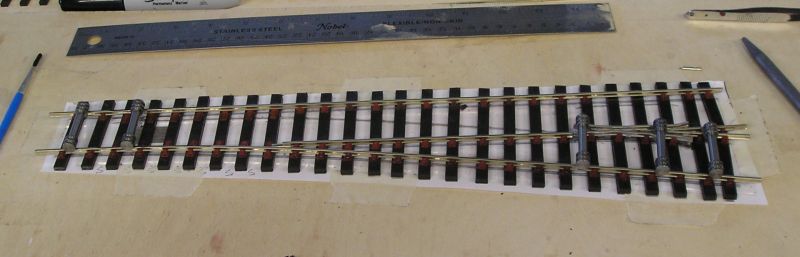
The side facing the stock rail (top) is planed to remove both flanges (webs?) at the end and tapered. The side away from the stock rail (bottom) has the top flange planed off and tapered. The amount of taper depends on the size of turnout. I also checked to make sure that I had enough taper so as not to reduce gauge.
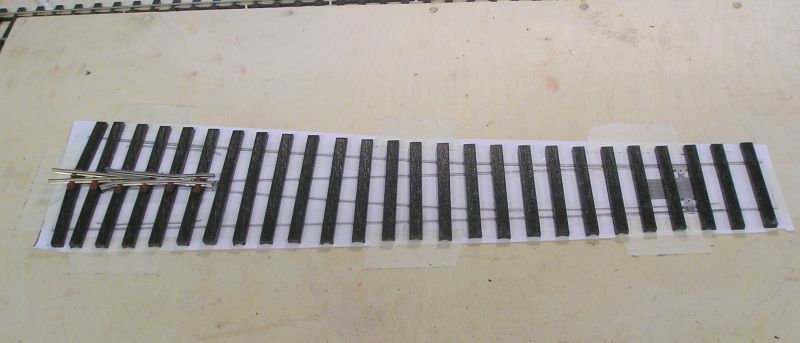
Switch blades installed:
The ends of the rail are inserted into code 100 rail joiners to make the loose heel.
Tiebar next.
John
Last edit: by Brossard
John
Posted
Full Member
These are a bit trficky. There are only effectively two chairs holding the check rail and a bunch of half chairs. Ihave found that this is not very strong. My answer is to put a dab of contact cement at the ends and follow up with CA at the chairs.
The gauge ensures that the flangeway is correct.
Tiebar:
Same method as before. The pins are spaced to 27mm but I still get 2mm throw. There's a comfortable gap for wheel flanges.
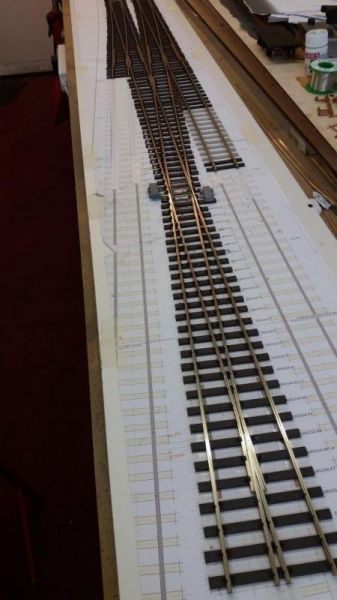
That's the turnouts done, I hope to report on tracklaying next.
John
John
Posted

Site staff
Who knows, might have a go myself one day

Clever use of the Code 100 rail joiner John, is that the standard way of creating that joint?
Also wondering about the different lengths of switch and closure rails, which is pretty obvious on the various versions of Peco 00 gauge points over the years.
Is it better to have a longer switch rail and shorter closure rail, is it dependant on the length of the point and radius of the turnout, or is there some clever formulae for working it all out?
Ed
Posted
Full Member
The turnouts I built are based on the Peco template.
There are technical notes available from the Societies and Guilds. One of the best books is Iain Rices "Finescale Track" - come to think of it, I probably should get my copy out and reread.
I guess it comes down to having the right amount of slide chairs whether or not the blades have loose heels (hinges). Track is quite flexible and you could probably get away with continuous closure/switchrails - certainly with a high torque motor like a Tortoise, not sure about solenoid though. The balance is flexibility vs strength.
Mainline track in the real world doesn't use heels/hinges but these turnouts are very long, longer than most of us can contemplate on our layouts. Turnouts in yards, which are smaller, may be loose heeled - perhaps because these are frequently switched manually.
John
John
Posted
Legacy Member
Allan
Posted
Full Member
John
John
Posted

Inactive Member
A few bibs and bobs and you'll be neck and neck. :thumbs
Max
Port Elderley
Port Elderley
1 guest and 0 members have just viewed this.