TRAIN CONTROLLER
Posted

Full Member
STOP AND BRAKE MARKERS
Hi AlanI have to go out now……there is an 8 hour time difference

I will post something later…..you will be able to read it at breakfast


Posted
Full Member
thanks for taking time to look at it for me
Thanks Alan
Using DR5000 12x DR4088s loconet
DR5033s
Ecos System
Train Controller
iTrian
arduino
Var
DR5033s
Ecos System
Train Controller
iTrian
arduino
Var
Posted
Full Member
thanks Alan
Using DR5000 12x DR4088s loconet
DR5033s
Ecos System
Train Controller
iTrian
arduino
Var
DR5033s
Ecos System
Train Controller
iTrian
arduino
Var
Posted
Full Member
How can that be when Point 100 lies between your start block Inner 2 (CI 2/03) and your profile block In 1 (CI 2/02 and CI 2/01)all the profiling sensors are one after the other on the layout there are no gaps at all
thanks Alan
I dont understand the purpose of two CIs in the profile block.
Is the section controlled by CI 2/02 where the loco is profiled and is the section controlled by CI 2/101 the run off block?
Like some of the guys on the R&R forum I am confused about the way your profile track is set up
Most profile tracks have a simple set up as per the manual……consisting of three blocks, each with a single occupancy detector (CI) , in a straight line with no intervening points.
FINISH CI 3 PROFILE CI 2 START CI 1
Train Controller is complex enough…..each time one varies from the manual it makes troubleshooting that much more difficult.
I have written separately about stop markers
Regards
Posted
Full Member
Even if your profiling is perfect you will never get accurate stopping unless you have a clear understanding of how TC operates Stop and Brake Markers.
Lets say we have a Loco entering a block at 30 mph with a stop marker set at 48" and a Brake Marker with a distance of 36" and a ramp of 12"
The moment the loco is detected entering the block, TC uses the speed of the loco to calculate when it will have traveled 36". it then progressively reduces the speed to the crawl or threshold speed set up in profiling and when it calculates a further 12" has been reached it stops the train
If we change the brake marker ramp to 10" then everything happens as above except that after 10" of deceleration the train will continue at crawl speed for a further 2"
It must be easier to calculate distance travelled at a constant speed than when the speed is being progressively reduced………so the longer the ramp the less accurate the calculation
Secondly crawling can be very unpredictable so the distance between (Distance+Ramp) and Stop Marker should be kept to a minimum…….the maximum I ever allow is 1" and I rarely do that
A picture is worth a thousand words
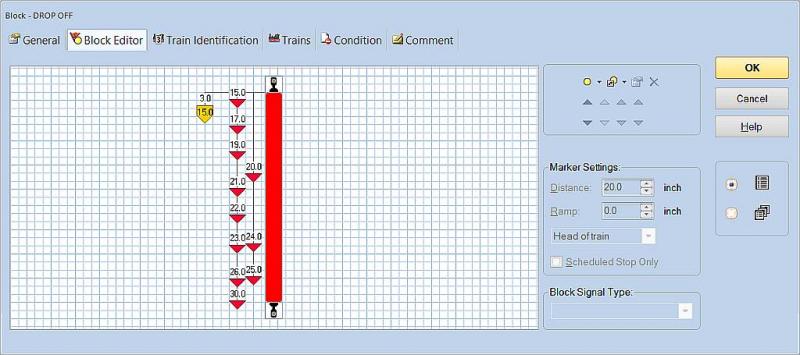
There is an awful lot of stop marker each assigned to a train group I think but only one brake marker with a 15" ramp
Lets take two extreme examples
Loco 20 Blue is assigned to the 15" Stop Marker……on entering the block the brake marker will be activated after it has traveled 3" it will decelerate but only for 12" and then stop before it reaches crawl speed
Rail Freight is assigned the 26" stop marker…..it will travel 3" at block entry speed then decelerate for 15" and then crawl for 8"
The lesson here is that if you want a number of different stop markers each should have a brake marker with distance + ramp matching the stop distance……..TC needs to know which set to activate so both stop and brake marker should have the same restriction……either train or schedule.
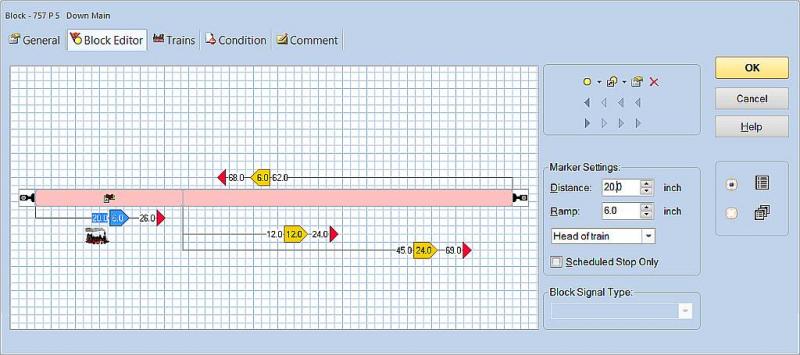
Here is a block from Granby to show this
Hope this helps…….sorry its so long winded but its the nuts and bolts of stopping accurately
Posted
Full Member
i notice in you picture you have a stop maker of 68 then a brake marker with a ramp 0f 6 and a distance of 62
on mine have the distance shorter than the ramp i.e.
stop marker of 20 then a brake marker with a ramp of 18 and a distance of 2
which is the correct way
i have found that my way it stops closest to the brake marker
if i change the brake marker to a ramp of 2 and the distance of 18 it does not stop near the brake marker
Using DR5000 12x DR4088s loconet
DR5033s
Ecos System
Train Controller
iTrian
arduino
Var
DR5033s
Ecos System
Train Controller
iTrian
arduino
Var
Posted
Full Member
i have removed all the multiple brake marker and started again
There is nothing wrong with multiple stop markers as such…..they just have to have precise conditions and should each be associated with a brake marker
i notice in you picture you have a stop maker of 68 then a brake marker with a ramp 0f 6 and a distance of 62
on mine have the distance shorter than the ramp i.e.
stop marker of 20 then a brake marker with a ramp of 18 and a distance of 2
which is the correct way
i have found that my way it stops closest to the brake marker
Obviously I think mine is the correct way
It is generally recognised that the most accurate stopping is achieved by using the same speed and ramp distance that you used in your brake test…..you cant do that with your system because blocks vary in length
Although maybe you should check on the RR&Co forum rather than just accept what I do.
Alan, you have quite a complex layout with a lot of schedules……….I was very impressed when I ran the Blue Pullman out sequence:thumbs……….. I have been through exactly the same phases as you when you get really frustrated at some insoluble glitch………..I have found the best solution is to try and strip everything back to the fundamentals
if i change the brake marker to a ramp of 2 and the distance of 18 it does not stop near the brake marker
I assume you mean the stop marker? The brake marker comes on after 18"
It would be best if we focussed on one loco and one schedule and got that to stop 9 times out of ten over the magnet…...it would be really helpful if you would tell me the loco and schedule rather than have me pick one at random.
I , or rather Mrs D :roll:, have a number of non railway events planned this week end so I may not be able to always respond right away
Best Wishes
John
Posted
Full Member
i noticed that my mistake is that my end part of the blocks the sense part was too long so i will now have block lets sat 40 inches long with 3 sensors in at the start of the block the sensor will be 5 inches long middle 30 inches long then at the end 5 inches
in the block i have a brake marker for 35 inches and a 5 inch brake marker i have done a test with all my locos and everyone stops in the correct place every time
so look like i am busy for e few weeks putting all the seniors back into the correct places
thanks for all your help
ill put up a picture when its all working
Using DR5000 12x DR4088s loconet
DR5033s
Ecos System
Train Controller
iTrian
arduino
Var
DR5033s
Ecos System
Train Controller
iTrian
arduino
Var
Posted
Full Member
done what you said removed all my sensor wiring what a nightmare and I'm starting from fresh
i noticed that my mistake is that my end part of the blocks the sense part was too long so i will now have block lets sat 40 inches long with 3 sensors in at the start of the block the sensor will be 5 inches long middle 30 inches long then at the end 5 inches
in the block i have a brake marker for 35 inches and a 5 inch brake marker i have done a test with all my locos and everyone stops in the correct place every time
so look like i am busy for e few weeks putting all the seniors back into the correct places
thanks for all your help
ill put up a picture when its all working
I dont understand……..which block has three occupancy detectors?
Regards
John
Posted
Full Member
i am putting new blocks in with 3 sensor in for a train that will run in both directions .
i will cut the track into 3 lengths in that block and make both the ends of the have short pieces of track 5 Inches at each end with the brake markers in.
the middle sensor will be the longest sensor for the brake ramp
the block will look like this
For a bi-directional block i use 3 sensors:
>brake ramp 35" >Stop Marker 5"
||–5"–||——–30"——-||–5"–||
< 5"stop marker < 35" brake marker
and
Direction Of Travel —>
>35"Brake ramp >5"stop marker
||————–35"————||–5"–|
so the so as the train hits the stop maker it will stop
i have tested this and all the trains stop over the kadee magnet perfect
i will post a picture when finished
 Last edit: by theflyingspanner
Using DR5000 12x DR4088s loconet
DR5033s
Ecos System
Train Controller
iTrian
arduino
Var
DR5033s
Ecos System
Train Controller
iTrian
arduino
Var
Posted
Full Member
I look forward to seeing the pictures
Regards
1 guest and 0 members have just viewed this.