This arrived today
Posted

Full Member
I tried the J50 out again tonight and she performed a bit better. She doesn't like any of the insulfrog points at all - but I do run her very slowly. If I give her a bit of steam, she struggles over most, but not all, of them - except the double slips which she seems to refuse to accept !! The problem is, I do like very slow running on my shunters - running at speed doesn't seem right. :roll:
Where the track is both spotless and perfectly laid, she can creep so slowly, you can easily count the wheel spokes as they go by. If she'd do that all the time, I'd be the happiest bunny this side of the grave. :doublethumb
Allan, it's very kind of you, of all people, to comment on my layout and I'd really love to take the credit for the bit you can see in the photo. Unfortunately, other than the loco and, in the wider shot, the bus, I had very little to do with it other than placing it and wiring up. Doug Dickson (Chubber on here) is the one you should be addressing your remarks to - it was he who built the mill.
Here's his thread on doing so: http://yourmodelrailway.net/view_topic.php?id=3303&forum_id=21&highlight=bear\\\\\\\%27s+end
Start at Post #139. :thumbs
'Petermac

Posted
Full Member
My J50 is fitted with a short underset shank coupling and connects with any of my rolling stock with no problem.Derek
 Last edit: by Super D
Posted
Full Member
Just back from a rare weekend away.
I'm sorry to read of your problems experienced with this model. The Hornby J50 is normally a very good runner and yours had an hour runing in in both directions without a moment's hestiancy before despatch. I would have suggested a stay-alive had it not perormed so well.
This will be resolved to your satisfaction, one way or another.
You have tried, and others have suggested, the initial testing/cleaning which needs to be done to eliminate basic problems. Please make sure that all of the pick-ups connect with their respective wheels at the full extent of their sideways movement.
After this, I think body-off is the next move. Fortunately this is not an unpleasant experience, though a little care is needed to make sure the sand pipes are outboard of the motion during re-assembly. Release 3 screws and lift the body upwards.
I've hard-wired the decoder, so it's pretty straightforward. Orange and grey wires to the motor, red and black to the track pick-ups.
However, this latter connection is an interesting engineering solution. The upper terminals are connected to the track pick-ups below through insulated tubes in the chassis casting. The connection is made by a pair of sprung telescopic legs.
After checking that all the soldered connections are sound, the operation of these telescopic legs would be my suggestion to investigate as this is a potential weak link in the signal/power pathway, and may have become dislodged in transit.
I'll email some photos so you can see what's what before tackling this.
Kind regards,
Paul
Last edit: by Paul Chetter
Posted

Full Member
Out of interest I just looked at the service sheet for the J50. Who in their right mind designed this one? Telescopic plungers? With what look suspiciously like watch strap springs? Dirt, grease and muck traps. And right next to the gears. Hmm. Hard-wiring to the pick-up strips and running the wires through the tubes previously occupied by the telescopic springs to some end-of-board push-on connectors (which would allow dismantling) rather than hard wiring might be a more reliable approach.
Presumably this approach was marginally less costly for Hornby than 2 solder joints and 2 edge connectors. Or soldering the wires to the ends of the pick-ups and running them in a channel through the bunker weight or side tank weights to the PCB (which is another alternative).
Nigel
©Nigel C. Phillips
Posted
Full Member
Hmmm. I agree, that's why I used the term 'interesting engineering solution'. Lol
In my email to Peter, one of the suggested solutions was to consider replacing this with wires directly soldered.
The Hornby solution does seem to be working for a lot of people currently, but I think, as you indicate, this could be a latent problem and one of the things we have to remember about this model in a few years time when replying to forum requests for help.
Kind regards,
Paul
Posted
Full Member
If it's something more serious than a slight displacement, he'll either sort it out, or, if all else fails, replace it. I'm sure that won't be necessary because, having read his instructions and looked at his photos of what I'll find inside, I'm now sure it's just a minor problem, probably caused in transit, and not a bad design on Hornby's part. (Sorry for casting nastursiums Mr Hornby ………:oops:).
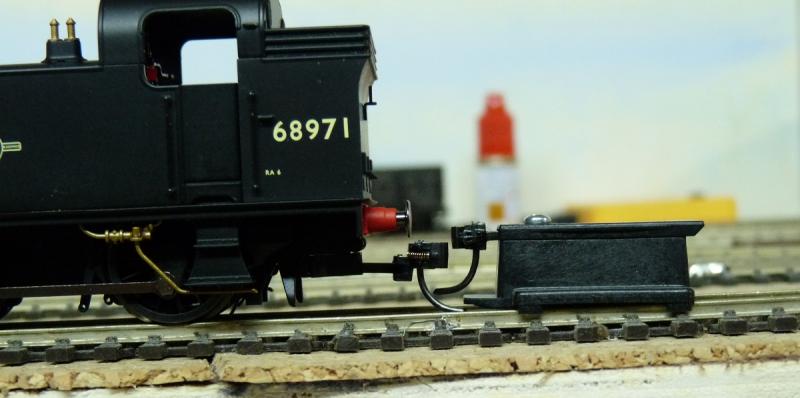
Here's a couple of photos showing the problem with the Kadees:
The front coupling - in this instance, I used a No 20 plugged into the NEM pocket but that's only because it was the first that I grabbed - I do have Nos 18, 19, 20 and some No 5's. Maybe a shorter one would remove some of the droop, or even slight "modification" of the pocket mounting - it's one of those silly wedge shaped push on fittings.
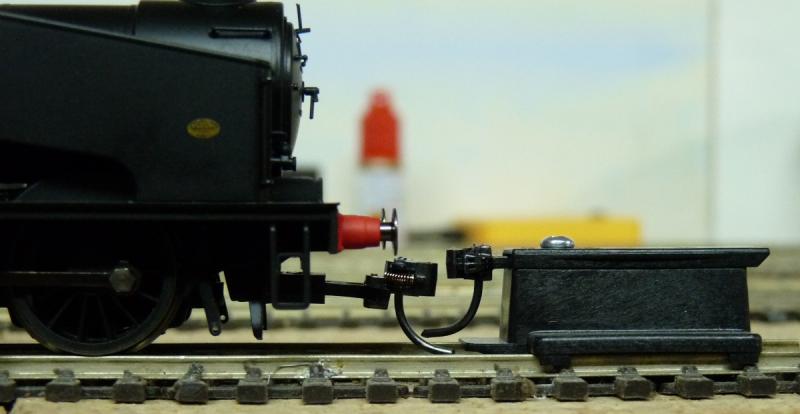
And the rear - it doesn't seem to droop quite so much but is well out on the height gauge :
I did take some short video, a part of which shows how it can creep, and will post that to You Tube later today.
'Petermac
Posted
Full Member
I have to say I know naff all about Kadees, but from your photos it looks like there is a degree of vertical play inside the NEM pockets.
Is this something that could be shimmed out of existance, raising the starting height and reducing droop in one fell swoop?
Paul
Posted

Full Member
Bon chance et courage!
Bill :)
Last edit: by Longchap
At 6'4'', Bill is a tall chap, then again, when horizontal he is rather long and people often used to trip over him! . . . and so a nickname was born :)
Posted

Full Member
Really lovely detail on 68971 Peter and a shame with the front end brewer's droop! I'm sure you'll soon fix it though and coupling may commence.
Bon chance et courage!
Bill :)

Bill beat me to it.
I would try #18 …..it doesnt need to be that far forward and the length will add to the droop. If that doesnt work I would remove the pocket from its mounting and fix the pocket directly to the chassis…….and as a last resort fix the Kadee directly to the chassis as previously suggested
I hope with Paul's help you get the running sorted……it does seem a wierd set up
Cheers
John
Posted
Full Member
It has improved the running a bit but not that much.
She's fine and dandy on good track but won't take the double slips at anything less than a trot - even then, the older style slip with chunky rails is a no-no. She also has problems with some of the dead frog points and that pesky diamond crossing !! The crossing I'll change for a live frog one - I have a "Finescale" one in stock and some adapter rails. I'll just need to swat up on how to wire it ………..:roll::roll:
I think the best way forward, without having to replace all the dead frog points and relaying some of the track, is to ask Paul if there's room for a "stay alive". I did take a rather boring video of it trundling round the layout without any problems (except for over the diamond). I'll post that later.
It's the high level station area where she struggles. There are 3 double slips and a few dead frog points in that area.
This video (which took about a month to upload :twisted::twisted::twisted:) shows some, but by no means all, the sound effects and a bit of the slow running capabilities. Sorry it's not a blockbuster but it does show how good the loco is. Murphy arrived as I was filming and I ended up with a tree growing out of the chimney at one point …………..:???: :
https://www.youtube.com/watch?v=Hr9oKE4K4Sk&feature=youtu.be
I also discovered a rather clever design function in the chip which I hadn't realised was there. You'll remember I wanted to reduce the sound levels. Well, I can do that with functions on the key pad. F27 reduces the overall volume and F28 raises it. Press F27 and the sound fades slowly. When it reaches the level I want, let go of the button and the sound stays put. To increase overall volume, simply press F28 until it's where you want it and again, releasing the button leaves the volume there. Maybe you all knew that but I didn't !!! :oops::oops:
'Petermac
Posted
Full Member
Sorry looking Kadee couplers, but that's down to the manufacturer playing lip service to the standards and getting away with it by using tension hooks. One of those cases where even going down to a #18 will only marginally improve matters. Mid point of the coupler needs to be inline with the buffer heads. As John suggested, bin the NEM 362 mount and use a Kadee #5 or similar and adjust for height. Use Parkside Dundas NEM pockets if you want to keep the Kadee NEM couplers. Now if those Kadee NEM couplers came centrally mounted instead of under-slung…….
When you insert the coupler box with the tenon into the mortise on the chassis it's handed, in that one surface is flat the other convex/ridged. If you have the convex/ridged surface at the top it pushes the coupler box even further down. Worth checking, although it will only help by a mm or so.
Nigel
©Nigel C. Phillips
Posted
Full Member
Hi Paul,Nigel,
Hmmm. I agree, that's why I used the term 'interesting engineering solution'. Lol
In my email to Peter, one of the suggested solutions was to consider replacing this with wires directly soldered.
The Hornby solution does seem to be working for a lot of people currently, but I think, as you indicate, this could be a latent problem and one of the things we have to remember about this model in a few years time when replying to forum requests for help.
Kind regards,
Paul
"Interesting", very apt considering the country of manufacturer. This DCC wiring klutz would benefit from a Tony Wright approach ("rip it out, rip it out"). I think you're spot on re potential issues down the road with a few years worth of age-hardened lubricant in the works and under the contacts at either end.
Nigel
©Nigel C. Phillips
Posted

Site staff
I've given up with diamond crossings. I've tried Hornby and Peco insulfrog and currently have a code 75 electrofrog, but I'm taking the advice I've read on lots of forums and intend to swap it out for a couple of points.
Ed
Posted
Full Member
I do need a diamond in that one position - I can't think how else I'd get a double track junction without using an "over or under" on one track. I don't have the space for that.
Another problem I have is that most of my insulfrog points are controlled by simple SEEP motors without polarity switching so changing them for live frogs would be quite an operation. I also have several surface mounted motors which would require micro switches for polarity changing.

I'm still pondering ………………….
'Petermac
Posted
Site staff
From what I've recently been reading, allegedly the prototype has also done away with diamonds. Modern track layouts have a crossover before the junction and a single line from the appropriate main line that then branches into two.
If your keeping the seeps, easiest way to switch the frog is probably a micro switch the same way Gary did on Linden Ford.
Ed
Posted
Full Member
Having narrowed the problems down to my track, I'm about to set a gang to work on track improvements. This will involve changing at least 1 double slip, a diamond crossing and afew dead frog points plus a little "shoring up" of plain track here and there.:thumbs
'Petermac
Posted
Full Member
 )
)Good luck with the track modifications……I am sure you will not regret it…..there is nothing worse than having to watch first class stock stumbling over poorly laid track…..I keep eyeing the double slips on the North side of Granby……the assorted compromises I am forced to make are beginning to really irritate.
Your storage sidings seemed to contain a somewhat larger collection of stock than I recall
:thumbsCheers
Posted

Legacy Member
:thumbs;-):cool:
Owen
web-cam 2.2.74.174:8081
if the lights are off no cam
if the lights are off no cam
Posted
Full Member
I have added 2 or 3 locos to the rosta since you were here but probably most of the rolling stock was in boxes under the baseboards due to lack of storage space "up top". It's ironic but one always seems to end up with more stock than one has room for. It's called "weakness" when reading catalogues ……………..;-)
Owen, during my period as an "armchair modeller" before I cut the first plank, I must have read volumes on the importance of getting the basics right - track, baseboards, electrics etc. before populating the layout. Further volumes have urged one to use electro-frog points to improve running qualities.
All that was just for sissys - Petermac knew better !!!…………..:oops::oops::oops::oops:
:???::???::???:
'Petermac
Posted
Legacy Member
so ,just the same as the rest of us then eh ?? it took yrs for it to sink in, but it got through the gloop in the end :doublethumb
:thumbs;-):cool:
Owen
web-cam 2.2.74.174:8081
if the lights are off no cam
if the lights are off no cam
1 guest and 0 members have just viewed this.