Getting Narrow minded.....
Posted

Full Member
Dipping a toe in the NG pond
Thank you, Max, it's certainly a test of patience!Doug
'You may share the labours of the great, but you will not share the spoil…' Aesop's Fables
"Beer is proof that God loves us and wants us to be happy" - Benjamin Franklin
In the land of the slap-dash and implausible, mediocrity is king
"Beer is proof that God loves us and wants us to be happy" - Benjamin Franklin
In the land of the slap-dash and implausible, mediocrity is king

Posted

Full Member
Cheers
Marty
Posted

Site staff
Ron
NCE DCC ; 00 scale UK outline.
NCE DCC ; 00 scale UK outline.
Posted

Banned
Two question for you regarding the engine shed.
1. How do you cut your window bars so fine ?
2. Do you sandwich the panes between the inside and outside walls, or are they a perfect fit into the outer window frame ??
Cheers, Gary.
Posted

Full Member
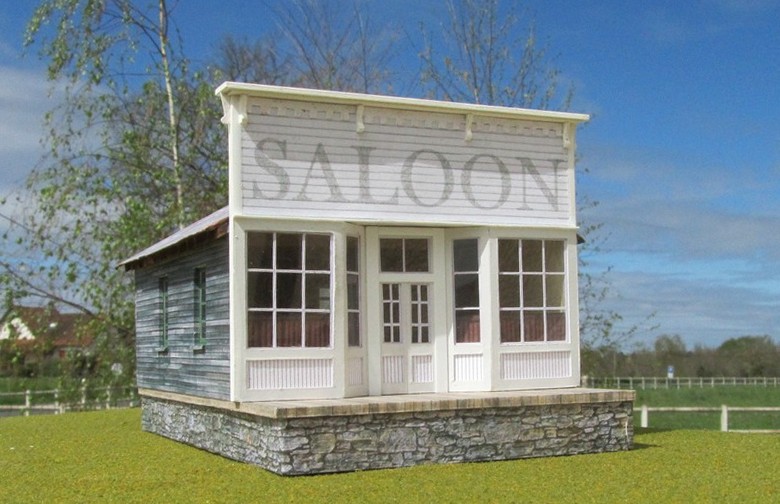
Stunning job,as always, with the shed. Neat idea with the vents and I am particularly impressed with the doors (and hinges). For whatever reason I don't always find Scalescene doors totally convincing but yours are brilliant
:cheers:cheers
Posted
Full Member
1. How do you cut your window bars so fine ?
Gary, the freelance window bars, these are not particularly fine at 0.5mm, work down to 0.3mm [ 1 point] is quite possible by printing onto self adhesive label stock, providing you buy a good quality one. Then stick it onto acetate sheet. For the very fine bars I rub a scalpel blade down to half thickness on 1000 wet and dry and then hone it lightly on a fine stone like I did for this American HO model.
By lightly cutting right across at a very low angle, not stopping for the intersections, you will left with a series of intersecting cuts that hopefully only penetrate the paper. Then flick up the corner of each 'pane' with the tip of the blade and pull them off with tweezers. I always do two or three extra in case of coc%-ups, and I'm usually glad I do! Those below for the engine shed were just cut across with a small Stanley snap-off knife. Once cut out, burnish the minute strips firmly onto the acetate, I currently use the end of a fountain pen.A suitable crayon or felt tip pen run around the inside of each pane completes the painted frame look.
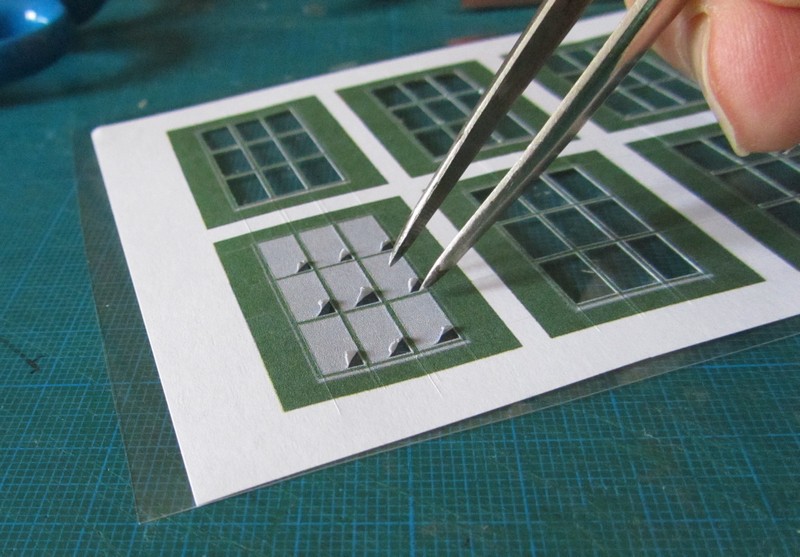
To get glazing bars on both side of a window, you can back-to-back two cut out acetates, sticking them where it doesn't show with Roket Canopy glue or similar or if you're feeling brave, cut out an unmounted printed window, and by holding the parts up to the light, peel off the backing and lay it in alignment on the 'back' surface before cutting out the 'panes'. I have tried peeling off pre-cut print-outs, it hasn't worked for me. I have sellotaped acetates to a sunny window to make it easier to guess the alignment.
2. Do you sandwich the panes between the inside and outside walls, or are they a perfect fit into the outer window frame ??
Well, it's just a matter of making a perfect fit, every time…………………..:oops:
No, in truth, after cutting the inner wall window shapes using the outer walls as a guide to draw around, I sandwich the acetates between them during assembly. In this case the outer window frames, made from paper covered card strips are pre-fitted to the inner and outer apertures.
John, thank you,
For whatever reason I don't always find Scalescene doors totally convincing…..
I 'colorize' mine, that's the term my ancient Microsoft Photodraw system uses to recolour objects.Then I lay down a solid square of the colour to use as a 'Pick a colour' in the 'Fill' tool and to cut out for texture paper for the window frames etc, ensuring everything matches. Scalescenes neutral weathering colours on things like the shed doors really do respond to increasing contrast as you colourise them, and then I go at them with watercolours to add weathering and 'replaced' boards etc. For these big braced three layer doors I use Packeto Cornoflako, printing straight onto the back [You'll need the big packets as these have a nice white interior…] because the printed surface seems to keep the edges nice and sharp and resists warping.
Well, unless there is anything I forgotten, I'll sign off, I expect our Ozz chums have had a few 'scoops' by now, I have a bottle of something fizzy waiting for a little later on [Tizer?]
Poop-poop!
Doug
 Last edit: by Chubber
'You may share the labours of the great, but you will not share the spoil…' Aesop's Fables
"Beer is proof that God loves us and wants us to be happy" - Benjamin Franklin
In the land of the slap-dash and implausible, mediocrity is king
"Beer is proof that God loves us and wants us to be happy" - Benjamin Franklin
In the land of the slap-dash and implausible, mediocrity is king
Posted
Banned
Fantastic explanation of how you achieve the windows, top notch. :thumbs I do recall this method you use and that I'm sure you have explained this previously, but once again, thanks for taking the time to photograph the steps and explain your skills.
Have a great New Year. :cheers
Cheers, Gary.
Posted

Full Member
Hi Doug,I shall have to take it down to the workshop to do the filing, Shelagh says whilst she doesn't mind bits of paper on the floor, the same doesn't apply to 'nasty grey filings' and especially when they appear as grey fingerprints all over the 'fridge door….
Poop-poop!
Doug
Just caught up with the post, the following may be useful.
Wear a pair of disposable neoprene gloves and a particle mask when working with white metal, the high lead content is potentially dangerous. Don't throw the waste scraps away, they're useful when you have to do a small repair or test the melt temperature. The kitchen is probably not the place to mess around with white metal.
I routinely use a 15-40 w iron at the lowest setting. It call for a different technique to brass soldering. Scrupulously clean surfaces, increased surface area using a blade to score the metal, liquid no residue flux, and use the iron tip to melt the solder, not to heat-up the surrounding white metal (which is almost impossible to do, it's one big heat sink). The aim is to use the heat in the solder to get the temperature up.
Always ask the supplier what white metal mix was used and what the melt temperature is. That gives you some indication what temperature to use. With old kits this is near to impossible to find out, test the iron on that piece of scrap. I've had to resort to 80° solder rather than 100° when the white metal had a very low melt. It's normally around 185°-275°, you want the iron hot enough to melt the solder quickly and get it flowing. Try and position the parts so the join to be soldered is at the lowest point. If the white metal casting is thick enough (cab roof for example) spot welding can be employed using a fine tip and a light touch. Get an old K's kit to practice on.
In my experience CAA glue and white metal are not that compatible. It works (after a fashion) if the white metal surfaces are cleaned of grease (fingers) and oxidation immediately before gluing up. Even then a lateral shock easily breaks the bond (as you found out).
Nigel
©Nigel C. Phillips
Posted
Full Member
Low temp (70 degree) solder does flow very well with red flux, and with no danger to electronic grade solder but I have discovered that two tips (or two irons ) are needed as the two don't seem to mix.
Thanks again for posting,
Doug
'You may share the labours of the great, but you will not share the spoil…' Aesop's Fables
"Beer is proof that God loves us and wants us to be happy" - Benjamin Franklin
In the land of the slap-dash and implausible, mediocrity is king
"Beer is proof that God loves us and wants us to be happy" - Benjamin Franklin
In the land of the slap-dash and implausible, mediocrity is king
Posted
Full Member
I got fed up with all the different fluxes and now only use an organic water-based one for everything (organic acid to etch, surfactant to lower the surface tension, alcohol, water to taste). I also use one tip for all, cleaned and tinned after use. My irons cost about $25.00/12 GBP, they last about a year, cheaper to replace rather than re-tip. El cheapo brand. I also use a 60 w iron when necessary. Useful for welding old white metal kits that have plenty of metal, especially in O-scale. I keep away from the expensive temperature controlled irons, as one batch of solder will be different to the next. I also belong to the hot iron school. I just adjust the power knob until the solder melts quickly, normally 15-20w (+/- probably 25%, it's relative at this price range) then it's ready. I use masking tape and clothes pegs to keep the pieces together, spot solder at either end, check positioning, then run a seam. Easier to adjust if necessary. If all is clean the solder follows the flux into the joint, and no clean-up is required.
Nigel
©Nigel C. Phillips
Posted
Full Member
Doug
'You may share the labours of the great, but you will not share the spoil…' Aesop's Fables
"Beer is proof that God loves us and wants us to be happy" - Benjamin Franklin
In the land of the slap-dash and implausible, mediocrity is king
"Beer is proof that God loves us and wants us to be happy" - Benjamin Franklin
In the land of the slap-dash and implausible, mediocrity is king
Posted

Full Member
Wonder if a Parrot feather would also work as we have a Green Amazon that deposits the odd feather or two, would save me chasing around the garden trying to "Catch that Pigeon"
Cheers
Andy
Andy
Posted
Full Member

Doug
Last edit: by Chubber
'You may share the labours of the great, but you will not share the spoil…' Aesop's Fables
"Beer is proof that God loves us and wants us to be happy" - Benjamin Franklin
In the land of the slap-dash and implausible, mediocrity is king
"Beer is proof that God loves us and wants us to be happy" - Benjamin Franklin
In the land of the slap-dash and implausible, mediocrity is king
Posted
Full Member
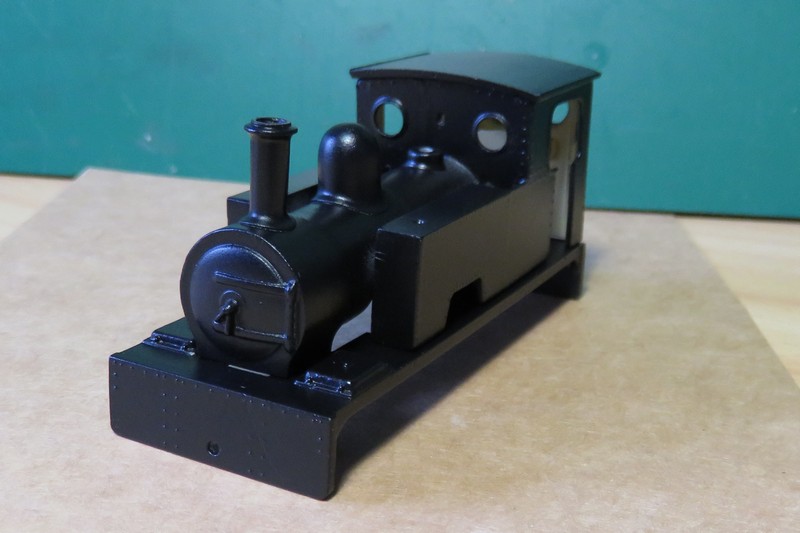
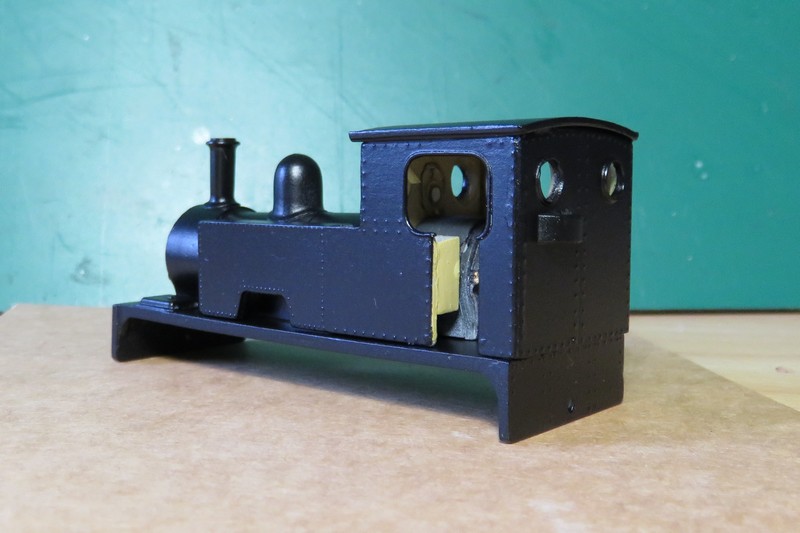
Body resting on footplate only.
Doug
'You may share the labours of the great, but you will not share the spoil…' Aesop's Fables
"Beer is proof that God loves us and wants us to be happy" - Benjamin Franklin
In the land of the slap-dash and implausible, mediocrity is king
"Beer is proof that God loves us and wants us to be happy" - Benjamin Franklin
In the land of the slap-dash and implausible, mediocrity is king
Posted

Inactive Member
Max
Port Elderley
Port Elderley
Posted

Full Member
it was already on fire when I got here, honest!
Posted
Full Member
Marty
Posted

Full Member
- Darius
Posted
Full Member
Now I have to add all sorts of little bits and pieces and attempt glazing the winders with glue & glaze, don't feel very confident about that.
Doug
'You may share the labours of the great, but you will not share the spoil…' Aesop's Fables
"Beer is proof that God loves us and wants us to be happy" - Benjamin Franklin
In the land of the slap-dash and implausible, mediocrity is king
"Beer is proof that God loves us and wants us to be happy" - Benjamin Franklin
In the land of the slap-dash and implausible, mediocrity is king
Posted

Site staff
Regards
Alan
Born beside the mighty GWR.
Alan
Born beside the mighty GWR.
1 guest and 0 members have just viewed this.