Birkenhead Woodside
Posted

Full Member
A layout in progress, slow progress...
Phew. My brain hurts just looking at that lot. I'll have to take some photo's of my panel when it's done. Waiting for a couple of servo's and the switches.
I used to be indecisive but now I'm not sure.

Posted
Full Member
I've noticed that all the photos I've taken of the layout, and the panels, always look better than the real thing - don't understand why!
Check out Mike's panels in Quernaby New - now they're professional panels!
Keith
Do I have a plan? Na, if I did I'd spend most of my time trying to remember where I put it.
Posted

Legacy Member
Been there, done that got the T shirt etc Keith… Next time you make one, try and make it better than the last one… you'd be surprised just how many panels I've made in the last 40 odd years, each one getting progressively better.My panels are only offcuts of hardboard, rough track layouts drawn with a felt tip pen, the only high tech is the labels run off on the computer - I'm sure you'll manage better than that.
As for;-
"Check out Mike's panels in Quernaby New - now they're professional panels!"
Thanks for the compliments Keith (refer to above statement)… also off-cuts of 6mm mdf, and they ain't that good - just better/neater/tidier than my last ones, but thanks anyway…..
Mike
Praise is an excellent fillip for waning ambition.
Praise is an excellent fillip for waning ambition.
Posted
Full Member
I can't see me making another panel now - this layout will be it…. possibly if we move house that could change… but once the layout is finished, well all the bare baseboards, undercoated greenery have been covered with something and the ballasting and signalling is complete I'll be in my element trying to maintain the timetable….. that will be a good few years away yet.
My time in the loft is limited by forces out of my control….. mutter mutter!
Keith
Do I have a plan? Na, if I did I'd spend most of my time trying to remember where I put it.
Posted
Full Member
Enough of this rambling, pictures is what we like :

The P2 ready to depart Woodside. … and passing under the road bridge :
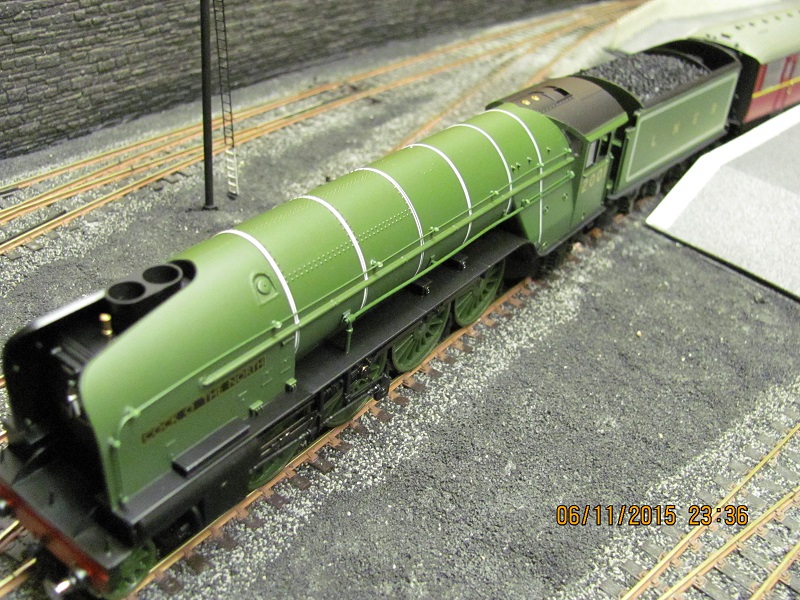
This is the railroad version, still lots of detail, even the separate handrail. Paul plans to upgrade it as has been detailed in the magazines.
Now on the mainline
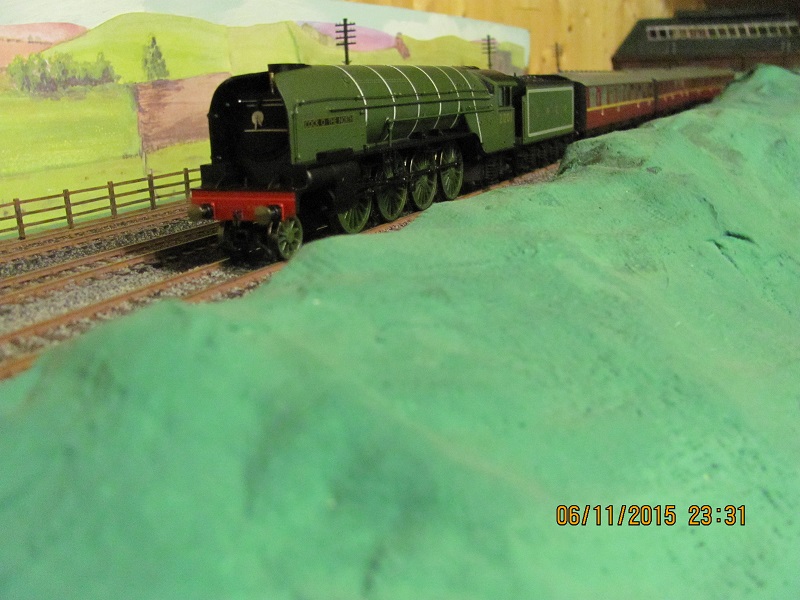
and finally trundling through Hooton

That was nice, clocks have now returned to 1961, the P2 and Paul (and Sue) will soon be on their way back to deepest Kent, and I've got the last couple of hours of the timetable to get through.
Incidentally that ex LNER stock I keep for the occasional special from the Eastern region, for football or railfans, when I can run an A4 with them into Birkenhead. Always wanted an A4 way back when, and now having spotted a bargain at Alton Model Centre a few years ago, I have one!
Keith
Do I have a plan? Na, if I did I'd spend most of my time trying to remember where I put it.
Posted

Inactive Member
Max
Port Elderley
Port Elderley
Posted

Full Member
Now that is one fabulous looking locomotive. Well done and thank you for sharing with us.
Bill :)
At 6'4'', Bill is a tall chap, then again, when horizontal he is rather long and people often used to trip over him! . . . and so a nickname was born :)
Posted

Full Member
This is one layout that I have missed and so it was a joy to read from start to finish. It is great to see a mainline layout with some serious locos running. I also really liked the innovative solution you found for the double tunnel. The result was excellent. A very nice layout.
Bob
Posted
Full Member
Glad you like it - it will look a lot better when I've at least got all the bare baseboards covered, and all the track ballasted…. but that may take a while… the list of things to do just gets longer…and longer…. and I'm determined to get through this timetable as soon as I can now.
Cheers
Keith
Do I have a plan? Na, if I did I'd spend most of my time trying to remember where I put it.
Posted
Full Member
ATB,
Bill :)
At 6'4'', Bill is a tall chap, then again, when horizontal he is rather long and people often used to trip over him! . . . and so a nickname was born :)
Posted
Full Member
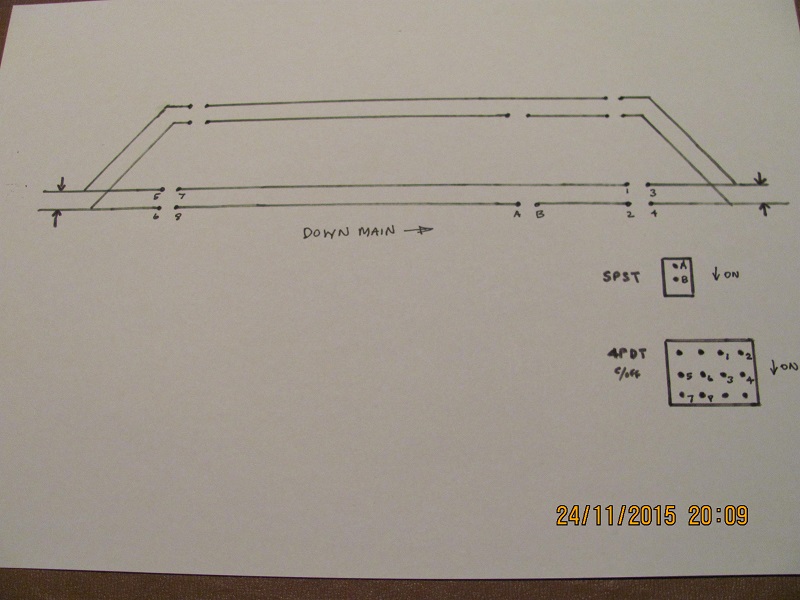
During the rush hour periods life does get quite hectic, often there are seven trains waiting to either arrive into Woodside, call (up/down) into Hooton or wait for their slot on the main line down to the fiddle yard. So, I have to be able to store them in some sort of order in the loops I have - two lines on the down side and three shorter lines on the up. The loops under Woodside and Hooton Station form the only roundy roundy section on the layout, although it is only ever used in that mode for running in purposes. After a bit of thought with my sole remaining working grey cell, I came up with an idea….
On each loop I've used a SPST switch (on/off) and a 4PDT c/off switch, wired as indicated by the diagram - I've also added pics of the ends of the loops and the switches separately as the detail is a bit small on the full view. Because of what goes on at Hooton and elsewhere, I need power inputs at both ends of the loops - that does allow me to include a third train in the queue (happens a couple of times each day) - but I'll leave that for now. Incidentally, the 4PDT switches are available from Peco - you can use one to sort out the frog polarities on an electrofrog crossover, I've done that - which is when I had the idea for the loops. They were a bit pricey from Peco at the time I was doing this, suggest you look at All Components or Andy Lowe Electronics.
The diagram?, here it is, hand drawn, no fancy software available here, good job I noticed I'd wrongly labelled the switch terminals just before I started this, so this is the second attempt, with a new lot of photos and new hand drawn diagram (yes I did try using correcting liquid, don't ask)… you just can't get the staff…
..actually it's clearer then I thought, but here's the separate pics anyway, first LHS
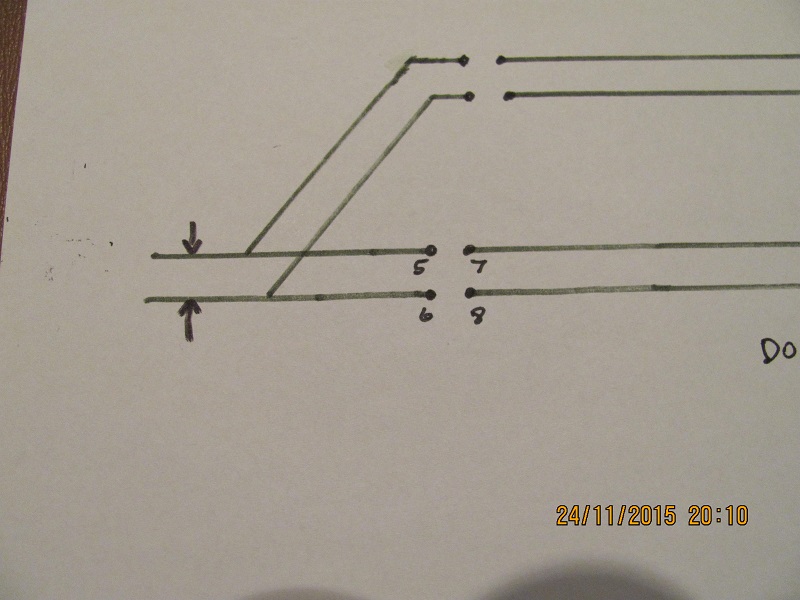
and now RHS, showing the switch terminals
The simple on/off switch on the single break is coloured Black on the panel, the 4PDT switch is labelled Grey. In normal operation, with the loop empty, both switches are "on", when the first train is due in the loop, both switches are switched "off" so the single break and the double break at the head of the loop are open. The first train will then stop automatically between the breaks. A second train can then be brought in behind the first - and that can then be isolated by switching the grey switch to the centre off position, so both double breaks are open. When the first train is due to move on, the grey switch is just switched "on", which closes the double break at the head of the loop, and the first train leaves. Once that arrives in Hooton/Woodside, the grey switch is switched "off", opening the front double break and closing the rear one, so then the second train can move up to the front of the loop… and so on.
What this does give is an instant view of what's going on in the loops by the position of the switches :
Black ON Grey ON - loop empty
Black OFF Grey OFF - one train at head of the loop
Black OFF Grey CENTRE - two trains in loop
Black OFF Grey ON - one train at rear of loop, ready to move to the front.
Looking back at the photo of Fiddle Yard Junction panel :
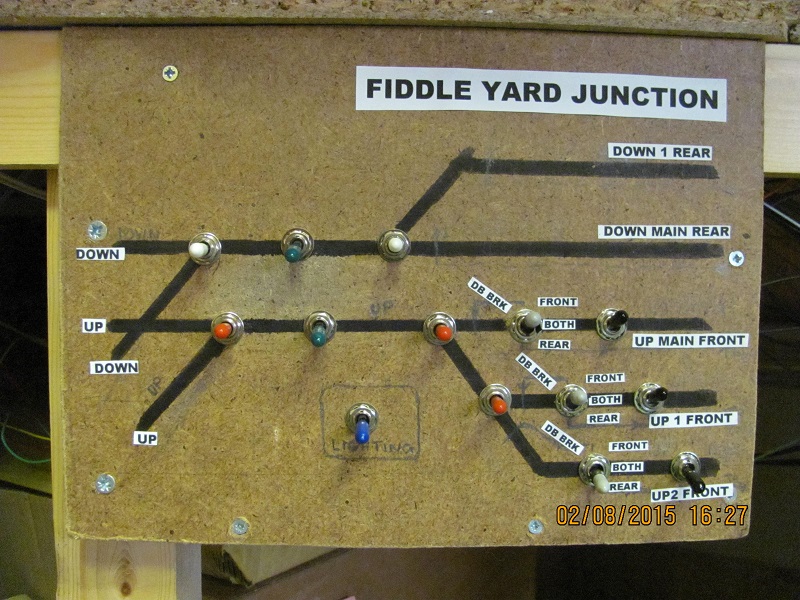
… there's a train at the head of UP MAIN, also one at the head of UP 1, and UP 2 is empty.
I must admit trying to write this down makes the whole thing far more complex than it is, honest - really, it is dead simple. My main worry is that everybody is already saying - "but we knew all that". But hopefully this may be new to somebody… it was to me until the grey cell was fired up.
So this may prove useful to someone out there.
I've also been busy photographing the freight which now abounds on the layout as the day draws to a close… but that'll wait 'til next time, you've had enough of me for now…
Nos da
Keith
Do I have a plan? Na, if I did I'd spend most of my time trying to remember where I put it.
Posted

Site staff
Before I embrased the dark art that is DCC, all my isolated sections were single line breaks. I assumed standard way to do things, to save on wiring and switches.
Never, ever, occurred to me that by having a single line break section within a double line break section you can have an isolated section within an isolated section.
So yes, definetly new to me
 thumbs:thumbs
Ed
PS Can I borrow your brain cell

Posted
Legacy Member
:thumbs
Mike
Praise is an excellent fillip for waning ambition.
Praise is an excellent fillip for waning ambition.
Posted
Full Member
My grey cell is currently in a loop - trying to figure out if your brilliant summary is actually correct….. there is however a problem with borrowing my grey cell, assuming it ever gets out of the loop….I'm afraid that it isn't actually compatible with DCC…. sorry!
Keith
Do I have a plan? Na, if I did I'd spend most of my time trying to remember where I put it.
Posted
Full Member
The position of the switches indicates if a train is in a section of the loop, so that's not a problem…. what I'd really like is a system that tells me where the train is headed and time due. If I haven't operated the layout for a few days, sometimes weeks depending on permission from SWMBLT, the clock shows the time on the layout, the switches show where trains are in the loops….. but I still have to spend a while figuring out which train is which. I did try post-it notes… but they often fall off…. I'm thinking of a system like what used to be the standard in Air Traffic Control, with a rack containing strips of paper/card. Any other suggestions welcome…. just so long as it doesn't involve DCC!!!
…. of course if I operated the layout every day…. I wouldn't have a problem at all, would I ??? …. may be a bit difficult to get that agreed with you-know-who mind….
Keith
Do I have a plan? Na, if I did I'd spend most of my time trying to remember where I put it.
Posted

Full Member

How about printing out the timetable with a column for noting current siding and heading. Tick 'em off as you go.
cheersMarty
Posted
Legacy Member
Assuming your timetable has a starting point Keith where all trains are in a pre-set location, your next card tells you which train is going where, at what time… when you've done that one, put the card at the back of the box or pile and read the next one… in this way, should you have to have a break for what ever reason, you could get straight back into your timetable… simples…
Each card could show the location of all trains (station, loop etc) in one colour - say black and, the next train due to be moved in another colour - say red…..
Mike
Praise is an excellent fillip for waning ambition.
Praise is an excellent fillip for waning ambition.
Posted
Full Member
Busy day yesterday, weekly pilgrimage to Morrisons, Old Folk's Club and windfarm correspondence.
Firstly SWMBLT - "She who must be listened to" - I did try the "obey" thing but never really got the hang of it, so over the years I have developed into a very good listener - I listen, then carry on with what I was doing…… when I'm allowed to!!!!!
Many thanks for the suggestions, I've pondered similar ideas as I've plodded on through the timetable - this time, in full anorak mode, I have logged EVERY single engine and stock movement, the idea being to give me a "script" which I can follow in future…. I'm on my third pad, which is more of a novel than a script. I have also produced detailed rosters for each engine used on the layout thus far, that's about 46.
Things would have been much easier if I'd modelled just Woodside, even Woodside and the first station down the line… except that was Rock Ferry, which in those days was one terminus for the 3rd rail electrics from Liverpool Central Low level, so I couldn't sensibly do that. I chose Hooton, 14/17 mins out of Woodside 'cos I spent many a happy afternoon on a bridge near the station armed with my Ilford Sportsman recording what was at that time still a mainly steam line.
Being that far out from Woodside I have to hold down trains to Birkenhead after calling at Hooton and up trains from Birkenhead waiting to call at Hooton for those 14/17 minutes…. which is fine until the rush hour starts. There is also the anorak in me which means that coaches which leave for Chester/Helsby can't return until their due time…. I rapidly realised that I couldn't manage that with the London trains when I saw seven trains each day, each way, in the timetable…. I do maintain the rule for the sleeping cars mind, which is something.
Just while I'm rambling on, I've had a thought… if those engine rosters were in proper order - they're not now, just scraps of paper, all I would need to do is note which engines were under Woodside/in the Fiddle yard when I switch off - and then refer to the rosters when I'm ready to start up again to identify which train is which…. that may work….. I'll give your ideas further thought though as I fancy they may provide a neater solution in the long run.
I've still to finish this timetable, 11.20pm (the 24 hour clock hadn't arrived yet) just two down trains to come, incding the last train of the day from Paddington, and one up train to get through Hooton…. 6C is filling up fast, last time I ended up with 29 engines on shed… with every last inch of track covered! Looks like I'll need an empty stock working as well to balance up the coaching stock for the morning… there's a few more down trains than up it would seem, can get that ex LMS diesel on it's way back to Crewe on that… that is a good model. I use the proximity of Crewe works to provide the odd test run for something outshopped from the works, or overhauled at 5A - they come up with the two TCs from Euston which are taken off a L'pool train at Crewe, then go back light engine… or empty stock.
I'm rambling again….
Onwards and sideways….
…and there's those photos…
Cofion
Keith
Do I have a plan? Na, if I did I'd spend most of my time trying to remember where I put it.
Posted
Full Member
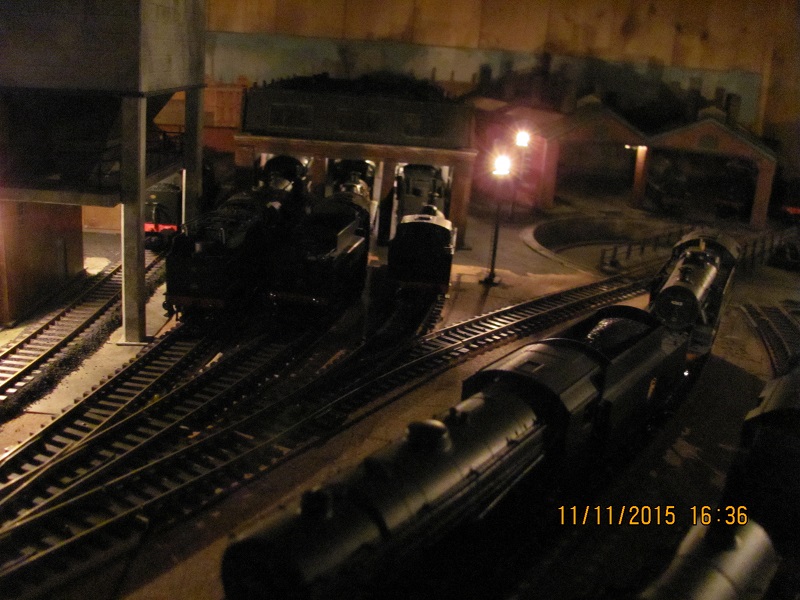
Some progress in the loft - a David Bailey session trying some night shots of late night freight and 6C filling up. Here's the shed :
… more in the gallery. I've also managed to get the tunnel mouths suitably weathered now and addded the nameboards, this is Hooton Soouth
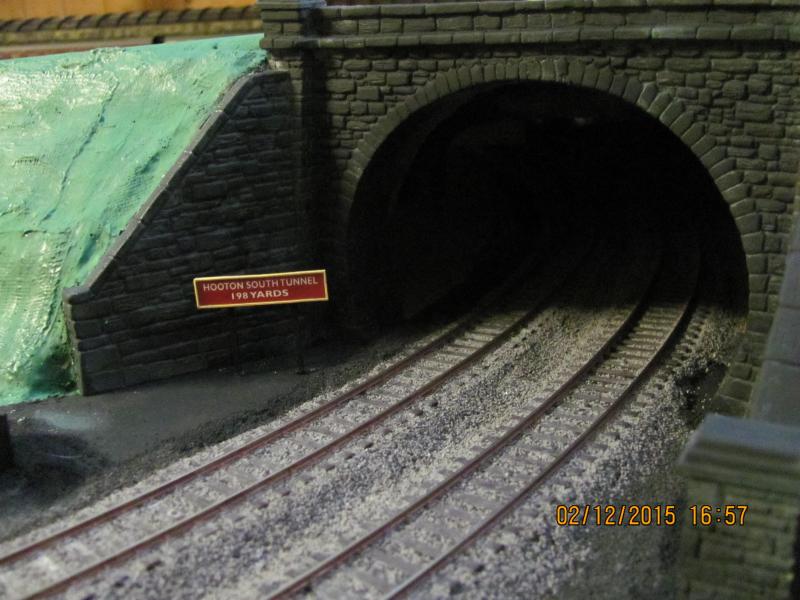
Of course apart from the tunnel from the long closed (1945) Birkenhead Town station and Woodside itself there were no tunnels on the line to Chester, so all names have been chosen relating to stations on the line. Boards are plasticard, with balsa legs, bespoke signs from Sankey Scenics. I always have a bit of balsa in things - throwback to my 50s/60s modelling days when balsa was more popular. (Note to me : you haven't weathered the sign yet)
I've managed to complete the timetable (well a couple of freights to put to bed), and in David Bailey mode again tried capturing Woodside at night. These are the last two trains of the day in Woodside :
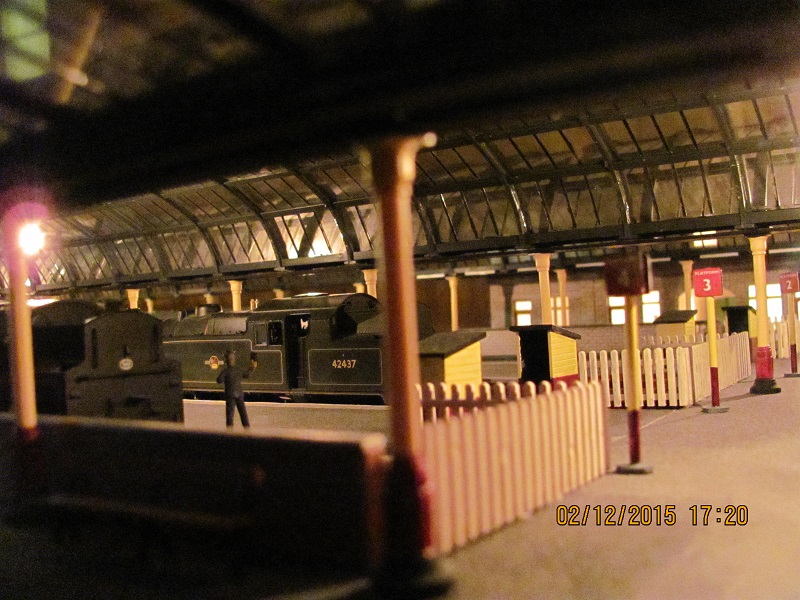
that actually doesn't look all that bad, could have done with getting the platform 4 sign turned just a bit, and got some of the coaches in shot, never mind.
More pics in the gallery, including a miserable attempt at taking the station through the main entrance, won't be trying that again.
So now, once these two odd freights are put to bed, time to swap some engines before starting all over again - at least this time I've got a script! - perhaps though I'll get on with finishing the w-i-t to the points in Woodside first - that's a fiddly job, but once done, and having got it working - which can take me some time - often a long time, very rewarding - well, it is to me.
I'm also experimenting with trees at the moment, using stuff from the garden - see Dave's Langley Junction Junction thread
http://yourmodelrailway.net/view_topic.php?id=12834&forum_id=21
…. I remembered how to do that!!!!! Max will be pleased with me……
I'm also trying some other "natural" bits from the garden. I always think stuff made from something natural should look better ….and I'd like try this static grass thingy too - that's totally new to me - so any tips from all you experts out there will be greatly appreciated, and will probably save me from making a total mess of it.
So, from a slightly dripping mid Wales:
Nadolig Llawen a Blwyddyn Newydd Dda
… I'm off to empty the tubs….
Keith
Do I have a plan? Na, if I did I'd spend most of my time trying to remember where I put it.
Posted
Full Member
I haven't used static grass yet apart from via a puffer bottle, which worked OK, but I reckon the proper applicator will be better.
The puffer bottle was just a normal plastic sauce dispenser bottle (without sauce in it!) filled with the static grass of choice. Shake enthusiastically to generate a static charge in the grass. Cover a small section of the area to be grassed with a thin layer of neat PVA and "puff" or "squirt" the static grass from the puffer bottle, held vertically, nozzle down, onto the PVA. Repeat. allow to dry and tease up the static grass with an old toothbrush should it be required.
someone who HAS used a charged applicator, or who knows where the discussions are in the various layout threads, will be along shortly I'm sure.
If not, try searching for Static Grass… I got dozens of hits…. and then of course there is both google and youtube.
cheersMarty
1 guest and 0 members have just viewed this.