Birkenhead Woodside
Posted

Full Member
A layout in progress, slow progress...
A most enjoyable post Keith and glad to hear that your grey matter is hard at work and getting the better of them time bandits!With typical 40 deg temperatures here, wielding a soldering iron to hook up the last droppers to the bus seems a bridge to far at the moment, but as soon as it cools sufficiently, I'll do just that, then ballast so point rodding exercises can commence, as can those oh so encouraging words!
I hope your DJ 0-4-2T performs well. I'm pleased with mine and will be detailing a trailer with the excellent Dart Castings kit to accompany it.
I particularly like your 22h18 photo and following 'watch this space' comment, as you have built a lot of railway into the space to watch and it looks grand.
Continue enjoying the timetabled running sessions and letting us in to your railway room.
Best,
Bill
At 6'4'', Bill is a tall chap, then again, when horizontal he is rather long and people often used to trip over him! . . . and so a nickname was born :)

Posted
Full Member
Many thanks again for the positive comments – I must be doing something right!
Yes, this weather… we can’t compete with 40 degrees, but five consecutive days in the thirties, topping out at 35 last Wednesday isn’t bad for mid Wales. This house has two foot thick stone walls, for the first couple of days it was wonderfully cool in the house, but slowly but surely those walls absorb all that heat, and by the fourth day it was like living in a fully charged storage heater. Three fans in the loft (fully insulated) kept the rails straight, just, but too hot to do anything useful, and another three on the landing were fighting a losing battle with the bedrooms. Not for me this hot weather, 21 degrees is just about right – which is what it is today, and some welcome rain for the garden too.
With the weather now back to normal, I’ll probably start Metcalfing again, but neighbour Paul is up for the next fortnight so the 0-4-2T is bound to get a run, and the timetable should advance too. I reckon Paul knows as much about this layout as I do… ’cos he remembers stuff…. a skill I sadly lack. By the time I find my Wills rodding kits, in whichever box they’re in, I’m hoping I'll be able to read how to do a proper job on your thread, with lots of photos please.
No pressure…. plenty of time!
Keith
Do I have a plan? Na, if I did I'd spend most of my time trying to remember where I put it.
Posted
Full Member
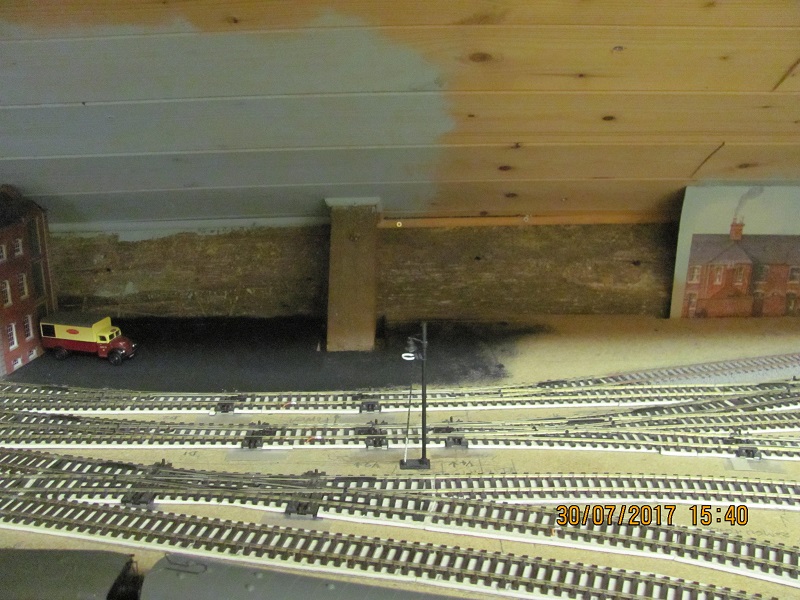
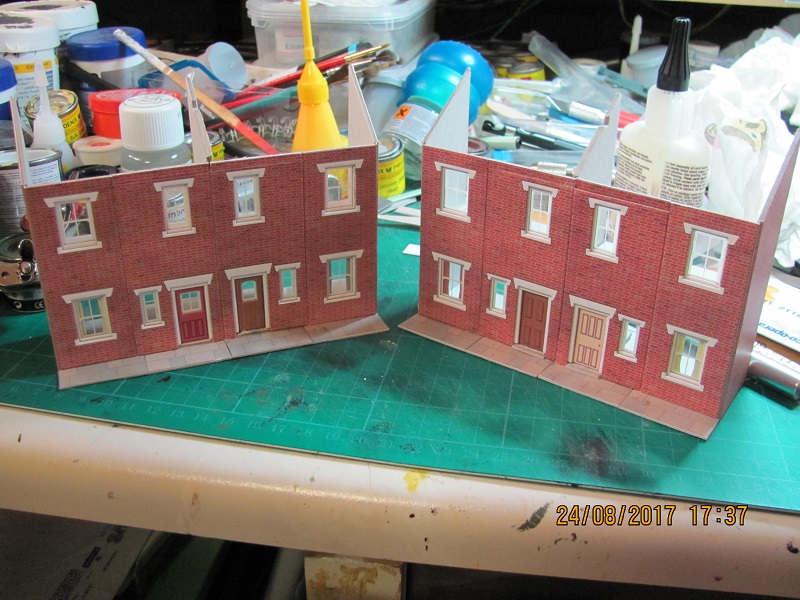
Yes, I know, all that ballasting still to do – it’s on one of my lists, honest. My original idea was to just have some terraced house backs to bridge the gap. As reported previously two kits arrived in the last delivery from Hattons (along with my 0-4-2T, which remains steadfastly in it’s box). Checking on the kit dimensions, I realised I needed another kit to bridge the gap, so that arrived last week, along with another delivery (which included a spare Hornby turntable for the fiddle yard – more of that later). Unfortunately I had ordered house fronts… at least they are houses in brick – so that has meant a bit of a rethink. Now, the plan (I don’t do plans, but you know what I mean) is to have the newly acquired house fronts starting behind the factory which will then be overlapped by the backs, which will start in front of the back-scene. There’s just a chance it may give the impression of a road of terraced houses – when viewed from a suitable distance, whatever that might be, but probably as far away as possible. I’m not very good at this perspective thing, so don’t expect much. Progress will be slow.
In the meantime just a couple of pics (as ever, more in the Gallery) – the Stanier Crab, I am a bit keen on this, has started work with some vans bound for the yards at Crewe, seen here in the goods yard.

Behind is the local pickup freight with the 4F – and behind that the fish empties are now waiting for the O4 to take them back to the East Coast, and behind that the oil shuttle awaits the G2 for the first run of the day to Ellesmere Port. Finally the Sultzer type 2 is parked up awaiting it's next run. I’ve been busy in the marshalling yard, while the passenger side of things was still quiet.
Woodside is now in full swing – the Ivatt is just departing from platform 1 with the 7.20 for Helsby.
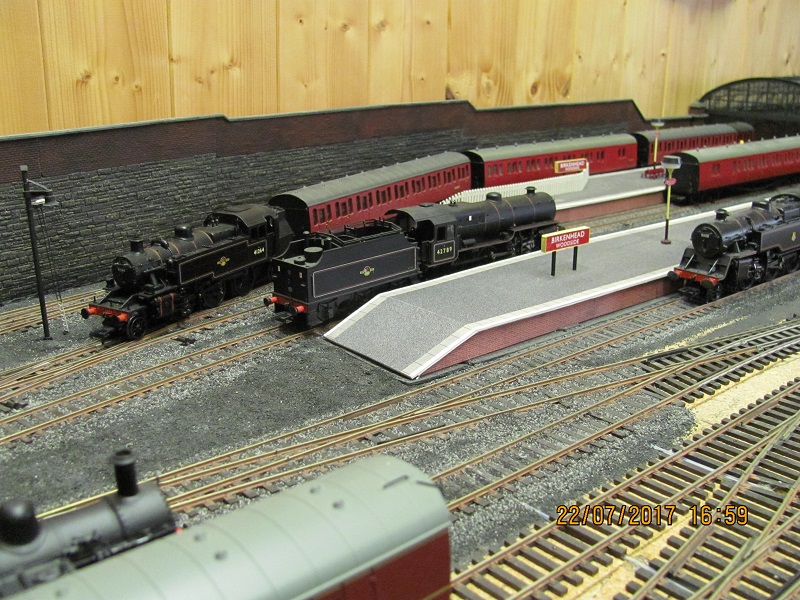
I really should get on with some ballasting. As soon as the road is clear the Crab, which brought in the slightly odd through coaches from Ditton Junction into platform 2, waits in 3 (having used the very handy crossover between 2 and 3) for a trip to the shed for turning, coal/water (in my version of 6C sometimes they have to do things at breakneck speed!) before returning to Platform 4 to take out the 7.40 train to Paddington (only as far as Chester of course). In Platform 4 at the minute the Standard 4 tank is waiting for the Helsby train to clear so it can move up to platform 2 to take the 7.25 relief train down to Hooton, using two of the coaches from the Ditton arrival. Really that should be a longer train, but storage limitations in the loops under Woodside, as the rush hour begins, means it has to be two. Once that is away, the pilot (a Jinty for a change) will take the parcels van (now emptied and loaded with stuff for the Cambrian line), which came in with the DPU local parcels in platform 5, and put it on the front of the coaches for the 7.50 Barmouth train which will depart from platform 3. Yes, Woodside is in full swing now ….and it gets busier! All the freight/parcels traffic is down to my vivid imagination, I’ve no actual detailed info – other than photos – but I do try to make it plausible.
All this organising is really why I’m a bit of a fanatic about using the BR timetable, rather than just making it up – if I did it, I’d make sure it was easy! I know if I had all this DCC lark with chips and decoders and fancy software I could set it up so all I had to do was just switch on and watch – but for me that takes all the fun out of this hobby – I want to ‘drive’ the trains, I want to set the route (admittedly using more switches than is probably good for me) and I want to set the signals. Despite a background in computing, I just don’t see the fun in all this computer stuff – I totally accept that I may be in a rapidly reducing minority now …..but I’m too old to change ….each to his own!
That turntable… I use one in the fiddle yard – very useful when you can’t really see when the tracks are aligned. A couple of weeks ago it started to make some odd noises (possibly down to lack of use), so I thought… if that goes I’m in deep trouble – I haven’t seen anything else, at the price, which I could use as an easy replacement. So I thought I’d have a spare in place – if I have a spare the old one will just keep working, odd noises and all, if I don’t have a spare it will fail, just after the last one has been sold. Turns out only Hattons still stock it (albeit at almost double the 2009 price), all other dealers I checked had no stock, and Gaugemaster showed “no longer producedâ€â€¦..so if you use the Hornby turntable as I do ….you have been warned.
One other thing, just checking a recent acquisition to the railway library, although passenger services to West Kirby from Hooton ceased in 1956, freight continued until the line closed in 1962… so perhaps that pick-up freight should have a West Kirby portion, detached at Hooton, and then taken forward by …..something ……possibly for the last two years the 0-4-2Ts were at 6C, (to ’58), that would have been a suitable working ….life at Hooton just got a bit more interesting …..I just have to get this ’61 run finished first ….. which should be around Christmas time …..no year specified….
More on the Metcalfing soon – ish, well hopefully before Christmas….
Keith
Do I have a plan? Na, if I did I'd spend most of my time trying to remember where I put it.
Posted

Full Member
Staying on the thread Kevin.
Posted
Full Member
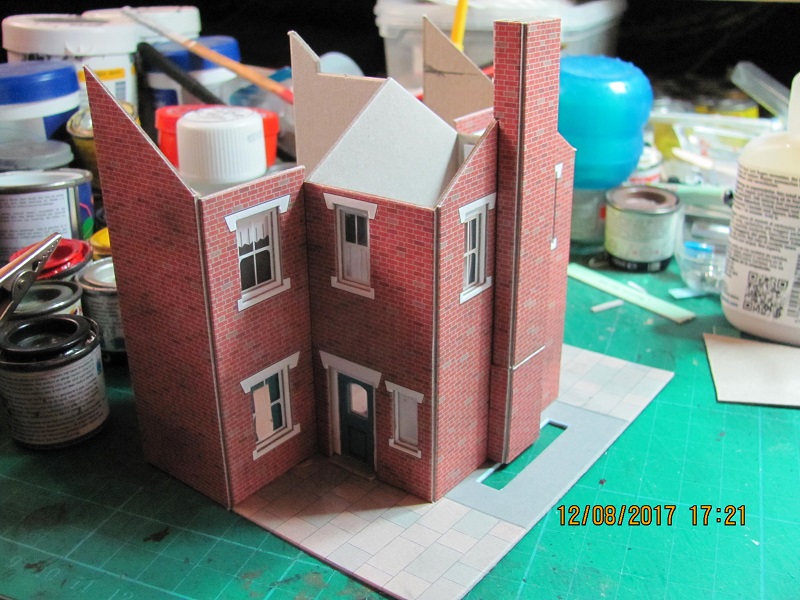
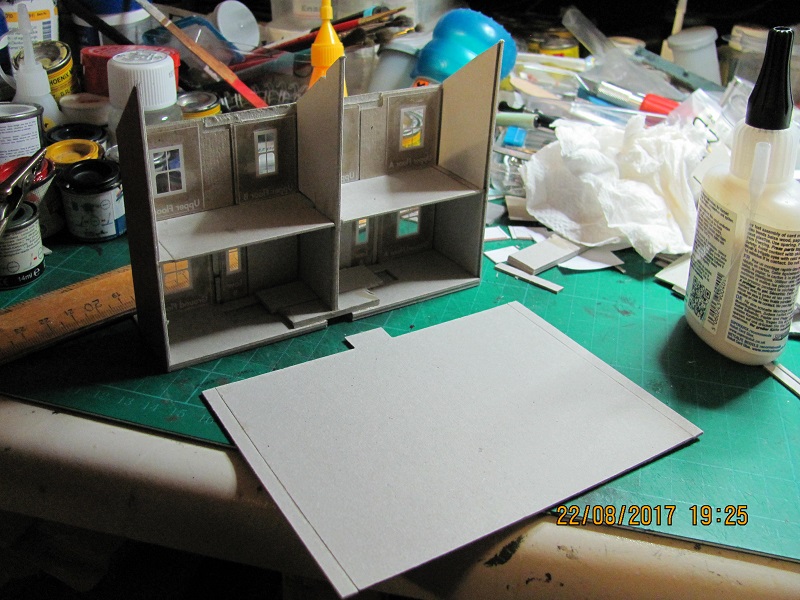
However, that said…. I have actually started the Metcalfing, less than a month after the last kit arrived – never really saw the underside of the layout. Thus far all I have done is begin the first of the house backs…. I find it much easier to work with something ‘solid’ rather than a list of dimensions – much easier to see just what will fit… and what won’t…. and I get an idea as to what it could look like.

… and yes, I did tidy my workspace before I started.
Hadn’t realised a couple of things: first, this kit includes curtains for the windows, first time for me with a “domestic†kit, (not sure they add much to L/R buildings, but as you can see I'm using them), and second, these are quite posh terraced houses, with an extension and shed at the rear. I was thinking back to our old house in the ’Pool all those years ago – plain front and back. Anyway, given that I don’t have a lot of space to play with I think the lean-to shed, at least, will have to go, it will just be a case of trying various options. I did think about doing away with the gable altogether, but then the back doors would be too close, if I included the small window - without it it would look a bit odd. Similarly when I get on to the fronts, they will need to be quite “flat†too (no bay windows). One thing I have noticed is that the back kit is a good match for the terraced houses in the backscene, so that may help with the overall look, whatever that will be, once I’ve finished.
So it is time for me to switch to creative mode …. see what I can fit in the space available.
Incidentally in the pic above the Fowler tank, with stock, is biding time in the fiddle yard having worked the 6.25 Woodside to Helsby (7.07). Normally Chester and Helsby trains wait in the main part of the fiddle yard, this side is mainly freight/parcels/sleepers and spare coaches – I’m sure there was a good reason for it ending up on this side, but can’t remember what it was. The Fowler will reappear soon on the 7.32 Helsby to Woodside (8.13)…. Then run around the stock and travel up the line (or in my case into the carriage sidings, only way I can include services to/from Rock Ferry), to form the 8.31 Rock Ferry back to Helsby. OK it’s a bit tight, but doable, just. No idea why this service didn’t start from Woodside – obviously in the real world this may well have been a different engine/stock, but I reckon my version is perfectly plausible. Timetables definitely add to a layout and are part of the fun…. well they are in the world I inhabit…
More, as ever, soon-ish…..
Keith
Do I have a plan? Na, if I did I'd spend most of my time trying to remember where I put it.
Posted

Full Member
I am so liking your comments reagrding train and their routes etc. For me, too many layouts feature "mixed freights" and "diverted expresses" - both on my hate list - instead of "7.35am SO service to Hooton" or whatever. For my next layout, where I have running loop storage, I will have rotations of, for example, parcels stock so that I can add and subtract to services just as you do here. It makes the whole exercise feel like the railways are doing something rather than just running from A to B. At present I use cartridges and this introduces restrictions in the area.
Personally, I think you are faffing in the right direction!!
Shed dweller, Softie Southerner and Meglomaniac
Posted
Full Member
Staying on the thread Kevin.
Posted

Full Member
Your "organic" scenery construction has worked very well so far in my opinion. It produces believable scenes that are unique despite starting with a flat pack kit.
Looking forward to seeing what you come up with this time.
Cheers
Marty
Posted
Full Member
S’mae Barry
We’re definitely singing from the same song sheet – even down to the analogue bit!! Yes, all this timetabling brings the layout to life… you get the rush hours where everything is supposed to happen at once (but very rarely does), the engine shed is almost empty, and the stations are full – yet in a few hours there’ll be plenty on shed, and just the station pilot and perhaps an odd train in action. Storage at rush hour is always a problem, you never seem to have enough – I know at one point in the evening rush there are six trains stored under Birkenhead..… so at least one has to be stock limited, so that they all fit… the fact that they do fit at all is bordering on the miraculous, given I just put down as much track as I could fit in the space, both under Birkenhead and in the fiddle yard. I’m only running the full passenger service, with freight as and when – to run the freight as well, I reckon I’d need to take over most of the house…. and I can see significant problems with that. But at the end of the day, you know all the trains ran (some even on time) and you have kept faith with the original timetable. Like you said the layout/railway, and the fat controller, have actually achieved something. I guess I'll keep on faffing….
S’mae Kevin
Check out from post 80, page 4 – for how I used the Metcalfe Warehouse kit (x2) – it can be made up as a standalone building. Best place for accurate dimensions/info is the Metcalfe website:
https://www.metcalfemodels.com/product/po282-00-h0-warehouse/
S’mae Marty
Thanks for that Marty – if you think it looks OK, that’s good enough for me…. If my workbench looks like yours I’m obviously doing too much tidying up, fear not that won’t happen again!
Keith
Do I have a plan? Na, if I did I'd spend most of my time trying to remember where I put it.
Posted
Full Member

I’ve left the house half-finished for now, more concerned with how it will fit. I did build the second unit, from the second kit, as the other sheet in the first kit had been cut well off centre, and so was unusable. A first for me, so quick e-mail with attached photo to Metcalfe requesting a replacement… and a couple of days later it duly arrived first class post… well done Metcalfe – sign of a good Company.
So with two houses part built it was back to the question of how they would fit in the space – even without the shed they are still quite wide. The idea now was to get the support strut to line up with one of the gables… that way I could effectively get the “row†much further back from the track, so I needed to attack one of the houses. First thing was to measure the angle of the strut, not easy where it is…. then the old lateral thinking clicked in… I could easily measure the angle at floor level… and so I could make a template. I removed the centre support and cut back the floor, three iterations of this, but now the “row†of houses (apart from the gables) sits behind the leading edge of the strut – much better.

In fact this is one of the earlier attempts, it now sits even further back, and that ballasting (or lack of it) is really starting to annoy me.
Although I’d decided against a “flat†terrace, I was still a bit concerned about the space available and so I revisited the idea of turning the remaining houses into plain terraces and after a bit more thought, the plain terrace won out for the remaining houses, it is however turning out to be a bit more of a job than I first thought, and quite fiddly. The basic idea is to fill the gap left by the gable with the gable sides, this will increase the overall width of a single unit by roughly one of these centimetre thingies – which means extending the base. One point, the gable sides are a bit lower, so they too will need some extension. Also, this “new†terrace will need a roof as none of the existing roof pieces will do, without lots of gluing. Fortunately on the sheet with the spare brickpaper there is a section of slates, which mounted on card will cover the whole thing in one piece. Must give some thought to the position of the chimneys in this new set-up.
Stage 1, cut the base sections in half, remove the front portions of the base, keeping all the paved areas to fill the gap across the new ‘back’, and the “steps†for the back doors.
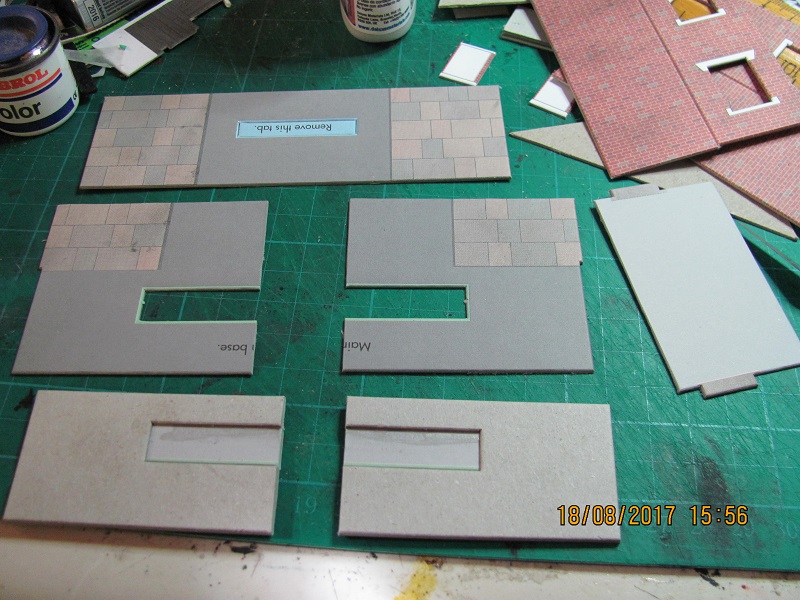
That done – start as usual with the corner, and from the spare paving sections extend the paving
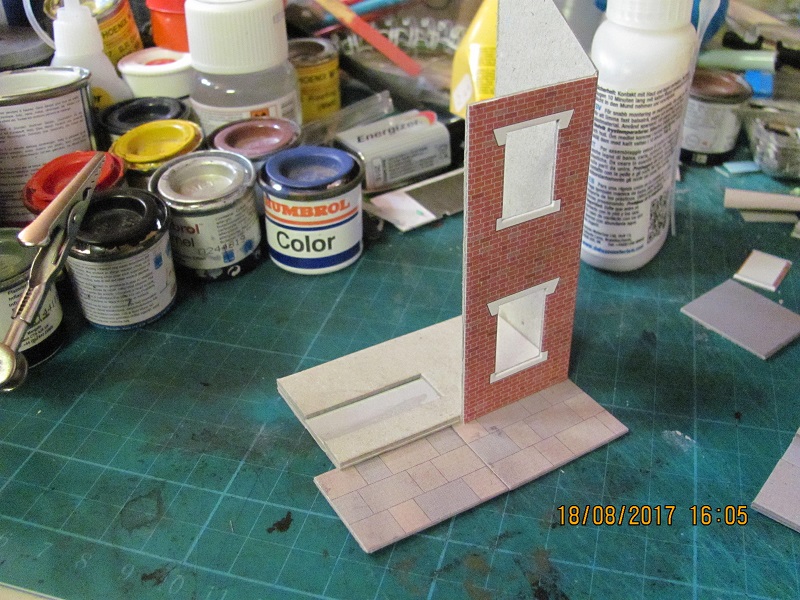
Cut the sides from the gable end, fit the glazing, and then glue to the corner section – you’ll need a rebate cut on the top base card to allow for the wider base of the side + windows (in the original model, there are no windows/doors on the forward facing ground floor)..
All these joins in the brickwork are a bit awkward, but given where it is going, and after the usual weathering treatment, it should be OK… may hide a couple of joins with drainpipes, eventually. Repeat all this with the other “halfâ€, and then glue together – I added some card on the back of the joins, and then braced the gap in the base with some offcuts of the removed centre support from the gabled house.

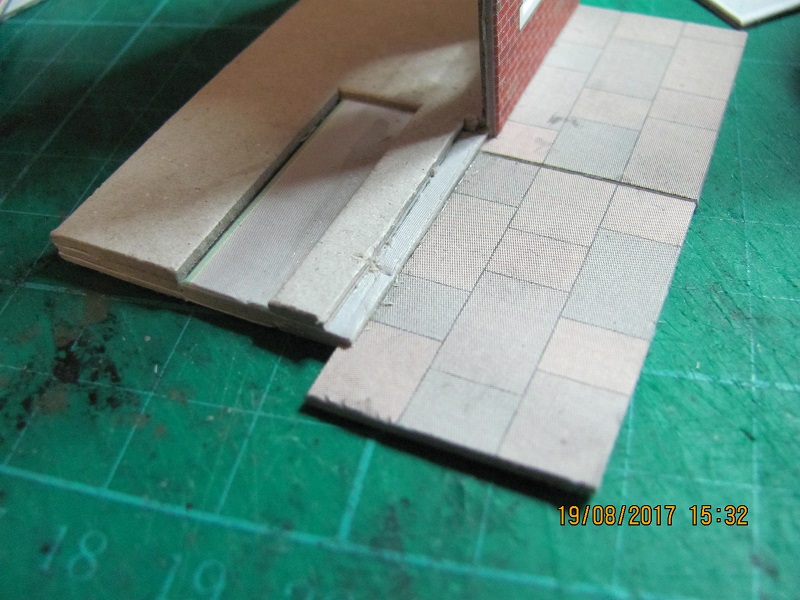
After all that, I trimmed back the paving to two rows (I want to leave as much space as possible between the back wall and the track), added the doorsteps, and it is starting to look OK -ish.
I've decided to put the doors together, as that's how our old house was arranged.
It’s useful for me to detail all this… now there’s half a chance I’ll be able to repeat the process with the second unit… normally once I’ve done something, that’s it, job done, and I instantly forget how the job was actually done….
More soon-ish
Keith
Do I have a plan? Na, if I did I'd spend most of my time trying to remember where I put it.
Posted
Full Member
A thin line of pva glue in and around the sheet joins on the walls and a drizzle of green flock/scatter to represent a climbing creeper/rose/ivy is another way to hide the joins too.
Keep it coming
Marty
Posted
Full Member
What a good idea – thank you for that…. I’ll use that when I get around to the Hooton bit on that board above the junction I fitted a while back. It was a lot greener out there, but for Birkenhead, near the shed, not really suitable – back in the late 50s/early 60s I used to make a regular pilgrimage to 6C from home every Sunday. Bus into town, electric train from Central Low Level to B’head Central, left out of the station into Argyle Street, first left into Mollington Street (I can remember it as if it was yesterday!)… shed entrance at the end of this cul-de-sac…. lined with what I call “plain†terrace houses, there was also a line of similar houses alongside the adjacent marshalling yard – which is what gave me the idea for this latest Metcalfing. I can remember everywhere was very dark… a mixture of browns and various levels of black/soot… no sign of anything green at all. I suspect by now the whole area has been redeveloped…. probably home to a supermarket /shopping centre. One day we’ll have a trip back just to see….
Another chunk "how I did the next bit" following very shortly…
Cofion
Keith
Do I have a plan? Na, if I did I'd spend most of my time trying to remember where I put it.
Posted
Full Member
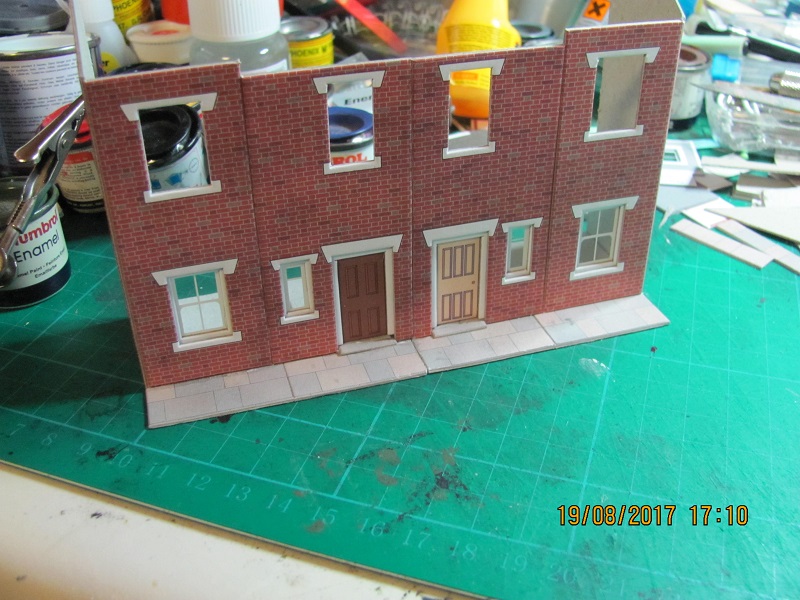
Because of the extra width the first floor needed to be extended, the centre support reduced in height to allow for the extra strengtheners, and the front edge cut back to allow for the doors. (…and yes, you can see who cut the wrong edge first).

Once it was all glued together, it was just as solid as the original gable end. The windows for the first floor were then added – the extension on the windows for the sides of the original house gave good support to the join in the brickwork, the other side window from the gable then needed to be cut back in order to fit.

The gap in the brickwork was filled with off-cuts from the now redundant (although I’ll find a use for it – possibly as the basis for a bungalow…) gable end. The back needed to be extended like the floors, with a couple of holes to be added ready for my standard lighting to be fitted later, and that was it done, apart from roof and chimney, which will also be done later.
All that remained, was to do it all again…. which, as ever with me, didn’t go as smoothly as it should have, but eventually…then there were two.
Before gluing everything together I decided to have another go at the gable which covers the strut, taking it back still further so that the strut was hard against the first floor. Also I boxed in the two side ground floor “rooms†ready for lighting. I did leave some small gaps so hopefully some light will leak out into the other ground floor rooms. Finally added the modified centre support, which I had to make up from spare card… as I’d already cut up the original to act as strengthers for the first “terraceâ€â€¦it’s that problem I have with planning……
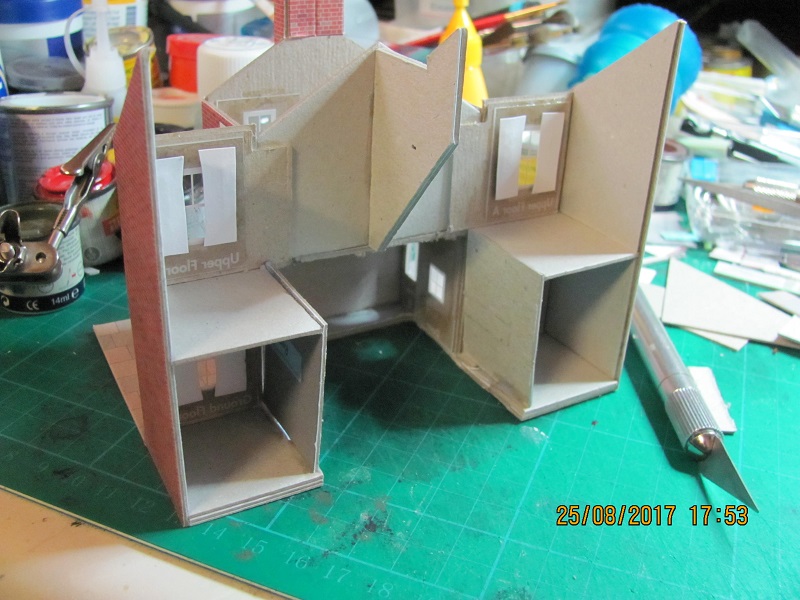
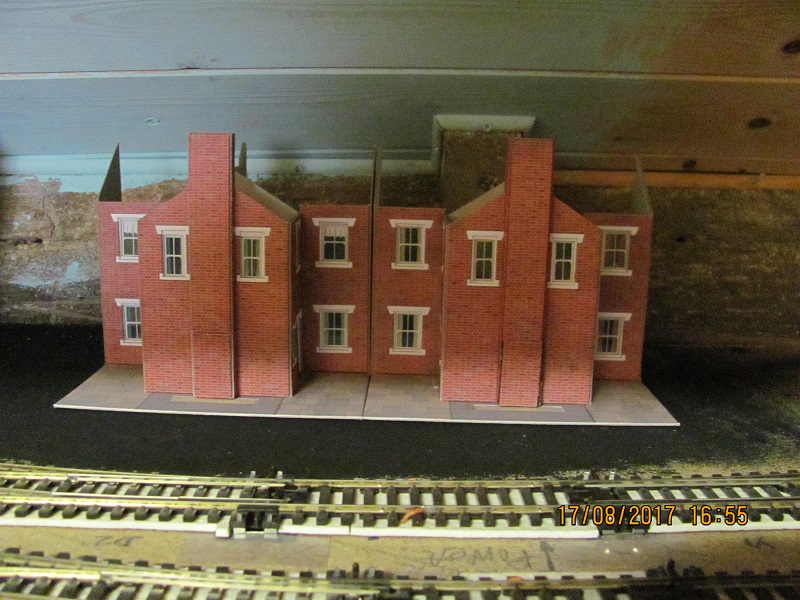
So two gables and two plain terraces done (not bothering with roof/chimney just yet), time to see how the finished thing will look, still separate units at this point.
That’ll do. Time to do some roofing, as I mentioned I used the slates sheet for the joins – easily enough. My idea was to keep some back, so that I’d have some to cover any joins … but when it came to it… I glued both sheets complete onto card. Remembering my idea later I thought, no problem – I’ll use the sheet in the terrace fronts kit I haven’t started yet…. except on inspection that kit doesn’t have any spare slates sheet. Anyway, cut the roof sections from the slates:
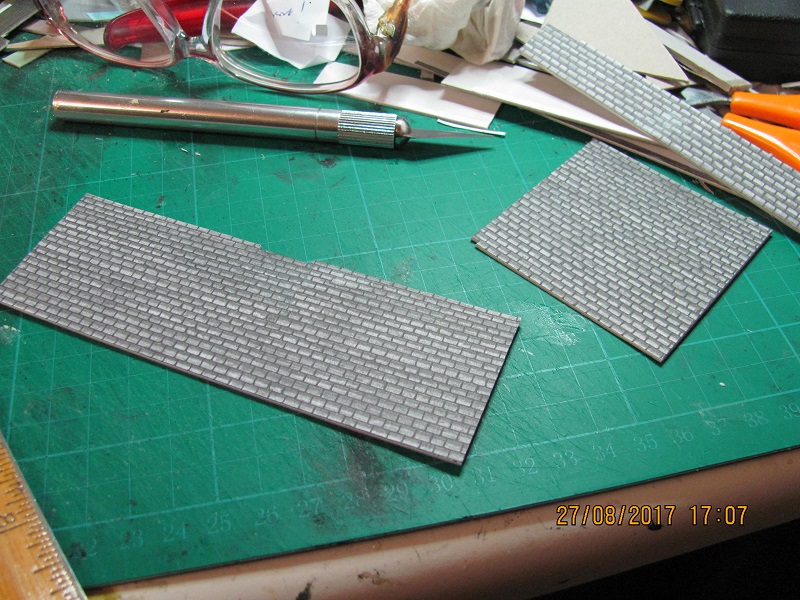
… and don’t do what I did, make sure you have the slates the right way around… the slates don’t slip UP the roof…. Noticed just in time!
So time to glue together and add the roof. Fortunately for me, the roof joins turned out to be OK, but probably by ensuring that the roof joins were good some of the house joins are not as good, so I’ll need to cover with the brick sheet. I also used some of the spare grey card to cover the joins at the back – makes the whole thing quite rigid. So now it is just one unit, and fits quite well, and not a million miles from my original idea.

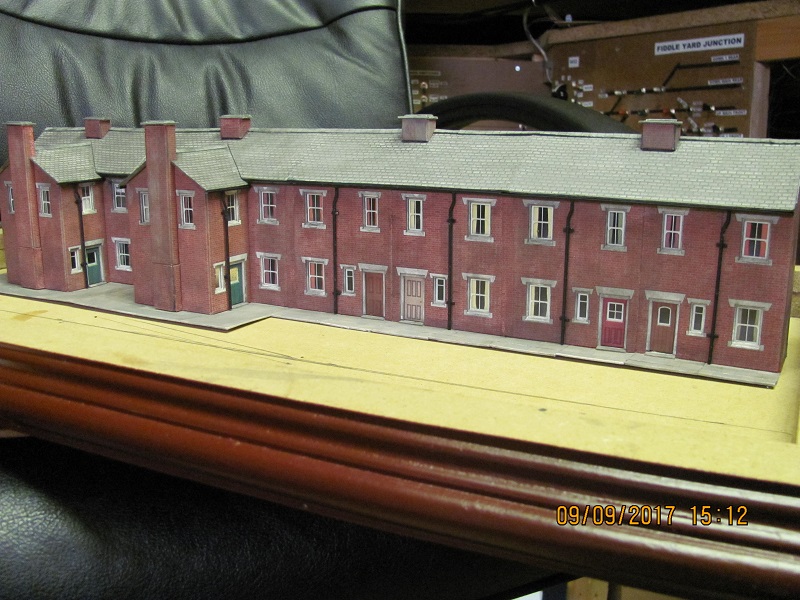
Although I was a bit unsure about the curtains you can see that I've fitted them to almost all windows, it should improve the effect when the houses are lit. Now it is time to complete all the chimneys, and the outside walls/back doors, get the “sky†finished, and get the basic black on the ground. The house fronts will probably be reduced to just the front face and a section of roof. Then everything has to get the weathering treatment to make it all look like the Birkenhead I remember. Hopefully that shouldn’t take too long (!!), so the final part, probably penultimate part, of this epic should be soon-ish. After all…. I’ve got trains to run!…. and I'm still desperately trying to ignore that track…
Keith
Do I have a plan? Na, if I did I'd spend most of my time trying to remember where I put it.
Posted

Inactive Member
Max
Port Elderley
Port Elderley
Posted

Full Member
Been following your interesting "how to" on the terraced houses.
I'll bet the folk at Metcalfe never thought their kits would / could be bashed about such as you've been doing. Nice bit of work; looking good. Always a problem about how to cover over the joints but you seem to have got away with it very nicely.
My lawn seems to have had an outburst of moss in it this year. so I've been out picking it out a bit and maybe some of that can be trimmed and used as joint coverage in a similar manner to which Marty has made comment.
I built a couple of the Metcalfe terraced houses when I first got back into the hobby - never thought about how they might be modified; I simply built them 'as is'. They look ok, but a bit of customisation could have improved them somewhat. Maybe when they get back onto the new layout (is there even a place for them, I ask) I'll have a go at reverse engineering them and adding a bit of something extra. Your 'how to' has certainly given me ideas - I just hope I don't wreck my already-built kits (I hate to trash anything that currently works).
Keep up the good work.
Dave
Posted
Full Member
I'm a bit confused though, after the mis-order of house fronts instead of house backs and the kit bashing you've been doing. Are these now house backs or fronts? I'm trying to envisage tiny back yards and fencing or a road and then lineside fencing.
carry on, doing famously despite the adversity.
Marty
Posted
Full Member
Max – as I said to Marty, if you think it’s turned out well, that’s good enough for me, thank you.
Dave – Yes, after the summer we’ve had the moss is having a field day everywhere, some of our paths have become green carpets – and I’ve been thinking about some of the larger specimens, and a possible role, as bushes/hedges in the loft.
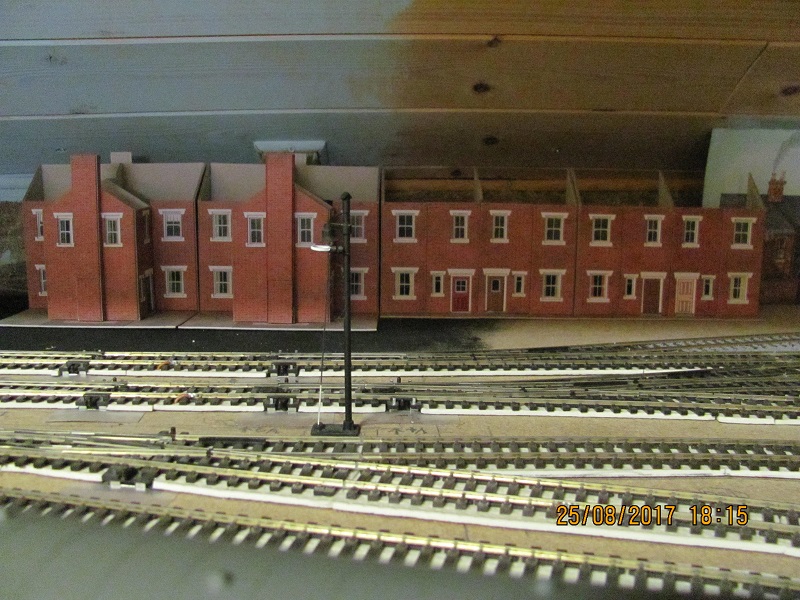
When I restarted this railway modelling lark, as soon as I’d got the track as far as Hooton I wanted an instant station, and for me with my fairly limited skill set when it comes to actual modelling, that meant Metcalfe. As you can see from the various photos, Hooton is totally standard Metcalf – not even weathered – that, at least, will eventually happen (on a list, somewhere). At Birkenhead I had to cover another one of these struts which appears at the end of platform 5 – and so I thought of the Metcalfe water tower, bought one… and then realised that a single kit wouldn’t cover the strut.. but if I combined two kits… and the rest is history. Originally I’d bought two two road engine shed kits for 6C, when I finally got to laying track there was only room for a three road straight shed, and so I went for the Townstreet kit… and then set about making the two Metcalfe kits into a section of roundhouse behind the turntable. Ever since then no Metcalfe kit has survived in standard form – but they are very “flexibleâ€. If you do have a go on existing completed kits (I reckon there’s always a place for them somewhere) all I would say is don’t throw away any bits – if it doesn’t work out – you can always put the bits back together!
Marty – yes, the tracks are heading for the goods yard. Now, if you’re a bit confused – what hope is there for me?! These are the backs, far too big backs with those gables. Having reduced the flags on the plain backs to just two rows, and with the houses further back, I’ve reinstated the third row (never throw anything away, ’cos there’s always a chance, I may regret it) – and once the back walls are up it will look more like the backs. Before the back walls though, there’s the weathering to do, and fitting the gutters/drainpipes (Ratio). Then the finished thing will be essentially as you describe, in fact I’ve drawn a plan! ….OK, it’s not a plan, but it’s the nearest I ever get to one…
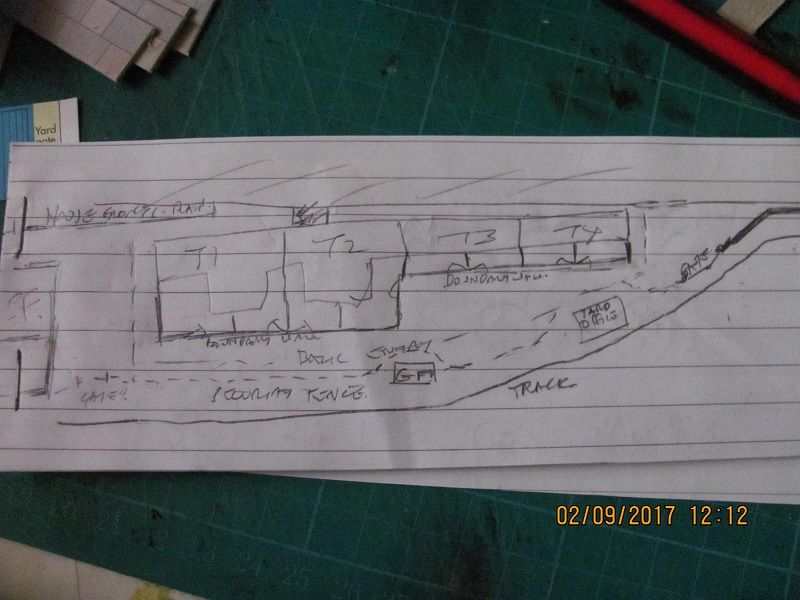
…. the fence at the railway boundary may well be Bachmann security fencing, which will start after the gates into the yard – I’ll see how it looks. As for those fronts, shown on the ‘plan’… when I was searching for something completely different I came across another set of house fronts (obviously had this idea some time ago…. either that or senility is really setting in) so the fronts will now extend some way behind the small factory. Also I may try this perspective lark again, take out a few rows of bricks at door/windows levels, to reduce the height, and mount them part way up the purlin. Naturally I’ll hang on to the bits, just in case it looks daft, so I can resurrect the original and have it at ground level… at least I’m trying!
… and I am supposed to be running trains too….
More soon-ish, of course.
Keith
Do I have a plan? Na, if I did I'd spend most of my time trying to remember where I put it.
Posted
Full Member
Next, the drainpipes and gutters – Ratio 538. This was a very fiddly job – I decided to reduce the thickness of the pipe brackets (as supplied the drainpipe sits a bit too far out from the wall) … which tested the patience levels. After a few expletives, the link between my fingers and the one remaining functioning grey cell is somewhat intermittent, I developed a technique, involving a pair of tweezers, which allowed me to produce much thinner brackets. Just about worth it in the end, as I think it does improve the look of the houses.
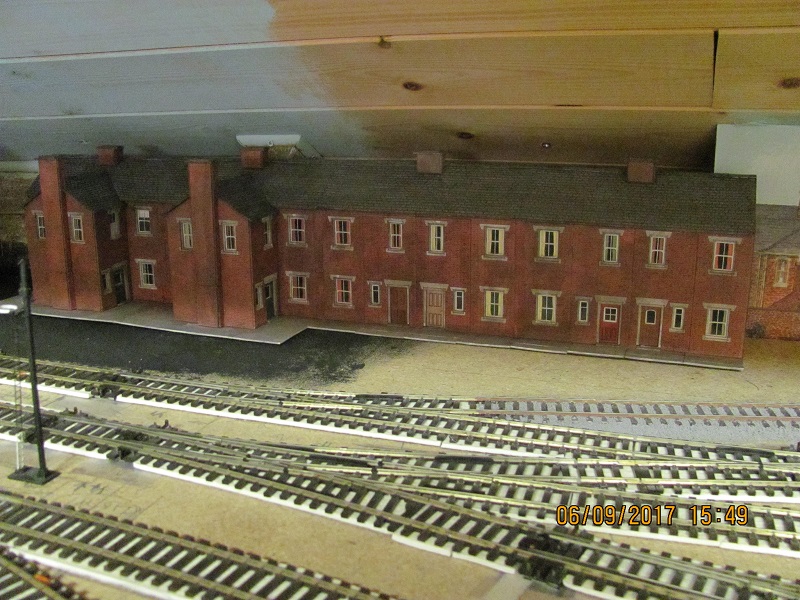
Now for those outside walls, it is just a case of using what is available, including the original shed wall as just wall. I’ve used the Metcalfe idea of offsetting the backing pieces and the wall to improve the joins in the wall.

Only just got started on this, but you get the idea :
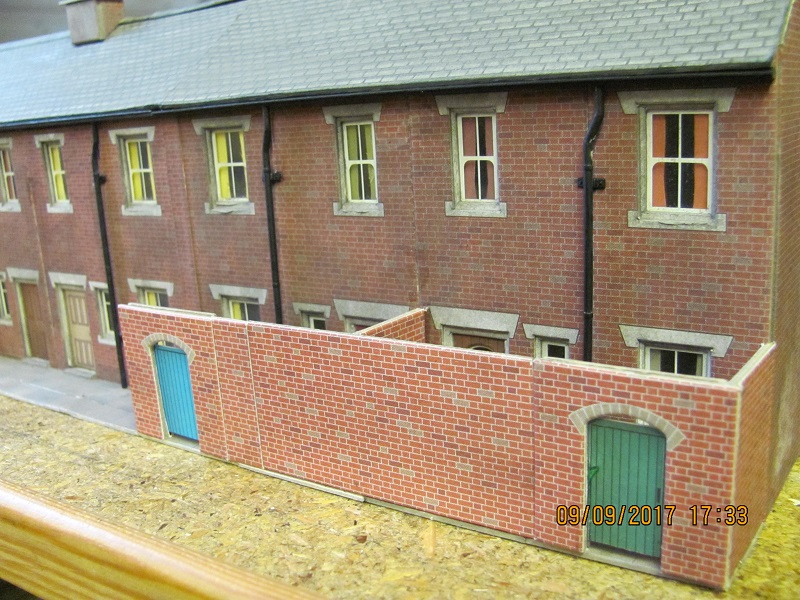
Interesting the difference between the weathered house and the pristine wall. These yards are a bit small, OK they are seriously small, but given that the houses are really only the backdrop to the marshalling yard, hopefully when everything is finished it will not be too noticeable.
More, hopefully the last of this, soon-ish of course, as it is high time the trains started running again. By the way, in case you’re wondering what has happened to the chimney pots – I always add them as the final job – past experience with the earlier kits I did, I seem to have a knack of catching them with something while doing the next job, and that can sometimes require a major repair.
Keith
Do I have a plan? Na, if I did I'd spend most of my time trying to remember where I put it.
Posted
Inactive Member
I'm sure that no one will notice the yards.
Max
Port Elderley
Port Elderley
Posted
Full Member
The weathering is the trick. All of a sudden it blends into the scene.
Cheers
Marty
1 guest and 0 members have just viewed this.