New Life For Old Wagons
Posted

Inactive Member
Weathering basic plastic no frills old Hornby wagons
 hmmhmmhmmhmm
Dunno !!!!
:cheers Gormo
"Anyone who claims to have never made a mistake, never made anything!!"
https://sites.google.com/site/greatchesterfordmodelrailway/home
https://sites.google.com/site/greatchesterfordmodelrailway/home

Posted

Full Member
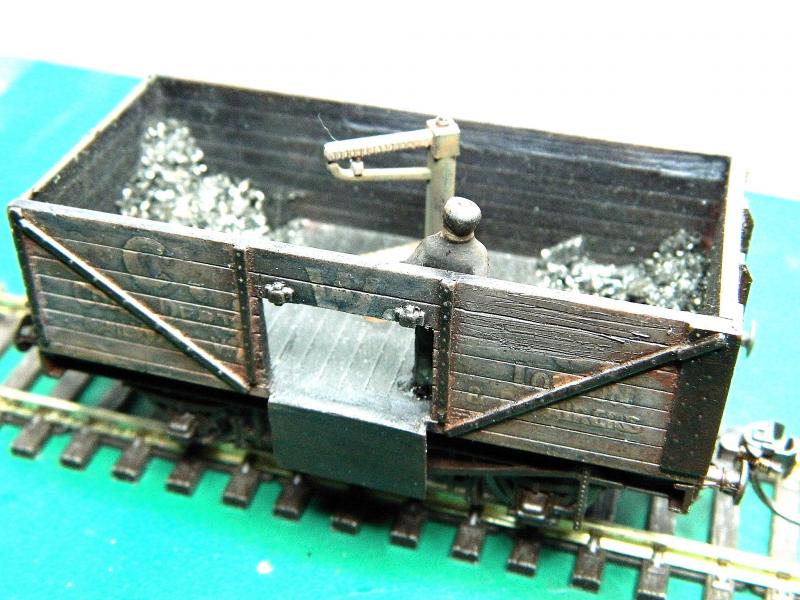
Found the pics of the mainline CO-OP wagon that got the "treatment". Typical activity on small branch line station/halt sidings with one local coal merchant. Coal was bagged in the wagon, loaded straight onto the delivery lorry. Weathering powders only, matte varnish finish. Needs a P number and white paint on the RHS diagonal bracing as it's also an end discharger. If it was a London coal merchant the upper wooden plank above the door would have been hinged on one side (and folded up out of the way) to allow easy access. I've never seen that modeled.
Nigel


 Last edit: by BCDR
©Nigel C. Phillips
Posted
Inactive Member
That`s a miniature work of art!!!!
I love the extra detail and the finish. You see, to my eye …..that is absolutely spot on!!!
Brilliant
 thumbsthumbs:thumbs
How did you do the drop down door????
:cheers Gormo
"Anyone who claims to have never made a mistake, never made anything!!"
https://sites.google.com/site/greatchesterfordmodelrailway/home
https://sites.google.com/site/greatchesterfordmodelrailway/home
Posted
Full Member
REgards Alan
Posted
Full Member
Brute strength, slid from the lorry bed into the wagon at an angle. London merchants did not have this problem of course. Which begs the question - how do you start bagging and weighing with a full wagon?
Nigel
©Nigel C. Phillips
Posted
Full Member
Fine saw blade in a scalpel holder and a lot of patience keeping it exactly vetrical and horizontal - that plastic is thick. Non-working, easy enough to have a working one using styrene sheet cut to plank height/width. This wagon is part of a cameo of 3 with a flat-bed lorry and coal sacks. Mainline CO-OP wagons only came with one number, using P numbers allows some differences.
Nigel
©Nigel C. Phillips
Posted

Site staff
Posted

Inactive Member
Max
Port Elderley
Port Elderley
Posted
Site staff
Up to Gormo and everyone else, but I thought it a useful one to have at the top, like posting pictures.
Posted
Inactive Member
It looks like it's at the top.
Cheers
Max
Port Elderley
Port Elderley
Posted
Site staff
Posted
Inactive Member
It doesn't bother me whether this topic is stickied or unstickied.
I leave it up to the majority or the moderators discretion.
I'm happy to go with the flow.
Cheers
Gormo
Last edit: by gormo
"Anyone who claims to have never made a mistake, never made anything!!"
https://sites.google.com/site/greatchesterfordmodelrailway/home
https://sites.google.com/site/greatchesterfordmodelrailway/home
Posted
Inactive Member
Thanks for the interesting beginners intro to weathering. I noticed you mentioned changing the front coupling on a Smokey Joe. I have just bought a used one missing the said coupling and would appreciate any tips about how to fix a replacement as they were moulded as part of the chasis. I realise this should probably be the topic of a new thread and I'd happily move it but just thought it might be worth asking you as you've been there recently.
Thanks
Ray
Posted
Inactive Member
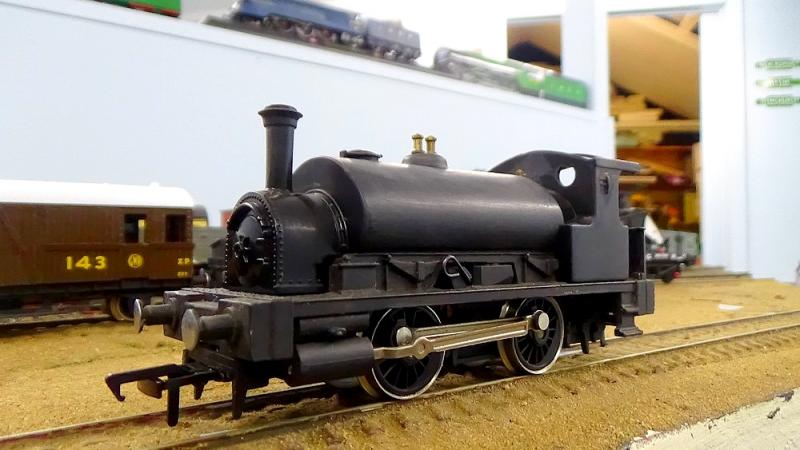
Yes I did the conversion a little while back and not sure where I posted it now?…..no bother…I have some pics.
I must say that this is not the prettiest way of doing it, but it works fine. The first thing to do is study the area carefully and work out what goes and what stays.
At the front of the loco I sliced off most of the moulded coupling…..enough so that from a side view it would look like it was never there. I then took a small Bachmann coupling and trimmed each side of it`s retaining plate so that it would fit into the recess under the buffer beam. I drilled a suitable size hole for the retaining screw. From memory the height of the coupling was good, however if it sits too high you can use a small washer or two as spacers. The height of the coupling is important and should be checked against some of your rolling stock to make sure you`ve got it right.

This is a small coupling compared to the original, however it still looks big on a small loco like Smokey Joe. I do feel though that it improves the look of the thing dramatically.
The rear coupling was a similar exercise although I think a little easier. Again slice off the redundant moulded coupling. Once again I have trimmed the retaining plate off from each side of the Bachmann coupling. Drilled a suitable hole for the retaining screw and fitted the trimmed down coupling. Also once again check the height carefully and adjust with washers if necessary. You may note that the coupling is butted up to the plastic casing behind the screw. This stops the coupling pivoting on the screw. Normally the retaining plate that was trimmed off would do that job.

Here we have it completed……tested and working.
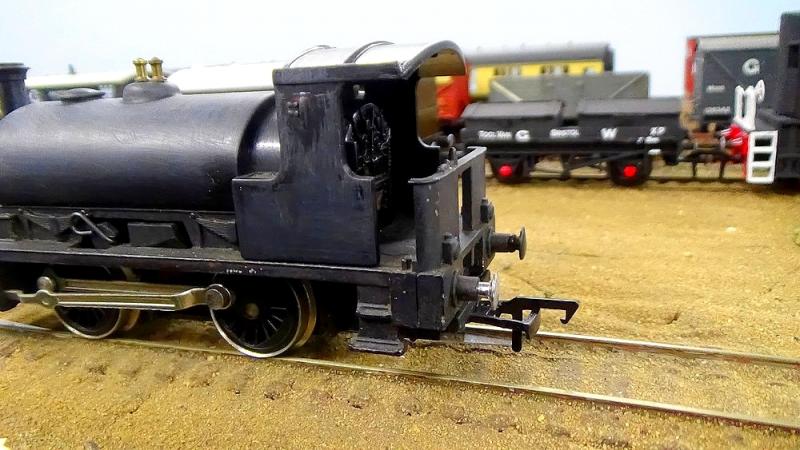
Once the original couplings are gone, the Bachmanns fit up underneath pretty much at the same height as the originals…..give or take a washer or two.!!!
A quick tip!!!……old audio cassettes are a good source of small screws. Before you toss `em out, take the screws out.!!!
Something different of note too is the silver buffer closest in the above pic. This is a replacement made from a flat head nail of suitable size. The top of the flat head was filed to create a key for solder. The nail head was then heated with the soldering iron until solder would flow quite easily. When soldering the nail head, it is quite easy to form a small dome with the solder. When it cools you can give it a rub with some fine paper to match it more closely to it`s neighbour. Then drill a hole so that it fits snugly into position. Oh….also you have to trim the nail to length to suit. Glue it into position if you wish.
So there you are Ray……the hardest thing to do is the initial step of hacking off the moulded coupling.

:cheers Gormo
Last edit: by gormo
"Anyone who claims to have never made a mistake, never made anything!!"
https://sites.google.com/site/greatchesterfordmodelrailway/home
https://sites.google.com/site/greatchesterfordmodelrailway/home
Posted
Inactive Member
Thanks so much for the effort to bring out those older pics of the Smokey Joe conversion. The nail tip is a great make do fix too! Sadly all my cassettes are long gone in a previous international move!
This is a wonderful topic with some great pics and video how to's - thanks so much.
Ray
Posted

Full Member
Off to look at my nail selection for suitable candidates…..
Cheers
Andy
Andy
Posted
Inactive Member
If you need more detail on the method…….just post it……and I`ll sort something out.
:cheers Gormo
"Anyone who claims to have never made a mistake, never made anything!!"
https://sites.google.com/site/greatchesterfordmodelrailway/home
https://sites.google.com/site/greatchesterfordmodelrailway/home
Posted
Guest user

Cheers
Matt
Posted
Inactive Member
As long as the grandaughters stocks are safe.
:cheers Gormo
"Anyone who claims to have never made a mistake, never made anything!!"
https://sites.google.com/site/greatchesterfordmodelrailway/home
https://sites.google.com/site/greatchesterfordmodelrailway/home
Posted
Full Member
Thanks
Cheers
Andy
Andy
1 guest and 0 members have just viewed this.