Maiden voyage
Posted

Banned
First tentative steps into weathering and overhauling
Looking foward to your first steps with the weathering.One tool I would suggest is a Fibreglass pen. These are usefull for removing the painted logos/signage on locos and rollingstock.
http://www.amazon.co.uk/Fibreglass-Abrasive-Cleaning-Pencil-Refills/dp/B003YSWJDG
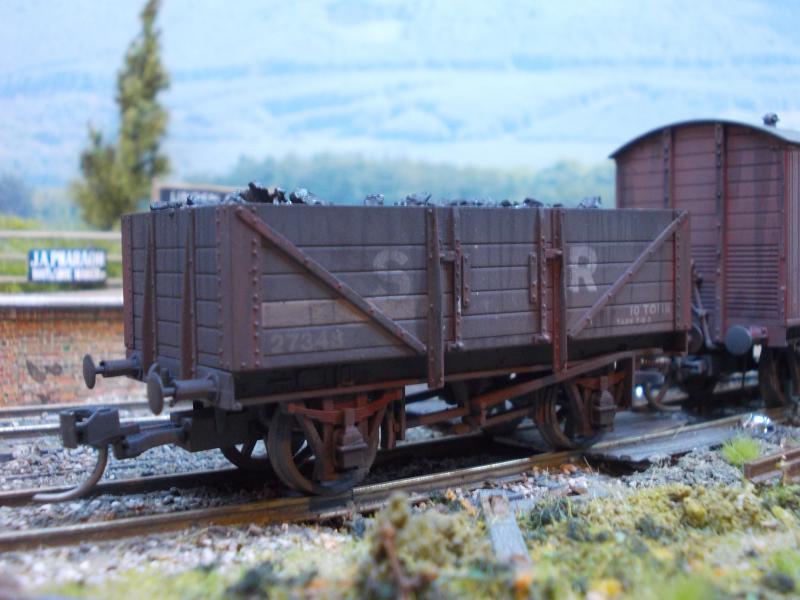
These wagons show where I had rubbed the pen over the "Roberts Tarmacadam' signage, before a light spray with a mix of browns and greys, followed by weathering powders.

The SR 5 plank here has a panel or two painted to represent a replaced plank. Light applications of 'dust' were applied with the airbrush, then powders were taken to it. The use of Isopropyl Alcohol helps quite a lot. The steel corner sections, straps and framing are a mix of blacks, greys and rust weathering powder, painted on using Isopropyl alcohol as the liquid content. The black streaks again are done by dipping a fine brush into isopropyl and then into some black powder, then gently streaking the wagon side.
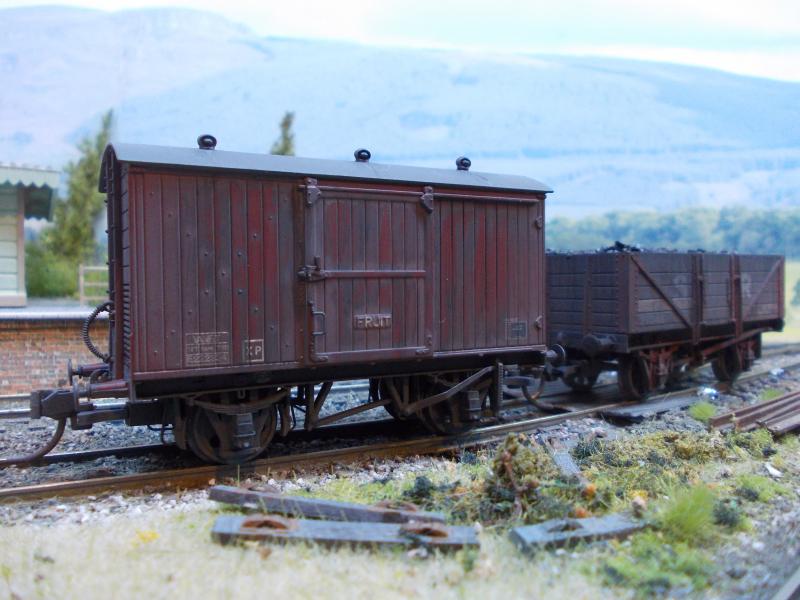
This fruit van was sprayed with 'too much' paint. I had to quickly remove the excess with a clean cotton tip. Powders followed this and then a light spray with Isoprpyl through the airbrush sealed it all into place.
I recommend practising different techniques, airbrush, paint brush, powders and powders with isoprpyl alcohol. Weathering is trial and error. At first it may look like an error, but with some building up of layers, good results can be had. Another tip, do your weathering undr good light.
Enjoy the processes.
Cheers, Gary.

Posted

Full Member
You guessed correctly for the cleaner,
I normally empty any remaining paint back into my jar / tin, then wipe the cup with a lint free cloth soaked with the appropriate thinner,
acrylics I then fill the cup with W5 or Asda Window & Glass cleaner, and spray into the cleaner, if just clearing out the gun between colours, then spray on to a tissue, once clear, empty the cup of cleaner, loads with the next colour and away you go.
enamels, as above, but use white spirit for the bulk of the cleaning, and a few drops of enamel thiners to clear at the end.
At the end of painting or changing from acrylic to enamel (or the other way as well), then do the above, then strip down and clean.
Once you get the hang of it, it takes minutes.
Your office is just along the road from the flat where my young lad stayed while at Heriot Watt (flats above Greggs & Boots).
Paul
Posted
Guest user
Top team with a great name and reputation.. Not blowing my own trumpet of course.

Cheers
Toto
Posted
Inactive Member
Loads of good tips coming from our friendly members.
Some lovely weathering of wagons from Gary.
I shall refer to these pages when I get around to painting something railway related.
Cheers,
Derek.
Posted
Guest user
I'll be setting up later today once I've done the domestic stuff. Hopefully I'll be add something to the mix. Maybe not as good as the others that are on but we'll see.
Looking forward to giving it a bash.
Toto
Posted
Legacy Member
reg
Posted
Guest user
I had the airbrush out to take it for a whirl. I picked a doner wagon and decided to go for it. I'm posting up a few pictures below but dont go looking for too much.
I will need to go back to this later tonight when the original paint dries and work on it with more paint, weathering powders and maybe another little trick or two. Anyway warts an all, here it is.
Here is the set up. I'm using acyrilic paints so not too worried about fumes and decided to work inside the shed.
Here is one of the doner wagon before it was abused.

and here is one of the same but with a coat of frame dirt ( not perfectly applied ) and a light dusting of a grimy black on the planks

personally at this stage I thought the paint / thinners mix was wrong, it needed some more paint. However I battled on a bit.
another after a slightly heavier coating of the same.

and decided to give it a bit more still.

I've left it for now but will go back and introduce possibly a slightly brownier mix to the planks , maybe paint out the odd board and apply a bit rust powders to the riveted steel angles.
however, if there are any better ideas out there, feel free to holler.
I also need to practice at getting the paint mix correct. I dont have any droppers which would help to be a little bit more accurate but they are on their way……………. from China
Anyway, I've made a start and shall carry on in my quest to produce something credible. Hope you've got plenty time.
cheers for now
Toto
Posted

Site staff
Try the local chemist,might be quicker.I dont have any droppers which would help to be a little bit more accurate but they are on their way……………. from China
Regards
Alan
Born beside the mighty GWR.
Alan
Born beside the mighty GWR.
Posted
Inactive Member
That wagon is coming along nicely. Given the dark nights I would have thought the kitchen would have been cosy.
Err Perhaps not.
I remember my mother giving out to me as I used her best saucepan to melt lead for a weight for an 0 gauge loco I was building back in the 80s.The fumes were something else
.No stopping you now.
Derek.
Posted
Guest user
Does not to convincing to me but I can work on it. The paint is not solid enough for me. Plenty opportunity to bring it around yet. As you say ……. First blood.
Cheers
Toto
Posted
Legacy Member
reg
Posted

Full Member
I don't, as a rule, criticise others but, in this case I think you are looking for a bit of guidance. We are both on a learning curve with the Paasche as well.
My impression of the results, is that there is too much air. My problem was the opposite and I got too much paint coming out. The double action trigger is tricky.
I started with the default #3 nozzle but changed to the #1 and got better results.
Having said that, my fish van came out nicely and I'll take a pic in a while.
John
John
Posted
Guest user
I appreciate the honesty because to tell the truth, if someone else had posted these pictures up, I would have thought that it just look like dirty paint had been thrown at the wagon in no planned way.
When I saw the result, I backed off with the airbrush. I need to return to the scene of the crime and master one or two things before trying again.
1. Get to a comfortable stage with the thickness of the paint as I am convinced that I thinned it too much.
2. Once I am comfortable with the viscosity of the paint, go back to practicing on some card again to get the spray pattern right.
3. Write down a solid plan of attack with regards to what I am trying to achieve exactly, work out the best way of applying the necessary layers ( and powders ) then stick with it.
The pictures above were not where I would have been leaving it. I had been intending to introduce a bit very thin brown cast on the wagon sides as well and a little rusting here and there. However I decided to stop in my tracks before I turned it into one big molten pile of mess.
It's a learning curve and I will be returning to it tomorrow to bounce right back at it again ( with any comments / suggestions being taken on board )
And try to rescue the situation. All part of the game and hopefully I come out the other end a better modeller for it.
Thanks for your honest appraisal , and I hope you get your own experiences sorted out as well.
I'll be back again tomorrow. In fact there could be a few come backs before I get it anywhere near acceptable.
Cheers
Toto
Posted
Full Member
I had another go at the cattle wagons, with powder this time. The result didn't please me so I've washed them completely and will try again tomorrow.
John
John
Posted

Full Member
Airbrushing is a case of "less is more" and of building up very fine layers of paint. The first application will sometimes barely show but repeated oversprays will progressively add to the effect.
Think I might need a smaller compressor for mine - the one I have is a mite over-powered for the job and causes problems accordingly.
Posted
Guest user
Thanks for the encouragement. Unfortunately it has gone a bit pee tong but again, I don't mind really. I'll be back in the shed tomorrow trying to get the paint consistency corrected and will be giving it another go.
I will keep going until something comes out of it.
better get some more paint on order then.I'm certainly up for more of it and after taking a bit of a step back to think about what was happening, my practice attempts prior to restarting on the wagon will be based on today's experience. Experience that I did not have before today. So from a positive, no matter the initial result I can still take something away from it and hopefully improve on it.
Another good thing is that there is a bit similar activity going on which I can follow ( John ) and the previous threads by a host of others. All good stuff.
Anyway, thanks again ………… There will be more.
Cheers
Toto
Posted
Banned
Looking good so far. Multiple light coats is what you need and a warm enviroment to help the paint dry.
How are you finding the acryllics on the painted body sides of the wagons ? I tried acrllics once and found that they didn't take to well to the factory finished surface. I prefer to use enamals (matt) for the first few layers of colours, before the use of powders. Each to their own..!
Can I ask how you will bind/adhere the powders to the wagon bodies ?
Cheers, Gary.
Posted
Full Member
With powders you do need a matte surface. Spraying on a coat of Dullcote will help. I've found the best surface for powders is a light airbrushed layer of earth/black.
I've always been leery of enamels for weathering because they are much harder to shift if you don't like the work you've just done.
As you say though, everyone finds their comfort zone. As I said on another forum, it's a matter of trying things, looking at the result with a critical eye and deciding what's best for you.
John
 Last edit: by Brossard
John
Posted
Full Member
I detest the Hornby ones which are, unluckily for me, in railway colours and as good as I can get in the absence of Railmatch out here.
I use Jo Sonjas which I find are very good and take on most of the plastic used by our model manufacturers quite readily. They also take on resin models and on such items as Wills plastic sheet building materials.
Each to their own of course. And in a time when it's not readily possible to ship paints around the world (not even water-based acrylics a lot of the time) it's what we can get as much as anything that determines what we use.
Last edit: by Gwiwer
Posted
Banned
I wish I could get hold of Railmatch or Phoenix Precision here in Australia… :roll:
An interesting article for those starting out painting and weathering..
http://www.doubleogauge.com/journal/enamelpaint.htm
Cheers, Gary.
Last edit: by Gary
1 guest and 0 members have just viewed this.