LMS Period I Coach Upgrade
Posted
#180189
(In Topic #10181)

Full Member
Updating the Bachmann Models
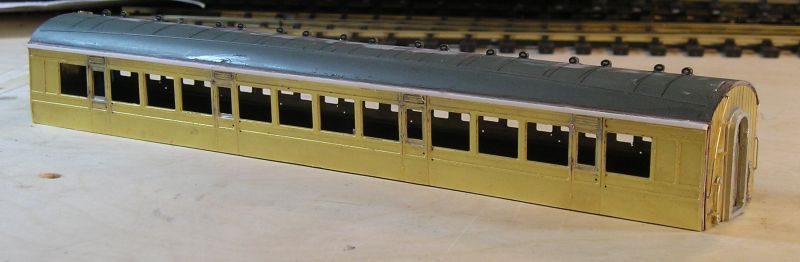
I always thought that these models were quite good. They have a Mainline provenance so their design is typical of that era, that is, accurate bodies but naff underframes and, in this case, a fictitious livery.
You can see that in this picture, there are two brakes and a composite. The composite is the first issue because anyone wanting to assemble a rake of Period I coaches using these will end up with a surfeit of 1st class accomodation. It's a pity that Bachmann never bothered doing an all 3rd (I'm considering doing a cut and shut for this, but that's another thread).
You will also note that these have had upgrades. The underframes have been redone with Comet components. The bogies have been replaced with MJT Carriage Compensation Units (CCU) (available from Dart Castings) and the bogie sides are chopped from Bachmann bogies. Wheels are Romford. Also of note are the Kadee couplings at the brake ends but Tony Wright's hook and bar system everywhere else.
Well, what more is there to do you ask?
There are two glaring problems, the lining is fictitious and the windows are recessed. These are what I want to address.
With the marvellous products from ShawPlan the windows are an easy fix. I have some packs of LaserGlaze windows for this job.
The lining is more difficult. Now, Bachmann appear to have recognized the problem and it looks like these coaches will be part of the 2014 program with Midland style lining.
http://www.modelrailshop.co.uk/product/17658/Thames_Clyde_Express_Set
Now a history lesson, based on what I've learned over the last few weeks as I mulled over the problem.
The LMS was formed in 1923, as were the other three of the big four (GWR, LNER and SR). Probably the most influential constituent of the major companies that formed LMS was the Midland Railway. Initially of course, inherited stock from the constituents had to be used but soon LMS started to build its' own stock. The so called Period I coaches were heavily influenced by Midland designs and, when delivered were painted Crimson Lake with Midland style paneled lining. This is a very attractive livery but the very devil for a modeller to reproduce.
Towards the end of the decade, Period II coaches started to be delivered. The main difference being that Period I coaches had panelled wooden bodies and Period II plain steel ones. Even though Period II coaches no longer had panels, they still received the panelled livery as if they had.
When William Stanier arrived from the GWR, he almost immediately started to put his stamp on everything that rolled. He is responsible for the Period III coaches with larger windows and more modern all round. These started to be delivered in 1932, in the Midland paneled livery. In 1934, LMS introduced the simplified lining style and I think most are familiar with this. Two yellow lines straddling the door ventilators above the windows and a composite black/yellow/black line beneath the windows in line with the door handles. This livery proliferated until nationalization in 1948. By the way, Bachmann's new "Porthole" coaches reflect the last Period III design from LMS. The first coaches were delivered early in 1948 and these few had LMS lining but BR numbering. Shortly thereafter the livery changed to crimson and cream, and here endeth the lesson.
The only way a coach that originally had paneled livery would receive the simplified livery is if it had a full repaint after 1934 and I have never seen a picture of one (Period I or II) so painted. The other consideration is that, of course, war came in 1939 and normal peacetime maintenance practices were curtailed. In fact a lot of Period I coaches were converted to ambulances (there's a Bachmann ambulance train set and I've seen a figures set too) and, became full brakes after the war.
Now, I'm useless with a ruling pen. So, I plan to make some transfers. You may remember the LSWR coach kit build for which I made lining transfers. That worked out reasonably well I thought.
The problem with yellow is that it is transparent and over crimson lake, will be lost. There is a type of transfer sheet that has a white backing but then you have to make a transfer surround to match the paint. The other problem I have found is that my attempts to use it were a bit of a disaster in that the top coat of transfer flaked off when I cut leaving an unsightly white edge. I suspect I didn't seal it properly.
To overcome this, I want to try making fine white lines over which the lining transfer will go and use standard transfer sheet. I will use modelling masking tape (the dear stuff) and aerosol flat white for this.
If this goes well, I will use the same method for the driving trailer.
John
 Last edit: by Brossard
John

Posted
Full Member
The final parts arrived yesterday:
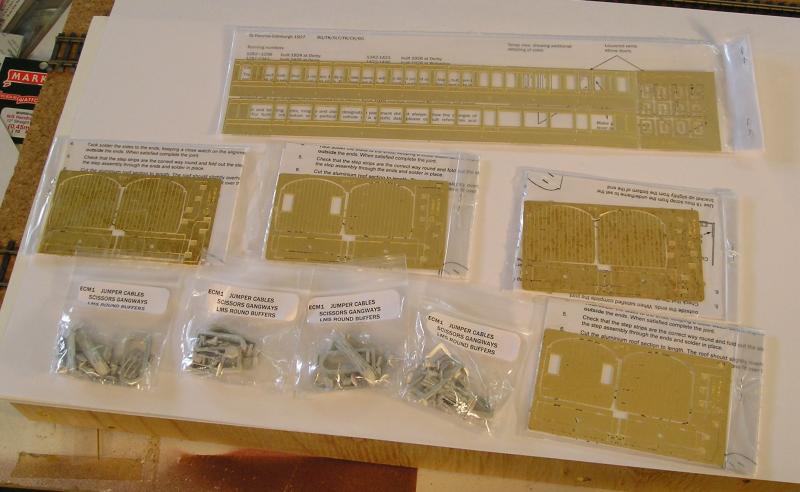
Here, you can see the sides. There are four sets of matchboard ends (the plastic ends on the models are looking pretty badly beat up) and four sets of end castings including a gangway set (which I may just use on the brake ends with folded paper accordion gangways between coaches), jumper cables and rigid buffers.
I like to plan ahead so that when the muse takes me, I'm ready.
John
John
Posted
Full Member
I've been working these last few days on some Comet bogies. I had these in stock and wanted to use them up. They are time consuming and if you have plastic bogies, you are probably better off using those.
Here's where I am:
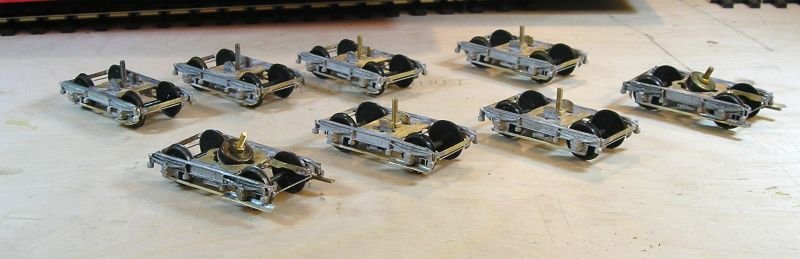
Things to note:
1) The bogie sides come with a cast tie bar, but this is usually near impossible to make straight. I cut them off and soldered on some 1mm brass strip.
2) The bogies front left and front right are for the brake ends. These have extended steps both sides. I also cut away the front beam and soldered in a reinforcement from brass strip.
3) When these coaches were first built starting 1923 presumably, they had full length steps on all bogies. In 1930, short steps began to be added and older coaches retrofitted. The short step are on one side of the bogies enabling access to the end steps in order for the toilet water tank to be filled. I used some left over coach step etch from a surplus underframe.
Wheels are Gibson.
Everything is soldered.
John
Last edit: by Brossard
John
Posted

Full Member
I've got some of those coaches myself, in carmine and cream. Bachmann also sells or at least sold them in their US-exclusive Thomas range

Posted
Full Member
John
John
Posted

Full Member
'Petermac
Posted
Full Member
Bachmann have a number of Mainline tooled models still in production and they could all do with an overhaul for the 21st century.
John
John
Posted
Full Member
Posted
Full Member
The Mk 1 corridors are very good. The Mk 1 suburbans have the same dated body and underframe design.
John
John
Posted
Full Member
Comet ends:
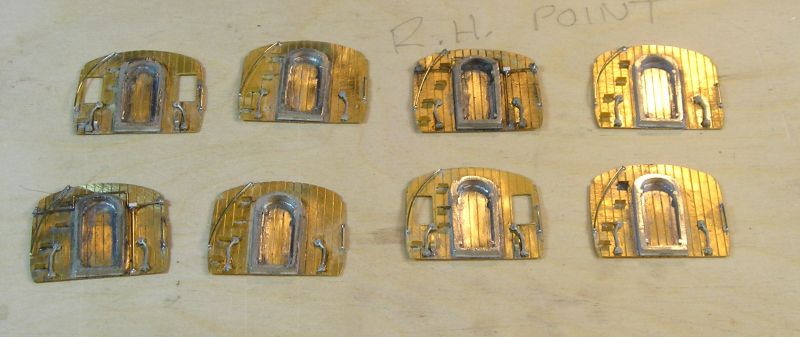
Steps are made from a fold up etch that slides into slots. Pretty easy but the builder still has to get them the right way round :roll:
Grab rails were formed from 0.45mm NS wire. The usual method of sliding it through the thumb and forefinger and exerting pressure in the direction of the bend. I have a book with 4mm scale drawing which was very helpful. The grab rail on the other side is straightforward. Make a 90 deg bend, offer it up to the end and make the other bend. With practice you will get quite close. One dodge I use is if I'm close but not quite there is to open the holes to 0.032" from 0.020". The solder will tend to fill the gap.
Gangway bases are whitemetal and soldered on. Again the usual method is to tin the brass end with 145 solder and fix the WM parts using 70 solder. I set my iron to 300 C for this but I know others have different opinions.
The WM jumper cables were stuck on with CA. In hindsight solder might have been better, since I had one or two fall off.
Finally, there is the alarm gear. According to my books, this was almost never fitted to brakes. Therefore I made it for just the ends that will be used for the compo and 3rd. These are second from top right and bottom left. I bent 0.45mm NS wire to shape and secured the ends to ears from a Comet super detail etch. There's a wire that goes along the side of the RHS of the gangway. I covered the join with a tiny piece of plastic strip.
The other thing I spent considerable time on is the 3rd sides:

I scribed the lower doors.
The door ventilators are separate pieces. These were tinned while still on the fret. I then fluxed and placed them in their recess above the doors. The solder was sweated to secure them in place and cleaned up with a fiber glass pen.
Hinge locations had to be drilled out. The super detail etch includes a jig for this. The etch also include hinges, which are really tiny and a mighty fiddle. I eventually got them in.
Tee handles need to be added along with commode handles. These will be installed after lining.
John
John
Posted
Full Member
Posted
Full Member
Not sure I understood your setting your iron for 300 C for the low melt solder ………….. :???: :???: Is this to allow a very quick in and out ?
I keep telling myself that, one day, I'll tackle something in brass. They do make up into exquisite models when done well. However, I doubt it will be tomorrow - I'm far too ham-fisted …………. :sad: :sad: :sad:
'Petermac
Posted
Full Member
I should add that, given the work required, I wouldn't recommend this method to the casual modeller.
As for 300C, yes, I like to have a lot of heat energy available so I can get in and out quickly. It's the dithering and dawdling with the iron on the WM that melts it. I haven't melted anything so far so I reckon I'm doing something right.
John
John
Posted

Full Member
Regards Rob
Posted
Full Member
John
John
Posted
Full Member
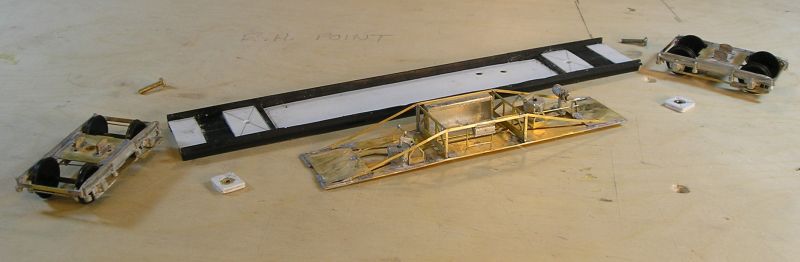
Here's the 4th coach that I had to build the improved underframe for. I took a Comet underframe kit and chopped it to make a module to fit in the Bachmann U/F. I had to shave the plastic underframe and file the brass module to get things to fit.
This picture shows how I am mounting the bogies. I've plugged any holes from the old fixing and glued on some packing to get the bogies to ride at the correct height. The packing has been drilled.
I want to install captive nuts and you can see I made 2mm thick by 10mm square nut holders.

Underframe module installed and bogies attached. The upper underframe shows the captive nut holders topped off with 0.010" plastic to make sure the nuts remain captive.
John
John
Posted
Full Member
Posted
Full Member
John
John
Posted
Full Member

Compartment side
Corridor side.
I cut away the plastic coach sides a bit above and below the window openings. I then shaved off the plastic detail to give me a smooth surface. Sides and ends were glued on with contact cement. I added a cantrail from 0.040 x 0.040 plastic strip and then shaved that to thin it slightly to give what looks to my eye about the right profile.
TBH, in hindsight, I might have been better off soldering the sides and ends like a traditional Comet kit. Ah well it's done now. There's a bit of gap between ends and sides, must think about filling that somehow.
I removed the vents from the roof and filled any blemishes. I then reinstated them by drilling holes in the correct position for a third class coach.

I made the interior by chopping out the third class sections from two compo interiors. I lost a seat in the process so used a Ratio seat. I made a new vestibule/toilet at one end.
John
John
Posted

Inactive Member
Max
Port Elderley
Port Elderley
1 guest and 0 members have just viewed this.