More a gangway than a plank
Posted
Guest user
small end terminus with industrial area 8 x 2
Either the Quarry or rural Tmd for me…on the Tmd , the branch line thingy could still disappear into a tunnel…I think it adds something, as you say where does it go ?Just my threepence worth
Cheers
Matt
Posted

Full Member
'Petermac

Posted
Guest user

As much as I was swaying towards a TMD, the quarry wins. It has certainly attracted the strongest vote from the outset and the section along the door end of the R & GLR is going to have a similar theme. That section is to house a cutting where the hillside is being cut into to provide a road or something of that nature.
No Matt I won't be calling it Bedrock and their will be no guest appearances by Fred Flintstone or Barney Rubble.
I have a baseboard already in the shape of the second control panel which was made but never built as such. I'll measure it to see what the exact dimensions are and that will be the size.
There will be no work as such done until the R & GLR is on target with regards the completion of the lower level as mentioned before but hopefully that won't be too long.
Job done and thanks to everyone who chipped in with their opinion.
Cheers
Toto
Posted
Full Member
'Petermac
Posted
Guest user
Cheers. I've already got a load of materials etc for various parts of the build when it does commence so for once I shouldn't have to shell out too much.
I am favouring the use of plaster bandage where possible because I have about two ton of the stuff. I'll maybe use a mix of chicken wire and try some cardboard strip lattice work like a Terry uses. The name of the game here is experimenting. I also like the foam and plaster method of creating the rock faces etc but again, I'm trying to work with what I have rather than spend more.
Wire in tube for the points probably trying Gary's method with the switches moving the rod and activating the polarity changes. Track will be code 75 again as I have loads of it available.
I have various scatters for grass etc and an applicator so that will have its debut. I have not got ballast so that will be top of the list on the shopping front. I need to determine what colour that is likely to be.
I'll stick with DCC operation and the loco's will be restricted to an 08' an 03 and something like a 25 or similar for bringing in the empties and taking away the full. The shunter for moving them around the loading facility on site.
Wagons……I need some advice there as to what would have been use in terms of type and livery. Considering I will be using BR blue / green loco's.
I'll also need some plant and some site accommodation. Ie a canteen / toilet for the workers and maybe a site office. Possibly porta cabins if I can get them in a 1960 ish style.
I'm looking forward to this.
Cheers
Toto.
Posted

Banned
One change I would make is to move the point to the branchline in between the headshunt siding and the quarry sidings. This will give you a little more operational space for arranging trains, and or bring a short train into the quarry off the branchline.
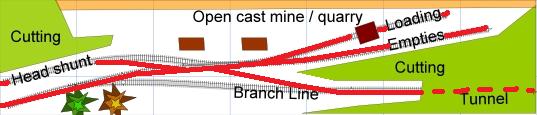
Cheers, Gary.
Posted
Guest user
It's certainly a different take on it. I can see the advantage in altering the track as you have demonstrated. I will amend this to suit.
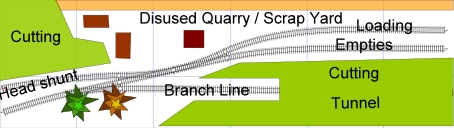
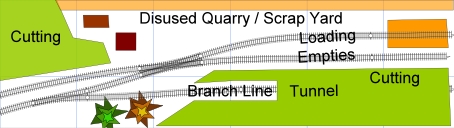
I agree that certain industrial features start off as one thing and then once there is no further use for it is usually snapped up cheaply and adapted for a secondary purpose.
This could bring the best of both worlds being able to model the quarry area itself but also model the scrap yard operational side of things.
Any other opinions on this? Sounds like a win win.
Cheers
Toto.
Posted
Guest user
Has anyone done a Ruston wotsit face shovel or drag shovel kit like the one available from Langley models ?
I would like to know how difficult the kit is and what the base material is. If there are any photographs available with ANY version of this crane, I would appreciate if it could be posted. Preferably one on a layout in order to get a sense of scale.
Cheers
Toto,
Posted
Banned
Posted
Guest user
Thanks. I was trying to find a photo of one on a layout to get a sense of scale against it. I'll continue my quest for the moment.
There is bound to be one somewhere.
Cheers
Toto.
Posted

Full Member
Less is more though or you might never get back to the main layout!
Marty
Posted
Guest user
I know what you are saying. I think the emphasis on the plank would be the scenery not so much the detailing. I'm not saying it would never be detailed but the aim would be to tryout the scenic methods and techniques and get it to a certain stage before returning my attention back to the main layout. Hopefully a bit wiser for the experience.
The track will take no time at all. Neither should the electrics. These will be kept very basic.
The main hill area's will be supported by framing and chicken wire / cardboard formers utilised to provide the initial profile. Then covered with plaster bandage.
The painting and scatter material would in my opinion take the longest as I don't have a clue about it. It's ok hearing about other peoples methods but it's quite another thing applying it.
So initially I would be " trying " to create a quarry setting with sidings and a branch line running past it. That's it.
There is still a bit to go yet before I divert any real attention to it. Right now it's just plans.
If it turns out to be a bad idea, it will be binned. The R & GLR takes priority.
Cheers
Toto.
Posted
Guest user
Here is the baseboard which was the second control panel from the abandoned 1st attempt at the R & GLR.
It measures 71 inches long by 20 inches deep. So …….. just shy of 6 feet by 1 foot 8 inches……….waste not want not.

A foot shorter than the 7 feet I thought I had but shpuld still be big enough for the job. I'll keep it " in storage ";-)
cheers
toto
Posted
Inactive Member
Still I like the idea of a scrap merchant plying his trade as the quarry would stay intact.
Cheers,
Derek.
Posted
Guest user
I suppose it has a double bonus because like railways, the land was there first and the railway " built into it ". Well, on this occasion, the quarry came first and then the scrapyard adapted to suit.
I have to build the quarry first. Which I think is the biggest part of it. I get to do the scenics. The scrapyard will hopefully give me more in terms of detailing.
Of course, I could make an elephants rectum of both.
Cheers
Toto
Posted
Banned
Why not give the styrofoam (polystyrene foam) a go for making the land forms. It is a little messy, but can be carved quite easily to give you a rock face or a railway cutting. Plaster can then be brushed over in several layers and when 60% dry, the plaster can be brushed with a small wire brush or the slightly carved with the use of a knife to represent a craggy rock face.
To paint rock faces take a look at this : https://www.youtube.com/watch?v=j6O5mM01S9Q
Cheers, Gary.
Posted
Full Member
 thumbs:thumbs
'Petermac
Posted
Guest user
I'll have a look at your link when I get back in tonight. Gormo sent me a link on the same and it looks like a good medium to work with. The only reason that I have been referencing the chicken wire and plaster bandage is that I have loads of both so why pay to buy something else. However, if the Styrofoam is not to expensive, I may buy some as the results do look good where I have seen it used before.
The one big benefit that I see with the Styrofoam is the ease of getting the desired end result in terms of out crops etc. It does look quite easy. The plaster bandage does tend to look a bit flat once finished and a further exercise is needed to produce a rock like effect.
I'll let you know the verdict on the link once I've had the chance to view it.
Thanks again for sending it
Toto.
Posted
Guest user
Cheers
Toto
Posted
Guest user
any comments appreciated.
cheers
Toto
1 guest and 0 members have just viewed this.