LMS Pull Push Coaches
Posted
Inactive Member
Finally!
Best of luck with those coaches John.Typical RTR appears when you start building your own.
Maybe the manufactures have copped on at last that the main money is now spent by the older hobby people.One noticed all the smaller Bachman locos sold out very quickly while the big express jobs gather dust in the stock rooms.
Cheers,
Derek.

Posted

Full Member
We're still probably the best part of a year away from seeing those Hornby coaches, particularly as they are still in the process of ramping up new production facilities.
Agree about the big express locos. Nice as they are, most of us haven't got the space to do them justice (and I have a dedicated basement).
John
John
Posted
Full Member
Two problems:
1) Lousy paint job and
2) The front window pane had broken at the corner. There is only a tiny amount of material so it's no surprise.
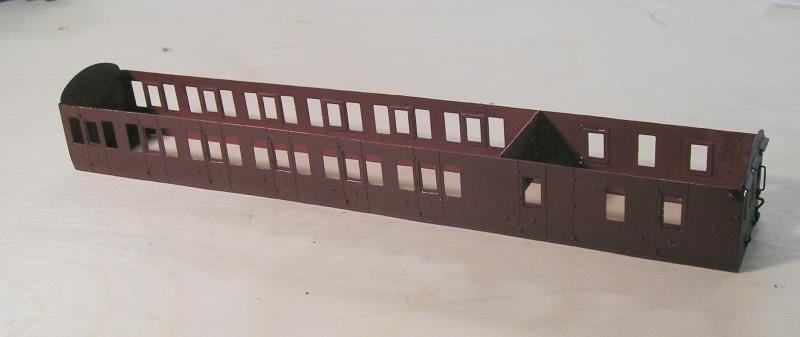
Having used acrylic paint for my last attempt at painting I dunked the whole thing in IPA. After about 20 mins, I could see the old paint sloughing off, right down to bare metal.
As usually happens with these jobs, one thing led to another and I wound up with the body disassembled. No bad thing really, I was never entirely happy with the interior and I had to get at the back of the front window.
So, 4 pieces, 2 sides and 2 ends, all nice an shiny, on my workbench.
In the process of disassembling, the other pane broke in the same place.:roll: Repair was L shaped pieces of 0.45mm NS wire and 190C solder.
I have now reassembled the body and it's been washed. Phew!
John
John
Posted
Full Member
Had a break of rather a long time while my mojo went walkabout. A couple of weeks ago, I did some self analysis and realised that the reason for my funk was the daunting prospect of modifying a load of locos to EM gauge. As soon as I had this epiphany it was like a load lifted and I'm getting back into it, but I'll stick to 00 - fingers crossed.
As for the coach, it has languished unpainted for all this time. Again, I realised I didn't have a hope in the proverbial of doing the correct full Midland panelled lining. After some thought, I felt that I could convert the coach to Period III. This means I can line the coach to the 1934 simplified lining scheme.
I've been busy and primed the coach body today. I also stripped off the full length roof rainstrips and added transverse strips.
Hopefully I'll take some pics in the coming days so you can see my progress.
John
John
Posted

Site staff
Changing gauge can be very thought invoking - not least the cost & time.
Ron
NCE DCC ; 00 scale UK outline.
NCE DCC ; 00 scale UK outline.
Posted
Full Member
John
John
Posted

Full Member
Nice to hear from you again. I can appreciate the comment re modifying loco's to EM - my Collett Goods would be £76 each, and there are 3 of them. OO finescale track looks a better proposition!
Nigel
©Nigel C. Phillips
Posted
Full Member
John
John
Posted
Full Member
I removed the duckets from the guards end, cleaned up the tarnish, re primed and painted.
I added a transverse bulkhead to stiffen things up.
Roof modified to look like period III:
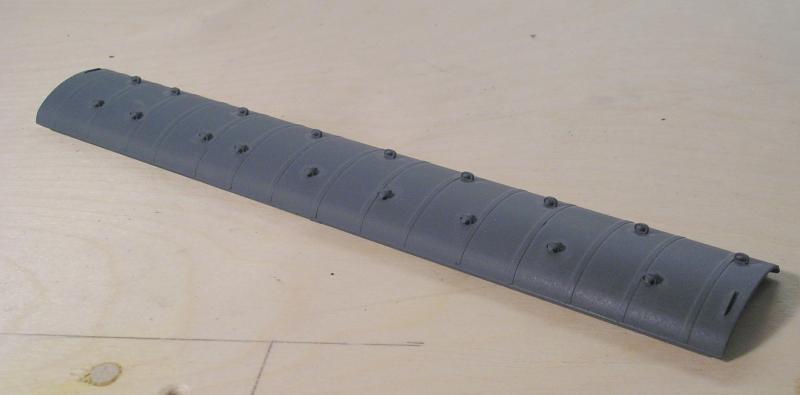
Transverse strips replace the long rain strip.
I also worked on some details:
This is a cruel close-up of the ventilators found above the doors. I determined the dimensions and started with a suitable styrene strip. The corners were rounded and I used my chopper to produce a load of the things. I used double sided tape to stick them down as you can see. I then primed and painted.
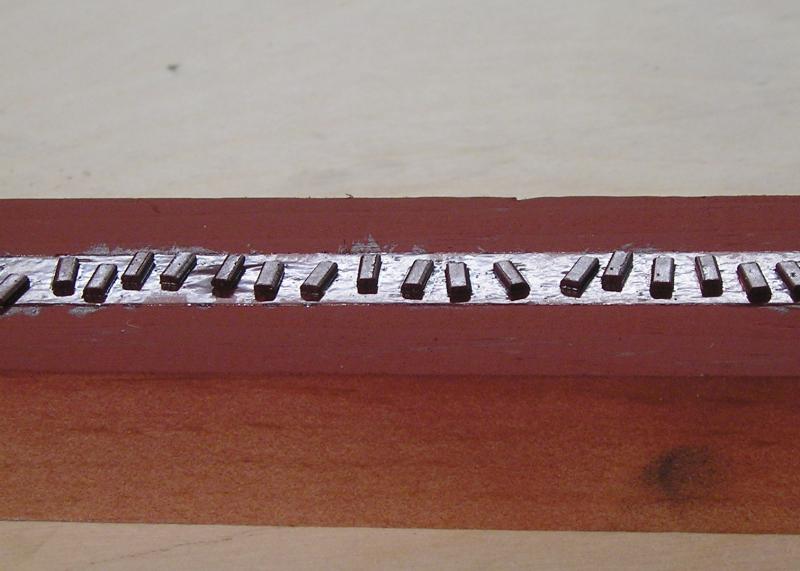
Door or "T" handles are an important detail. Comets' superdetail pack includes these but they are an impossible fiddle to use - tiny!
I recollect reading something somewhere where T handles were produced by grinding down the heads of pins - this I did and I like the result:

I reanimated an ancient jar of brass paint to finish them. These will be so much easier to install.
John
John
Posted

Full Member
Posted
Full Member
In the course of what should have been a simple job to install a representation of the dynamo pulley, I managed to damage the trussing of one coach quite badly. This in addition to a broken truss on another coach. This didn't seem right since I've never encountered trussing this fragile before.
So, not wanting to be forever repairing trusses, I decided to try some alternatives.
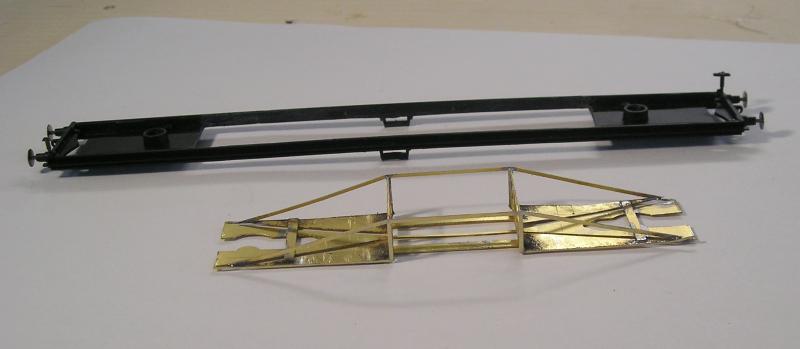
First, I have the Comet underframe from the coach discussed above - this is NOT going to break. I built a second underframe for the non driving trailer. This fairly time consuming and getting the thing to be straight and, in particular, getting the stepboards to be straight without being wavy is a challenge.
For my next proof of concept, I hit on the idea that Hornby's underframes had straight stepboards, so decided to do a hybrid.
I removed the damaged truss unit:

I then cut the floor away and added 0.020" plastic card over the hole.
Next I built up the truss part of the Comet underframe and removed most of the brass outside of that:
It only takes a few words to describe but 2 or 3 hours to do. :roll:
Happy that it fits, I finished building up the brake gear and other bits:
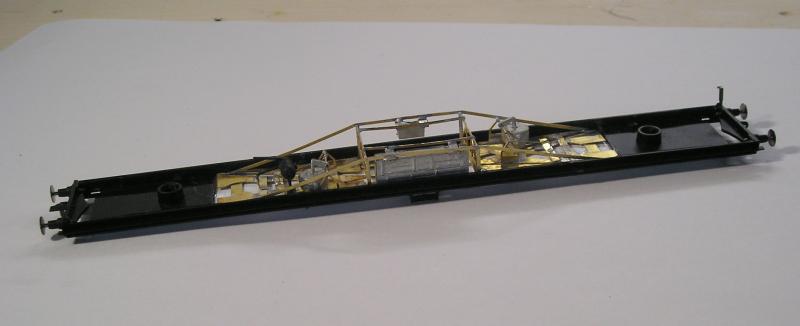
I have another proof of concept which involves retaining the Hornby truss unit but reinforcing the trusses by gluing 0.45 mm NS wire to the inside of the angle. I used CA overall and contact cement in strategic places. My analysis of the Hornby underframe caused me to think that the vacuum cylinders looked undersize. I also wanted the 4 coaches to be consistent.
The puny cylinders can be seen in this view.

The completed underframe is shown here:

I removed the cylinders and dynamo and filled the holes with 0.020" plastic card. I then built up replacement Comet subassemblies and installed those.
This is probably the easier of the concepts and I may continue with that.
All 4 underframes are now painted, as are the bogies. I want to weather these before final assembly.
 Last edit: by Brossard
John
Posted

Inactive Member
Max
Port Elderley
Port Elderley
Posted

Full Member
I have 3 Gresley coaches - I'm guessing Kitmaster but not sure - that I bought on Fleabay because they had a superb "teak" paint job. All were damaged in some way. I need to make new underframes for them all and also fit new bogies.
I'll see what Comet have to offer ………………..it will be my first venture into brass. :hmm
'Petermac
Posted
Full Member
John
Last edit: by Brossard
John
Posted

Full Member
Posted
Full Member
Thanks John - I'll need the advice. :cheersPeter, Comet do have LNER coach underframes and bogies in their range. Best of luck. I can provide advice if you need it.
John
I just have to try to work out what model of coach they are ………I can't find either a manufacturer's name or model number at present ……….:???:
'Petermac
Posted
Full Member
Not Kitmaster but possibly Ian Kirk?
John
John
Posted
Full Member
'Petermac
Posted
Full Member
John
John
Posted
Full Member

I have 4 bodies varnished and waiting for transfers. I sprayed them with Testors Glosscote. This will help the transfers to stick. After I will finish with a coat of semi-gloss.
I dithered about the second driving trailer but in the end I bit the bullet and took the end from the Comet body. It just didn't make sense to slave over the details of the Comet kit when Hornby has done all the work.
The Hornby brakes are fitted with duckets and the PIII driving trailers did not have these. Removing these is not difficult but you do get some inevitable damage to the finish. I filled, sanded and primed. I used my airbrush to spray on the maroon. I have to repair the lining and replace some handrails - already made and blackened.
Note the handrail for the driver - this is 0.45mm NS wire.
The only thing the non driving trailers need are to have the numbers rubbed off (I used Turtle Wax Paint Restorer) and new numbers added.
Interiors are done:

I cobbled up a control console based on a picture of a DMU. There's a regulator and brake lever and a couple of gauges. The red thing I fancy is the emergency brake. You can see the handbrake wheel - supplied by Hornby.
Other than that I didn't really do anything.
As I mentioned, all 4 underframes are finished:

I just have to gird up my loins now for transfers. I've got quite queue building.
John
John
1 guest and 0 members have just viewed this.