LMS GUV Upgrade
Posted
#178771
(In Topic #10113)

Full Member
Tarting up the Lima model
I've noticed that this model has been mentioned a couple of times here and elsewhere. I've been meaning to have a go at this and was encouraged even further by an article in the July BRM by Ben Jones.The van is really good above the solebars as many of these legacy models were:
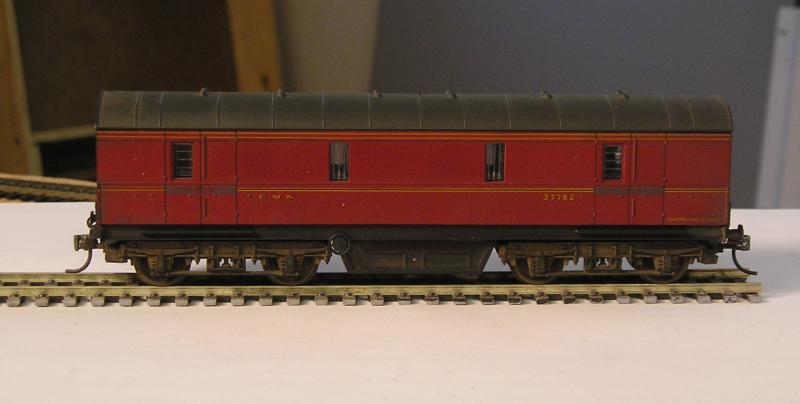
It falls down, for me anyway, with crude underframe details. I remember changing the wheels years ago. The bogies may have been changed but the fixing looks original.
As a preliminary to the upgrade, I sourced some parts from a box of bits scrounged from some PC coaches given to me quite some time ago. These were the kits with printed sides if readers recall. There were enough coaches for a decent rake but they were all in dire straits having decomposed over the years. I never liked the notion of printed sides either, there being no raised detail. Finally, the transfers hadn't been put on very well - so off they went to the knackers yard for parts.

The parts selected include trusses, vacuum cylinders, vee hangers and dynamo. I'll try to retain some of the less offensive detail.
I also want to try Bill Bedford's sprung bogie. My plan is to chop up the model bogie and stick the sides on later.
If you're on 00, the bogie part of the upgrade can be omitted apart from changing wheels to something better than the Lima pizza cutters.
John
 Last edit: by Brossard
John

Posted
Full Member

The glazing is pretty naff so that will have to go. I will construct glazing bars. I sent off an email to Brian Shaw at Shawplan to see if he can suggest something for the windows.
The roof vents are to anemic, I'll replace with Comet parts.
There's a buffer missing but they're pretty bad anyway so I will replace with Comet.
Now that I look more closely, those bogies are almost certainly Bachmann. The wheels look to be split axle so they'll have to go as well.
The van body is accurate as evidenced:
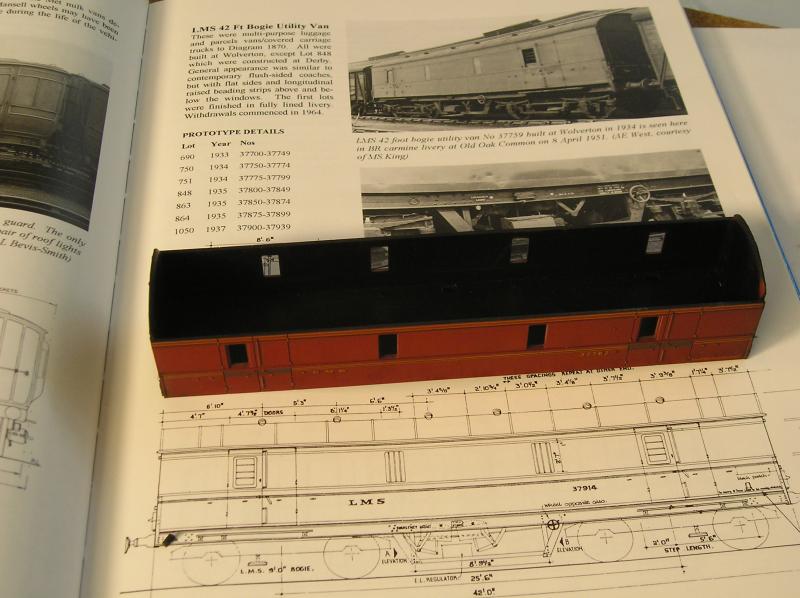
The book is Historic Railway Carriages - Vol. 3 - NPCS by Peter Tatlow.
As I look at the livery, I'm getting less happy. It seems to be self coloured plastic and looks a bit too red to me.
John
Last edit: by Brossard
John
Posted

Inactive Member
Posted
Full Member
John
John
Posted
Inactive Member
Posted
Full Member
I'm embarrassed to report that the bogies that I thought were Bachmann were, in fact, Hornby from their 80s short Stanier coaches. The bogies have a WB of 8' 6" instead of the correct 9'. These coaches, IMO, are fit only for the bin.
I have found a set of Bachmann sides.
John
John
Posted

Full Member
Watching carefully. ;-)
'Petermac
Posted
Full Member
Pay very careful attention.
John
John
Posted
Full Member

That's what I mean John - was the ziploc bag a purchased complete "upgrade" pack including the white metal parts from PC Models or have you sorted through your "bits box" as well ?
Actually, it probably doesn't matter because we couldn't buy it today anyway ……………………….:roll:
'Petermac
Posted
Full Member
John
John
Posted
Full Member
Today, I'll start on the bogie etch:
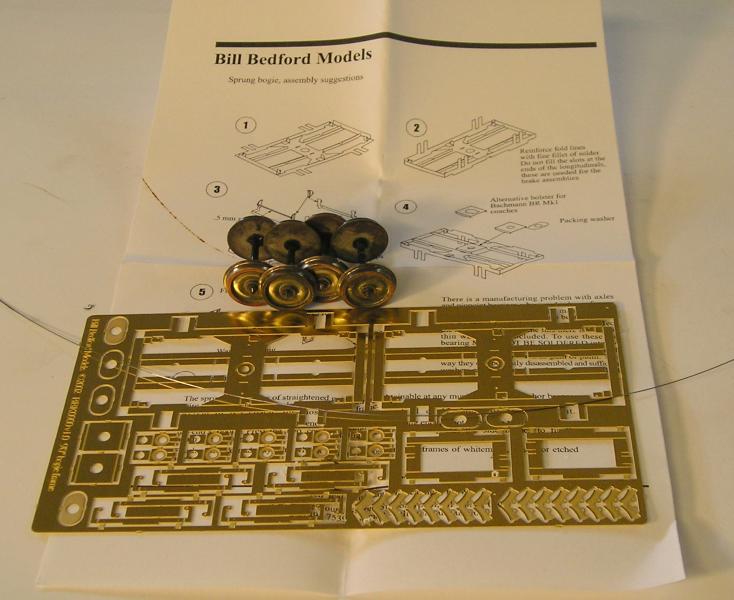
Glory Hallelujah! There are instructions! Well, the sheet says "suggestions".
John
Last edit: by Brossard
John
Posted
Full Member

Getting the brake shoes onto the hangers was much easier if done on the flat. Must look at that uneven wire.
It runs freely and, surprise surprise, it's also square!
You might be just able to see some half etched on the axle box carrier. For correct ride height, these should line up with the bearing. They don't at the moment but once the weighted coach body is added, they should be right. The brake shoes will align better with the wheels too.
John
Last edit: by Brossard
John
Posted
Full Member
 thumbs
Looks good and strong. I'd love to have a go at something like this. I don't have the time to even think about it at present but it's all being filed away for when I do. :cheers
'Petermac
Posted
Full Member
The first thing to do is to gain confidence with soldering. When I started, I slavishly emulated Iain Rice's advice as to equipment and materials. Over time I have developed my own techniques. Having a good iron is a must (ie, you need to spend a bit of dosh and not buy the cheapest), followed by good quality solder and flux.
I chuckle to myself when people try to avoid soldering. It is a skill that gives one an opportunity to expand his/her range of modelling subjects.
John
John
Posted

Site staff
Regards
Alan
Born beside the mighty GWR.
Alan
Born beside the mighty GWR.
Posted
Full Member
I've done that too Alan. ;-)………………………… even using soldering irons that you heat up on a gas ring……………………………
To me, it's not particularly the soldering, it's trying to make my shovel hands behave like micro-engineering tools. I'm a bit ham-fisted when it comes to small parts. If you read my thread on chipping a split chassis V2 loco, you'll see what I mean. I broke almost everything my hands made contact with …………….:oops::oops::oops:
'Petermac
Posted
Inactive Member
Posted
Full Member
John
John
Posted
Full Member

I smoothed out the pivot area underneath and added a 0.080" plastic card bolster plus another 0.020" to the point where the bogie swing misses the solebars.
The bogies are fixed through some plastic tube (I wanted brass but didn't have anything suitable) with 8BA screws.
John
Last edit: by Brossard
John
Posted
Full Member
This morning I turned my attention to the thorny issue of couplings.
In the past I have installed Kadee couplings on bogies and this DOES work. However, it is not best practice. The bogie should be unconstrained and allowed to do its' job of coping with the track. By having a coupling on the bogie, a constraint is added that may restrict the bogie in the performance of its' duties. It is one cause of derailments I think.
So, what is best practice? Well, as in the prototype, the coupling should be on the body. So, this is where I resolved to fit it. The big problem with bogie coaches and couplings on bodies, is that the bogie frequently fouls it. I energized my leetle grey cells and decided that the answer was to cut some of the bogie away as well as shaping the coupling draft gearbox.
You can see what I did here:

The bogie on the right is modified, the one on the left, unmodified for now. The long shank Kadee has had the back corners rounded off. On the RH bogie you will note angled struts added. These were added before any cutting and there was trial and error in order to prevent the struts from rubbing on the wheels. After I felt the struts were right, I cut the bogie. I have tested it and the underframe sails through the test point. :pathead
John
Last edit: by Brossard
John
1 guest and 0 members have just viewed this.