3D printing
Posted
Full Member
Is anyone doing it?
This software is worth a look.DesignSpark | Design Software | Technology Community
Not bad for small parts.
freelance model railways and tramways
index02
index02

Posted
Full Member
Been a while due to a few things, SWMBO poorly, holidays, recovery from holidays, front windows of caravan falling out due to previous owner failing to realise mastic goes between rubber sealing strip and bodywork, hospital and doctors appointments etc.
All sorted now except for medical appointments which will be a continuous monitoring process.
OK on to thread.
I have been learning how, and how NOT, to use my printer and will pass on my experiences in case they help someone.
Mine is a cheap £135.00 self assembly printer. As I have said before, anyone capable of building a layout or model kit should have no problem with the build. The video instructions are excellent but the actual user manual is non-existent.
In order to keep the price down some poor practices have been used such as mounting the print bed on springs instead of adjustable screw legs. However, like a lathe, the printer is capable of manufacturing parts for it’s own upgrade and I have now got a properly adjustable bed.
The bed leveling is critical.
Too low and the print will not stick to the bed for the initial layer.
Too high and it will contact the print head and push the print around the bed.
Both of these ruin your print.
Level the bed for every print, or, fit an automatic bed leveler add on kit at about £15.00. The cheaper ones need to get a free software update online to allow it to work. I have both but am waiting for my next door nerd to install the software before I fit the kit.
Correct temperature is vital.
Too hot and the whole print sags.
Too cold and the layers do not adhere to each other and the print is weak and can delaminate.
Do not believe the temperatures given by filament manufacturers or shown on the printer screen These are approximations and a good place to start to do your own checks and trial runs.
The quality of the filament will define the quality of your print.
Seems obvious but it’s often overlooked.
The only thing I can say is that the more you pay the better the filament seems to be. The best supplier I have found so far is Rigid Ink who give accurate temperatures for both bed and print head and also have a highly informative website with downloadable hints and tips.
Find them here. https://rigid.ink/
Ask for their free sample kit. After using the cheap filament theirs was an eye opener.
So how good are the prints?
The first pic is a set of 4mm tenement end wall chimneys on their own plinth. They are 4mm wide by 4mm high pots with a central gap of 1mm and a side spacing of 1.5mm. They are mounted on a 1mm thick plinth with a width of 11mm and a length of 41mm.

The second pic is of the shorter plinth for the tall stacks in situ. These are taller at 6mm and the plinth is correspondingly reduce in length.

Regards
Jim
 Last edit: by The Bankie
Because, except in some unfortunate circumstances, trains did not run on town centre streets
Posted

Full Member
My issue is that I’m rubbish on cad.
Posted
Full Member
You said
I'm not exactly an expert myself. My CAD is not too bad , it's 3D I struggle with and how to arrange the print on the bed for the best results.My issue is that I’m rubbish on cad.
I suppose we both need to keep on practicing!
Keep up the mediocre work :sad: :sad: it'll improve.
Regards
Jim
Because, except in some unfortunate circumstances, trains did not run on town centre streets
Posted
Full Member
What I have found is that 3D CAD needs to be planned out. 2D you can play around with on the screen, as one might with a pencil but I have not found a 3D system that allows that. Years ago I managed to get on with AutoCAD 3D, but the price puts off domestic users.
At least computers can keep up. My first insight into 3D was through the OU and the computer supplied as part of the course took all night to plot a wire frame of a chess set. No printer or plotter so I photographed the screen. Must be around somewhere.
I did pick up a book on the topic from Foyles in London on a trip a couple of years ago.
Beginning design for 3D Printing by Joe Micallef. Using it I managed a few items using OpenSCAD. This is a CAD programme where the item is written out as a programme. Again a steep learning curve and the need to have planned out what you want up front.
So if anyone has found a good free/cheap CAD programme I would be interested.
David
freelance model railways and tramways
index02
index02
Posted
Full Member
Valid points.
BUT, check out the AutoCAD website. As far as I know they let students have a free/cheap cut down or possibly outdated copy..
Should get you started.
Regards
Jim
Because, except in some unfortunate circumstances, trains did not run on town centre streets
Posted
Full Member
Last edit: by 81F
Modelling the GWR in the Welsh Borders, and the Glyn Valley Tramway with quite a few bits from elsewhere!
Posted
Full Member
Looks good and I have a plethora of CD drives needing a useful home. Snag is they come in so many sizes.
The other immediate question is, what do you intend to use it for as these things spin at a phenomenal rate? So fast that the outer edge of a CD is traveling just below Mach 1 :shock: :shock: and the case for the drive is evacuated to eliminate air resistance.
Either way nice design and good luck with your project.
Regards
Jim
Because, except in some unfortunate circumstances, trains did not run on town centre streets
Posted

Inactive Member
I spend a fair proportion of my working day designing and modelling in 3D. Below is a preliminary image of the reception for a hotel I've been designing..

The model for this was made in AutoCad Revit, and the imaging produced via some other software called Lumion. Both of these are financially out of reach for most modellers, unless you have access to them for non hobby reasons, However some of the objects in that scene, the light fittings for example, are actually made in sketchup, which is free.
There are a few 3D software design packages that are free, and I find sketchup to be the easiest and most intuitive. It's not so great with complex curves though, but as you can see from the light fittings, curved objects can be made.
I find it easier when making scale models to model everything at full size and then scale the completed model down when ready to print. I use a program called Meshlab, which again is free (or at least shareware) to do the re-scaling. This is not the friendliest looking piece of software, but I only use it to do one thing and that is pretty straightforward.
Meshlab doesn't import straight sketchup files, but free plugins are available for the free version of sketchup that allow you to export the model as an STL file, which Meshlab can import. So it's simply a case of importing the STL file exported from sketchup, re-scaling it and exporting a new STL file which can then be used by the software on your home 3D printer or uploaded to a 3D printing bureau such as Shapeways.
The important thing to keep in mind when designing models for 3D printing, are the print limitations of the printer that is going to print the model. For example, Shapeways minimum wall thickness for their "Versatile Plastic" material is 0.7mm. I therefore make sure that nothing I design that will be printed at 00 scale is less than 55mm (0.7 x 76 =53.2). In practice I actually work to a minimum of 61mm, because this will allow the same model to be re-scaled for HO (0.7 x78 = 60.9). N scale models are normally also possible from the same model if instead of printing using Shapeways versatile plastic you use their "Fine detail plastic" which has a minimum wall thickness of 0.3mm (0.3 x 148 = 44) for UK N scale and (0.3 x 160 = 48) for US N Scale. The same model can therefore be used for at least four scales. The larger scales S and O are also easily printed from the same model, but the larger the models get the more expensive they become to print.
As I said at the start of this post, I have been away from railway modelling for a while, but I have done a bit of scale 3D modelling, mainly in response to specific requests. Most recent are some chimney pots for Metcalfe Terraced houses.
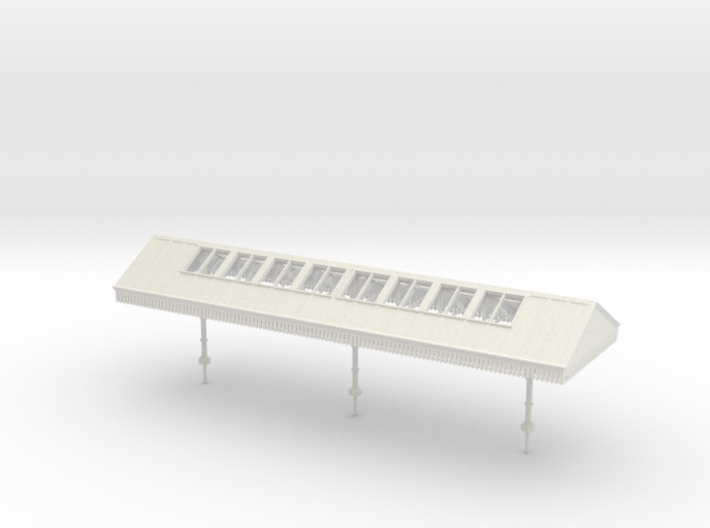
Also a version of my platform canopies as requested to suit a narrower platform. In this case, all printed as one single print, rather than as individual components to be assembled.
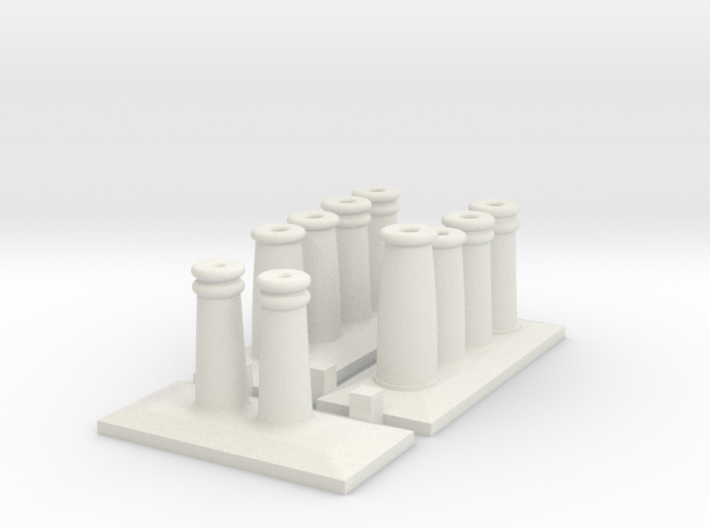
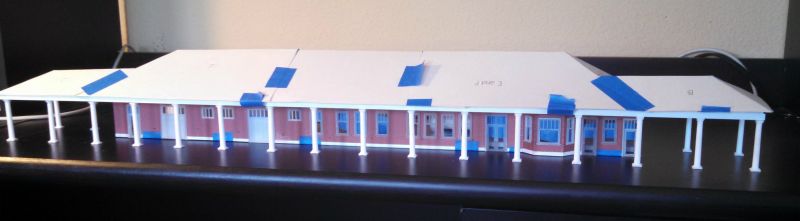
I was also asked by a modeller from the USA to model the columns for an SP Station that he was making. In the end i also modelled all the doors and windows. Below is a progress picture of his model under construction.
Posted
Full Member
Good advice and great bit of modelling.
Even though I am a poor UK pensioner I have access to the full AutoCAD 2017 suite, not on my own machine, but easy enough to get access to so I'm reasonably well sorted.
It's good to let everyone know the alternatives just in case they need to use them. I'll let you know how I get on as a review of one of the teaching videos on youtube shown me an area where I have consistently gone wrong.
Thanks again
Jim
Because, except in some unfortunate circumstances, trains did not run on town centre streets
Posted
Full Member
Sorry for the delay in getting back to you but I wanted to fit the thing and make sure it worked. The loco I have fitted it to is a Lima 94XX.
I obtained the motor from a supplier on ebay (see https://www.ebay.co.uk/itm/Lima-00-Class-08-09-31-37-40-47-52-59-60-66-92-Steam-Quiet-Motor-Replacement-Kit/113338145593?hash=item1a637adb39:g:KaAAAOSw4DJaZ5XG:rk:1:pf:1&frcectupt=true ) which included a gear and other parts.
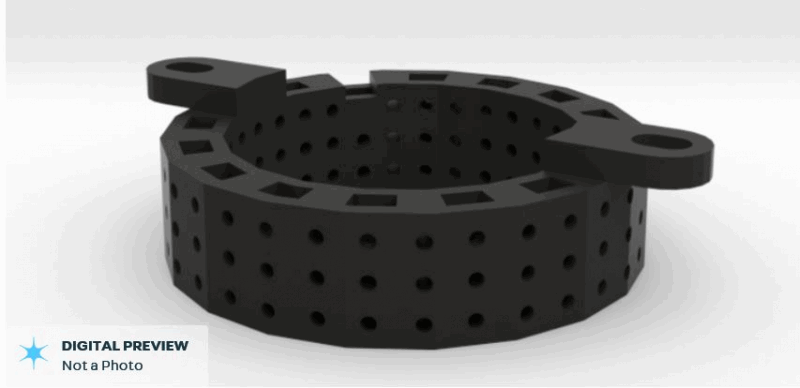
I believe from the write-up for another re-motoring kit the supplier sells the the motor I have is a 10mm thick version that he recommends for the Lima 08, 09, 31, 37, 40, 47, 52, 57, 59, 60, 66, 92 & the steam locos. However I have not been able to test the mounting rings in anything other than the 94XX.
The diameter of the motor was measured up to be approximately 24mm which I used for the motor aperture in the ring which is a very tight fit and there is no sign that the motor tries to turn in its mount. I have printed holes around the edge of the ring to enable superglue to be applied should this happen but as the loco tends to wheel-slip before too much torque is placed on the motor I would be surprised if glue would be needed as long as the gears are free t9o rotate.
Having fitted the motor it will need a resistor as it zooms off at an incredibly fast speed so I am currently experimenting with resistors to slow it down.
I had hoped to test the ring with other LIMA locos but those I have bought from ebay with alleged issues have been easily fixed by reattaching wires or a simple service!
Modelling the GWR in the Welsh Borders, and the Glyn Valley Tramway with quite a few bits from elsewhere!
Posted
Full Member
Nice to hear from you again.

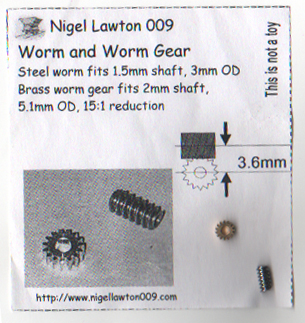
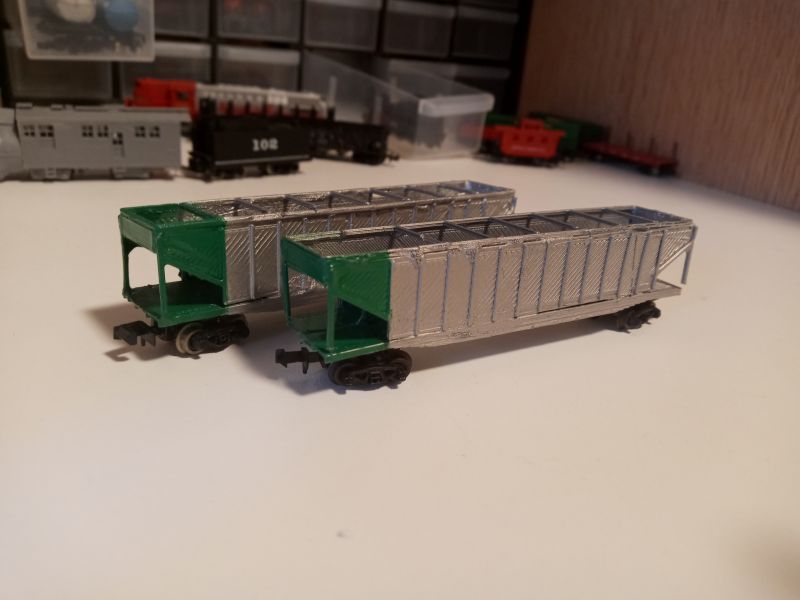
My problem is the Subject matter not the motor or mounting. With a four wheel truck I can not get even one of Nigel Lawtons superb little 6x6x10mm motors under the car without it protruding into the lower salon (6+3.6+2mm for clearance) will mean a little bit of licence will be needed for fitting but will allow a good grip to hold the motor.
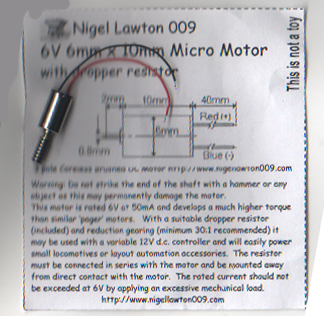
As you can see the components are actually smaller than the illustrations :shock: :shock:
and Nigel does supply the relevant resistor since it's a 6 volt motor because he can't shoehorn all the component for a 12 volt into the case..
All I need now is a chassis.
Hope this is of use to someone.
Regards
Jim
Because, except in some unfortunate circumstances, trains did not run on town centre streets
Posted
Full Member
I helped towards the Didcot Railway Centre recently by buying a copy of 3D Printing and Laser Cutting - A Railway Modelling Companion by Jeff Geary and Dave Renshw published by Ian Allen in theri book shop. Much of it is about producing the 3D drawings but the sections where a basic plastic reel fed printer is used are quite revealing. For anything except very basic shapes the technology has some way to go. When it comes to 3D printing larger objects the best way is to print the parts for a model to be assembled.… I was impressed. I reckon they are going to become major players in all forms of modelling. David
The main problem with top fed printers, which is what the reel fed plastic ones are is supporting parts of the item being printed. Also the final definition does not seem to be too good yet.
Industrial systems create a body from within a supporting material, but naturally cost a lot more. Additive manufacturing to give it the correct technical name certainly has a future and if you can afford a machine then certainly have a go, but regard it more a a learning aid rather than something that willchange your world.
From the book I suspect that lazer cutters might have a more immediate future being able to cope with slight thicker materials than the card possible with the current Sihouette and similar cutters.
There also the need for an intuitive 3D CAD sytem. The book relies on the free downloads availble, which certainly work but are not always the easiest to learn and use.
One of the problems about the publicity of new technology is where they disregard the old. 3D printing is slow, but the forms produced may be used as casting patterns for quantity production. Similarly if a form of wax replaces the plastic then the item produced, and possible part of an assembly can be used as the basis of lost wax casting, a process the ancient Egyptians certainly knew about. I believe Rolls Royce and the like use this process in the manufacture of complex parts for aero engines.
David
freelance model railways and tramways
index02
index02
Posted
Full Member
Last edit: by Aunuli Mansfield
Posted

Full Member
Posted
Full Member
Posted
Full Member
Couple of points,
David: Resin printers are the cheaper form of the ones you refer to and as far as I can make out they are OK with definition but severely limited in print bed size (130 X 70 X 200MM approx in current amateur ranges. They can only print plastic at this stage whereas the commercial jobs can print low melt (Silver, Gold, Aluminium) metals and the POWDER they print from is expensive.
Aunuli: Nice job and just remember most kits require fettling to produce a good model. Like you I am more interested in stuff that isn't produced commercially (Span wire ears for tram catenaries and pole caps etc) so I need to make them.
To both of you the price for our "toy" resin printers is currently below £200:00 and falling.
Regards
Jim
Sorry guys I should have put this link on before I posted N4-anet3d.com
Last edit: by The Bankie
Because, except in some unfortunate circumstances, trains did not run on town centre streets
1 guest and 0 members have just viewed this.