Tinkers End
Posted

Full Member
East Coast Main Line - in the sun
Well I hope everyone is staying safe. Here in Spain it's four weeks since I have been away from the house and at least another two to go. Needless to say a fair amount of time is being spent on the model railway although the lack of being able to get materials is having an effect. The laser cutter work is on hold pending materials, plastic kits are on hold due to lack of glue but still plenty I can be doing. But it's turning out to be a great thing to have on the go at the moment.So as well as a bit of scenic work I have returned to my terraced housing build (I'd been putting it off) and started re-examining my lighting plans. The basic Idea is to use SMD lights in strings of 4 with a resitor attached to a 12v power supply. So the idea for the Metcalfe terraced houses was a set of four in each pair of houses. I woke up this morning thinking that was all well and good but what happens if I have a failure. So the current test is shown below. I would welcome comments and suggestions if anyone can think of a better way of doing it. Anyway pics first:

The above pic shows two SMD lights one threaded through the plastruct for the ground floor, the other through the card collar and fastened to the outside of the plastruct.

So two light pillars and a resistor connected to a 12v power source and I drilled holes in the house floors into which the pillars can be dropped, the collars making sure they are at the right depth. The feed wires will then be attached to a 12v bus running through the row of terraces, connected via junction blocks. The roof will then be attached with tiny drops of silicon so that it can be easily removed if required. and any faulty light pillars replaced.

Lights in place although, on this particular set, the upstairs lights are both at the back and the downstairs at the front but that is easy to change.
Not sure if it is overkill but as I have loads to make I thought I would put it up here first. I plan to use a similar method for all the buildings although some may be fed from the under the layout depending on position.

Posted

Full Member
'Petermac
Posted
Full Member
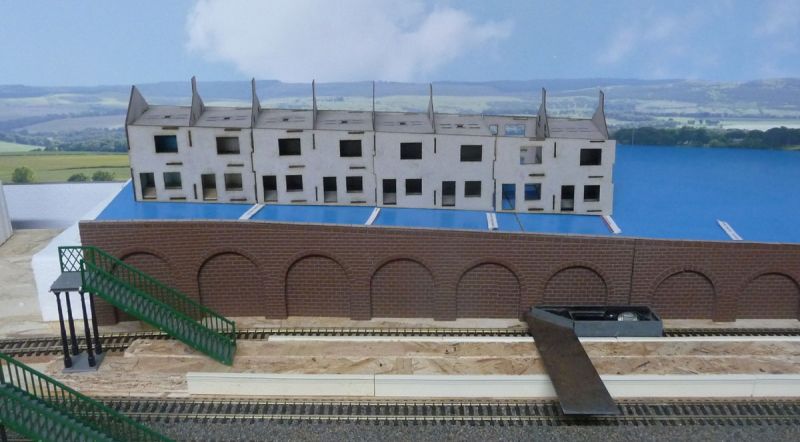
This picture shows the slope behind one of my mainline stations and my home grown terraced houses. Currently there are only 8 but, once new materials arrive, there will be two rows of 16 plus two rows of 16 half depth ones behind these. I have designed the houses to fit the 1 in 20 slope and cut them with my new laser cutter/engraver. It's been quite a challenge to get the tabs lined up and floors on the level. I have just ordered brick paper for covering them but when it will arrive who knows. There is still loads to design and cut for doors, windows and other bits but it keeps me busy.

This picture is by the other mainline station. I have started building the platforms and just need to put on a final surface. My plan was to have people get to the platforms via an underpass from the station building itself so I have started making the steps. I knew I had the Hornby station in stock and got it out to see how it looked. I am seriously not impressed it looks very small to my eyes, especially when compared to the Metcalfe houses behind. So I think I need to look for a new station building.
And finally for now, here is a picture of progress on one of my smaller branch stations - early days but I think it should look ok. It's a bit difficult to get it looking quite right as the large rock face behnd hides the southern fiddle yard and has the airfield above it.

I have decided to do the roads by cutting the road itself from brown paper (I do have a 100 metre roll in stock) and then spraying it with Rust-oleum old iron spray paint. I like the effect and by spraying it on the the brown paper I can do the spraying away from the layout.
Well at least another two weeks of lockdown here so I guess that's more modelling time. Hope you all stay safe.
Posted
Full Member
Looking at the scale of your tools - the hammer and square, you look to have a decent space there to work with. I also like your "Soar Point" station name.

That sloping terrace looks excellent and I know from experience, they're not easy to build whilst making them look realistic. I wanted to model them on Maxmill 1 so spent a fair amount of time studying the terraced houses built on steep hills in the West Yorkshire mill towns. Even for builders on a 1:1 scale, they're not easy but they really do set the scene - Hovis and all that stuff ………………………
Regarding your rock face - would brick or stone be more appropriate ? I don't know the terrain you have but massive retaining walls were a striking feature of many areas.
'Petermac
Posted
Full Member
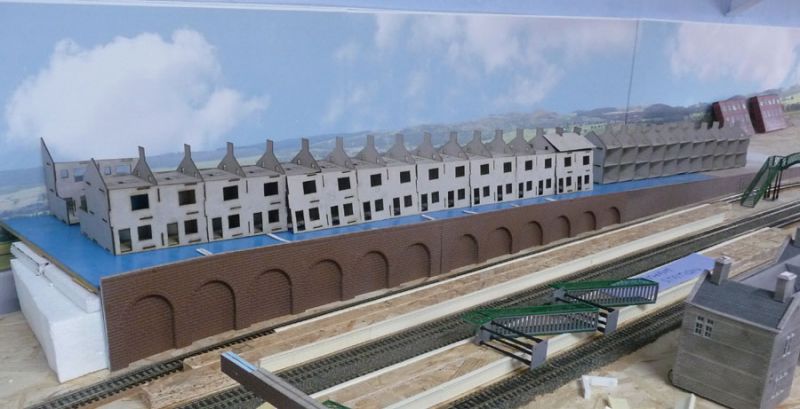
The house fronts are only placed in position as they need brick paper wraps and the internals done a bit. The lower row is almost complete and I have started on the low relief backs for the rows up against the backdrop. Although it is only 7:30 the laser cutter is on the go as I write this doing another set of houses. I have the cutter in the garage with a wifi camera sending video to the PC so I can keep an eye on it.
The second laser cutting project I have on the go is platform canopies for one of my main line stations.
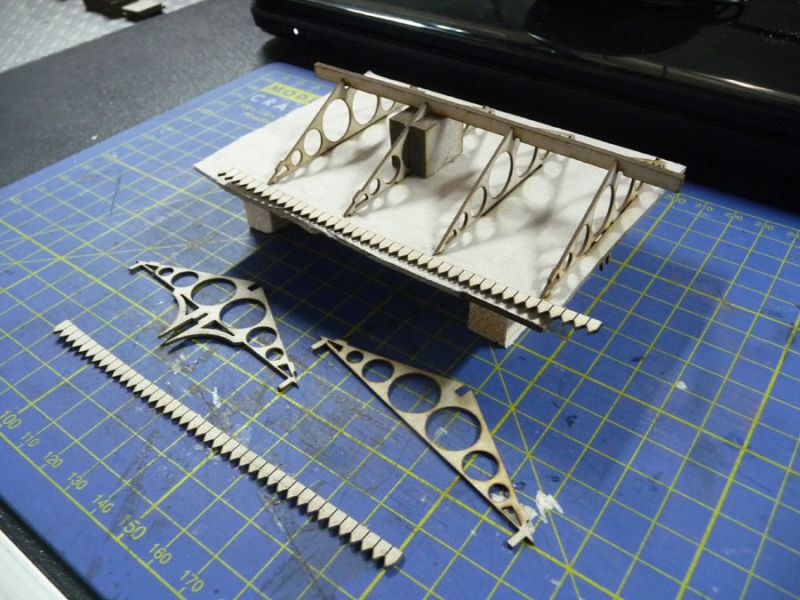
What you see is a jig I made up for assembly of the basic structure which is quite delicate but is fine once assembled. The ribs are spaced at 30mm but only every alternate rib has the lower section to which the pillars will be attached. The roof will then be laser cut, probably from cereal packed card, with windows between each rib. I'll post another update when I get the first 120mm section nearer completion.
Some work has also been done on the platforms themselves but I am keen to sort out a station building. Townstreet do a rather nice impressive one although now I have the laser cutter maybe a scratch built item may have to be worked on.
Keep safe.
Posted
Full Member
I love your long terraces - are they copied from a commercial product or did you design them yourself - similarly the station canopy. You said you use cereal packet card - that's quite thick for a home cutter - or do laser cutters cope with thicker material than plotter cotters ?
Is the card laminated after cutting or single thickness ?
'Petermac
Posted
Full Member
The terraced house outer walls are made from 2mm card, I planned to use 2mm MDF but I can't get any delivered easily here in Spain during the lock down. All inner walls and the kitchens out back are 1mm card. The platform roof is primarily 1mm card although the ridge bar is 2mm. The laser cutter has to make two passes to go through 2mm material so no quick.
My plan is to make both roofs from creal packet card as it is a little thinner than 1mm. For the houses I have just taken delivery of some tile sheets to cover it with. On the platform canopies the video I saw just painted them silver and then weathered them down to look like an aged metal roof. I think a trial section may be the answer.
It has taken quite a bit of experimenting to get tabs in the right places and a number of choice words have been uttered when I actually come to build them and found it was impossible to get tabs to locate when other walls have been glued in place.
Thanks for the interest.
Posted
Full Member
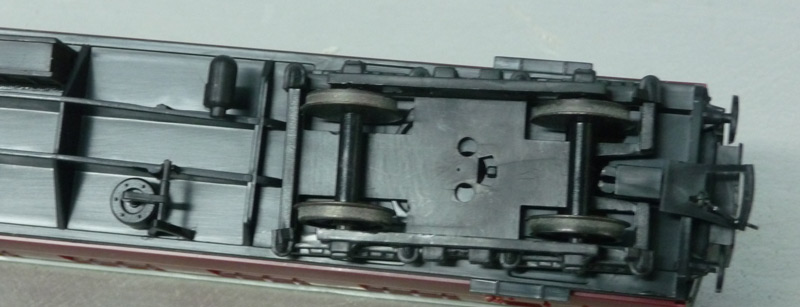
Anyway, can anyone help. I am also trying to sort out the stock I have ready for running trains. I found, spread around a number of boxes, 5 carriages that I have no idea where the came from or what make they are. Here is a picture of one so if anyone can provide me with any more info I would appreciate it.
The carriage appears to be a Mk1 corridor second. None of the five have running numbers but they all have metal wheels (14mm) and small(ish) tension lock couplings.They have plastic axles which are in two parts.

Posted

Full Member
Given the heat over here today (I live just north of Alicante), in order to keep cool, I have been in my model room in the basement. I have done a bit of modelling of my station. I don't have a laser cutter so have to revert to the good old card and scalpel.
I have just re read your posts from start to finish and congratulate you on your work and progress.
I hope all is ok with you after your operation.
As for the carriages, with the plastic axles and lack of manufacturer details, Airfix springs to mind but I could be and probably will be wrong about that.
Today, lockdown is released for us so I hope you can start to source more of your materials.
Stay safe.
Gary
__________________________________________________
I am no expert but I do what I can, when I can, with what I can.
__________________________________________________
I am no expert but I do what I can, when I can, with what I can.
Posted
Full Member
Thanks for the suggestion. I will do some more research around Airfix. I am trying to make all my express trains up to 6 ot 7 carriages as that is the most my platforms can accomodate. I could just add a diffent manufacturers buffet/restaurant car if I get stuck.
Posted
Full Member
See this link here as an example - Hachette Coaches
 Last edit: by RFS
Robert
Posted
Full Member
Posted
Full Member
Having had a period where quality was good and prices not stupid, we seem to have moved back into model railways being aimed at the wealthy…….
From what I've read, whilst not perfect, those Hachette coaches can look quite good after a bit of work.
'Petermac
Posted
Full Member
Step back no. 1: I was posting on Granby Junction about PSX units for creating power districts and the problem I have with DCC Concept IP digital point motors loosing their address when there is a short. I bought the Digitrax controller and booster units from Digitrains so contacted them about PSX units. John was really helpful and explained that the key was to get the IP point motors on one power district but that frog power must be on the track power district. So instead of the 3 wires I have going to each of the 50+ IP motors, I need 5 so combined with splitting up the track to form different power districts (dedicating specific train detection boards to particular areas so extending wires etc) that's going to involve a significant amount of rewiring (and cost but keep that quite - walls have ears). Anyway I have ordered one PSX3 and other hardware required to do the central section of the layout the rest for the two sides will have to wait.
Step back no. 2: I was also finding that some old Hornby (and others) diesels draw power from one track through one bogie and the other track from the other bogie. This would normally be fine but because I have the main controller powering the centre section and a booster for each of the left and right sections they are isolated where the sections meet. So these type of locos stop as they straddle the join. Ok contact Digitrax who say connect the main controller to the booster using the earth connector and that should solve it. So a temporary wire from the main controller to the right hand side booster and success, the old Hornby loco keeps on going. Celebration. A week later and I get round to connecting up the other booster and all hell breaks loose. Again, talking to John at Digitrains he explains that the solution offered by Digitrax is good for only one booster, but if you connect two, you are effectively creating a short. Decoders with stay alives are the next attempt so the affected 4 locos are sidelined for now along with another 4 requiring work.
Step forward no. 1: I have been offered, and actually collected yesterday, a number of pre-built Metcalfe kits. Rather sad circumstances in that a guy who used to come to the club recently passed away and his widow was keen that someone make use of them. It wasn't worth trying to send them back to the UK from Spain. Anyway I now have about 30 models to add to the layout. Some will only be relatively temporary but some are exactly what I was waiting for Hattons to get back in stock. Well worth a donation to charity I thought.
Keep safe.
Posted

Full Member
Why not add pick-ups to the dead wheels? Or get some modern, wired dummy bogies? Cuts down on all that circuitry (time and money). It's what I did with my Lima models.
Nigel
©Nigel C. Phillips
Posted

Full Member
Hi DaveHi Dave,
Why not add pick-ups to the dead wheels? Or get some modern, wired dummy bogies? Cuts down on all that circuitry (time and money). It's what I did with my Lima models.
Nigel
Sorry to hear of your tribulations
Even without the “booster gap“ I would be inclined to try and update the problem locos
Best wishes
John
Posted
Full Member
I have also received a Digitrax combined auto-reverser and track detection unit which will hopefully enable me to see what is running within the "dark zones". Hopefully once tested and new stock arrives to the UK from the USA, I can order two more for the other auto-reversing sections.
So I can start doing some more scenic stuff and maybe, just maybe, run some trains!
Posted
Full Member
I was looking for Tortoise motors, Zimo decoders and right hand electrofrog points but constantly drew a blank.
Looking forward to seeing what you do with all the wizardry. :shock:
'Petermac
Posted
Full Member
That makes my head hurt! wow!50+ DCC Concepts IP digital point motors
Posted
Full Member
Do you have shares in Cobalt Dave ? You certainly ought to with that lot !!
'Petermac
1 guest and 0 members have just viewed this.