A Final Curtain Call for Westown-Heathfield
Posted

Full Member
GWR OO Gauge - 1930's rural Somerset - Winter 1937
Thanks for the comments everyone. To take each point in turn,Peter,
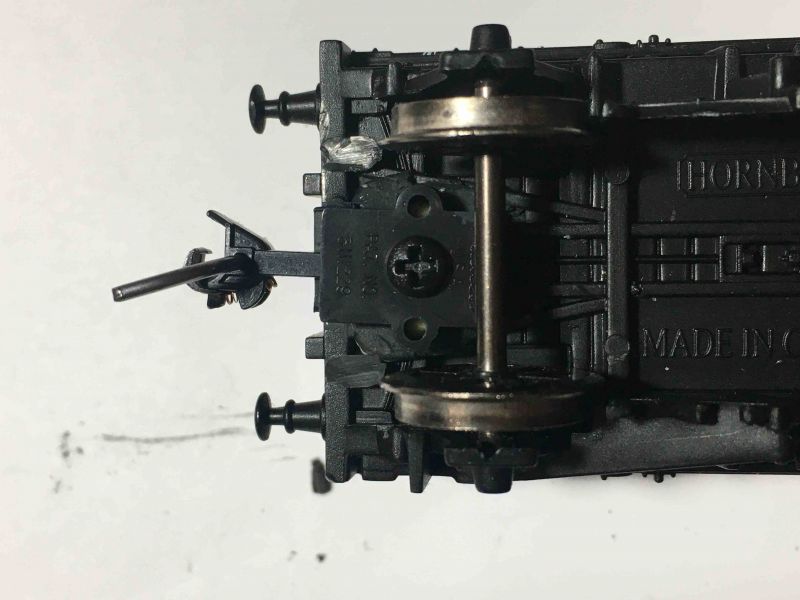
I measured up with the gearbox held on top of the bogie against the #206 Kadee reference gauge (as appearing in the lower photo) This told me I was 4mm too high and gave me the correct level to use.
At present, and to also address Nigel's point it is a very snug fit against the sides of the recess which was carefully whittled to shape and it stays there even unglued. I wanted to do further checks before finalising the installation as I'd no experience with using the Kadees on bogies and worried I'd hit problems on my tight W-H curves. The good news is my first test run with it held in place with CA and worked well.
The Kadee kits are very good including all sorts of bits and spares including screws, but no nuts so I've got to wait until these come to finish the job off.
Sol,
thanks for the info on the newer gear boxes and couplers, I'll explore what's available on line here.
I'd been mostly using plug-in NEM types as a straight swap and have installed the odd PA34 / NEM socket but now with lots of kits to fit out, I need to get serious about using gearboxes.
Looking at the link for #233 it says it uses a torsion centering spring. I think you mean the #242 or #252
as these are specified for whisker couplers. All the same most helpful guidance so no complaints :cool:
https://www.kadee.com/products-by-number-c-81/242-snaptogether-gearbox-ho-p-332.htm
https://www.kadee.com/ho-scale-couplers-c-274_276_284/252-ho-scale-small-whisker-coupler-snaptogether-gearboxes-lids-whisker-coupler-30series-equivalent-gearboxes-lids-p-335.htm

Posted

Site staff
And Bachmann do a range of similar couplers - Mk 2 only is what I would use.
E-Z Mate® Couplers : Bachmann Trains Online Store
Ron
NCE DCC ; 00 scale UK outline.
NCE DCC ; 00 scale UK outline.
Posted
Full Member
Yes the torsion centreing spring is used in the old boxes & 30 series couplers.
And Bachmann do a range of similar couplers - Mk 2 only is what I would use.
Do you order direct from the US under "normal" conditions?
I noted for Kadee items the pricing ex their site and best I could find here were reasonably comparable before shipping. Other than "best here", they are typically much dearer from local dealers. Few have any stock left now, anyway.
Posted

Full Member
I think it's better now but still a long way from being good. Not sure about UK but buying direct from the States attracts a fairly hefty import duty here in France. My experience, with other things, is that the duty almost doubles the purchase price.
'Petermac
Posted
Site staff
example
Products | Casula Hobbies
also littletrainshop.com.au - Ce site web est à vendre ! - Ressources et information concernant littletrainshop Resources and Information.
Search: 525 results found for "kadee" - Page 2 - Metro Hobbies
E-z mate from NZ
Couplers & Buffers
Ron
NCE DCC ; 00 scale UK outline.
NCE DCC ; 00 scale UK outline.
Posted
Full Member
Once they were put into use it became clear that the gaps between sides and stock were sufficient to allow stock to easily jump the tracks during handling. Addition of foam board either side at suitably chosen heights solved this issue.
A partly assembled cassette shows the end result. The two plastic strips each end are the supports for the end cards, nice tough resilient old loyalty and other like cards are perfect and if you're lucky can bring back fond memories from when we could travel. Top marks to those who can work out which one is shown here.
Posted
Full Member
All my RTR stock receives a standard treatment to bring their rolling weight up to about 75% of that recommended in the NRMA Car Weighting Recommended Practice RP 20.1. I can't remember who told me to do this but it has worked very well avoiding wagons jumping the tracks particularly when being pushed around curved point arms; preventing "Rocking and Rolling" in some older coaches etc.
Normally it's no big deal but Dapol throw up a tricky challenge with their covered wagons which are glued never to come apart.
I wanted to achieve this:
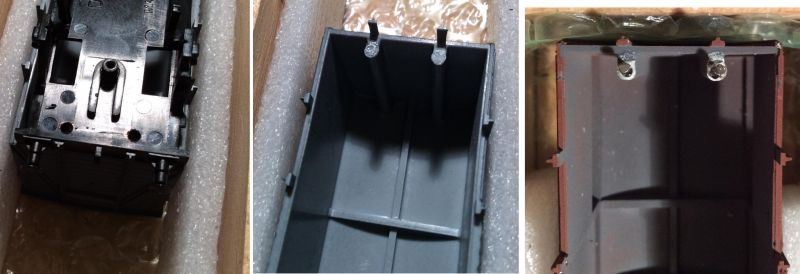
Wagon on the left weighs in at a modest 31g which I needed to raise to 53g and add some passengers as shown at right. But how to get inside?
Body stud locations are 9.5mm in from Body sides and 3mm from ends. I drilled out with 2mm bit (5/64in) until completely through the softer black chassis plastic and into the white wagon plastic. This is critical to weaken the joints which are very firmly glued down.
With the entire centre of the joined section removed I had 100% success in easily snapping the joins by inserting a screwdriver into the side and levering. Looking at the join I could see why any lesser weakening might well cause breakage elsewhere.
Next I drilled out 1.2mm holes in the centre of each pillar (not being fussed about retaining them as I don't intend to look that closely inside) and glued in 1mm * 12mm nails using a standard gel adhesive. After adding a suitable loading the floor is attached and held with small drops of adhesive. Now the new wagon needs the "treatment" a number change and some Friesians.
 Last edit: by Colin W
Posted
Full Member
What do you use to weight them Colin ? I've tried fishing weights without too much success but there's a real problem with empty open wagons or stock with a low freeboard (can one have a freeboard on land-based things ? :hmm)
Other than the lack of weight and occasional moulding wear, these Dapol wagons bought as kits are excellent value if one isn't too much of a rivet counter. The old Airfix kits I believe.
'Petermac
Posted
Full Member
The Dapol roof.
This appeared to be very firmly glued down at the ends including to the tops of those internal pillars on the end walls. Judging by the amount on force still required to break the remaining bonds after drilling away most of the joins at the bottom there is no way the roof could be prised off without doing some serious damage.
Which weights?
My favourite source is discarded wheel weights from your friendly tyre repair store. Mine has a big tub and hence I've garnered all I need. A mix of Lead and Steel types, in 10g and 5 g sizes; the steel being larger due to its lower density and potentially (but not yet observed) issues with uncoupling magnets. The lead weights are designed to be cut off to required weight.
I also have a massive lump of lead found in the garden, apparently former use was as a weight on the bottom of a pool ladder. Hard stuff to cut despite Lead's reputation as a "soft" metal. Due care must be taken when working with lead because of it's toxic nature.
Where to locate the weights when inside is not possible?
As I want to run empty wagons sometimes, I first looked to where the weights could be concealed / forgotten
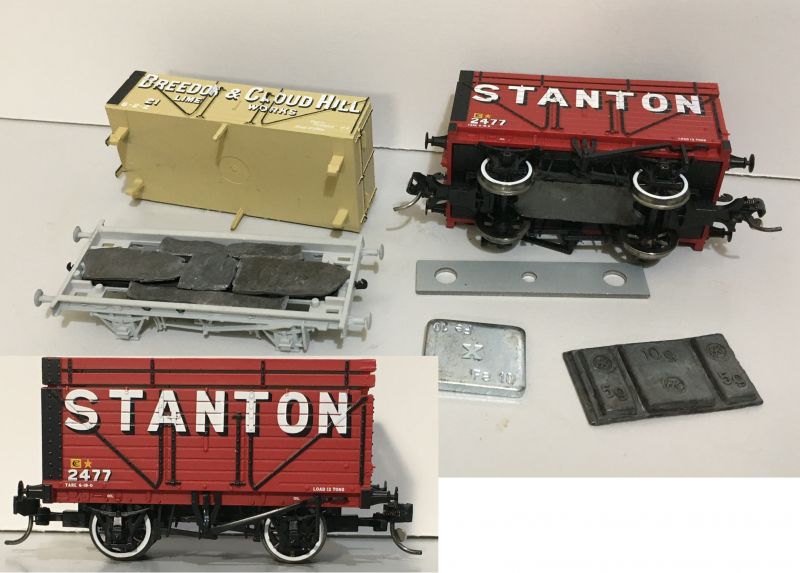
The RTR manufacturers often use a steel strip of ~ 6 to 10g located between the chassis and the upper bodywork. Typically I can add in a further 10-15g of lead in that space as shown with the lime wagon, weights flattened out with a mash mallet. Typically I'm aiming to add 25g on your typical plank wagon so the rest is added as a low profile strip between the coupling mounts. Viewed anywhere above direct side-on this is invisible (but even side-on in normal use barely so - see inset).
Colin
Posted
Site staff
Ron
NCE DCC ; 00 scale UK outline.
NCE DCC ; 00 scale UK outline.
Posted

Full Member
Michael
Posted
Full Member
Sol - are you saying you fitted a lead "skin" inside your empty wagons ? It's a brilliant idea but how did you get it that thin ?
'Petermac
Posted
Site staff
Ron
NCE DCC ; 00 scale UK outline.
NCE DCC ; 00 scale UK outline.
Posted
Full Member
The iron based weights can be bought new on line here e.g.https://tinyurl.com/ydgn54jg
I expect you can find similar in France. For the more useful malleable Pb ones you'll probably need that friendly tyre repair shop with added benefit of being free; paying is against my religion when you can recycle.
The Pb sheet Sol refers to is I think lead flashing as used for roofing. This product is still available but very expensive unless you can find some leftover off-cuts from a roofing job. Its big advantage is it's an alloy and quite soft. ( I see Sol beat me to this point)
Last edit: by Colin W
Posted
Full Member
Peter, lead roof flashing I believe it is called. From old buildings is one source outside of some hardware stores.
I'm off to raid St Mary's of Charity……

Posted
Full Member
[user=606]Sol[/user] wrote:Peter, lead roof flashing I believe it is called. From old buildings is one source outside of some hardware stores.
I'm off to raid St Mary's of Charity……
You beat me to it Michael but I was thinking maybe there's a bit left at Notre Dame ……………………………
I had thought of lead flashing but thought it was thicker than the stuff Sol was talking about. Do they still use it or has Del Boy got a monopoly ? I do have some "Flashband" which I think is some kind of synthetic replacement for lead although nothing like as heavy.
Lead wheel weights I'm sure I could get but I'm not too sure how useful they'd be given their shape. Melting them down is, I'm pretty sure, a no-no because of the health risks.
Thanks for the link to the iron version Colin. :thumbs
'Petermac
Posted
Full Member
Today marks the end of my project to convert all my stock to Kadees and weight all my wagons. Now with passenger, XP, and generals goods wagons all having the same connections operations become much simpler. The last two locos 4869 and 2779 were trickiest needing external gearboxes.
Running the Class 48xx and Autocoach is very good as I've managed a slightly closer arrangement than with the Hornby Mark II types.
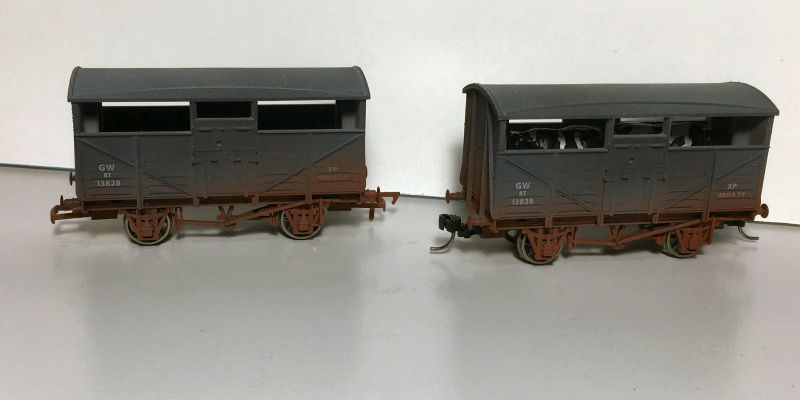
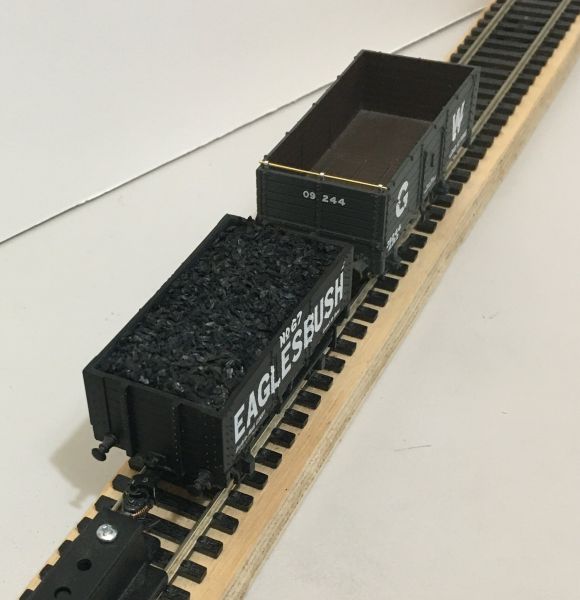
In the wagon department weighting also required some detailing to conceal internal weights. Eaglesbush No 67 is a very basic (but not Railroad range) Hornby from 2012. Lots of extra plastic at the ends to support the terrible Couplings it came with. These are all now gone but the coarse modelling is more apparent now I'm used to better.
Its been done tens of '000s of times I'm sure, so this is for my "next gen" modellers who follow here. Adding a coal load.
The photo shows the weights evenly distributed in the wagon and elevated to support the load. An old business card is cut to give a shallow mound and then fitted in place. Scenic coal is added, one of my young helpers has already done one of these with me some time ago.
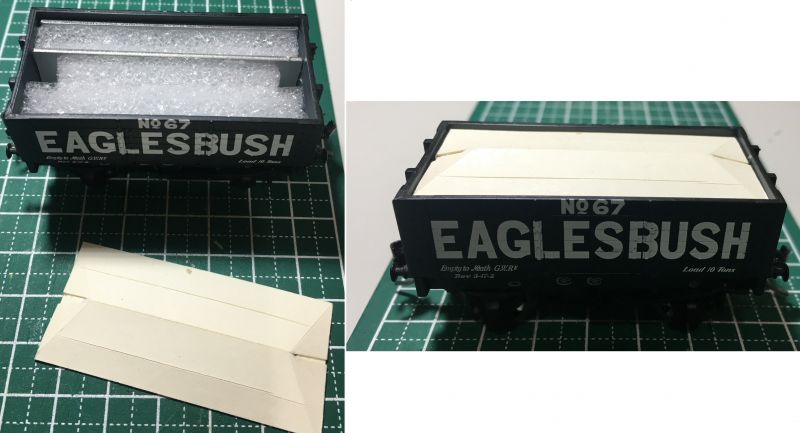
The second photo shows the completed wagon and a second one, an end door wagon that I'd bought pre-owned, minus the end hinge rod. The rod now added as shown here.
edit 31 Aug to add photo of Kadee fitting on Eaglesbush
Last edit: by Colin W
Posted
Full Member
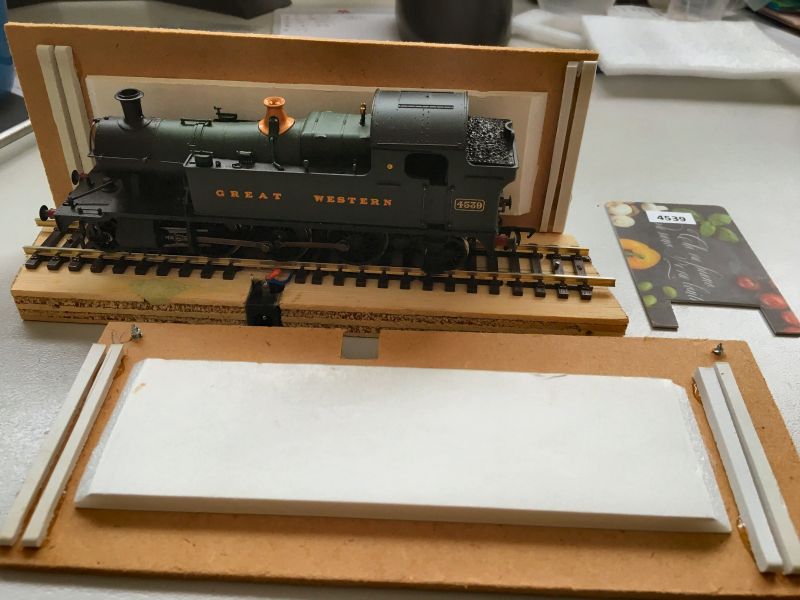
The postman came today, my Peckett, presumed lost after over 21/2 months has arrived safely. What a little beauty!
Runs superbly and made for the job as my Gasworks loco. Here it is lined up alongside what are not large locos themselves, from the back:
Class 64xx
Class 48xx
Terrier A1
Peckett
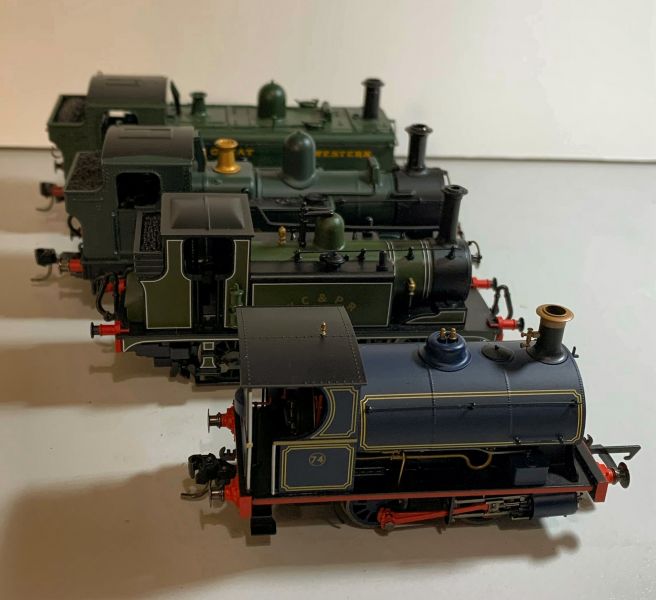
The Peckett is a marvel of modelling, can't fault Hornby with this one

Last edit: by Colin W
Posted

Site staff
The Peckett is a marvel of modelling, can't fault Hornby with this one
My 'Port of London Authority' version arrived earlier this week Colin, but I must admit I haven't actually taken it out of the box yet.
Noticed you have a knuckle coupler on the back of yours, can I ask whether that's a Kadee and how easy it was to fit.
Ed
PS Why a knuckle coupler only on the back :???:
Last edit: by spurno
Posted
Full Member
I thought I'd leave the original Mk II coupling on front to show how oversized it appears by comparison.
The rear is a standard Kadee #19 (Long underset) which plugs straight into the NEM socket at correct height and positioning, just takes a few seconds once you've pulled out the one supplied. Will put another on front in due course as I'm very happy now my whole fleet has been converted over.
Last edit: by Colin W
1 guest and 0 members have just viewed this.