Craftsman Midland 0-4-4T 1P - Belpaire Firebox Kit Build
Posted
#236694
(In Topic #13073)

Full Member
Progress on building first ever loco kit
Good morning folks,After completing the Falcon Horsebox kit, I thought I would progress and attempt a locomotive. Wanting to keep it relatively simple, I chose a tank locomotive and someone had a Crafstman kit going complete with wheels, motor and gearbox. This took a lot of the guesswork out and made it much easier for me to grasp so I snapped it up.Progress so far:
High level gearbox and mashima motor built
Basic chassis built although I need to add strengthening panels where the XO4 motor would have been.
Wheels fitted and motor bench tested. Axles are a little tight in the bushes so need to ream them out slightly.
Here are pics of it so far!


Ian Lancaster
Please visit my OO Gauge 1930's LMS layout "Jencaster"
http://yourmodelrailway.net/view_topic.php?id=14622&forum_id=21&page=1
Please visit my OO Gauge 1930's LMS layout "Jencaster"
http://yourmodelrailway.net/view_topic.php?id=14622&forum_id=21&page=1

Posted
Full Member
I fitted strengthening bits to where the XO4 motor would have been, and installed a cab floor (had to be removed again as it stopped the body sitting flat. I havent track tested it yet, but I have installed the pick ups, brake gear, DCC chip and some of the body parts. The gap between the boiler and tanks will be filled probably by spare brass and some Epoxy or Filler. I cant use solder to fill the gap otherwise the heat will melt the white metal parts already fitted.
As my first loco kit build, I am pleased with my progress. Again, its not perfect, but I am learning lots as I go.


Ian Lancaster
Please visit my OO Gauge 1930's LMS layout "Jencaster"
http://yourmodelrailway.net/view_topic.php?id=14622&forum_id=21&page=1
Please visit my OO Gauge 1930's LMS layout "Jencaster"
http://yourmodelrailway.net/view_topic.php?id=14622&forum_id=21&page=1
Posted

Full Member
Looking good.
Romford wheels/axles. You can very carefully (very, very, carefully) use a fine flat file on the square ends of the axle (2 strokes on each side, check, repeat) or if you have a mill (we all have one lying around of course) take off a thou' or so, or put it in the freezer for an hour and then see if it fits. Or send them back and get a set that fits.
Brass body bits not fitting - par for an etched model, especially older ones with thick metal. You can stretch them a bit by heating cherry red, letting cool, and rolling/beating with a panel hammer, and flattening, or use silver solder (high temp so it doesn't melt when attaching detail bits) and strips of brass for big spaces. In this case a flame is better than a soldering iron. Car body filler, epoxy or glass fiber/resin works as well. Have to be careful soldering after though. Probably easier just to cut a piece to size from brass sheet, punch wivets as required.
Nigel
©Nigel C. Phillips
Posted
Full Member


Ian Lancaster
Please visit my OO Gauge 1930's LMS layout "Jencaster"
http://yourmodelrailway.net/view_topic.php?id=14622&forum_id=21&page=1
Please visit my OO Gauge 1930's LMS layout "Jencaster"
http://yourmodelrailway.net/view_topic.php?id=14622&forum_id=21&page=1
Posted

Site staff
Ed
Posted
Full Member
Ian Lancaster
Please visit my OO Gauge 1930's LMS layout "Jencaster"
http://yourmodelrailway.net/view_topic.php?id=14622&forum_id=21&page=1
Please visit my OO Gauge 1930's LMS layout "Jencaster"
http://yourmodelrailway.net/view_topic.php?id=14622&forum_id=21&page=1
Posted

Full Member
Cheers,John.B.:thumbs
Posted
Full Member
I have weighted the chassis with extra lead shot, and fitted 2 pick ups per wheel.
I need to test loco on a section of analogue track to check if pick ups etc are doing its job, or if the chassis/wheels alignment or DCC chip is causing a problem.
I am at the stage where I can think about painting the body shell. I have cleaned it all up using brass/steel wire brush on my rotary tool, gave it a soak in diluted viakal and a scrub using a toothbrush and some soda crystals. Its being drying overnight so hopefully I will be able to give it a coat of Phoenix paints etching primer tonight or tomorrow night.
A final coat of black will finish it off before I get the pressfix decals out.
 Last edit: by IanLMS
Ian Lancaster
Please visit my OO Gauge 1930's LMS layout "Jencaster"
http://yourmodelrailway.net/view_topic.php?id=14622&forum_id=21&page=1
Please visit my OO Gauge 1930's LMS layout "Jencaster"
http://yourmodelrailway.net/view_topic.php?id=14622&forum_id=21&page=1
Posted
Full Member
Are all the drivers level? Very important if you do not have a sprung suspension. Check with a mirror. Any sign of a waddle?
A 0-4-4 loco need pickups on all wheels. Is the trailing bogie/truck wired?
Repeated stalling can be the result of momentary shorts. Not noticeable with DC, an immediate stall with DCC. Is the decoder hard-wired or did you use a wiring harness? Either way, check the connections, including those to the decoder.
Edit 1. If you used a harness check that the wires are firmly soldered. I had one recently where the black wire was loose due to a soldered joint failure, the heat shrink sleeve was keeping it in contact - most of the time.
Edit 2. One advantage of using a wiring harness instead of hard wiring is that you can test the decoder in another locomotive known to run properly with DCC. And also use a blanking plug in the new one to test with DC. Plus you can test continuity with a meter at the plug.
Nigel
©Nigel C. Phillips
Posted
Full Member
I have a slight tight spot when turning the motor by hand, so I am wondering if its enough to casue the motor/chip to cut out. I have widened the holes in the coupling rod very slightly as there was zero play, but it could be the wheels not sitting square.
After double checking everything on analogue (by bridging the connections in the harness) I will be able to verify all is good in that respect.
My next plan was to test the chip in another loco, then try a different chip in this one. It could be a shorting issue now you mention it, although its not tripping the DCC system. It could be enough to stop the chip from working properly though I guess.
I hope to take another look this evening.
ian
Ian Lancaster
Please visit my OO Gauge 1930's LMS layout "Jencaster"
http://yourmodelrailway.net/view_topic.php?id=14622&forum_id=21&page=1
Please visit my OO Gauge 1930's LMS layout "Jencaster"
http://yourmodelrailway.net/view_topic.php?id=14622&forum_id=21&page=1
Posted
Full Member
Sound like it could be mechanical. Is the gearbox frame square? Are the bushes binding on the gearbox axles or the driving axle? Any solder in the bushing? Are all the gears in the correct orientation? Is the worm too tight on the idler gear? Check the gears for eccentricity. How tight are the rods? All things that have happened to me over the years.
Tight gears are a pain to fix, you can use a cream abrasive (I use one based on sea shells, tooth paste works just as well), but such fixes are only good for a few microns. Anything more and they should be replaced. Tight or just less than square bushes are usually fixable with a tapered reamer. Or solder in new ones. A less than square gearbox frame is usually the culprit.
Nigel
©Nigel C. Phillips
Posted
Full Member
Ian Lancaster
Please visit my OO Gauge 1930's LMS layout "Jencaster"
http://yourmodelrailway.net/view_topic.php?id=14622&forum_id=21&page=1
Please visit my OO Gauge 1930's LMS layout "Jencaster"
http://yourmodelrailway.net/view_topic.php?id=14622&forum_id=21&page=1
Posted
Full Member
For the running issues: Basically, I stripped out the wheels, gearbox and motor and checked everything for squareness, and re-assembled. I put the motor in the other way round so it now sits in the firebox.
I purchased a Zimo DCC chip, however, it was too large, so I used a DCC Concepts Zen chip which fitted in the coal bunker. The stay alive unit fitted in the R/H tank. I put a 4-way micro joiner in between the body and chassis so I can disconnect the body from the chassis without having to remove the chips etc.
This has helped it run a lot more smoothly. Still having issues with the intermittent running, but it works perfectly on the rolling road and on the gaugemaster track cleaner. This is probably down to poor pick-up arrangement, or one wheel not quite sitting level. I have checked everything, and the wheels sit level, so I am heading down the pick up route. If it was the track, all my other loco's would do the same, but they work fine.
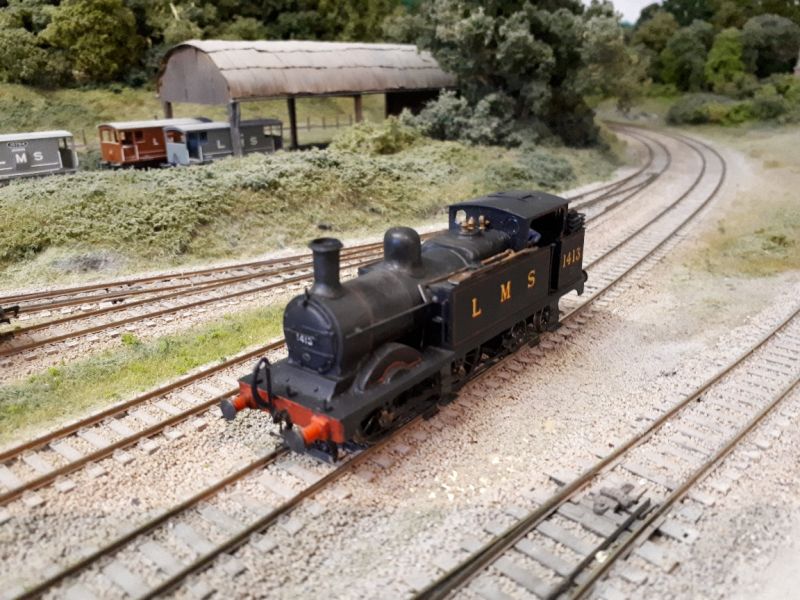
I have painted and lined (with a bow pen) the loco, and just have a few minor jobs to do before calling it complete (installing sand-pipes/additional sand boxes behind steps, fit the shed plate (20F - Skipton), works plate (Derby), add a dash of weathering, gently smother in coat of satin varnish, add a touch of real coal for the bunker, gently apply tools to the top of the L/H tank, ease glass into the windows (plastic or krystal klear), and for the third time, revise the pick-ups (possibly add some to the bogie wheels), oh, and yet again, due to ham-fistedness….fix the brake rod/linkeage mounts, again!!
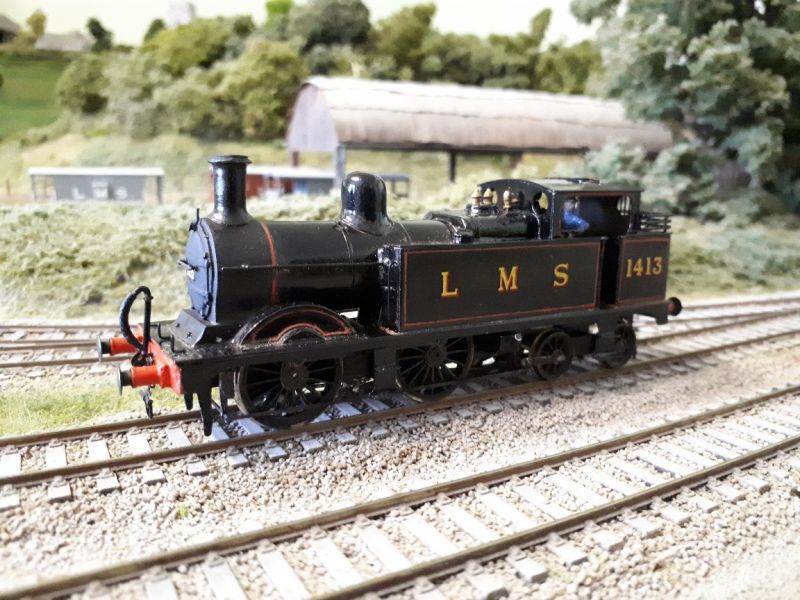

The lining could be better, but it was my first time using a bow pen, and it highlights the need for much more practice!!!!
Ian Lancaster
Please visit my OO Gauge 1930's LMS layout "Jencaster"
http://yourmodelrailway.net/view_topic.php?id=14622&forum_id=21&page=1
Please visit my OO Gauge 1930's LMS layout "Jencaster"
http://yourmodelrailway.net/view_topic.php?id=14622&forum_id=21&page=1
Posted
Full Member
Looks the business.
Have you got a tight rod? Usually happens when the axle holes on the sides are not exactly aligned or the frame spacers are not quite parallel. Doesn't hurt with an 0-4-4 if there is a tad of slop in one axle bushing. Just a thou' or so. Run it on the rolling road at the slowest possible speed and observe both sides.
Nigel
©Nigel C. Phillips
Posted
Full Member
Ian
Ian Lancaster
Please visit my OO Gauge 1930's LMS layout "Jencaster"
http://yourmodelrailway.net/view_topic.php?id=14622&forum_id=21&page=1
Please visit my OO Gauge 1930's LMS layout "Jencaster"
http://yourmodelrailway.net/view_topic.php?id=14622&forum_id=21&page=1
Posted
Full Member
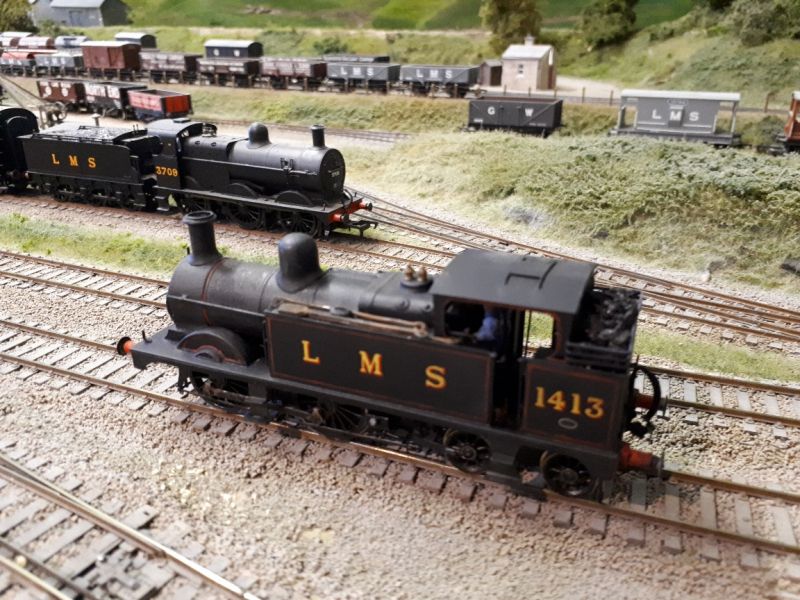
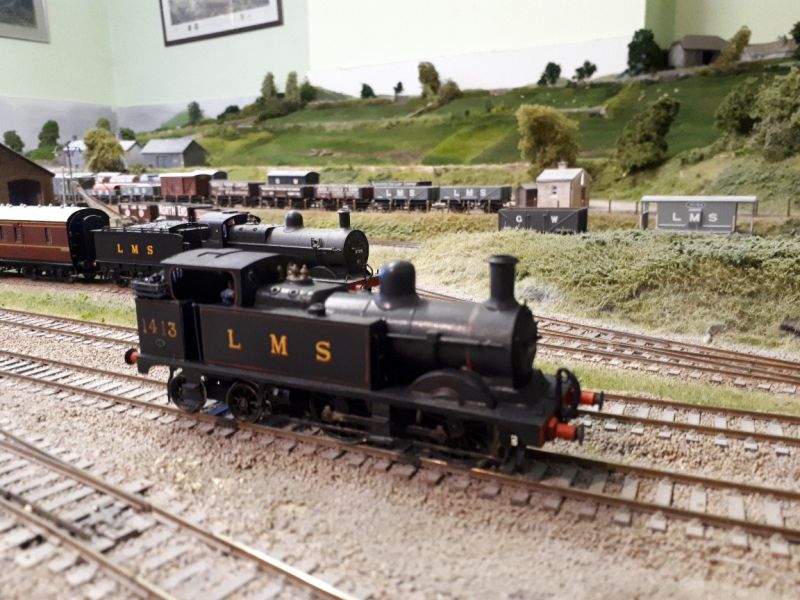
I have pretty much completed the loco, adding weatehring, real coal, krystal klear windows, tools and a coat of matt varnish. I am pretty pleased with the outcome seeing it was my first loco build I had attempted. Will be nice to see it running around the layout with a few of my suburban coaches behind it.

Ian Lancaster
Please visit my OO Gauge 1930's LMS layout "Jencaster"
http://yourmodelrailway.net/view_topic.php?id=14622&forum_id=21&page=1
Please visit my OO Gauge 1930's LMS layout "Jencaster"
http://yourmodelrailway.net/view_topic.php?id=14622&forum_id=21&page=1
Posted
Full Member
CC Weathering Services: https://ccgwr1.wixsite.com/ccweatheringservices/
CC Weathering Services Facebook Page: https://www.facebook.com/ccweatheringservices/
CC Weathering Services Facebook Page: https://www.facebook.com/ccweatheringservices/
Posted
Full Member
For me, the lining lets it down and the running isnt as smooth as I hoped, but again, its moy first loco kit build so happy to learn from my mistakes.
Currently making a SE Finecast LMS 4F and will start a new post for that.
Ian Lancaster
Please visit my OO Gauge 1930's LMS layout "Jencaster"
http://yourmodelrailway.net/view_topic.php?id=14622&forum_id=21&page=1
Please visit my OO Gauge 1930's LMS layout "Jencaster"
http://yourmodelrailway.net/view_topic.php?id=14622&forum_id=21&page=1
1 guest and 0 members have just viewed this.