Scalescenes Corner Shop/Pub
Posted
#190284
(In Topic #10648)

Full Member
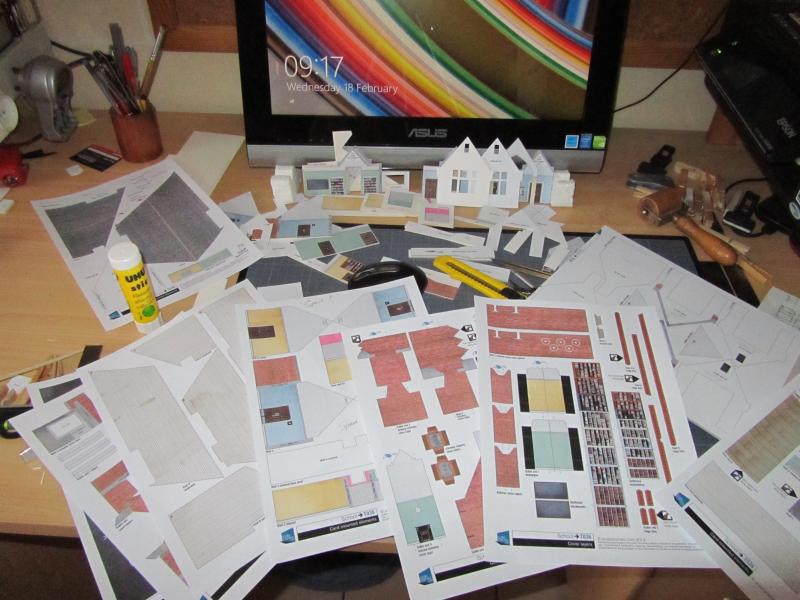
All John Wiffen's kits are ingenious…..this one is no exception. It is primarily designed to add on to the end panel of a row of his terraced houses. In addition the kit includes a number of alternative shop fronts (Butcher, Laundrette, Chippy etc) which can be substituted for house fronts thus creating a row of shops
Component assembly is standard Scalescenes………..from time to time I have added words of advice……..based ……believe me ……on bitter experience:oops::oops::oops:
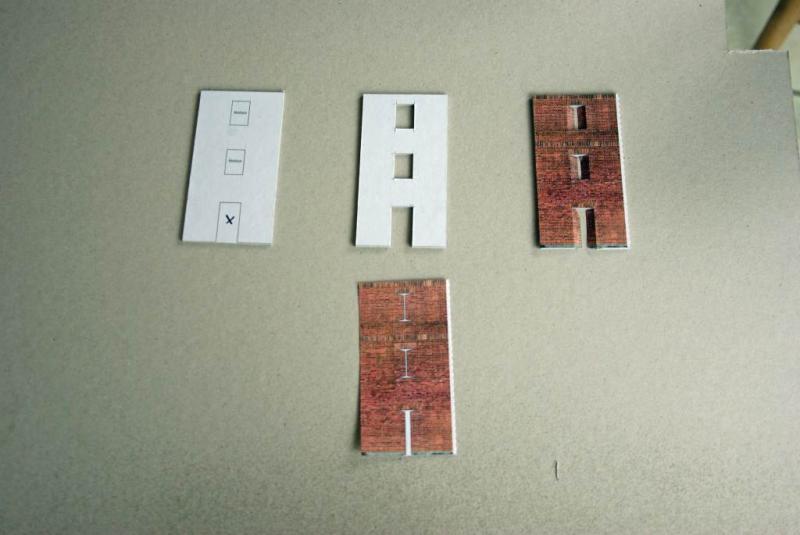
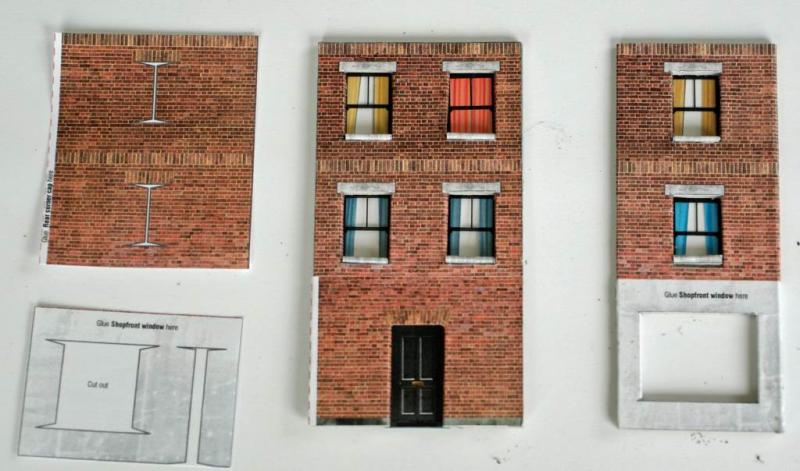
From the left :
Base layer or template glued to thick (2mm) card……..sometimes you can take chances with John's recommended thicknesses……dont mess about with Base Layers…….if he says 2mm …….2mm it is
Top Centre
Base Layer with apertures cut out………..change the blades frequently…….lots of shallow cuts rather than attempting one deep slash!
Bottom Centre
Cover Layer before cutting out apertures
Top Right
Cover Layer glued to Base Layer
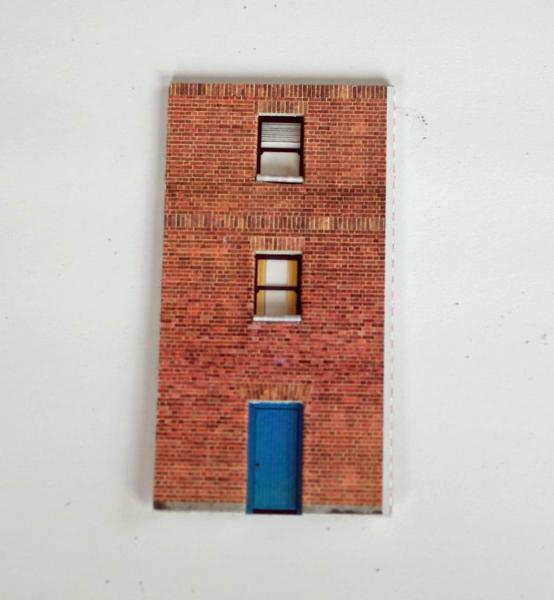
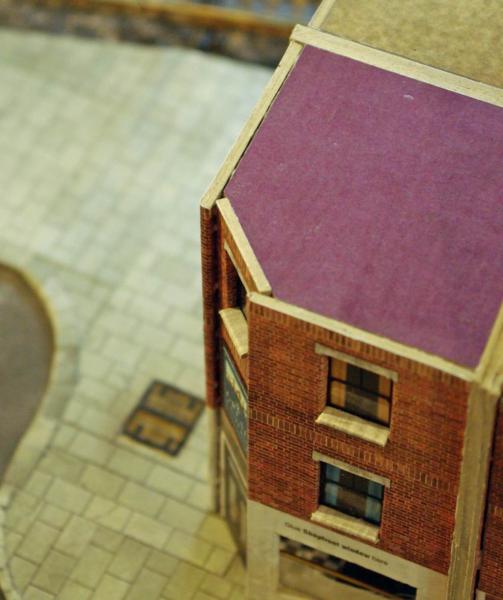
This is a completed back panel. Aperture overhangs wrapped and glued. Windows and door fitted.
The window sills are finicky but worth the trouble……a door step gets added after the panel is in place
The camera angle shows the white cut line at the top of each window…….it doesnt show at normal viewing angles so I didnt bother painting it out .
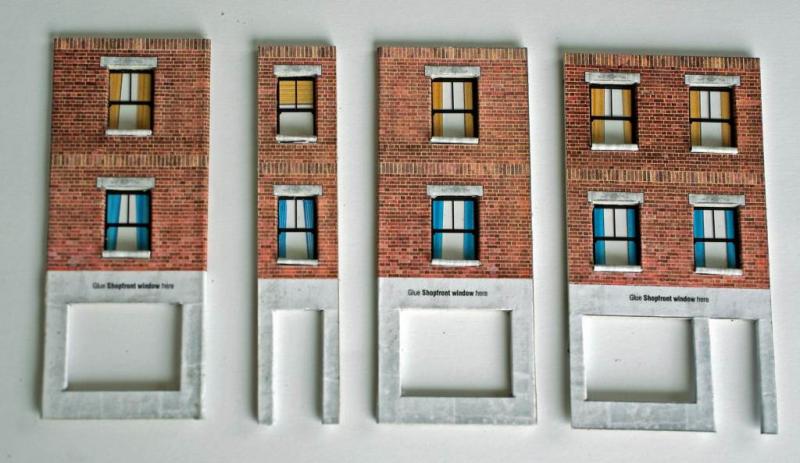
Completed Panels for the shop front………these are basic panels that are used for all the shops
The next shot shows my first variation from the standard design
The back panel I showed earlier (top left) is also designed as side panel to be placed next to the shop front panel with door way…..top right.
I didnt care for the contrast between the un-linteled windows on the back/side panel with the more elegant linteled windows above the shop fronts………so I did a bit of Kit bashing using a shop front base layer with a combination of top layers from the shop front and the back/side
Here is another shot showing how I mix and matched the top layers to in an effort to link more harmoniously with the adjacent shop front
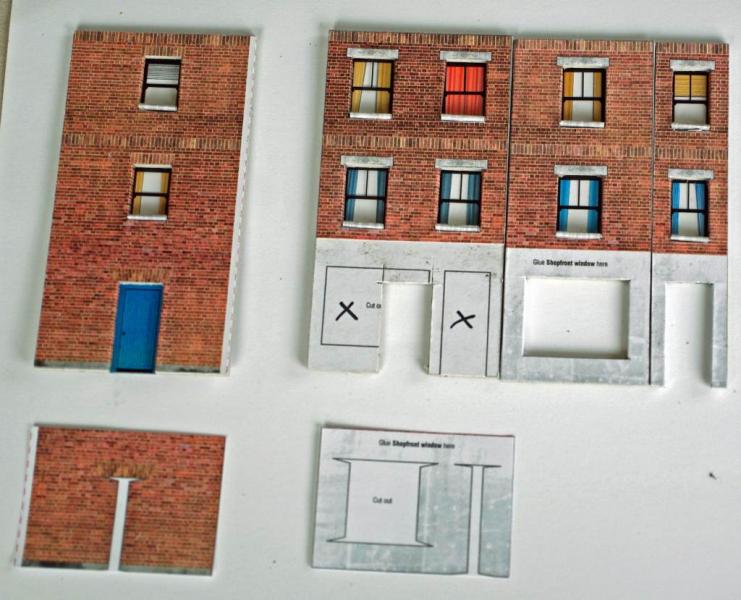
The next shot shows how the individual shop fronts are created
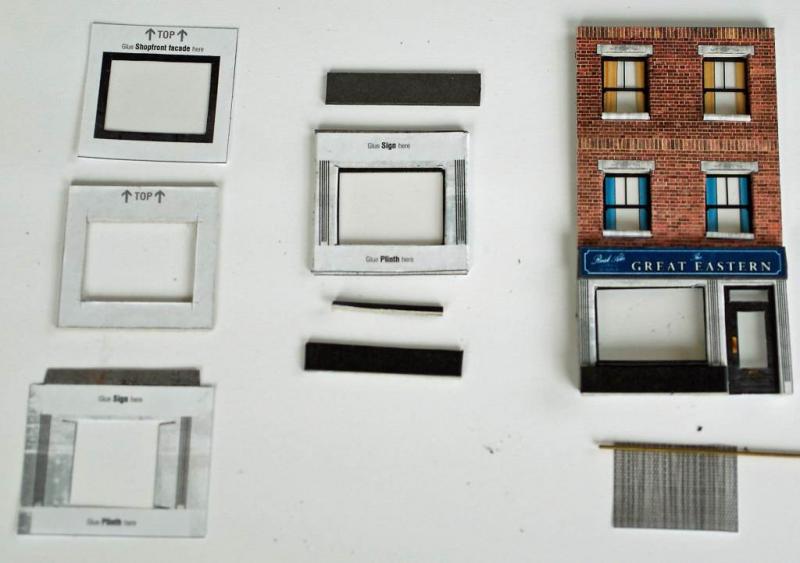
Top Left Shop front base layer mounted on to film
Middle Sub Layer
Bottom Shop Front Top Layer …….wrap and glue
The centre shots show these the components assembled together with its associated sub components:
Shop Sign Base* Window Sill Plinth
* For some reason, unlike the butchers etc, the Pub Sheet doesnt include a a sign base but I chose to make my own …….I think it looks better
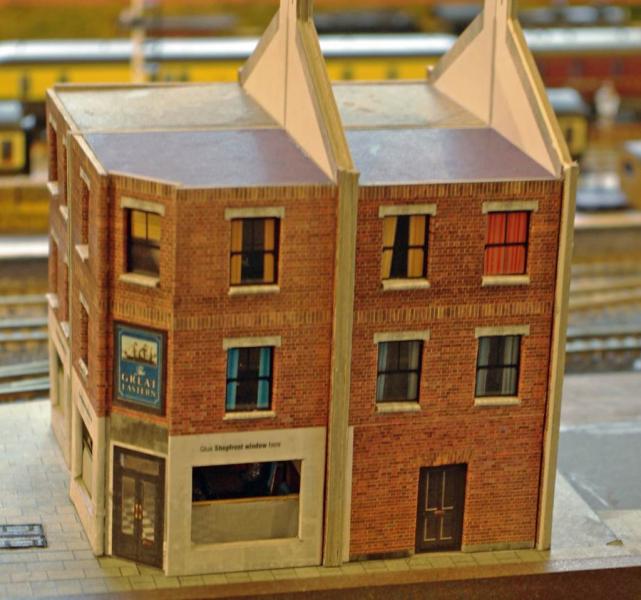
and finally, on the right a completed shop (well pub actually) front panel.
Bottom right is a suggestion of how to handle the clear glass…….my memory of pubs in Liverpool was a sort of frosted glass in the lower half etched with signs like "Walkers Warrington Ale"…….."Saloon Bar" etc but maybe net curtains will work?
Will discuss the name of the pub next post


Posted

Full Member
Bob
Posted
Full Member
Terry
Posted
Full Member
Hi BobThanks for sharing this John. I have yet to tackle one of these kits and I am keen to see how all the sub assemblies fit together.
Bob
Good to hear from you…….glad this may be of some use to you……I am attempting to write it fairly briskly so if you need any further information or photos do ask.
KInd Regards
Posted
Full Member
Thanks TerryLooks good John. :thumbs
Terry
Long way to go…….I will be more than satisfied if I get an accolade like that from you at the end
Kind Regards
Posted
Legacy Member
reg
Posted

Full Member
cheers
Marty
Posted

Full Member
One modification I do to the N Scale kits is to add a third, middle layer, of thin card with oversize window cut-outs so that the window glazing sits into a recess and does not therefore cause the inner layer to 'bulge' over the glazing. Also, this way the glazing is trapped into position in the recess and cannot slip. Not sure if this is necessary with 00 but it certainly helps the N Scale kits to go together better.
 Last edit: by Chinahand
Regards,
Trevor
Trevor
Posted
Full Member
[user=946]Chinahand[/user] wrote:
Thanks Trevor…….its not so much a tutorial as "how to avoid the mistakes I have made"A very good tutorial John for those that have not tried the Scalescenes kit before.
One modification I do to the N Scale kits is to add a third, middle layer, of thin card with oversize window cut-outs so that the window glazing sits into a recess and does not therefore cause the inner layer to 'bulge' over the glazing. Also, this way the glazing is trapped into position in the recess and cannot slip. Not sure if this is necessary with 00 but it certainly helps the N Scale kits to go together better.
I am never sure how much detail to go in for because some of it is very basic for guys like you and Terry but I guess if it helps anyone who is contemplating starting a Scalescenes kit it is worth it.
Thats a very good tip about the third middle wall………I wish I had known about it when I did the warehouse and station…….I fitted the optional Brassmasters Window Etchings and the bulge you refer to was quite an issue…….
Kind Regards
Posted
Guest user
Cheers
Matt
Posted
Full Member
Cheers
Posted
Guest user
Cheers
Matt
Posted

Full Member
Looking very good as normal John.
I have to admit I have trouble keeping my blade verticle on the 2mm card cuts, things are improving, I now tend to stand when cutting 2mm card, use a new blade, and stand over the blade (you should see both sides of the blade) and as you say lots of light cuts. I've also started to use a Jakar 7322 60cm rule, its designed for use with their mount cutter which has a 2.5mm verticle face to act as a guide for the mount cutter, but also helps me keep my blade vertical.
I have also used shop fronts from the Low Relief High street kits as weel, as one of these has a narrower shop, with a additional door for the flats above. They will work with the 2 storey and 3 storey terraced houses.
Below is a combination of Low relief High Street kit with a Scratch built end wall, and rear forming the tennement, the corner shop kit, but adjusted to fit the end of the tennement, and the small terraced house kit, with shop fronts from small corner shop kit. I also used the front of the building on the rear, as I didnt have space for the rear extensions.
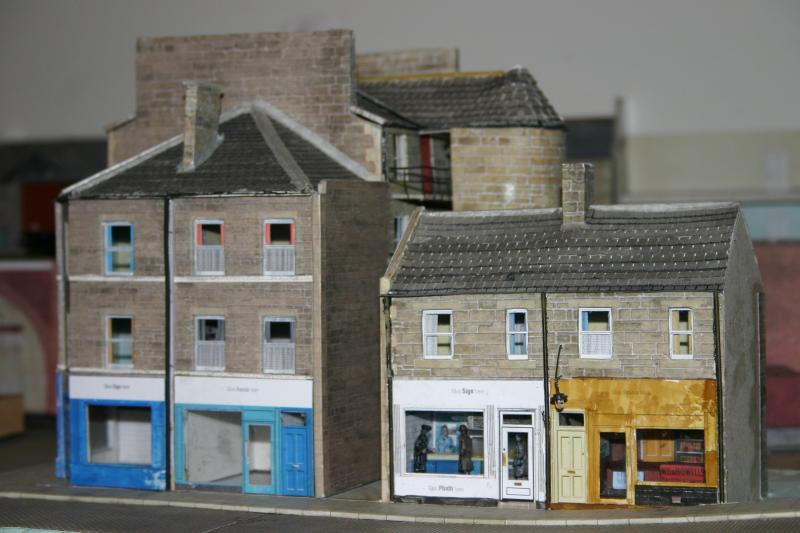
Also I trimmed back the internal middle wall, glue two base layers / cover layers side by side, and covered the join with a piece of spagettii. This gave me a terraced house without a fire break wall between each house.
John's Kits are so adjustable.
Paul
Posted

Full Member
 thumbs:thumbs
I wonder what I could use macaroni for ……………:roll::roll:
'Petermac
Posted
Guest user
Cheers
Matt
Posted
Full Member
I like the spaghetti solution:thumbs
Cheers
Posted
Full Member
Yes very much in the way of the other scalscene kits, and the high street rear also are very similar in construction.
The brick and warehouse (2nd & 4th from the left) were built almost as per kit instructions - warehouse roof was changed.
1st uses the standard carcase, with modified decorative front - based on the high street front kit, with a lower level added, and the 3rd uses the High street front stories (same base layer as 1) and a scrath built extension in place of the shop front.

These will need spliting up as the roofline is too sameish, but you get the idea, the tennement used in the previous post used two low relief buildings back to back, but spaced out enough to look ok
Paul
Posted
Full Member
Once again….nice models…..:thumbs Thanks for posting them………that kit looks ad though it has lots of possibilities……I was thinking of a General Post Office and/or a Station Hotel………….few other jobs to complete first
Regards
Posted
Full Member
This isnt the ideal shot to start with but unfortunately, yet again, I forgot to to take the key initial shot!:oops:……bear with me
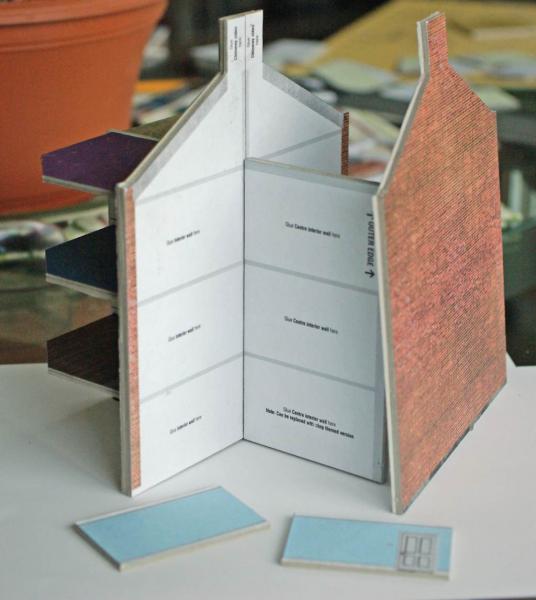
On the right is a standard Terrace house end wall mounted on 1mm (medium) card
An inner end wall marked out for individual floor wall panels is mounted on 2 mm (heavy card)
A centre wall, similarly marked for individual walls is is made up of 2 x 2 mm card glued back to back
This centre wall is glued at right angles to the endwall. So you finish up with a very substantial T……. a 9mm end wall joined to an 8mm centre :roll:
It is very important that the centre wall is at exactly 90o, dead centre and that the individual floor markers all line up. To achieve this accurate cutting is essential……you do need to focus to ensure the blade cuts are at 90 o
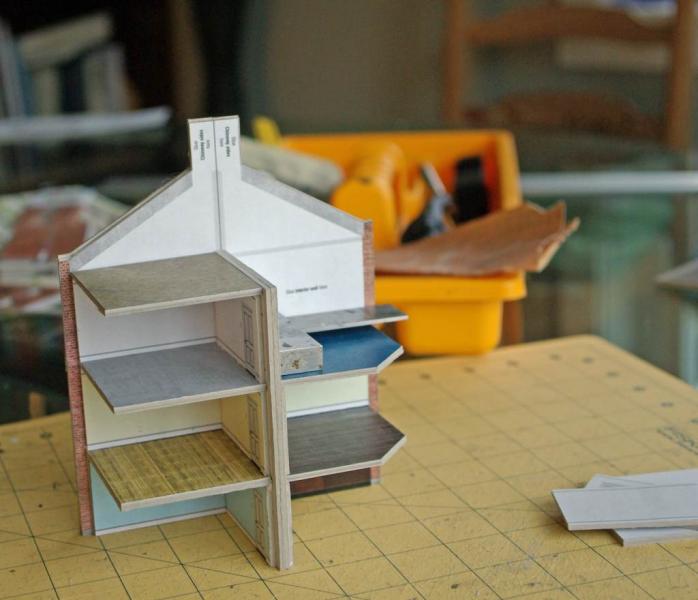
Initially this T structure is quite vulnerable but once the individual wall panels are glued to the end and centre walls and a floor panel added the structure becomes increasingly stable.
When I built the terraced houses which use a similar technique I didnt fully comprehend the importance of both the floor panels in forming a rebate into which the front panels will fit
The next shot…..a close up….hopefully shows this

It is so easy to miscut these small panels by half a millimetre or so……..3 floors the error accumulates quite quickly.
Its very important all the floors and walls are flush otherwise the front panels will not fit properly
This shot shows the end section added…….this section should use components from the terraced house kit. I had to change this because it would have been too deep for my layout so I used another centre wall and cut it, and one set of walls, back by 2mm so it would accept a front panel
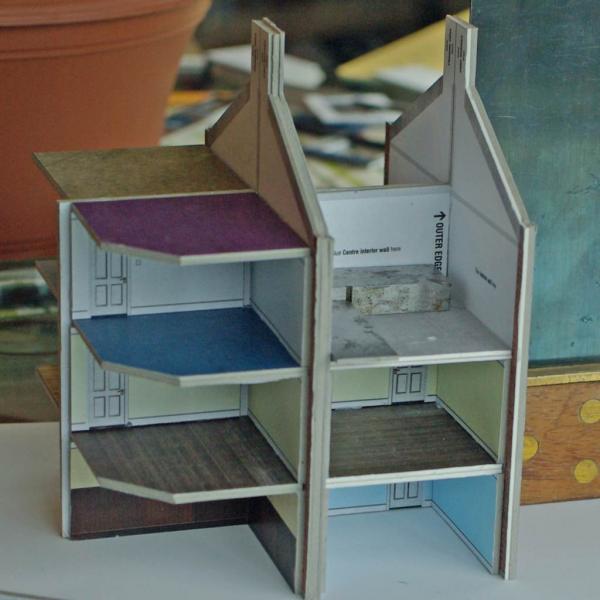
In the instructions you are supposed to build the core floor and walls before starting on the front panels……….I think it is far better to build the front panels first ………so you can use them for dry fitting as below
I kept doing this checking throughout the build and it gave me a far clearer understanding of how the model would finish up
The two back panels glued in place
And now the front panels are fitted.
Fitting the centre doorway panel is very ingenious……..see the shot below
Lots of dry fitting before I applied any glue!
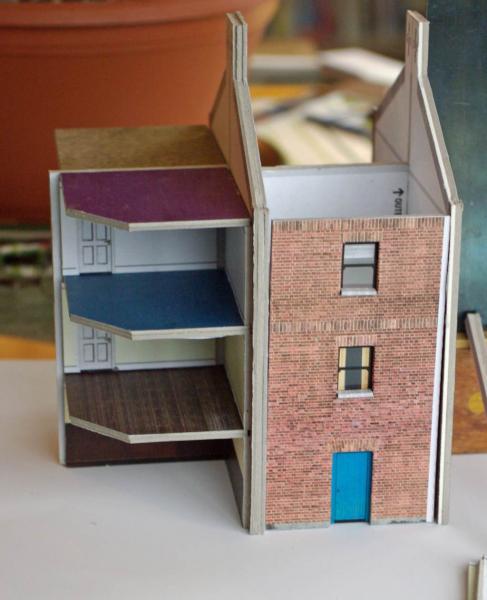
John Wiffen recommends leaving the fascia until the very last when the building is mounted on the foundation board. This is sound advice because it enables you to conceal any minor gaps by adjusting the fascia position. However I got in a catch 22 situation because I had to custom build the foundation to fit in with the layout and also sort out any interior detail…….I will cover this in the next post.
Here is a shot with the fascias fitted…….you can see that despite my best efforts the rear wall is a little under 2mm higher than it should be and the floor sags a bit :oops:…….there is an eaves layer still to apply and it may cover it but I may have to do something more drastic:roll:
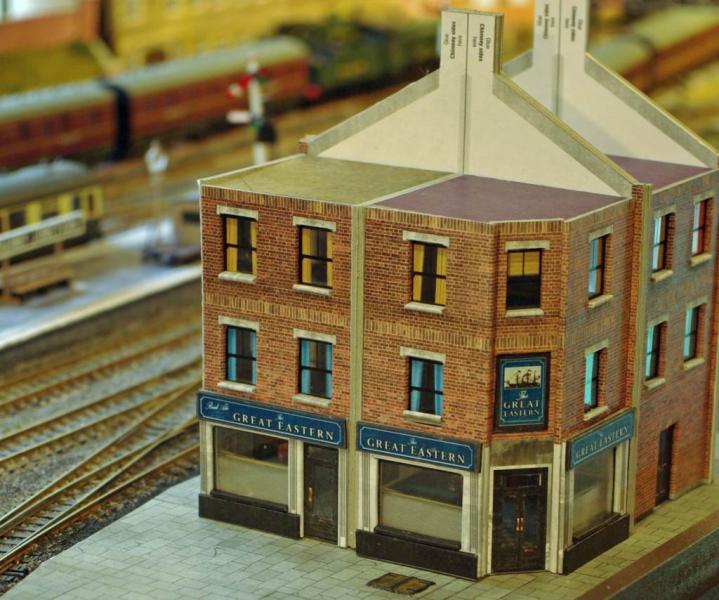
I mis-spoke last post when I said fascia cover sheets were not provided……I found them, but by then I had made my own from black core mount board (very handy if you can get off cuts from a picture framer). The centre fascia is trickier and I am still working on it
Real net curtains mounted on Brass Rod! Hint of an interior…..more about that later…..Oh and there wil be a wall between track and pavement.
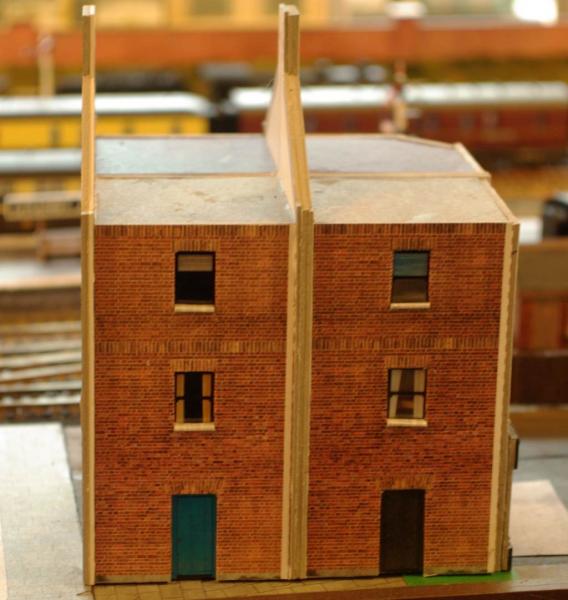
Not sure about the Pub name…….Great Eastern on a GWR layout! At least the "Great Eastern" was designed by Brunel so I suppose thats ok:roll: I think I can get away with the lettering style and colours…….but will pass quickly over "Real Ale" in 1947. Its the one downside of Scalescenes for me……..the buildings are fine but the signage is invariably based in the 60s and beyond. Chippies were definitely not called Take away in the 40s and 50s
Next job ……the roof and trim for the walls……..thats when all the nasties emerge
Posted

Full Member
These Wiffenations can certainly be fiddly, I have just come to grief with the latest, the Edwardian school building. I'm trying it to see if it will make the basis for a free-lance station or cottage hospital kit-bash. "No problems here!" thought I, as I have done one or two of these…only to come a cropper.
Above all, Rule number one should be RFI [ ' Read the Flippen' Instructions!']
Now I face a 90km round trip to buy another piece of card….
http://www.scalescenes.com/products/T036-School
Lots of bits to this one, three/four deep in places, not recco for the newcomer [or the Big-headed] :oops::oops::oops::oops:
Chastened Chubber
Last edit: by Chubber
'You may share the labours of the great, but you will not share the spoil…' Aesop's Fables
"Beer is proof that God loves us and wants us to be happy" - Benjamin Franklin
In the land of the slap-dash and implausible, mediocrity is king
"Beer is proof that God loves us and wants us to be happy" - Benjamin Franklin
In the land of the slap-dash and implausible, mediocrity is king
1 guest and 0 members have just viewed this.